
The holiday season is a time for thoughtful giving, and what could be more personal than a handcrafted gift? This year, consider transforming everyday household items into unique and cherished presents. Upcycling not only saves money and reduces waste but also adds a heartfelt touch that store bought gifts simply cannot replicate.
From cozy sweater mittens to charming tin can lanterns, the possibilities for creative reuse are endless. You will be surprised at how easily you can turn what might be considered trash into treasure. Get ready to explore a world of imaginative DIY projects that will delight your friends and family.
1. Sweater Mittens
Old, shrunken, or out of style sweaters can be given a new lease on life as cozy mittens. This is a wonderful way to preserve the memory of a favorite garment while creating something warm and practical. The natural softness and warmth of wool make it an ideal material for this project.
These mittens are not only stylish but also incredibly comfortable. You can customize them with different colors and patterns from various sweaters, making each pair a unique work of art. They are a perfect gift for anyone who enjoys a touch of handmade charm in their winter wardrobe.
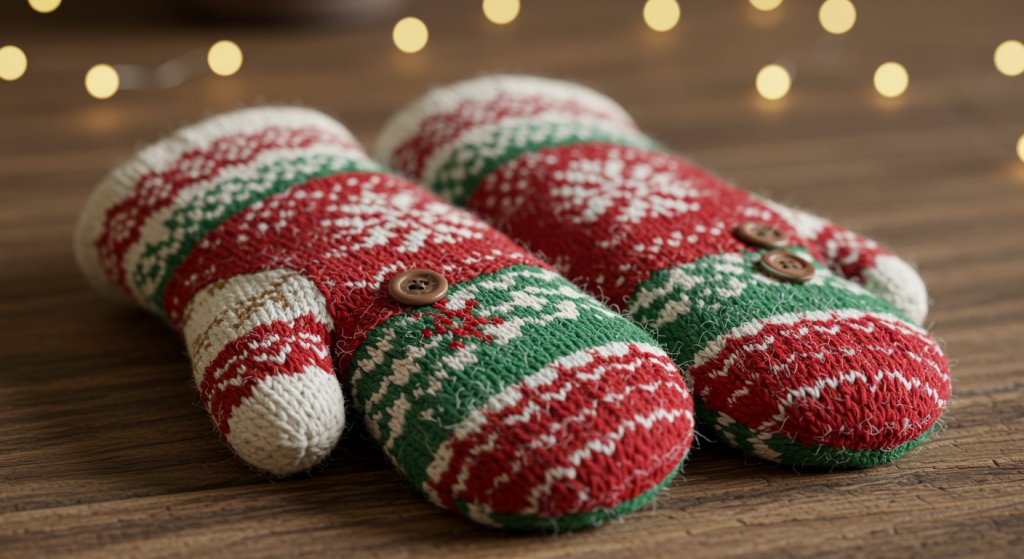
DIY Tips
- Choose sweaters made of at least 80% wool for the best felting results.
- Felt the sweater by washing it in hot water and drying it on high heat before cutting.
- Use a paper template of a hand to ensure the mittens are the correct size.
- Embellish the mittens with buttons, embroidery, or contrasting cuffs for a personal touch.
- For extra warmth, line the mittens with fleece from an old blanket or jacket.
2. Denim Coasters
Give old, worn out jeans a new purpose by transforming them into stylish and durable coasters. The sturdy nature of denim makes it an excellent material for protecting surfaces from drink rings. This project is a great way to use up even small scraps of denim.
These coasters have a rustic and casual appeal that suits many home decor styles. You can create a matching set or mix and match different shades of denim for a more eclectic look. They are a practical and eco friendly gift for anyone who appreciates handmade items.
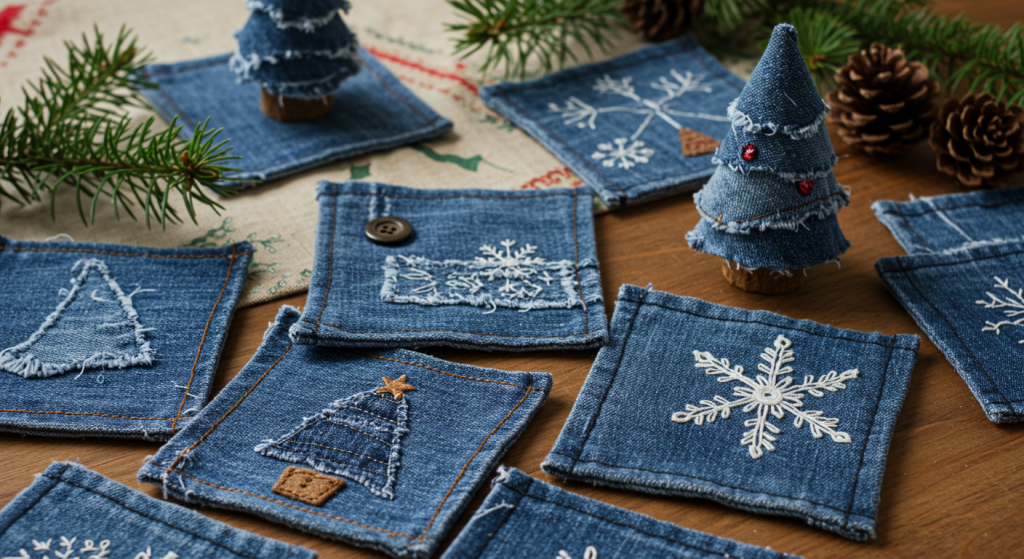
DIY Tips
- Cut the denim into uniform squares or circles for a neat and tidy appearance.
- Layer several pieces of denim together and stitch around the edges to create a thicker, more absorbent coaster.
- For a decorative touch, fray the edges of the coasters or add some simple embroidery.
- Consider using the pockets from old jeans to create coasters with a built in spot for a napkin.
- Glue a piece of cork or felt to the bottom of the coasters to prevent slipping.
3. Tin Can Lanterns
Empty tin cans can be transformed into beautiful and intricate lanterns with just a few simple tools. These lanterns cast a warm, flickering glow that creates a cozy and festive atmosphere. They are a wonderful way to add a touch of magic to any indoor or outdoor space.
The designs you can create are limited only by your imagination. From simple geometric patterns to elaborate starry night scenes, you can customize the lanterns to suit any taste. They make a charming and unique gift that is both beautiful and functional.

DIY Tips
- Fill the tin cans with water and freeze them before punching your design to prevent the can from denting.
- Use a hammer and nails of different sizes to create a variety of hole sizes in your design.
- Draw your design on a piece of paper and tape it to the can as a guide.
- Paint the cans with heat resistant paint in festive colors.
- Place a tea light or a small battery operated candle inside the finished lantern.
4. Wine Cork Trivets
Save your wine corks to create a rustic and practical trivet for hot dishes. The natural heat resistant properties of cork make it an ideal material for protecting your tabletops. This project is a great way to showcase your collection of corks from special occasions.
These trivets have a charming and organic look that adds a touch of warmth to any kitchen. You can arrange the corks in various patterns to create a unique and personalized design. They are a thoughtful and useful gift for the wine lover or home cook in your life.
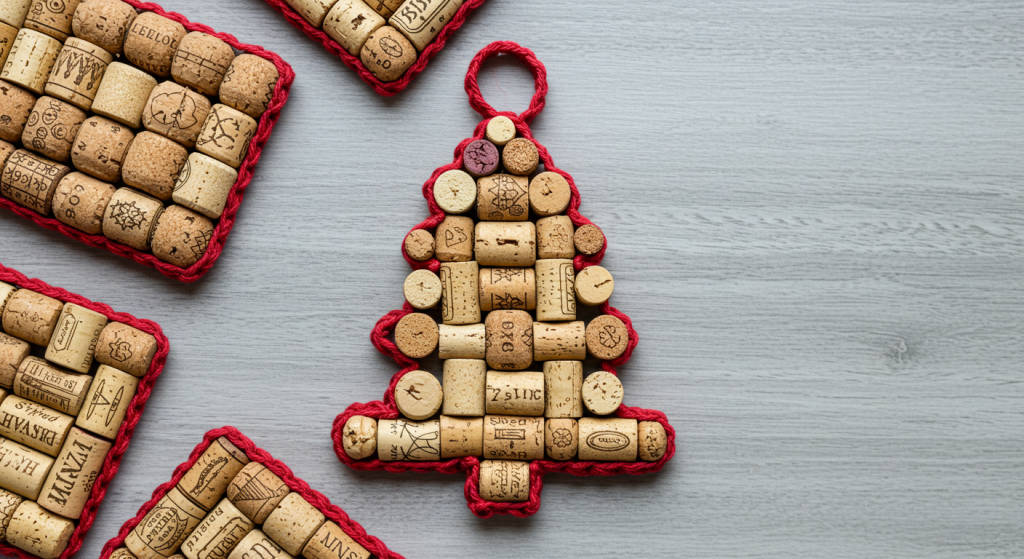
DIY Tips
- Cut the corks in half lengthwise to create a flat and stable surface for your trivet.
- Arrange the cork halves in a metal frame or a hose clamp to hold them together securely.
- Use a strong adhesive to glue the corks to a cork backing for added stability.
- Alternate the direction of the corks to create interesting patterns.
- Consider staining some of the corks with wine for a pop of color.
5. Glass Jar Snow Globes
Empty glass jars can be turned into magical winter wonderlands with a little bit of creativity. These homemade snow globes are a classic and enchanting Christmas gift that will be treasured for years to come. They are a wonderful way to capture the spirit of the season in a miniature scene.
You can personalize the snow globes with small figurines, bottle brush trees, and other festive decorations. The addition of glitter and glycerin creates a beautiful and slow falling snow effect. They are a delightful and whimsical gift for both children and adults.
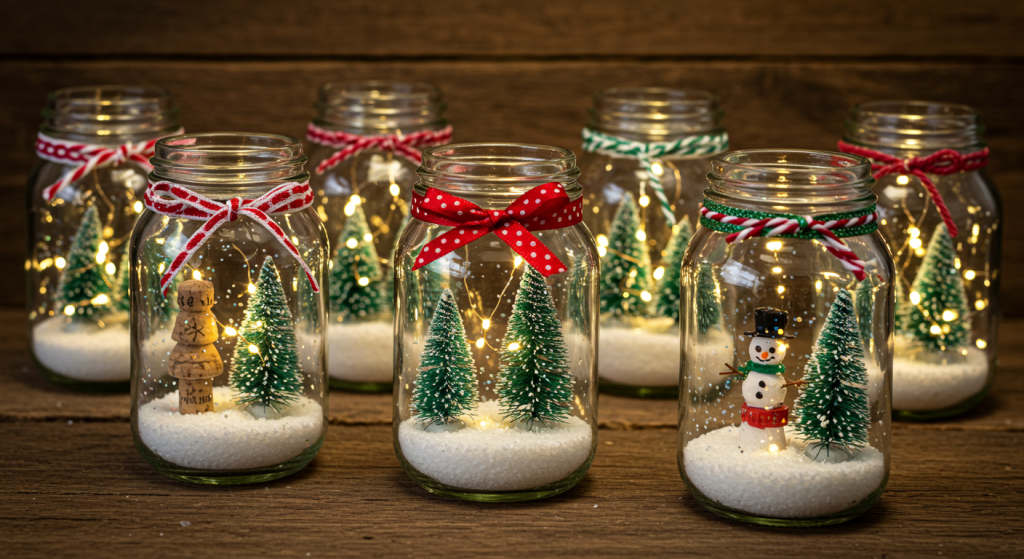
DIY Tips
- Use a strong waterproof adhesive to glue your figurines to the inside of the jar lid.
- Fill the jar almost to the top with distilled water, leaving a little room for air.
- Add a few drops of glycerin to the water to make the glitter fall more slowly.
- Use a generous amount of glitter for a magical, snowy effect.
- Secure the lid tightly and shake to watch your winter scene come to life.
6. Book Page Wreath
Old, damaged books can be given a new life as a beautiful and literary wreath. This project is a wonderful way to celebrate a love of reading and create a unique piece of home decor. The aged paper and printed text add a touch of vintage charm to the wreath.
This wreath is a conversation starter and a testament to the beauty of repurposed materials. You can customize it by using pages from a favorite book or sheet music. It is a thoughtful and artistic gift for any book lover or music enthusiast.
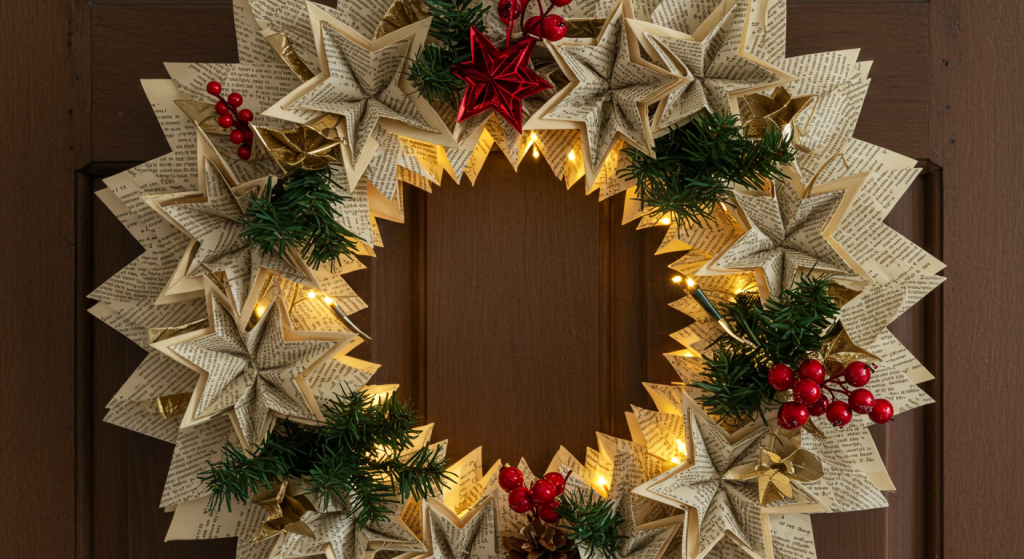
DIY tips
- Roll individual book pages into cones and glue them to a cardboard or foam wreath form.
- Create a layered effect by varying the size of the cones.
- Distress the edges of the paper with ink for a more vintage look.
- Add a pop of color with a festive ribbon or a few small ornaments.
- Consider using sheet music for a musical twist on this literary craft.
7. T-Shirt Tote Bags
Transform old t-shirts into practical and stylish tote bags with a few simple cuts and knots. This no sew project is a great way to upcycle t-shirts that are stained, stretched, or no longer worn. The resulting bags are surprisingly strong and versatile.
These tote bags are perfect for carrying groceries, books, or beach essentials. The graphic on the t-shirt becomes the design on the bag, making each one unique. They are a fun and eco friendly gift that encourages a reduction in plastic bag usage.
DIY Tips
- Cut off the sleeves and the neckline of the t-shirt.
- Cut fringe along the bottom of the shirt, through both layers of fabric.
- Tie the front and back fringe pieces together in double knots to close the bottom of the bag.
- For a stronger bag, you can sew the bottom seam instead of tying knots.
- Choose t-shirts with interesting graphics or logos for a more visually appealing bag.
8. Scrabble Tile Ornaments
Repurpose old Scrabble tiles into charming and personalized Christmas ornaments. This is a fun and creative way to spell out festive words, names, or meaningful phrases. The classic look of the wooden tiles adds a nostalgic touch to any Christmas tree.
These ornaments are lightweight and easy to make, making them a great project for all ages. You can combine them with other craft supplies like ribbons, bells, and glitter to create unique designs. They are a thoughtful and customized gift that will be cherished for many holidays to come.

DIY Tips
- Arrange the tiles to spell out your desired word or name and glue them onto a piece of felt or a small wooden craft stick for stability.
- Drill a small hole in the top of each tile to string them together with twine or ribbon.
- Add a festive touch by painting the backs of the tiles with holiday colors.
- Glue the tiles to a small wreath form to create a miniature word wreath.
- Embellish the ornaments with small bows, jingle bells, or a dusting of glitter.
9. Plastic Bottle Planters
Give plastic bottles a second chance by turning them into cute and quirky planters. This is a great way to reduce plastic waste and add a touch of greenery to any space. The durability of the plastic makes these planters suitable for both indoor and outdoor use.
You can paint and decorate the bottles to look like animals, characters, or abstract designs. They are a fun and educational gift for children, teaching them about recycling and plant care. These planters are a cheerful and eco friendly way to brighten up a windowsill or desk.
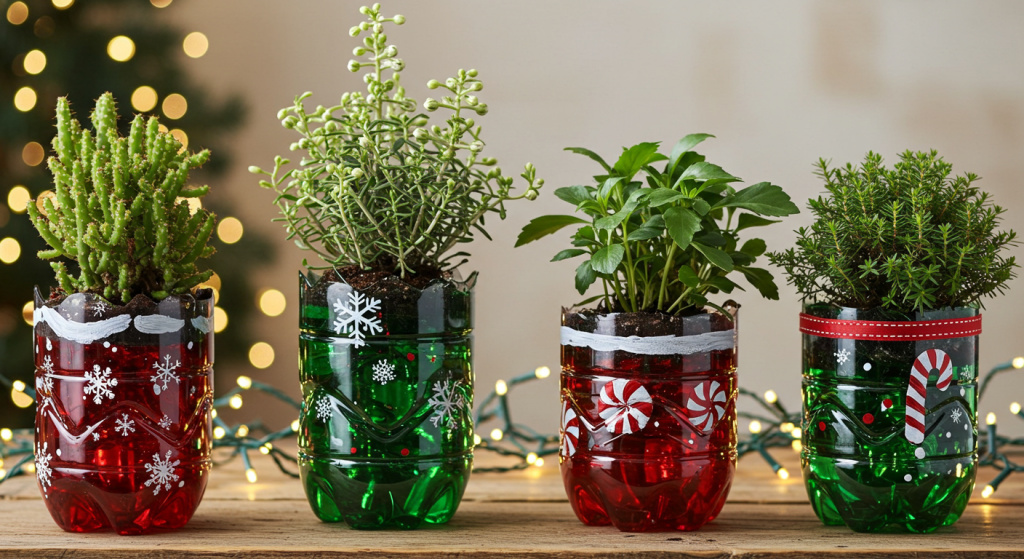
DIY Tips
- Cut the plastic bottle in half and use the bottom portion as your planter.
- Poke a few drainage holes in the bottom of the planter to prevent overwatering.
- Use acrylic paint to decorate the outside of the bottle.
- Add details like ears, eyes, and whiskers with a permanent marker or smaller paint brushes.
- Fill the planter with soil and a small plant, such as a succulent or herb.
10. Old Map Luminaries
Transform old maps into beautiful and nostalgic luminaries that cast a warm and adventurous glow. This is a wonderful way to repurpose maps from past travels or to celebrate a love of geography. The intricate details of the maps create a stunning visual effect when illuminated.
These luminaries are perfect for creating a cozy and worldly atmosphere in any room. They are a thoughtful and personalized gift for the travel enthusiast in your life. The gentle light shining through the familiar lines of a cherished map can evoke fond memories of past journeys.
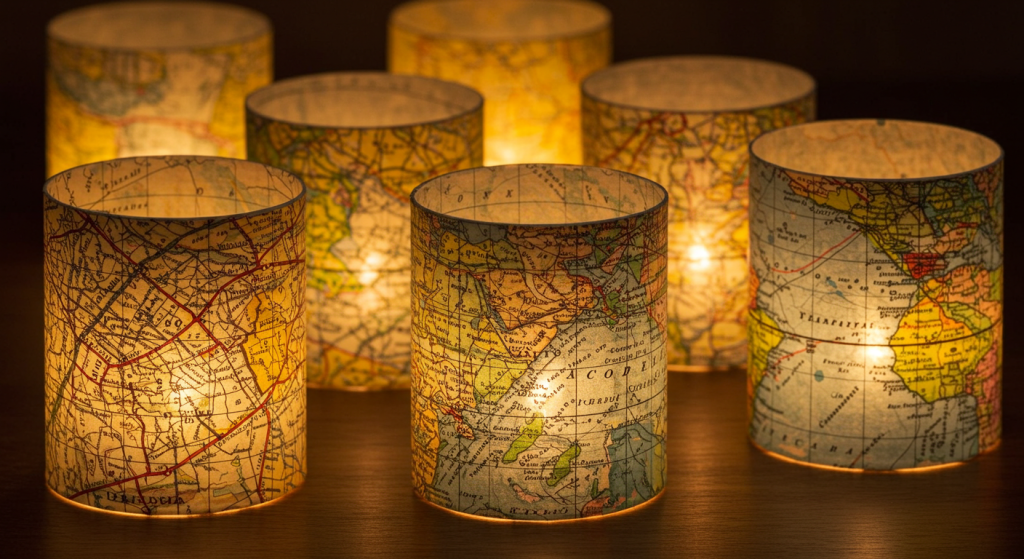
DIY Tips
- Cut the map to the desired height and wrap it around a glass jar or vase.
- Secure the map in place with a thin layer of decoupage glue.
- For a more translucent effect, use a vellum map or a lighter weight paper map.
- Place a battery operated tea light inside the luminary for a safe and beautiful glow.
- Embellish the rim of the jar with twine or a ribbon for a finished look.
11. CD Mosaic Picture Frame
Give a new life to scratched and old CDs by turning them into a shimmering mosaic picture frame. The iridescent quality of the CDs creates a beautiful and eye catching effect. This project is a great way to add a touch of sparkle to a plain picture frame.
This mosaic frame is a unique and glamorous way to display a cherished photograph. The fragmented pieces of the CDs catch the light in a mesmerizing way. It is a creative and eco friendly gift that transforms obsolete technology into a work of art.

DIY Tips
- Cut the CDs into small, irregular pieces using strong scissors.
- Be careful when cutting the CDs as the pieces can be sharp.
- Glue the CD pieces onto the picture frame, leaving small gaps in between.
- Fill the gaps with grout and wipe away the excess with a damp sponge.
- Buff the frame with a soft cloth once the grout has dried to reveal the shimmering mosaic.
12. Toilet Paper Roll Gift Boxes
Transform humble toilet paper rolls into elegant and charming gift boxes for small presents. This is a simple and surprisingly effective way to create beautiful packaging from something that would otherwise be thrown away. The natural curve of the roll lends itself perfectly to this project.
These little boxes are perfect for jewelry, candy, or other small trinkets. You can decorate them with paint, wrapping paper, ribbon, and other embellishments. They are a clever and eco friendly alternative to store bought gift boxes.

DIY Tips
- Flatten the toilet paper roll slightly.
- Fold in the ends of the roll to create a pillow box shape.
- Decorate the box with wrapping paper, paint, or stamps.
- Tie a ribbon or twine around the box to keep it closed.
- Add a small gift tag for a personalized touch.
13. Light Bulb Ornaments
Give burnt out light bulbs a new purpose by transforming them into festive and whimsical Christmas ornaments. The classic shape of a light bulb is the perfect canvas for creating snowmen, reindeer, and other holiday characters. This is a fun and creative way to upcycle a common household item.
These light bulb ornaments are a charming and unique addition to any Christmas tree. They are a great project for kids and adults alike, allowing for endless creativity. The smooth glass surface is easy to paint and decorate.
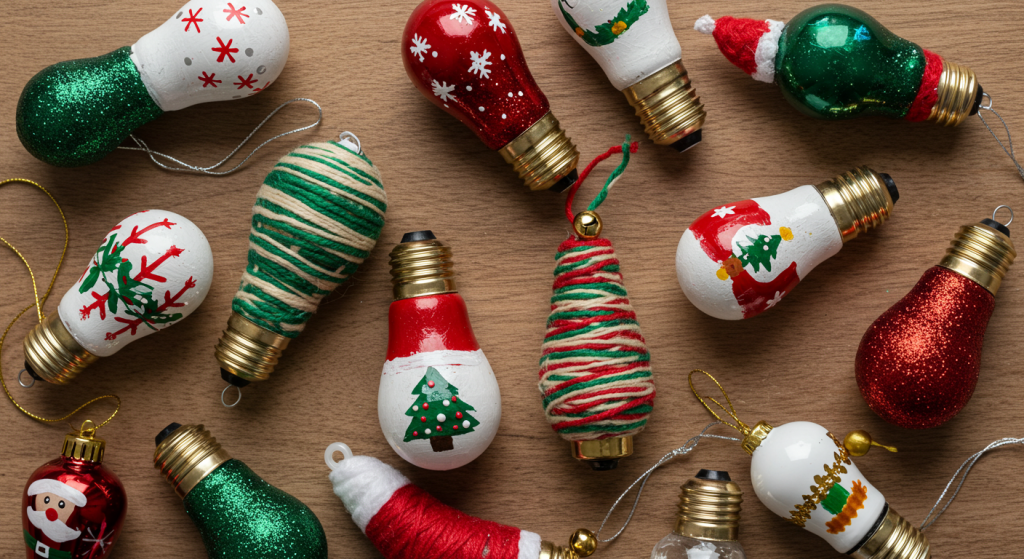
DIY Tips
- Clean the light bulb thoroughly before painting.
- Use acrylic paint to create your desired character or design.
- Add details like scarves, hats, and antlers using felt, twigs, and other craft supplies.
- Use a hot glue gun to attach a loop of ribbon or twine to the metal base for hanging.
- A coat of glitter paint can add a touch of sparkle to your ornament.
14. Wine Bottle Bird Feeder
Turn an empty wine bottle into a stylish and functional bird feeder for your garden. This is a clever and eco friendly way to attract feathered friends to your backyard. The bottle serves as a reservoir for the birdseed, keeping it dry and accessible.
This bird feeder is a beautiful and practical gift for any nature lover or gardener. The design is simple yet effective, and it can be customized with different types of bottles and bases. It is a rewarding project that allows you to enjoy the beauty of wildlife in your own outdoor space.
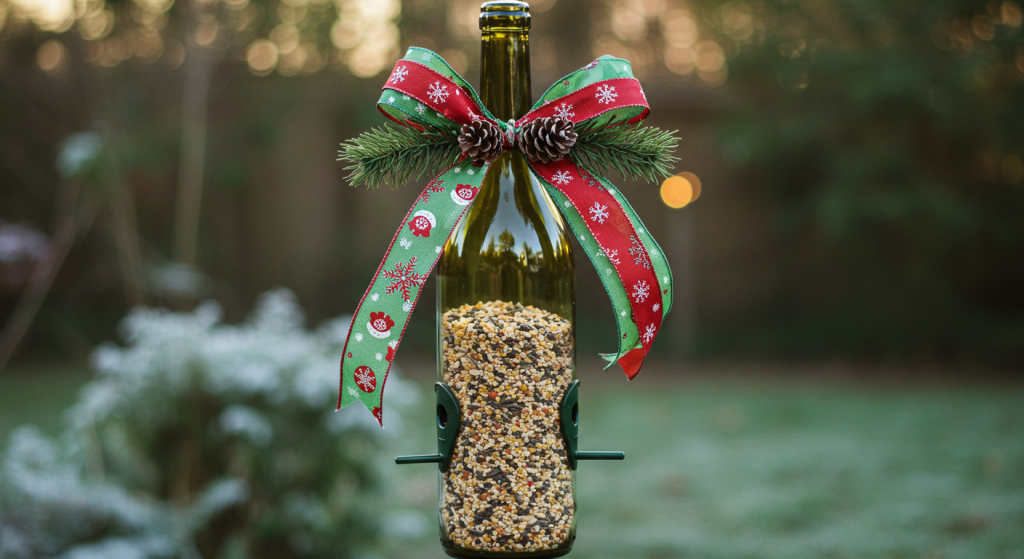
DIY Tips
- Thoroughly clean and dry the wine bottle before filling it with birdseed.
- You will need to use a special drill bit designed for glass to create the feeding holes.
- Construct a small wooden base with a perch for the birds to land on.
- Securely attach the wine bottle to the base in an inverted position.
- Hang the bird feeder from a sturdy branch or hook in your garden.
15. Sock Snowmen
Give new life to mismatched or outgrown socks by turning them into adorable and cuddly snowmen. This no sew project is a fun and easy way to create charming winter decorations. The soft texture of the socks makes these snowmen incredibly huggable.
These sock snowmen are a delightful and whimsical gift for children and adults alike. You can personalize them with different colored socks, buttons, and accessories. They are a cozy and festive addition to any holiday display.
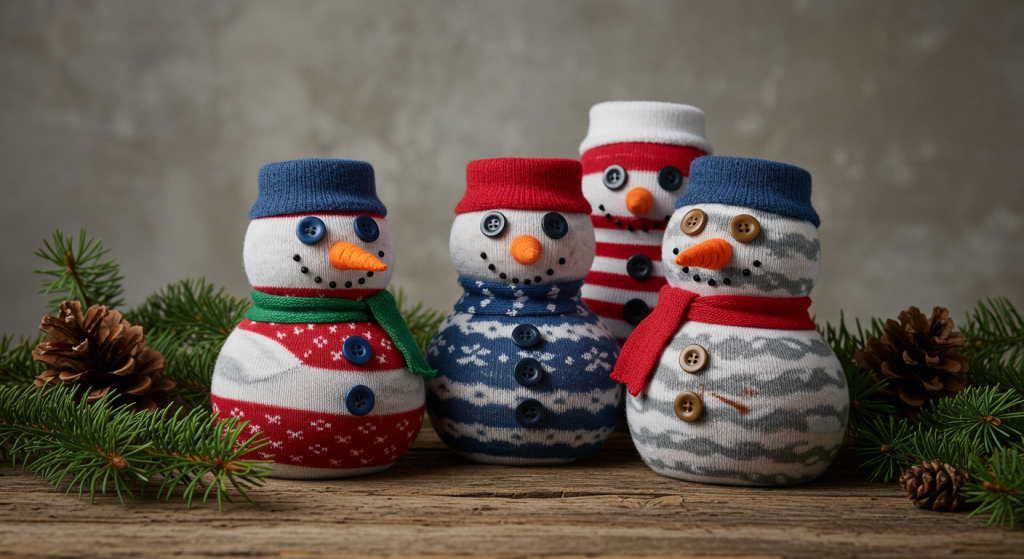
DIY Tips
- Fill the sock with rice or poly-fil to create the snowman’s body.
- Use rubber bands or string to section off the head and body.
- Decorate your snowman with buttons for eyes and a small piece of orange felt for a carrot nose.
- Use a scrap of fabric for a cozy scarf.
- The top part of the sock can be folded down to create a hat.
16. Credit Card Guitar Picks
Transform old credit cards, gift cards, or hotel key cards into custom guitar picks. This is a clever and practical way to upcycle plastic cards that are no longer needed. The sturdy yet flexible nature of the plastic makes it a suitable material for guitar picks.
These custom guitar picks are a thoughtful and unique gift for the musician in your life. You can use a pick punch for a perfect shape or carefully cut them out by hand. The design on the card becomes the design on the pick, making each one a small piece of functional art.
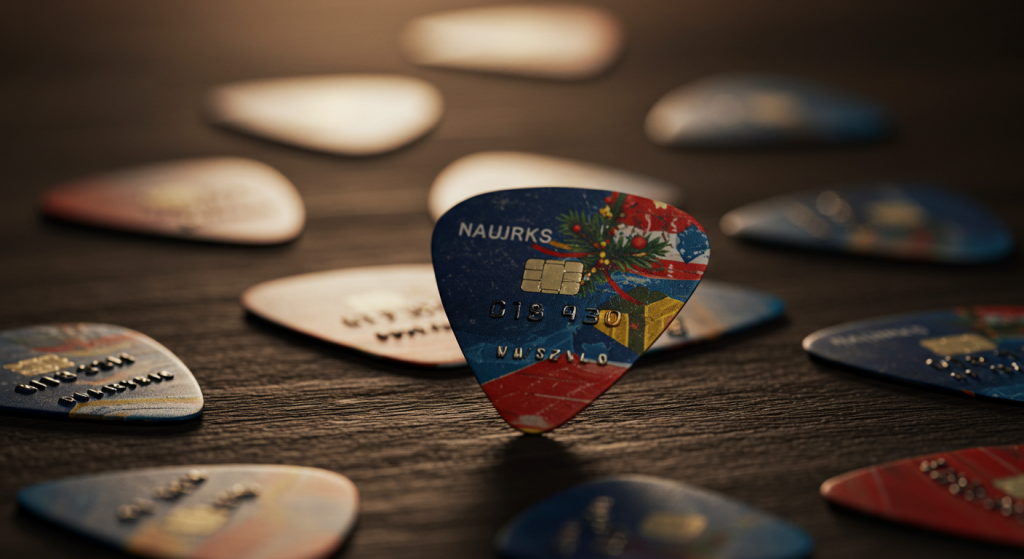
DIY Tips
- A guitar pick punch is the easiest and most effective way to create perfectly shaped picks.
- If you don’t have a pick punch, you can trace the shape of an existing pick onto the card and cut it out with strong scissors.
- Use a nail file or sandpaper to smooth any rough edges.
- Experiment with different types of plastic cards to find the thickness and flexibility you prefer.
- The numbers and letters on a credit card can provide extra grip.
17. Broken Crayon Candles
Melt down broken and forgotten crayons to create colorful and vibrant layered candles. This is a wonderful way to salvage crayons that are too small to use for drawing. The process of melting and layering the colors is a fun and creative activity.
These crayon candles are a beautiful and artistic gift that adds a pop of color to any room. You can experiment with different color combinations to create unique and stunning effects. The finished candles have a unique, slightly waxy texture and a subtle crayon scent.

DIY Tips
- Peel the paper off the crayons before melting them.
- Melt the crayons in a double boiler or in a tin can placed in a pot of simmering water.
- Pour the melted wax into a glass jar with a wick secured in the center.
- Allow each layer of color to cool and solidify before adding the next.
- Tilt the jar as you pour for interesting diagonal layers.
18. Keyboard Key Jewelry
Repurpose keys from an old, broken keyboard into quirky and geek chic jewelry. This is a fun and creative way to celebrate a love of technology and typography. The individual keys can be used to spell out initials, names, or meaningful words.
This keyboard key jewelry is a unique and personalized gift for the tech savvy person in your life. You can turn the keys into earrings, necklaces, bracelets, or cufflinks. The possibilities for creative expression are endless.

DIY Tips
- Carefully pry the keys off the old keyboard.
- Clean the keys thoroughly before turning them into jewelry.
- Drill a small hole in the key to attach a jump ring for a necklace or earrings.
- Glue the key to a cufflink finding or a ring base.
- Combine the keys with beads and other charms for a more elaborate design.
19. Paper Towel Roll Seed Starters
Give paper towel and toilet paper rolls a new purpose as biodegradable seed starters for your garden. This is an eco friendly and practical way to get a head start on your spring planting. The cardboard rolls will decompose in the soil, allowing the roots to grow freely.
These paper towel roll seed starters are a thoughtful and useful gift for the gardener in your life. They are easy to make and provide a sustainable alternative to plastic seed trays. This gift encourages a love of gardening and a connection to the earth.

DIY Tips
- Cut the paper towel rolls into smaller, pot sized sections.
- Make a series of cuts around the bottom of the roll and fold the flaps in to create a base.
- Fill the rolls with potting soil and plant your seeds.
- Place the seed starters in a waterproof tray on a sunny windowsill.
- When the seedlings are ready to be planted, you can plant the entire roll directly into the garden.
20. Bottle Cap Magnets
Transform bottle caps into colorful and fun magnets for your refrigerator or whiteboard. This is a great way to upcycle bottle caps from your favorite beverages. The small, contained space of the bottle cap is perfect for creating miniature works of art.
These bottle cap magnets are a cheerful and personalized gift that can be customized to suit any interest. You can fill them with small photos, decorative paper, or tiny trinkets. They are a simple and addictive craft that is perfect for all ages.

DIY Tips
- Clean and dry the bottle caps thoroughly.
- Glue a small, strong magnet to the back of each bottle cap.
- Cut out a small circle of decorative paper or a photo to fit inside the bottle cap.
- Fill the bottle cap with clear resin or a dimensional glaze to seal and protect your design.
- You can also paint the inside of the bottle caps with nail polish for a pop of color.
21. Cereal Box Notepads
Give empty cereal boxes a new life as charming and handy notepads. The sturdy cardboard of the cereal box makes a perfect cover for a small notepad. This is a practical and eco friendly way to repurpose packaging that would otherwise be discarded.
These cereal box notepads are a fun and colorful gift for students, teachers, or anyone who likes to jot down notes. The familiar and nostalgic designs of the cereal boxes add a touch of whimsy. They are a simple and satisfying project that promotes recycling and creativity.

DIY Tips
- Cut the front and back panels of the cereal box to the desired size for your notepad covers.
- Cut sheets of paper to a slightly smaller size than the covers.
- Stack the paper between the two cardboard covers.
- Secure the notepad with a binder clip, or punch holes and tie it together with ribbon or twine.
- For a more polished look, you can have the notepad professionally bound at a copy shop.
22. Sweater Pet Beds
Turn an old, cozy sweater into a comfortable and comforting bed for a small pet. This is a wonderful way to provide your furry friend with a soft and familiar scent. The sleeves of the sweater can be stuffed and arranged to create a supportive bolster.
This sweater pet bed is a thoughtful and loving gift for the pet owner in your life. It is a simple sewing project that requires minimal skill. The resulting bed is a cozy and personal space for a cat or small dog to curl up in.

DIY Tips
- Sew the neckline of the sweater closed.
- Stuff the sleeves and the body of the sweater with poly-fil or old fabric scraps.
- Arrange the stuffed sleeves around the body of the sweater to form a circular bolster.
- Sew the cuffs of the sleeves to the bottom hem of the sweater to secure the shape.
- The body of the sweater creates a soft and comfortable cushion in the center of the bed.
23. Plastic Spoon Wreath
Transform a collection of plastic spoons into a stunning and intricate wreath. This is a surprisingly elegant way to upcycle disposable cutlery. The layered spoons create a beautiful, petal like effect that resembles a chrysanthemum flower.
This plastic spoon wreath is a unique and artistic gift that is sure to impress. It is a time consuming but rewarding project that results in a high end looking piece of decor. The wreath can be painted in any color to match the recipient’s home.
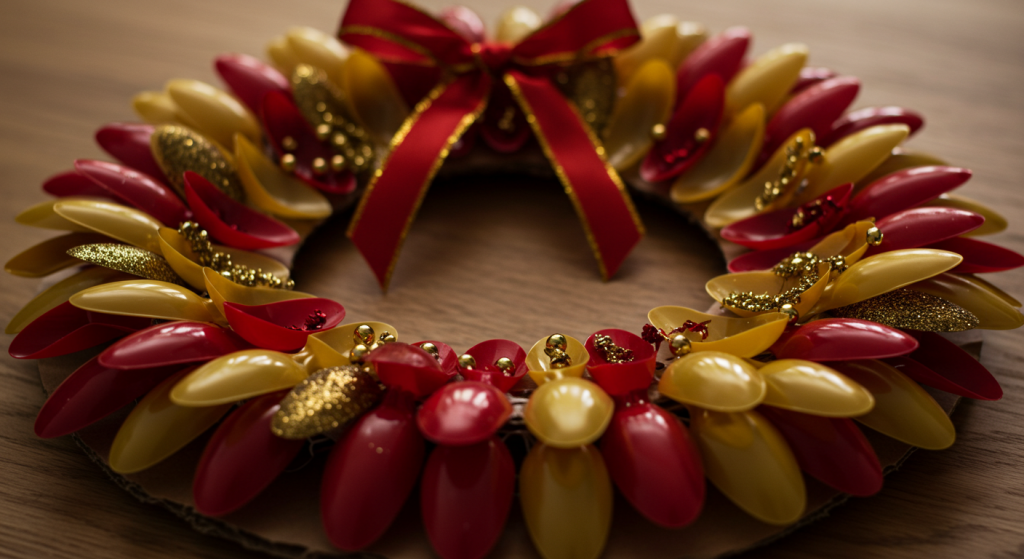
DIY Tips
- Cut the handles off the plastic spoons.
- Hot glue the spoon heads onto a cardboard or foam wreath form, starting with the outer edge.
- Layer the spoons in overlapping rows, working your way towards the center of the wreath.
- Spray paint the finished wreath in your desired color. A metallic or glossy finish can look particularly striking.
- Consider adding a contrasting color to the center of the wreath for a more dramatic effect.
24. Old Key Wind Chimes
Give old, forgotten keys a new and melodious purpose by turning them into a whimsical wind chime. The gentle tinkling of the keys in the breeze creates a soothing and magical sound. This is a wonderful way to repurpose keys that no longer open any doors.
This old key wind chime is a charming and nostalgic gift that adds a touch of vintage character to any outdoor space. You can combine the keys with other upcycled materials like old silverware or beads. The variety of shapes and sizes of the keys adds to the visual and auditory appeal of the wind chime.

DIY Tips
- Gather a collection of old keys in various shapes and sizes.
- Use a sturdy piece of driftwood, a small branch, or an embroidery hoop as the top of your wind chime.
- Drill small holes in the top piece to hang the keys from.
- Tie the keys to the top piece at varying lengths using fishing line or a strong thread.
- Incorporate other elements like beads, shells, or small bells for added visual and auditory interest.
25. Magazine Page Bowls
Transform colorful magazine pages into a sturdy and decorative bowl. This is a creative and eco friendly way to upcycle old magazines. The process of rolling and coiling the paper creates a surprisingly strong and durable structure.
This magazine page bowl is a vibrant and unique gift that is perfect for holding keys, jewelry, or other small items. The colors and patterns of the magazine pages create a beautiful and random mosaic effect. It is a testament to the fact that beautiful and functional objects can be created from the most humble of materials.
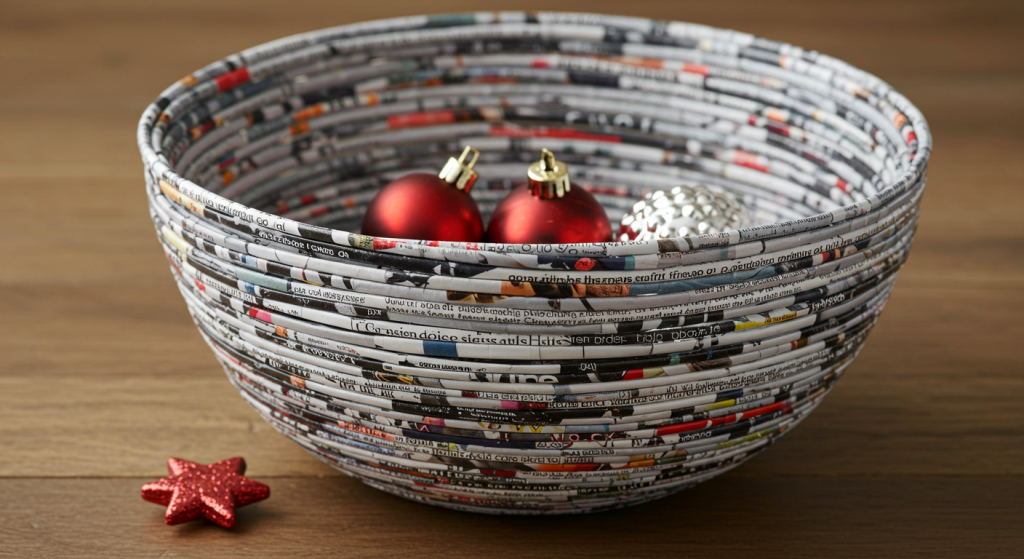
DIY Tips
- Cut magazine pages into long, narrow strips.
- Roll each strip tightly around a toothpick or a skewer to create a paper bead.
- Glue the end of the strip to secure the bead.
- Start coiling the paper beads together, gluing them as you go, to form the base of the bowl.
- Build up the sides of the bowl by continuing to coil and glue the beads in an upward spiral.
26. Egg Carton Fire Starters
Give cardboard egg cartons a new life as practical and effective fire starters. This is a wonderful and eco friendly gift for anyone who enjoys a cozy fire in the fireplace or a campfire in the great outdoors. The combination of the cardboard, dryer lint, and wax creates a slow and steady burn.
These egg carton fire starters are a simple and useful gift that is easy to make in large batches. They are a great way to use up materials that would otherwise be thrown away. The recipient will appreciate this thoughtful and practical gift on a cold winter’s night.

DIY tips
- Fill each cup of the cardboard egg carton with dryer lint.
- Melt old candle wax or crayons in a double boiler.
- Carefully pour the melted wax over the dryer lint in the egg carton, saturating it completely.
- Allow the wax to cool and harden completely.
- Cut the individual egg cups apart to create single use fire starters.
27. Tie Phone Case
Transform a vintage silk tie into a stylish and sophisticated phone case. The soft, padded nature of the tie provides excellent protection for a phone. This is a clever and fashionable way to upcycle a tie that is no longer worn.
This tie phone case is a unique and personalized gift for the dapper gentleman in your life. The rich colors and patterns of the silk tie create a one of a kind accessory. It is a simple sewing project that results in a practical and eye catching item.

DIY Tips
- Measure and cut the tie to the appropriate length to fit the phone.
- Fold the cut end of the tie over and sew it to create a closed bottom for the case.
- The wider end of the tie can be folded over as a flap to secure the phone inside.
- Sew a small piece of velcro or a button and loop closure to the flap.
- The lining of the tie provides a soft and protective interior for the phone.
28. Floppy Disk Pen Holder
Give obsolete floppy disks a new and useful purpose by turning them into a retro pen holder. This is a fun and nostalgic project for anyone who remembers the days of dial up internet and floppy disk drives. The sturdy plastic of the disks creates a surprisingly stable structure.
This floppy disk pen holder is a quirky and geeky gift that is perfect for a desk or office space. It is a simple construction project that requires only a few floppy disks and a way to connect them. This gift is a conversation starter and a tribute to the rapid evolution of technology.

DIY Tips
- Use five floppy disks to create the four sides and the bottom of the pen holder.
- Drill small holes in the edges of the floppy disks.
- Use zip ties or a strong thread to connect the disks together to form a cube.
- For a no drill method, you can use a hot glue gun to connect the disks.
- The metal shutter of the floppy disk can be left on for an extra touch of retro charm.
29. VHS Tape Lamp
Transform an old VHS tape into a unique and retro lamp. This is a creative and unexpected way to upcycle a piece of obsolete media. The translucent quality of the videotape creates a diffuse and interesting light effect.
This VHS tape lamp is a quirky and nostalgic gift for the film buff or lover of all things vintage. It is a conversation piece that is sure to bring back memories of movie nights past. The project requires some basic wiring skills, but the result is a truly one of a kind piece of functional art.

DIY Tips
- Carefully open the VHS tape casing and remove the spools of videotape.
- Drill a hole in the back of the casing for the lamp cord.
- Install a small light socket and bulb inside the empty casing.
- For a colorful effect, you can line the inside of the casing with colored cellophane.
- Securely close the VHS tape casing and plug in your new retro lamp.
30. Cassette Tape Coin Purse
Give an old cassette tape a new lease on life as a charming and retro coin purse. This is a fun and creative way to repurpose a beloved mixtape from the past. The sturdy plastic casing of the cassette tape provides a durable and protective shell for your coins.
This cassette tape coin purse is a nostalgic and unique gift for anyone who grew up in the 80s or 90s. It is a simple project that involves adding a zipper to the cassette tape. The finished product is a fun and functional accessory that is sure to turn heads.

DIY Tips
- Carefully pry open the cassette tape and remove the spools of tape and any other internal parts.
- Cut a piece of fabric to line the inside of the two halves of the cassette tape.
- Use a strong adhesive to glue a zipper between the two halves of the cassette tape.
- Allow the adhesive to dry completely before using your new coin purse.
- You can use the original J-card from the cassette tape to create a matching gift tag.
31. Jean Pocket Organizers
Repurpose the back pockets from old pairs of jeans into handy and stylish wall organizers. This is a simple and practical way to upcycle denim that is too worn to be worn. The sturdy pockets are perfect for holding small items like pens, phones, or craft supplies.
These jean pocket organizers are a casual and creative gift that is perfect for a dorm room, office, or craft space. You can arrange multiple pockets on a piece of fabric or wood to create a larger organizational system. The familiar look of the denim pockets adds a touch of rustic charm to any wall.

DIY Tips
- Carefully cut the back pockets off of old pairs of jeans, leaving a small border of fabric around the pocket.
- Arrange the pockets on a piece of fabric, a corkboard, or a wooden board.
- Use a sewing machine or a strong fabric glue to attach the pockets to the backing.
- You can use a variety of different colored denims for a more eclectic look.
- Add a loop of twine or ribbon to the top of the organizer for easy hanging.
32. Old Shirt Pillowcases
Transform old, soft shirts into comfortable and sentimental pillowcases. This is a wonderful way to preserve the memory of a favorite shirt that is no longer wearable. The soft, worn in fabric of the shirt is perfect for a cozy night’s sleep.
These old shirt pillowcases are a thoughtful and personal gift that is full of sentimental value. They are a simple sewing project that requires minimal skill. The resulting pillowcase is a comforting reminder of a loved one or a cherished memory.

DIY Tips
- Choose a shirt that is made of a soft and comfortable fabric, like cotton or flannel.
- Lay a standard pillowcase on top of the shirt as a template.
- Cut the front and back of the shirt to the size of the pillowcase, adding a seam allowance.
- With the right sides of the fabric facing each other, sew around three of the sides.
- Turn the pillowcase right side out and insert a pillow. You can add a simple envelope closure to the open end.
Conclusion
This holiday season, embrace the joy of giving gifts that are not only beautiful and thoughtful but also sustainable and unique. By upcycling items you already have, you can create personalized presents that tell a story and carry a piece of your heart. These 32 ideas are just the beginning of what is possible when you look at everyday objects with a creative eye.
The act of making something by hand is a gift in itself, a way to slow down and infuse your presents with love and intention. So before you head to the crowded stores, take a look around your home and see what treasures are waiting to be transformed. Your friends and family will surely appreciate the creativity, effort, and personal touch of a homemade, upcycled gift.