
Making homemade Christmas ornaments is a wonderful way to celebrate the holiday season, bond with family, and add a personal touch to your Christmas tree. These creative DIY ideas will inspire you to craft ornaments that are both beautiful and meaningful.


1. Classic Salt Dough Ornaments
Salt dough ornaments are timeless and fun to make with kids. Mix flour, salt, and water to create the dough, then roll it out and cut festive shapes like stars and snowflakes. Once baked, paint and seal them for lasting decorations.
Tips
- Use the classic ratio of 2 cups of flour, 1 cup of salt, and 1 cup of warm water for the best dough consistency.
- Knead the dough for at least 10 minutes to make it smooth and elastic before rolling.
- Bake the ornaments at a very low temperature, around 200°F (95°C), for several hours to prevent them from puffing up or cracking.
- Use a straw to poke a clean hole for the hanging ribbon before you bake the ornaments.
- Press stamps, lace, or fir sprigs into the raw dough to create beautiful textures.
- Let the ornaments cool completely before painting them with acrylic craft paints.
- Personalize your ornaments by stamping names or the year into the dough before baking.
- Seal your finished and painted ornaments with a clear sealant like Mod Podge or a spray varnish to protect them from moisture.
- For a natural, rustic look, add cinnamon to the dough to give it a warm brown color and a lovely scent.
- Store the finished ornaments in a cool, dry place to ensure they last for many years.

2. Glitter Pinecone Ornaments
Collect pinecones from your yard and coat them with glue and glitter for a natural, sparkly ornament. Add a ribbon loop for easy hanging.
Tips
- Before crafting, bake your pinecones on a foil-lined sheet at 200°F (95°C) for about an hour to kill any bugs and dry out sap.
- For an elegant look, spray paint the pinecones white, silver, or gold before adding glitter.
- Use a spray adhesive for a light, even coat of glue, or use a small brush to apply craft glue to the tips of the scales.
- To contain the mess, work over a paper plate or a tray to catch the excess glitter.
- Experiment with different types of glitter, from fine and iridescent to chunky and colorful, for varied effects.
- For a snowy look, apply glue and sprinkle on epsom salt or artificial snow flocking instead of glitter.
- The easiest way to add a hanger is to hot glue a loop of ribbon or twine to the top, wide end of the pinecone.
- You can also screw a small eye hook into the top of the pinecone for a more secure hanging loop.
- Apply a clear sealant spray over the finished glittered pinecone to minimize glitter shedding.
- Mix different sizes of pinecones on your tree for a more dynamic and natural display.

3. Mason Jar Lid Snowmen
Use mason jar lids as the base for snowman ornaments. Paint them white, add a face with markers or paint, and use fabric scraps to create little scarves.
Tips
- Use both the flat lid and the ring for a more finished look, gluing the flat part inside the ring.
- Prime the metal lids with a metal primer or a coat of white gesso to help the paint adhere better.
- Use fine-tipped permanent markers or paint pens for drawing the snowman’s face details like eyes and a smile.
- Cut a thin strip of flannel, fleece, or felt to tie around the “neck” of the snowman for a cozy scarf.
- Hot glue a loop of festive ribbon or twine to the back of the lid for a hanger.
- Create a “carrot” nose by dabbing on a small triangle of orange paint or gluing on a tiny cone of orange felt.
- Stack and glue three lids together vertically to create a full-bodied snowman ornament.
- Sprinkle fine iridescent glitter onto the wet white paint to give your snowman a frosty shimmer.
- Use tiny black buttons for the eyes or the mouth for a more classic, three-dimensional look.
- Write the year on the back of the ornament with a permanent marker to turn it into a keepsake.

4. Felt Christmas Trees
Cut green felt into tree shapes and decorate with buttons, sequins, or embroidery. Layer two pieces of felt together, stuff them with cotton, and sew or glue the edges for a 3D effect.
Tips
- Use a paper template to ensure all your felt tree shapes are uniform.
- Decorate the front piece of the felt tree with beads, sequins, or embroidery before sewing it to the back piece.
- A simple blanket stitch around the edge with contrasting embroidery floss gives a charming, handmade look.
- For a no-sew option, use fabric glue or a hot glue gun to attach the two felt pieces together, leaving a small opening for stuffing.
- Use polyester fiberfill for stuffing, as it is less lumpy than cotton balls.
- Incorporate a small piece of a cinnamon stick at the bottom for a fragrant and rustic tree trunk.
- Sew or glue a small loop of ribbon between the two layers at the top before you seal it completely.
- Create variety by using different shades of green felt for your trees.
- Tiny buttons make perfect “ornaments” for your felt trees.
- This same technique can be used to create other shapes like stars, hearts, and gingerbread men.


5. Cinnamon Stick Bundles
Tie a few cinnamon sticks together with twine and decorate with small holly berries and greenery. These ornaments not only look charming but also smell amazing.
Tips
- Use three to five cinnamon sticks of a similar length for a well-proportioned bundle.
- Secure the bundle tightly with festive baker’s twine or a simple jute cord for a rustic feel.
- A small dot of hot glue between the cinnamon sticks can help keep them from shifting.
- Tuck in a small sprig of faux greenery or a real sprig of fir or rosemary for a fresh look and scent.
- Use faux holly berries or tiny red pom-poms for a pop of festive color.
- Tie a small jingle bell into the knot of the twine for a cheerful, musical touch.
- Create a hanging loop with the same twine you use to tie the bundle together.
- These ornaments double as beautiful, fragrant gift toppers for Christmas presents.
- To refresh the scent in future years, you can lightly sand one side of the cinnamon sticks.
- Arrange the sticks at slightly different heights before tying for a more natural, staggered look.

6. Paper Straw Stars
Arrange paper straws into star shapes and glue them together. Use festive colors and patterns for a whimsical, lightweight decoration.
Tips
- Choose sturdy, high-quality paper straws to prevent them from bending or crushing easily.
- Cut the straws into equal lengths to create symmetrical star points.
- A hot glue gun provides the quickest and most secure bond for assembling the straws.
- For a more intricate snowflake design, create two star shapes and glue them together, offsetting the points.
- Thread a loop of clear fishing line or metallic thread through one of the top straws before gluing for a nearly invisible hanger.
- These ornaments are very lightweight, making them perfect for smaller trees or even garlands.
- For a fun kids’ craft, use white craft glue instead of a hot glue gun.
- Spray the finished stars with a light coat of glitter spray for extra holiday sparkle.
- Alternate between solid colors and patterned straws for a more dynamic and visually interesting look.
- You can also create a 3D star by building two identical flat stars and gluing them back to back.

7. Personalized Photo Ornaments
Print family photos and place them in clear plastic or glass ornament balls. Add fake snow, glitter, or small holiday trinkets for a personalized keepsake.
Tips
- Choose clear plastic ornaments if crafting with children, as they are shatterproof and safer than glass.
- Print your photos on a lightweight paper or vellum so they are easy to roll up and insert into the ornament.
- To make a photo double-sided, print two copies, trim them, and glue them back to back.
- Use a pair of tweezers to help position the photo and other fillings inside the ornament.
- Fill the ornament with items that relate to the photo, like sand for a beach picture or tiny snowflake confetti for a winter shot.
- Use a paint pen or vinyl lettering on the outside of the ornament to add a name and the year.
- Black and white or sepia-toned photos create a beautiful, timeless, and vintage feel.
- Secure the metal cap of the ornament with a dot of hot glue to prevent it from falling off.
- Cut the photo into a circle shape that is slightly smaller than the ornament’s diameter for a perfect fit.
- These ornaments make incredibly thoughtful and personal gifts for grandparents and other family members.


8. Hand-Painted Wooden Slices
Cut wooden slices and paint festive scenes, patterns, or holiday sayings on them. Drill a small hole at the top and add twine for hanging.
Tips
- If cutting your own slices from a branch, let them dry out completely for a few weeks to prevent cracking.
- Lightly sand the surface of the wood slice before painting for a smoother finish.
- Acrylic craft paints work best on wood surfaces and come in a wide variety of colors.
- Use carbon paper to easily transfer a printed design or lettering onto the wood slice before painting.
- Drill the hole for the hanging twine before you start painting.
- Apply a clear matte or satin varnish to the finished ornament to protect the paint and the wood.
- Simple designs like snowflakes, holly leaves, or single words like “Joy” or “Noel” are very effective.
- Use fine-tipped paint pens for adding small details or lettering with more control.
- Leave the bark on the edge of the slice for a wonderful rustic and natural texture.
- Make a whole set with a cohesive theme to give as a gift or to decorate your own tree.

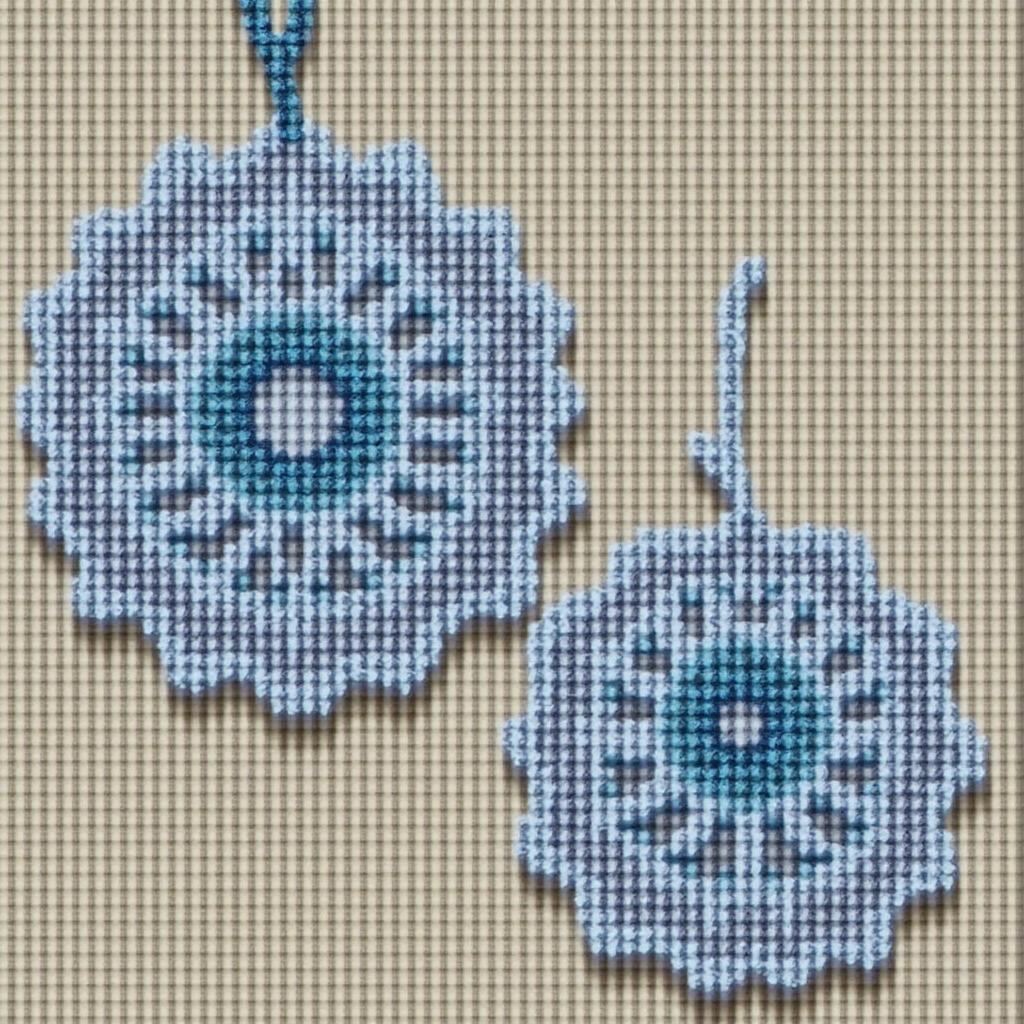
9. Beaded Snowflakes
Use wire and beads to create delicate snowflake shapes. These sparkling ornaments add an elegant touch to your tree.
Tips
- Use silver-toned craft wire that is thin enough to thread beads but sturdy enough to hold its shape.
- For a simple base, cut three equal lengths of wire and twist them together in the center to create a six-pointed star.
- A color palette of clear, white, iridescent, silver, and light blue beads creates a classic, icy look.
- Use a small dot of hot glue or bend the very end of the wire to secure the last bead on each point.
- Create intricate patterns by alternating different sizes and shapes of beads on each wire.
- For a kid-friendly version, use pipe cleaners instead of wire, as they are softer and easier to bend.
- Tie a loop of clear fishing line or thin metallic ribbon to the center of the snowflake for hanging.
- Mix faceted glass beads with simple seed beads for a beautiful contrast in sparkle and texture.
- These ornaments look especially beautiful when they catch the light from the Christmas tree.
- Make a variety of different snowflake designs and sizes to create a beautiful, coordinated theme.
10. Pom-Pom Garland Ornaments
Create colorful ornaments by gluing pom-poms onto cardboard shapes. Choose festive colors like red, green, and white for a cheerful holiday look.
Tips
- Use a pom-pom maker for a quick and easy way to create fluffy, uniform pom-poms.
- Draw your desired shape, like a wreath or candy cane, onto a piece of sturdy cardboard and cut it out to use as a base.
- A hot glue gun is the most effective way to securely attach the pom-poms to the cardboard base.
- Alternate pom-pom colors to create stripes on a candy cane or a pattern on a wreath.
- Use a variety of pom-pom sizes to add texture and visual interest to your ornament.
- After gluing, you can trim any stray yarn pieces to give your ornament a neater finish.
- Create a festive pom-pom reindeer by using brown pom-poms for the face and adding googly eyes and pipe cleaner antlers.
- Glue a loop of ribbon to the back of the cardboard base before you start adding pom-poms.
- For a fuller look, pack the pom-poms closely together so that no cardboard shows through.
- This is a great project for using up leftover scraps of yarn.

11. Rustic Twig Stars
Gather small twigs and arrange them into star shapes, tying them together with twine or hot glue. These ornaments are perfect for a rustic, natural-themed tree.
Tips
- Gather twigs that are relatively straight and have a similar thickness for a more uniform star shape.
- Allow the twigs to dry out completely before crafting to make them less brittle.
- Cut five twigs to the same length to create a classic five-pointed star.
- A hot glue gun is the fastest way to secure the points where the twigs overlap.
- For a more rustic look, wrap each joint with jute twine after gluing to hide the glue and add texture.
- Leave the twigs in their natural state or spray paint them white, gold, or silver for a different look.
- Create a simple hanger by tying a loop of twine to one of the top points of the star.
- You can create a whole garland by stringing multiple small twig stars together.
- Tuck a small sprig of greenery or a tiny pinecone into the center of the star for added detail.
- A light coat of a clear matte sealant can help make the twigs more durable.

12. DIY Gingerbread Men
Make faux gingerbread ornaments using cinnamon dough or craft foam. Decorate with puffy paint to mimic icing for a charming and calorie-free holiday treat.
Tips
- For a wonderfully scented ornament, make a dough using equal parts applesauce and cinnamon.
- Use gingerbread man cookie cutters to get the perfect shape from your dough or craft foam.
- White puffy paint is perfect for creating the look of royal icing for the face and details.
- Use tiny buttons or beads for the gingerbread man’s buttons before the puffy paint dries.
- Remember to make a hole at the top for hanging before you bake or dry the ornament.
- For craft foam ornaments, use a hole punch to create a clean hole.
- Add fine glitter to the wet puffy paint for a “sugared” look.
- Use this same technique with other festive cookie cutter shapes, like stars or Christmas trees.
- If using cinnamon dough, bake at a low temperature for several hours until completely hard.
- These are durable and lightweight, making them great for homes with pets or small children.

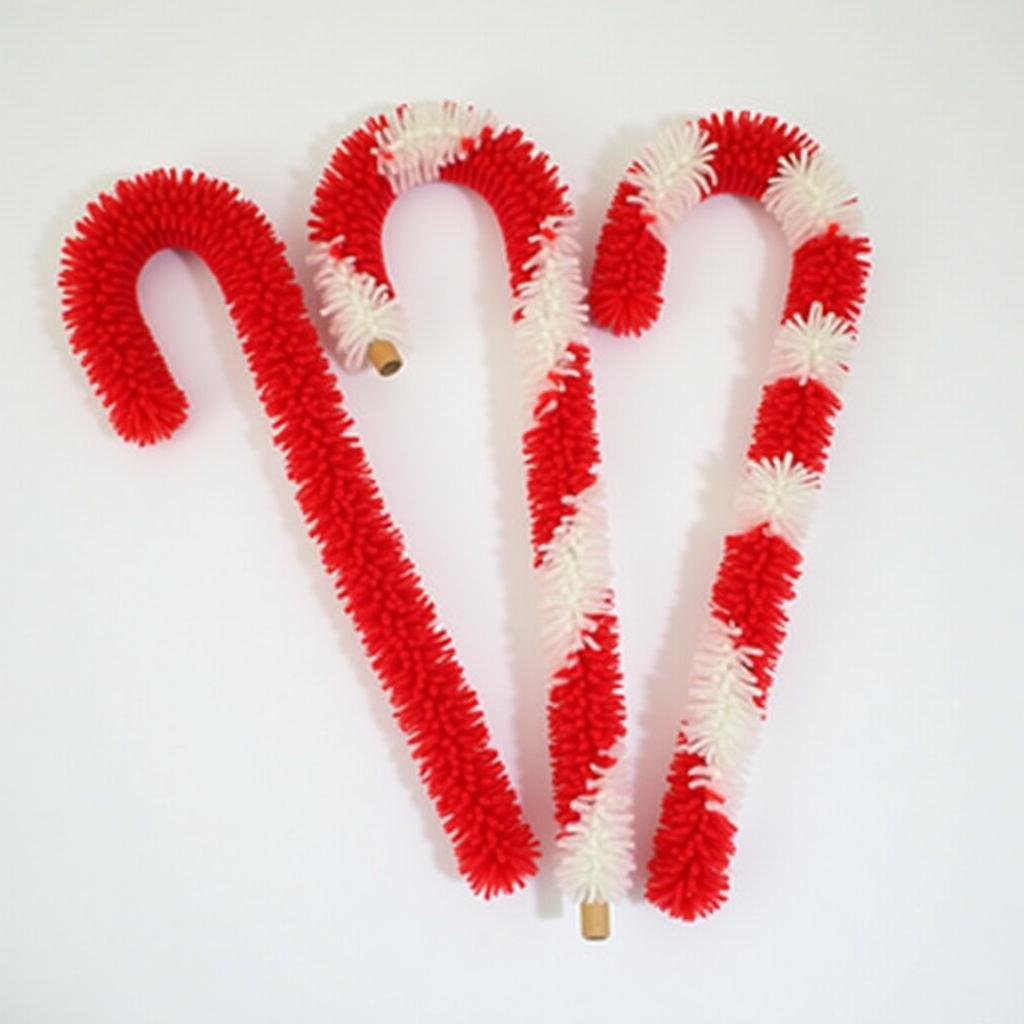
13. Candy Cane Pipe Cleaners
Twist red and white pipe cleaners together to create candy cane shapes. These are simple and fun to make with kids.
Tips
- For a fuller candy cane, use two white and two red pipe cleaners, alternating them before you start twisting.
- Twist the pipe cleaners tightly and evenly for a neat, striped appearance.
- Once twisted, trim the ends so they are even before bending the top to create the hook shape.
- Tuck the sharp wire ends in securely to make them safe for little hands.
- This is an excellent craft for developing fine motor skills in young children.
- Experiment with different festive color combinations, like green and white or blue and silver.
- These lightweight ornaments can be hung directly on tree branches without needing a separate hook.
- Tie a small green or red ribbon bow around the straight part of the candy cane for extra decoration.
- Use glitter or metallic pipe cleaners for a sparkly, more glamorous version.
- Make a large number of them to use as fun, inexpensive fillers on your Christmas tree.

14. Mini Wreath Ornaments
Form mini wreaths using small embroidery hoops or wire. Wrap them with greenery, ribbon, and tiny berries for a festive touch.
Tips
- The metal rings from mason jar lids make excellent, sturdy bases for mini wreaths.
- Cut a long, thin strip from a faux garland and wrap it around the base, securing with hot glue.
- For a rustic look, wrap the base with jute twine or burlap ribbon before adding other embellishments.
- Use floral wire to attach small sprigs of real or faux greenery like boxwood or fir.
- Tiny faux berries, miniature pinecones, or a small jingle bell make perfect wreath decorations.
- Finish your wreath with a small bow made from festive, thin ribbon.
- Create a hanger by simply tying a loop of ribbon to the top of the wreath.
- You can also create a wreath shape by hot gluing small sections of a cinnamon stick together.
- For a soft, modern look, wrap the base in a chunky yarn and add a few felt balls as berries.
- Make a set of three or four to create a beautiful, cohesive look on your tree.

15. Quilled Paper Ornaments
Use strips of colorful paper to create intricate quilled designs. Roll, fold, and glue the paper into festive shapes like snowflakes or Christmas trees.
Tips
- Using pre-cut quilling paper strips and a slotted quilling tool will make the process much easier for beginners.
- Start by mastering a few basic shapes, like tight coils, loose coils, and teardrops.
- Use a liquid craft glue with a fine-tip applicator for precise, clean application.
- Find free templates online to guide you in creating complex snowflake or angel designs.
- Once your ornament is assembled, brush a light, even coat of a clear-drying glue or sealant over the entire piece to make it more durable.
- Create a hanging loop by threading a needle with metallic thread and passing it through one of the top coils.
- Classic white paper is perfect for snowflakes, while shades of green work well for trees and holly leaves.
- Add a touch of sparkle by dabbing on a bit of glitter glue or using paper with a metallic edge.
- Be patient; quilling requires a delicate touch and can take some practice to perfect.
- Arrange your finished quilled shapes on a piece of wax paper as you work to prevent them from sticking to your work surface.

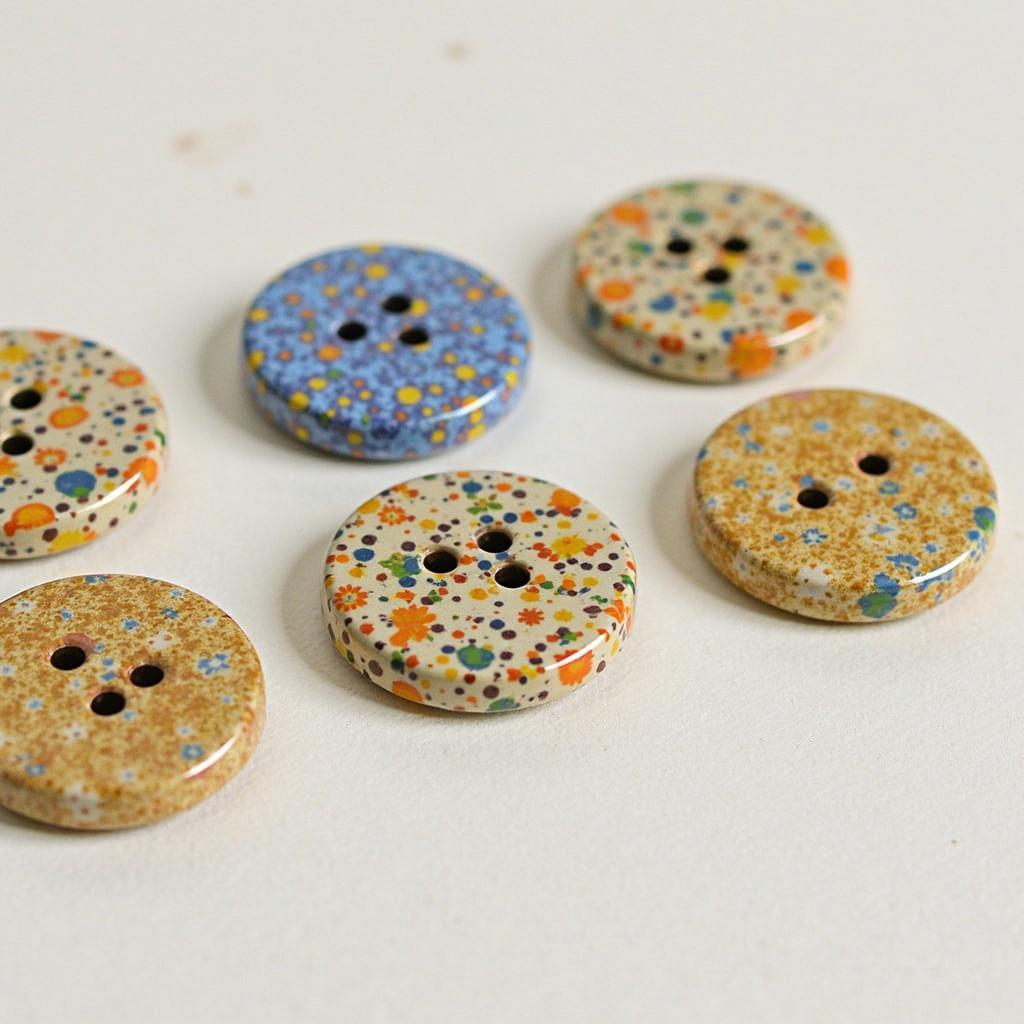
16. Button Baubles
Glue assorted buttons onto clear ornament balls for a colorful and textured decoration. Choose a specific color palette or mix and match for a playful look.
Tips
- A foam ball from a craft store is a great base for this project, especially for kids, as it is unbreakable.
- A hot glue gun provides the most secure and instant bond for attaching the buttons.
- For a sophisticated look, use buttons all in one color but in various shades and sizes, such as different shades of blue.
- Layer smaller buttons on top of larger ones to add dimension and cover any gaps.
- Fill in any tiny spaces between buttons with small beads, seed beads, or glitter glue.
- Create patterns like stripes or swirls by arranging your buttons in specific color orders.
- Before you start gluing, hot glue a loop of ribbon to the top of the foam ball to act as a hanger.
- Source inexpensive buttons from thrift stores, old garments, or bulk bags at craft stores.
- For a vintage or heirloom feel, use only mother-of-pearl or antique-style metal buttons.
- On a clear plastic ball, you can fill the inside with tiny buttons and glue larger ones on the outside.
17. Seashell Christmas Ornaments
If you live near the coast, collect seashells and turn them into ornaments. Paint them with metallic or holiday colors, and add ribbons for hanging.
Tips
- Before crafting, clean your seashells thoroughly by soaking them in a solution of bleach and water, then scrubbing them clean.
- Metallic spray paints in gold, silver, or champagne give seashells a beautiful, elegant holiday look.
- Apply craft glue to the inside or edges of the shell and sprinkle with fine glitter for a touch of sparkle.
- The safest way to create a hole for hanging is to use a Dremel tool with a very small drill bit.
- For a no-drill option, simply hot glue a loop of ribbon or twine securely to the back of the shell.
- Glue a small pearl bead and some delicate wings to a small scallop shell to create a beautiful angel ornament.
- Arrange tiny shells in a circle on a cardboard backing to create a unique coastal wreath ornament.
- Fill spiral-shaped shells with a mixture of glitter and glue for a magical effect.
- Use a fine-tipped permanent marker or paint pen to write a beach destination and year on the back.
- These make wonderful souvenirs to remember a family beach vacation.

18. Scrabble Tile Messages
Use Scrabble tiles to spell out festive words like “Joy,” “Noel,” or “Merry.” Glue them onto ribbon or twine and hang them on your tree.
Tips
- You can find bulk bags of new Scrabble tiles at most craft stores or find old games at thrift shops.
- Choose short, festive words or family names to keep the ornaments from becoming too long or heavy.
- A flat wooden craft stick painted a festive color makes a great, sturdy backing for the tiles.
- Hot glue or a strong wood glue works best for securing the wooden tiles.
- For a more charming look, glue the tiles slightly askew or staggered rather than in a perfect line.
- Glue a small ribbon bow, a tiny jingle bell, or a sprig of faux holly to the top or bottom for extra embellishment.
- Drill a small hole in the craft stick backing or simply glue a loop of ribbon to the back for hanging.
- These are a great way to personalize your tree with the names of everyone in your family.
- Apply a light coat of a clear sealant over the finished ornament to protect the wood tiles.
- Use a ruler to ensure you glue the tiles on straight if you are attaching them to a wide ribbon backing.

19. Upcycled Sweater Ornaments
Repurpose old sweaters by cutting them into shapes like mittens or hearts. Sew or glue the edges, stuff them, and add a loop for hanging.
Tips
- For best results, use a wool sweater that has been washed and dried on hot to “felt” it, which prevents the edges from fraying when cut.
- Use metal cookie cutters as templates to trace your desired shapes onto the sweater fabric.
- A simple blanket stitch with contrasting embroidery floss around the edges adds a charming, decorative touch.
- For a quick, no-sew version, run a bead of hot glue or fabric glue along the inside edge of the shape.
- Use a small amount of polyester fiberfill to lightly stuff the ornament, giving it a soft, 3D shape.
- Decorate your sweater ornaments with buttons, small felt appliques, or simple embroidered details.
- Sandwich a loop of ribbon or twine between the two fabric layers at the top before sewing or gluing it shut.
- Make the most of a sweater with a cable knit pattern by centering it on your ornament shape.
- This is a wonderful way to create a keepsake ornament from a loved one’s old sweater.
- Create a set of different shapes from the same sweater for a coordinated look.

20. Paper Snowflakes
Craft intricate paper snowflakes using scissors and paper. Add glitter or metallic paint for extra holiday sparkle.
Tips
- Start with a perfectly square piece of paper for the most symmetrical results.
- Simple white copy paper is easy to fold and cut, but parchment paper or metallic paper can create a more elegant look.
- Fold the paper diagonally, then in thirds, to create the base for a classic, six-pointed snowflake.
- Use sharp, small scissors to make clean, intricate cuts.
- Remember that any paper you cut away will create a hole, and any paper you leave will form the structure of the snowflake.
- Unfold the finished snowflake very carefully to avoid tearing the delicate design.
- To flatten a curled snowflake, place it between the pages of a heavy book for a few hours.
- Apply a light mist of spray adhesive and then sprinkle with fine, iridescent glitter for a frosty shimmer.
- To make the paper snowflakes more durable for use year after year, you can have them laminated.
- Use a needle and clear thread to create a nearly invisible hanger for your snowflakes.

Conclusion
Homemade Christmas ornaments are a great way to express your creativity and make lasting holiday memories with loved ones. From rustic and natural designs to colorful and playful options, these 20 festive ideas will help you decorate your tree in style. Start crafting today and bring even more cheer to your holiday celebrations!