Summer evenings are magical. They are meant for relaxing on the patio, sharing stories with friends, and enjoying the warm, breezy air.
The right outdoor lighting can completely transform your space. It turns a simple backyard into an enchanting retreat, creating ambiance, warmth, and a sense of magic.
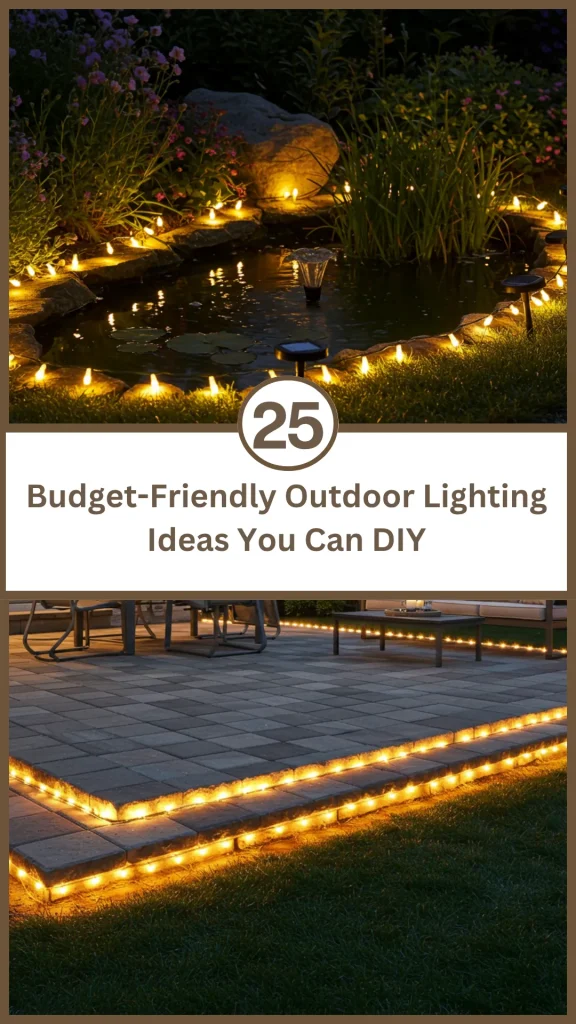
You do not need to spend a fortune or hire an electrician to create a beautiful outdoor oasis. With a little creativity and some simple materials, you can make your own stunning lighting. Here are 25 budget-friendly DIY outdoor lighting ideas to illuminate your summer nights.

String Lights & Solar Power
These ideas are the easiest and most popular entry point into outdoor lighting. They are affordable, versatile, and create an instant, festive atmosphere with minimal effort.
1. Classic String Light Canopy
Nothing creates a magical, European cafe-style ambiance quite like a canopy of classic bistro string lights hanging overhead.
DIY Tips
- Measure your space carefully before you buy your lights to ensure you have enough length.
- Use commercial-grade, weatherproof string lights for durability and safety outdoors.
- For a zigzag pattern, install cup hooks or eye screws on your house, a fence, or poles.
- Use galvanized wire or aircraft cable as a guide wire for the lights to hang from. This prevents sagging.
- Attach the string lights to the guide wire using zip ties or carabiner clips for a secure hold.
- Install a simple dimmer switch designed for outdoor use to control the brightness and set the perfect mood.
- Choose shatterproof, plastic Edison-style bulbs for a vintage look without the worry of broken glass.
- If you do not have anchor points, you can secure wooden posts in large planters filled with concrete.
- Wrap the string lights around the posts or beams of a pergola for an easy, integrated look.
- Make sure to use outdoor-rated extension cords and plug them into a GFCI outlet for safety.

2. Fairy Lights in Bushes and Trees
Weave delicate, twinkling fairy lights throughout your garden bushes and tree branches to create a magical, firefly-like effect.
DIY Tips
- Choose solar-powered fairy lights for the easiest, wire-free installation.
- Look for lights with a warm white color temperature for a soft, magical glow rather than a harsh, blue-toned light.
- Start at the base of the bush or tree trunk and loosely wrap the light string upwards around the branches.
- Do not wrap the lights too tightly; you want a natural, scattered look.
- A little goes a long way. Focus on a few key plants to highlight rather than trying to light everything.
- Place the small solar panel in a spot where it will get at least six hours of direct sunlight during the day.
- This is a wonderful way to add depth and magic to your garden beds at night.
- For a fun pop of color, you can find solar fairy lights in different hues like blue or green.
- Make sure the lights you choose are rated for outdoor use.
- At the end of the season, carefully unwind the lights and store them wrapped around a piece of cardboard to prevent tangling.

3. Solar Stake Path Lights
The easiest DIY project of all. Solar stake lights are an incredibly affordable way to illuminate pathways, garden borders, and driveways for safety and ambiance.
DIY Tips
- For the most effective look, buy a multi-pack of identical lights to create a uniform, cohesive path.
- Before placing them, lay them out along your path to get the spacing right. Placing them about 4 to 6 feet apart is a good starting point.
- Wipe down the solar panel on top of each light every few weeks with a damp cloth to ensure it can absorb maximum sunlight.
- Use them to create a border around a patio or a garden bed.
- Choose stake lights made from durable materials like stainless steel or hard plastic to withstand the elements.
- During the day, make sure the solar panels are not being shaded by overgrown plants.
- Some solar path lights have different settings, like a color-changing mode, for a fun, playful look.
- This is a fantastic, temporary lighting solution for a party or a special event.
- In the winter, you can bring the lights inside and store them to prolong their lifespan.
- Use them to highlight a specific garden feature, like a small statue or a beautiful plant.

4. Solar Mason Jar Lanterns
A charming and rustic way to create hanging lanterns. This project combines the farmhouse charm of mason jars with the modern convenience of solar power.
DIY Tips
- You can buy special solar-powered lids that are designed to fit standard mason jars.
- Alternatively, you can buy small, individual solar path lights and take the top light part off the stake. It will often fit perfectly inside the jar’s metal ring.
- For a frosted glass look, spray the inside of the mason jar with a light coat of frosted glass spray paint. This will diffuse the light beautifully.
- Fill the bottom of the jar with a little bit of sand, pebbles, or sea glass for a decorative touch.
- Create a handle for the jar by wrapping a piece of sturdy wire or twine around the neck of the jar.
- Hang the solar lanterns from tree branches, shepherd’s hooks, or along a fence line.
- Use different colored jars, like blue or green vintage-style ones, for a more colorful glow.
- You can also place these jars on an outdoor table as a simple, wire-free centerpiece.
- Make sure the solar panel on the lid is exposed to plenty of direct sunlight during the day.
- Group three or five jars together at different heights for a stunning visual display.

5. Rope Light Edging
Use flexible rope lights to create a sleek, modern, and defined edge for your patio, deck, or garden pathways.
DIY Tips
- Choose outdoor-rated rope lights. LED rope lights are more energy-efficient and last longer.
- You can buy special mounting clips to secure the rope light neatly along the edge of a deck or a concrete patio.
- For a garden path, you can lay the rope light on the ground and secure it with small landscape staples.
- This is a great way to improve safety by illuminating steps or changes in elevation.
- Rope lights provide a continuous, uniform line of light, which creates a very clean and modern look.
- Choose a warm white light for a sophisticated glow.
- Connect multiple strands of rope light together to cover a large area.
- A solar-powered rope light is a great option if you do not have an outdoor outlet nearby.
- Tuck the rope light under the lip of a raised garden bed for a beautiful, subtle, downward-glowing effect.
- This is a durable and long-lasting outdoor lighting solution.

Upcycled & Repurposed Magic
Get creative and eco-friendly by turning everyday objects and “trash” into beautiful, one-of-a-kind lighting treasures. These projects are incredibly budget-friendly.
6. Tin Can Lanterns
An old tin can can be transformed into a beautiful, patterned lantern with just a few simple tools. This is a classic and charming DIY project.
DIY Tips
- Clean out your tin cans and remove the paper labels.
- Fill the cans with water and place them in the freezer until the water is frozen solid. This prevents the can from denting when you punch holes in it.
- Use a hammer and a nail to punch a pattern of holes into the sides of the frozen can. You can create a spiral, a starburst, or a simple random pattern.
- Once you are done punching the holes, let the ice melt and dry the can completely.
- Spray paint the cans a fun, metallic color like gold, copper, or silver for a more polished look.
- Use a piece of sturdy wire to create a handle so you can hang your lanterns.
- For safety, use battery-operated LED tea lights inside the cans instead of real candles.
- You can also place these lanterns on a tabletop or along your steps.
- Use cans of different sizes to create a varied and interesting display.
- This is a fantastic project for kids to help with the design part.

7. Wine Bottle Tiki Torches
Turn your empty wine bottles into stylish and functional tiki torches that can help keep bugs away and add a beautiful, flickering glow to your patio.
DIY Tips
- You will need an empty wine bottle, a tiki torch replacement wick, and a brass or copper coupling from the hardware store that fits the wick and the bottle opening.
- Fill the clean, empty wine bottle about two-thirds full with citronella torch fuel.
- Insert the tiki wick through the metal coupling, leaving about a half-inch of wick sticking out of the top.
- Place the wick and the coupling into the top of the wine bottle. The coupling will hold the wick in place.
- Let the wick soak up the fuel for at least 20 minutes before you light it for the first time.
- For a decorative touch, you can fill the bottom of the bottle with small pebbles or glass beads before adding the fuel.
- Place the wine bottle torches securely on a flat, stable surface, away from anything flammable.
- Never leave them unattended when they are lit.
- Use a metal snuffer to safely extinguish the flame.
- Group a few bottles of different colors together for a beautiful display.

8. Glass Jar Candle Holders
This is perhaps the simplest upcycling project. Empty glass jars from things like pasta sauce or jam can be turned into beautiful, rustic candle holders.
DIY Tips
- Thoroughly clean the jars and remove any sticky residue from the labels.
- For a simple look, place a small votive candle or a tea light inside the jar.
- For a beachy feel, fill the bottom of the jar with an inch of sand before adding your candle.
- Wrap the outside of the jar with twine, lace, or burlap ribbon for a decorative, rustic touch.
- You can paint the jars. For a translucent, sea-glass look, use a special glass paint.
- Create a handle for hanging by wrapping a sturdy wire around the rim of the jar.
- Place a handful of small pebbles or coffee beans in the bottom of the jar to hold a taper candle upright.
- Group several jars of different shapes and sizes on a tray to create a beautiful, glowing centerpiece.
- Use battery-operated candles for a worry-free option, especially if you have kids or pets.
- These are perfect for creating a cozy, intimate atmosphere on an outdoor dining table.

9. Old Chandelier with Solar Lights
Find a beautiful, old, non-functional chandelier at a thrift store or a flea market and give it a magical new life as an outdoor feature.
DIY Tips
- First, remove any old, dangerous electrical wiring from the chandelier.
- Clean the chandelier thoroughly. You can spray paint it a fun, bright color or a chic matte black.
- Instead of light bulbs, you can place small, solar-powered stake lights (with the stakes removed) into the candle holders.
- You can also replace the bulbs with simple votive candle holders.
- Another beautiful option is to entwine the arms of the chandelier with a string of solar-powered fairy lights.
- Hang the finished chandelier from a sturdy tree branch, a pergola, or a covered porch.
- You can hang crystals or beads from the chandelier arms for extra sparkle.
- This creates a stunning, whimsical, and romantic focal point for your outdoor space.
- Make sure to hang it securely with a strong chain or rope.
- This project is all about turning something old and forgotten into something beautiful and magical.

10. Repurposed Colander Hanging Planter Light
This is a unique and quirky idea. An old metal colander, with its built-in holes, makes a perfect hanging basket that casts beautiful, patterned light.
DIY Tips
- Find an old, colorful enamel or a simple metal colander at a thrift store.
- Use S-hooks and a small chain to create a hanger for the colander, attaching it to the handles.
- You can use it as a hanging planter by lining it with coco coir, filling it with soil, and planting some trailing flowers.
- To turn it into a light fixture, simply place a waterproof, solar-powered puck light or a string of fairy lights inside.
- Hang the colander from a hook on your porch or from a tree branch.
- At night, the light will shine through the holes in the colander, casting a beautiful, polka-dotted pattern on the ground below.
- You can spray paint the colander a fun, bright color to match your other outdoor decor.
- This is a fun, unexpected, and very budget-friendly way to add some personality to your space.
- It looks especially great in a space with a rustic, farmhouse, or eclectic vibe.
- You could even combine the two ideas: a planter by day, and a lantern by night.

Candlelight & Flame
There is nothing more romantic or primal than the flickering glow of a real flame. These ideas use candles and fire to create a warm, intimate, and cozy atmosphere.
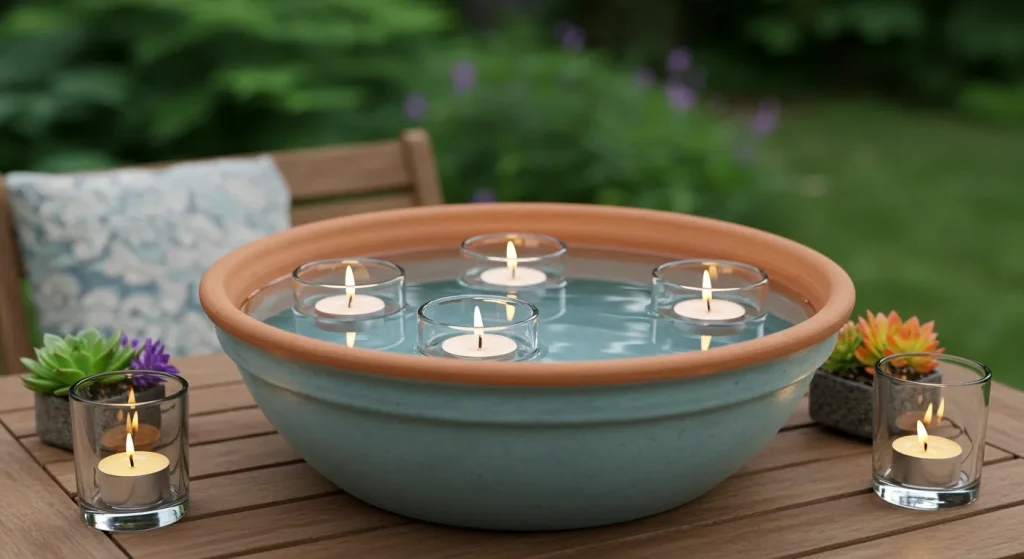
11. Floating Candle Bowl
A very simple, elegant, and serene centerpiece. A large, shallow bowl of water with floating candles creates a beautiful, tranquil focal point.
DIY Tips
- Choose a large, wide, shallow bowl. A simple glass or a rustic stoneware bowl works well.
- Fill the bowl with water.
- Gently place several floating candles on the surface of the water.
- For a more beautiful look, you can also add a few fresh flower blossoms, like gardenias or peonies, to float alongside the candles.
- A few thin slices of lemon or lime in the water can add a touch of color and a fresh scent.
- This is a perfect centerpiece for an outdoor dining table or a coffee table.
- The water will beautifully reflect the flickering candlelight, creating a magical effect.
- Use unscented candles if you are placing the bowl on a dining table, so it does not interfere with the aroma of the food.
- Make sure the bowl is on a stable, level surface.
- This creates a very calm, spa-like ambiance.
12. Citronella Candle Arrangements
Citronella candles are a summer essential for keeping pesky mosquitoes at bay. But they do not have to be ugly. You can incorporate them beautifully into your decor.
DIY Tips
- Instead of using the candles in their original metal buckets, you can buy citronella-infused wax melts or votives.
- Place these citronella votives inside your own beautiful, decorative lanterns or glass jars.
- Group several large citronella pillar candles of varying heights on a stylish, heat-proof tray.
- Surround the candles with natural elements like river rocks or seashells.
- Look for citronella candles that come in more attractive containers, like beautiful ceramic pots.
- Place citronella candles strategically around the perimeter of your patio or seating area for the most effective bug-repelling results.
- Always be mindful of fire safety. Keep the candles away from flammable materials like outdoor cushions or tablecloths.
- A large, multi-wick citronella candle in a beautiful bowl can be a stunning and functional centerpiece.
- This is a perfect way to combine practicality with beautiful design.
- Never leave burning candles unattended.

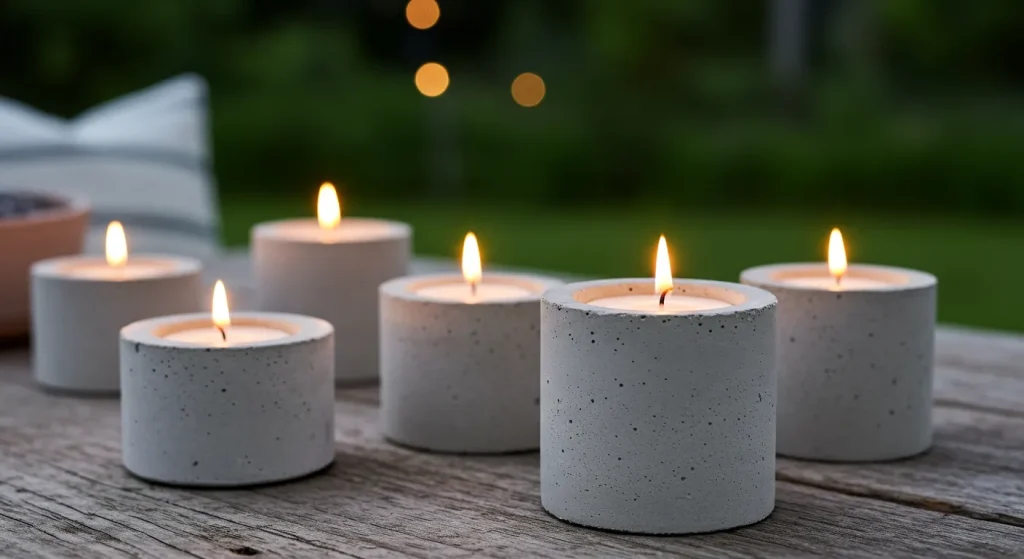
13. DIY Concrete Candle Holders
For a modern, minimalist, and industrial-chic look, you can easily make your own concrete candle holders. They are sturdy, heat-proof, and very inexpensive to create.
DIY Tips
- You will need a bag of quick-setting concrete mix and some simple plastic molds.
- Old plastic food containers, cups, or even milk cartons work great as molds. You will need a larger one for the outside and a smaller one for the inside.
- Mix the concrete according to the package directions.
- Pour the wet concrete into your larger mold.
- Press the smaller, greased mold into the center of the wet concrete to create the hole for the candle. Weigh it down with some rocks.
- Let the concrete cure completely, which usually takes about 24 hours.
- Once it is cured, remove the plastic molds. You can sand any rough edges.
- You can leave the concrete its natural gray color for an industrial look.
- You can also paint the candle holders, perhaps with a metallic gold or copper accent.
- These are perfect for holding tea lights, votives, or even taper candles.
14. Paper Bag Luminarias
A classic, beautiful, and incredibly budget-friendly way to light up a pathway or a patio. They create a soft, magical, and welcoming glow.
DIY Tips
- Use simple, flat-bottomed paper lunch bags. White or natural brown bags work best.
- You can get creative and use a decorative hole punch to create beautiful patterns on the sides of the bags. The light will shine through the holes.
- Fold the top edge of each bag down by about an inch to give it more stability.
- Pour about two inches of sand or cat litter into the bottom of each bag. This weighs the bag down and creates a stable base for your candle.
- For safety, it is highly recommended to use battery-operated, flameless LED tea lights instead of real candles.
- Place the LED tea light into the sand inside the bag.
- Arrange the luminarias along your driveway, a walkway, or around the edge of your patio.
- They create a beautiful, soft, and festive glow for a party.
- This is a wonderful tradition, especially in the American Southwest.
- They are a simple but incredibly effective way to create a huge visual impact on a small budget.

15. Hanging Jam Jar Lanterns
This is a simple and charming way to create hanging lanterns with a rustic, homespun feel. All you need are some empty jam jars and a bit of wire.
DIY Tips
- Thoroughly clean your empty glass jam jars and remove the labels.
- Take a piece of sturdy but flexible wire, like 16-gauge craft wire.
- Wrap the wire securely around the threaded neck of the jam jar several times.
- Create a second loop of wire and shape it into a handle, attaching it to the wire wrapped around the neck.
- Make sure the handle is secure and balanced.
- Place a small tea light or a votive candle inside the jar.
- Use a long match or a grill lighter to carefully light the candle inside the jar.
- Hang the lanterns from tree branches, hooks on a fence, or from a shepherd’s hook.
- You can use different colored glass jars for a more festive look.
- Again, using battery-operated LED candles is the safest option, especially if the lanterns are hanging near flammable materials.

Creative & Crafty Projects
For those who love a good hands-on project, these ideas are a bit more involved but result in a truly unique, one-of-a-kind piece of outdoor lighting.
16. DIY Rope-Wrapped Orb Lights
Create beautiful, textural, and bohemian-style glowing orbs by wrapping balloons with rope or twine.
DIY Tips
- Blow up a round balloon to your desired orb size.
- In a bowl, mix white school glue with a little bit of water to create a thin paste.
- Take a long piece of jute twine or natural rope and soak it completely in the glue mixture.
- Begin wrapping the glue-soaked twine randomly around the balloon, creating a web-like pattern.
- Continue wrapping until you are happy with the coverage. Leave some open spaces.
- Hang the balloon up to dry completely. This may take up to 24 hours. The twine should be hard and stiff.
- Once it is completely dry, pop the balloon inside and carefully remove it through one of the openings.
- You are now left with a beautiful, hollow twine orb.
- Place a string of battery-operated fairy lights inside the orb.
- You can place these orbs on a table or hang them from the ceiling of a covered porch.

17. Glow-in-the-Dark Painted Stones
A magical, surprising, and completely safe way to light a path. This is a fantastic project to do with kids.
DIY Tips
- Start by collecting a number of smooth, flat stones or river rocks.
- During the day, paint the rocks with several coats of a high-quality, outdoor-rated glow-in-the-dark paint.
- The more coats of paint you apply, the brighter the rocks will glow.
- Let the rocks “charge” in the bright, direct sunlight for several hours.
- Once it gets dark, arrange the glowing rocks along a garden path, in a planter, or to create a magical fairy circle.
- The glow will be subtle and ethereal, not bright like a traditional light.
- You can paint fun shapes or patterns on the rocks for a more decorative look.
- This is a wonderful way to add a touch of hidden magic to your garden.
- The glow will fade after a few hours, but the rocks will recharge in the sun the next day.
- This is a completely free lighting solution if you already have the paint.

18. Hula Hoop Chandelier
Create a large, dramatic, and surprisingly elegant chandelier using a simple hula hoop and some icicle-style string lights.
DIY Tips
- Start with a basic hula hoop. You can leave it as is or spray paint it a metallic color like gold or black.
- Take several strands of icicle-style Christmas lights (the kind with dangling strands) or curtain lights.
- Wrap the main wire of the light strand around the hula hoop.
- Let the dangling strands of lights hang down from the hoop, creating a waterfall or chandelier effect.
- Use zip ties to secure the lights to the hula hoop.
- Use three or four lengths of chain or rope, attached to the hula hoop at equal intervals, to create a hanger.
- Gather the chains at the top and use them to hang your new chandelier from a tree branch or a pergola.
- This creates a huge, high-impact piece of lighting for a very low cost.
- Make sure to use lights that are rated for outdoor use.
- This is a stunning decoration for a summer party or an outdoor wedding.

19. Paper Lantern String Lights
You can give a plain string of outdoor lights a festive and colorful makeover by adding simple paper lanterns.
DIY Tips
- Start with a string of outdoor-rated globe or “cafe” style string lights.
- Purchase a pack of small, colorful paper lanterns from a party supply or craft store.
- Most paper lanterns come with a wire frame that expands them into a sphere.
- Simply assemble the paper lanterns around each bulb on your string light.
- The lantern will diffuse the light beautifully and add a huge pop of color.
- You can use all white lanterns for a classic, elegant look, or a mix of bright colors for a festive, party atmosphere.
- This is a very quick and easy way to customize your string lights.
- These are best used in a covered area, like a porch or a gazebo, as the paper lanterns are not weatherproof.
- You can easily remove the paper lanterns and store them flat at the end of the season.
- This is a much more affordable option than buying pre-made lantern string lights.

20. Summer Ice Lanterns
For a special summer party, you can create beautiful, temporary lanterns made of ice. They are stunning, magical, and will melt away by the end of the night.
DIY Tips
- You will need two containers that nest inside each other, one larger and one smaller. A large plastic bucket and a smaller plastic cup work well.
- Place the smaller container inside the larger one. You can use rocks to weigh the smaller container down.
- Fill the space between the two containers with water.
- You can add decorative elements to the water, like citrus slices, flower petals, or fresh herbs.
- Place the entire setup in your freezer until the water is frozen solid.
- To unmold your ice lantern, run a little warm water on the outside of the larger container and the inside of the smaller one. They should slide right out.
- Place the hollow ice lantern outside and put a battery-operated LED candle inside.
- The candlelight will glow beautifully through the ice and the decorative elements frozen within.
- These are perfect for lining a walkway for a nighttime party.
- They are a truly magical, but ephemeral, piece of decor.

Garden-Integrated Lighting
These ideas are all about thoughtfully incorporating lighting into your existing landscape and garden features for a subtle, natural, and professionally designed look.
21. Uplighting a Tree
Use a simple solar-powered spotlight to highlight the beauty of a feature tree in your yard. This creates a dramatic and beautiful effect.
DIY Tips
- Choose a tree with an interesting shape, beautiful bark, or a full canopy.
- Place a solar-powered spotlight on the ground a few feet away from the base of the tree.
- Angle the light so it shines up into the branches and leaves.
- This technique creates beautiful shadows and highlights the texture of the tree’s trunk and foliage.
- It adds a huge amount of depth and drama to your nighttime landscape.
- You can use one spotlight for a smaller tree, or two or three for a very large, majestic tree.
- Make sure the solar panel for the spotlight is placed in a sunny spot.
- This is a very simple way to make your yard look professionally landscaped at night.
- Experiment with the angle and distance of the light to create the most beautiful effect.
- You can also use this technique to highlight a beautiful shrub or a garden wall.

22. Lights Woven into a Trellis
If you have a trellis with climbing plants like ivy or roses, weaving a string of lights through it can create a magical, glowing green wall at night.
DIY Tips
- Use a string of outdoor-rated, green-wired fairy lights so the wire will blend in with the foliage.
- A solar-powered string light is the easiest option here, as you will not have to worry about running a cord.
- Start at the base of the trellis and gently weave the light string up and through the plant’s vines and leaves.
- Do not pull the string tight; let it be loose and organic.
- The tiny points of light will look like captured fireflies scattered throughout the plant.
- This is a beautiful way to highlight a vertical element in your garden.
- It turns a simple trellis into a stunning feature both day and night.
- This technique also works beautifully for plants climbing up a fence or an arbor.
- Be gentle as you are weaving the lights so you do not damage the plant.
- This is a subtle, romantic, and incredibly beautiful lighting effect.

23. Lighting Under a Bench
Placing a light source underneath a garden bench creates a beautiful, soft, and indirect glow. It makes the bench look like it is floating.
DIY Tips
- The easiest way to do this is with a solar-powered, flexible LED light strip.
- Choose a waterproof light strip with an adhesive backing.
- Simply stick the light strip to the underside of the bench seat, near the front edge.
- Position the small solar panel so it can get plenty of sun during the day, perhaps on the back of the bench or staked in the ground nearby.
- This provides a soft, ambient light that is perfect for a quiet seating area.
- It is a great way to add safety lighting without a harsh glare.
- This technique works well for outdoor benches, patio sofas, or even built-in deck seating.
- It creates a very high-end, custom look for a very low cost.
- The downward-facing light highlights the texture of the ground or patio beneath the bench.
- This is a subtle but incredibly effective professional landscape lighting trick.

24. Illuminating a Water Feature
If you have a small fountain or a birdbath, adding a light source can turn it into a mesmerizing focal point at night.
DIY Tips
- The best and safest option for this is a small, submersible, solar-powered or battery-operated LED light.
- These small, waterproof puck lights can be placed directly in the water at the bottom of the fountain or birdbath.
- The light shining up through the moving water creates a beautiful, shimmering, and dynamic effect.
- It highlights the sound and movement of the water, creating a very tranquil and spa-like atmosphere.
- You can find these submersible lights in a classic white or in a color-changing option for a more festive look.
- This is a very simple way to add a touch of magic and elegance to your garden.
- Make sure any light you place in water is specifically rated as “submersible” and “waterproof.”
- This is a fantastic way to enjoy your water feature even after the sun goes down.
- The reflection of the light on the water’s surface is beautiful.
- This simple trick makes your garden feel much more luxurious and custom-designed.

25. Lighting Inside Planters
You can create a dramatic uplighting effect for your potted plants by placing a light source directly inside the planter.
DIY Tips
- Use a small, solar-powered spotlight or an upward-facing puck light for this.
- Place the light at the base of the plant, nestled in the soil.
- Angle the light so it shines up through the leaves and branches of the plant.
- This technique is especially effective for plants with interesting, sculptural shapes, like spiky dracaenas or tall grasses.
- It highlights the plant’s structure and creates beautiful shadows on the walls behind it.
- This is another great way to add depth and a professional feel to your patio or porch decor.
- It turns your simple potted plants into living sculptures at night.
- Make sure the light and its solar panel are waterproof.
- You can hide the light at the base of the plant with a little bit of mulch or some decorative stones.
- This is a perfect way to highlight the beautiful container plants that frame your entryway or patio.

Conclusion
Creating a magical outdoor lighting scheme does not require a huge budget or a professional electrician. It just takes a little creativity and a willingness to see the potential in everyday objects.
From the simple elegance of string lights and solar lanterns to the rustic charm of upcycled tin cans and wine bottles, there are countless ways to illuminate your space.
These DIY projects allow you to add a unique, personal touch to your backyard, patio, or garden. They help you craft a warm and inviting atmosphere that is perfect for making memories.
So this summer, embrace the magic of the evening. Try one of these simple projects, and transform your outdoor space into an enchanting retreat that you can enjoy long after the sun goes down.