When a sweet craving hits, especially on a hot summer day or a busy weeknight, the last thing you want to do is turn on the oven.
No-bake desserts are the perfect solution. They are quick, easy, and incredibly delicious, delivering all the sweet satisfaction without any of the heat or fuss.
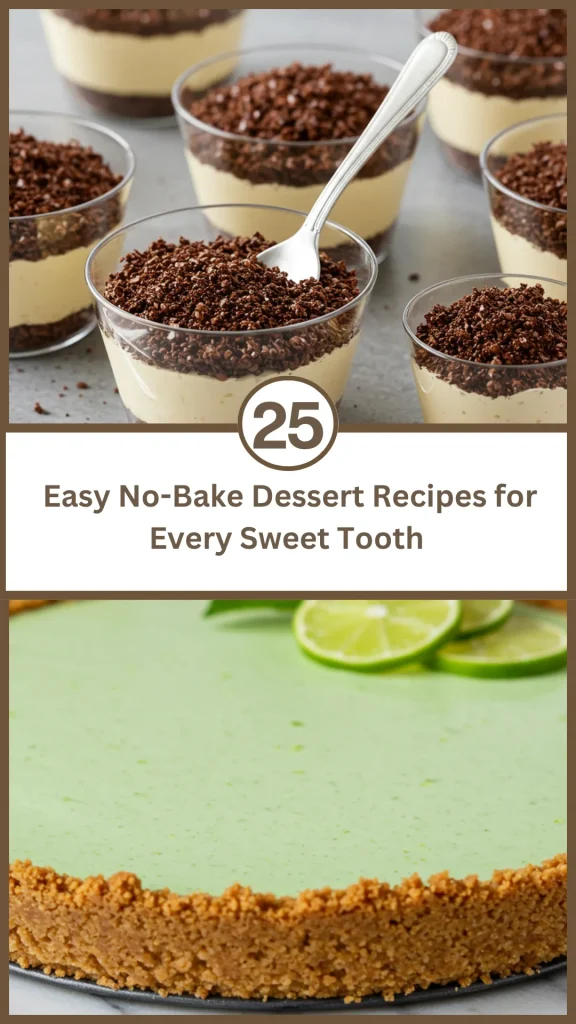
This guide is your ultimate resource for effortless and impressive sweet treats. It is packed with 25 incredible no-bake dessert recipes that are perfect for any occasion and any skill level. Get ready to satisfy your sweet tooth in the easiest way possible.
Classic Creamy Cheesecakes
These recipes give you the rich, tangy, and creamy flavor of cheesecake without any of the complicated steps or the long baking and cooling time of a traditional version.
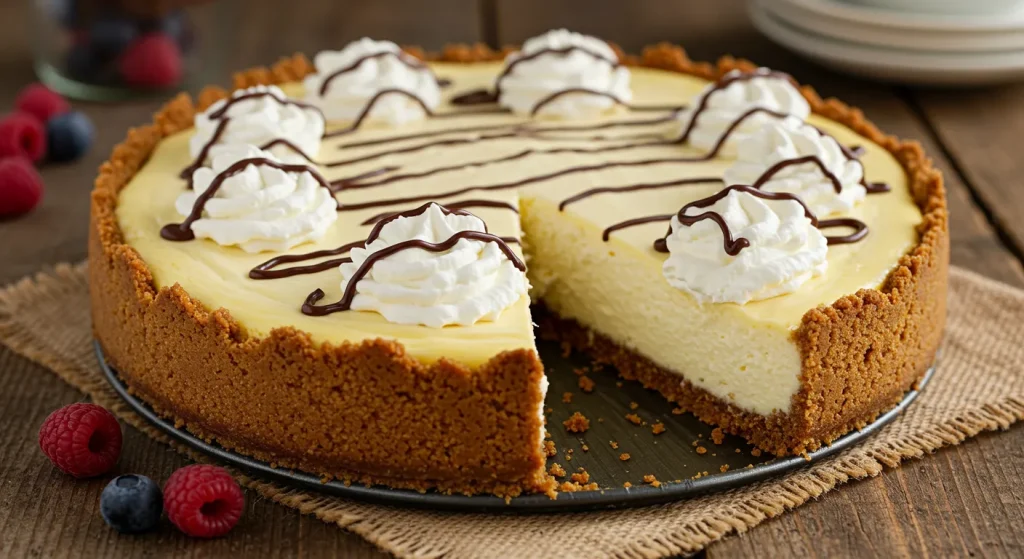
1. Classic No-Bake Cheesecake
The perfect, simple, and foolproof recipe for a classic cheesecake. It is creamy, tangy, and sets up beautifully in the fridge.
Recipe Method
- Start by making the crust. Crush one sleeve of graham crackers and mix the crumbs with a half cup of melted butter.
- Press the crumb mixture firmly into the bottom of a 9-inch springform pan. Chill the crust in the freezer for 10 minutes.
- In a large bowl, use an electric mixer to beat one 8-ounce block of softened cream cheese until it is completely smooth.
- Beat in one 14-ounce can of sweetened condensed milk until combined.
- Stir in a quarter cup of fresh lemon juice and one teaspoon of vanilla extract. The lemon juice will help the cheesecake set.
- Pour the creamy filling over the chilled graham cracker crust and spread it into an even layer.
- Cover the cheesecake and chill it in the refrigerator for at least 6 hours, or overnight, until it is firm.
- Release the side of the springform pan.
- Top the cheesecake with fresh berries or a spoonful of your favorite fruit pie filling before serving.
- This is a classic dessert that is perfect for any occasion.
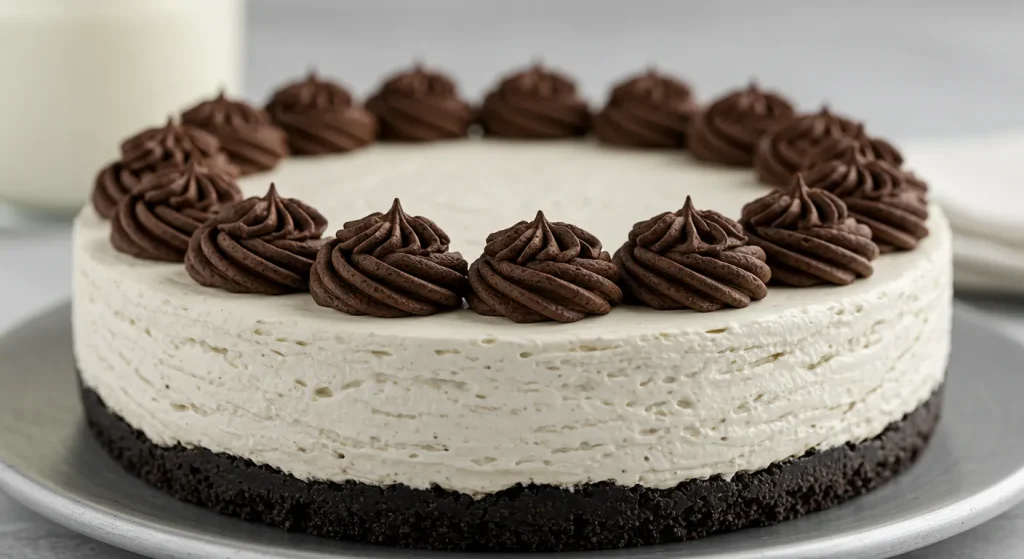
2. No-Bake Oreo Cheesecake
A dream come true for any cookies-and-cream lover. This dessert is rich, chocolatey, and incredibly easy to make.
Recipe Method
- For the crust, crush about 20 Oreo cookies until they are fine crumbs. Mix them with a quarter cup of melted butter.
- Press the Oreo crumb mixture into the bottom of a pie plate or a springform pan. Chill it.
- To make the filling, beat one 8-ounce block of softened cream cheese with a half cup of powdered sugar until smooth.
- Gently fold in one 8-ounce container of thawed whipped topping (like Cool Whip).
- Roughly chop another 10 to 12 Oreo cookies and gently fold them into the cheesecake filling.
- Spoon the Oreo-filled cream cheese mixture over the chilled crust.
- Smooth the top with a spatula.
- Chill the cheesecake in the refrigerator for at least 4 hours, until it is firm.
- Garnish with some extra whipped cream and a sprinkle of Oreo crumbs before serving.
- This is a guaranteed hit with both kids and adults.
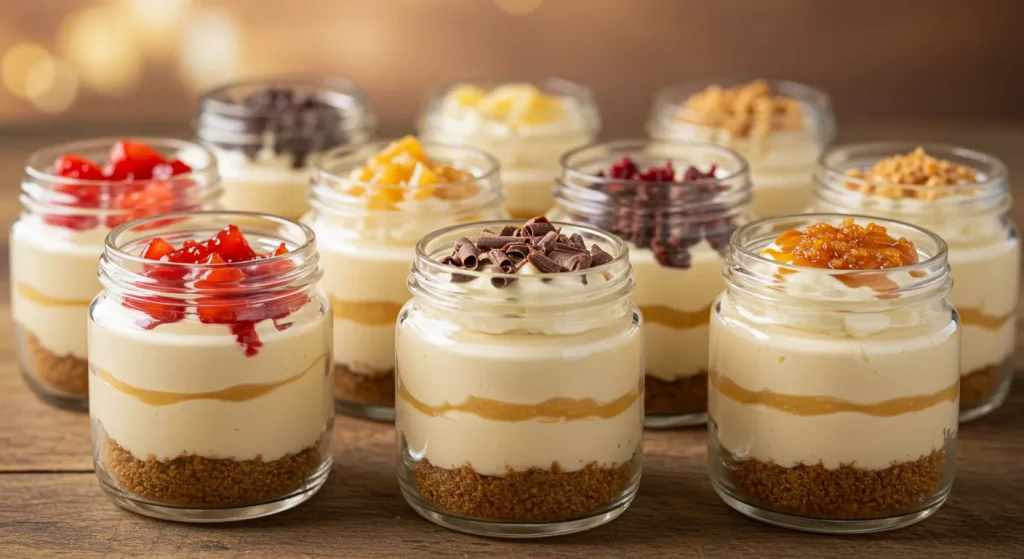
3. Individual No-Bake Cheesecake Jars
Serving your no-bake cheesecake in individual jars is a perfect, portion-controlled option for parties and gatherings. It looks beautiful and is easy to serve.
Recipe Method
- Prepare your graham cracker crust by mixing crushed graham crackers with melted butter.
- Press a layer of the crust mixture into the bottom of several small glass jars or bowls.
- Prepare your no-bake cheesecake filling (like the classic version in recipe #1).
- Carefully spoon or pipe the cheesecake filling on top of the crust layer in each jar.
- Place the jars in the refrigerator and chill for at least 2 hours, until the filling is set.
- Because they are smaller, they will set up much faster than a full-sized cheesecake.
- Before serving, top each individual cheesecake with a small dollop of fruit compote, some fresh berries, or a swirl of whipped cream.
- This is an elegant and easy way to serve dessert to a crowd.
- You can assemble these a day ahead of time.
- The layered look in the glass jars is very visually appealing.
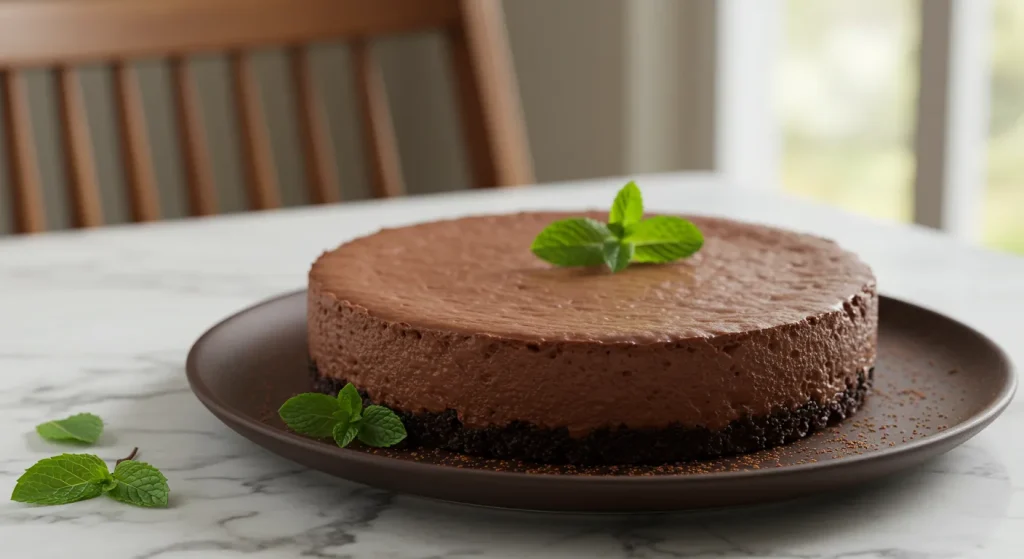
4. No-Bake Chocolate Cheesecake
A rich, decadent, and incredibly chocolatey cheesecake that requires absolutely no baking. It is a chocolate lover’s dream.
Recipe Method
- Start with a simple Oreo or chocolate graham cracker crust, pressed into a pie plate.
- In a microwave-safe bowl, melt one cup of semi-sweet chocolate chips until they are smooth. Let the chocolate cool slightly.
- In a separate large bowl, beat one 8-ounce block of softened cream cheese with a half cup of powdered sugar.
- Beat the slightly cooled, melted chocolate into the cream cheese mixture until it is fully combined and smooth.
- Gently fold in one 8-ounce container of thawed whipped topping.
- Spoon this rich, chocolatey filling over your chilled crust.
- Spread it into an even, smooth layer.
- Chill the chocolate cheesecake in the refrigerator for at least 6 hours, or until it is very firm.
- Garnish with chocolate shavings, a drizzle of chocolate sauce, or some fresh raspberries.
- This is a very rich and indulgent dessert.
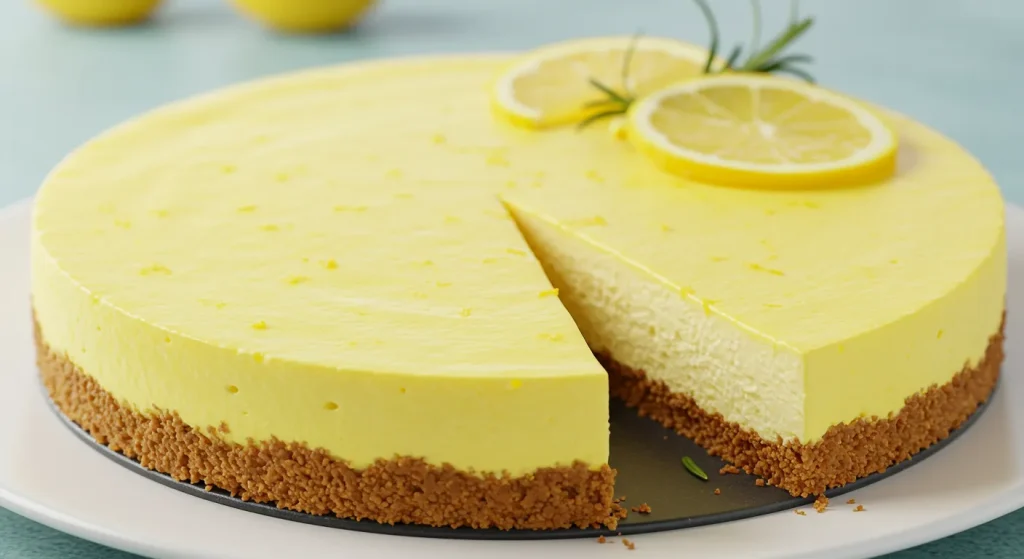
5. No-Bake Lemon Cheesecake
A bright, zesty, and incredibly refreshing cheesecake that is perfect for a summer day. The bright lemon flavor is a perfect balance to the rich, creamy cheese.
Recipe Method
- Prepare a simple graham cracker or a “golden Oreo” crust and press it into a pan.
- To make the filling, beat one 8-ounce block of softened cream cheese until it is smooth.
- Beat in one can of sweetened condensed milk.
- Now for the lemon flavor: beat in a half cup of fresh lemon juice and the zest of one lemon.
- The acid from the lemon juice will naturally thicken the filling.
- Pour the bright, lemony filling over your prepared crust.
- Chill the cheesecake in the refrigerator for at least 4 to 6 hours, until it is firm.
- This cheesecake is wonderfully tangy and not overly sweet.
- Serve it with a dollop of whipped cream and a thin slice of lemon for garnish.
- It is a perfect, light-feeling dessert for after a heavy meal.
Easy Chocolate & Peanut Butter Treats
The combination of chocolate and peanut butter is a match made in heaven. These no-bake recipes are simple, classic, and always a crowd-pleaser.
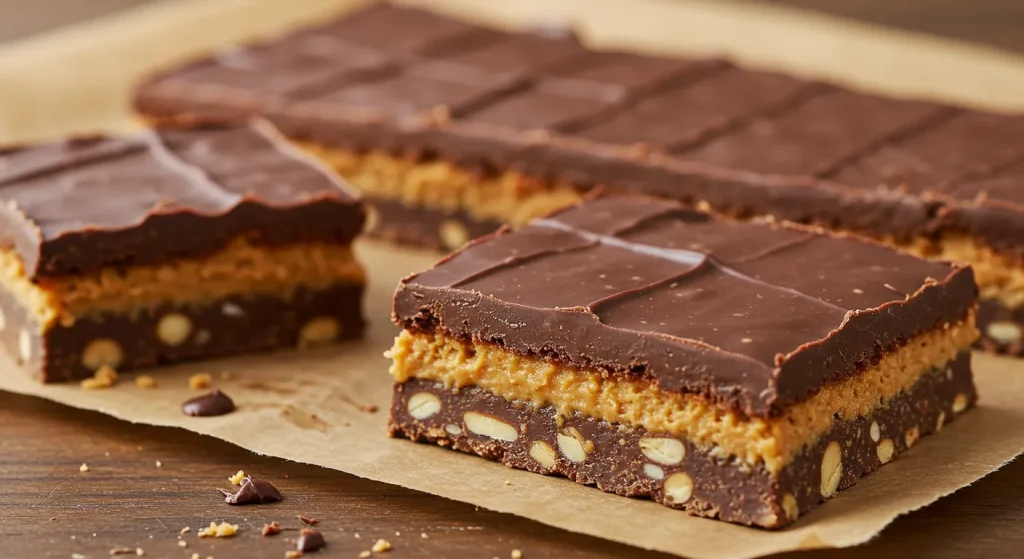
6. Classic Chocolate Peanut Butter Bars
These are like a homemade version of a Reese’s cup, but in a simple bar form. They are incredibly easy and dangerously delicious.
Recipe Method
- To make the peanut butter base, combine one cup of creamy peanut butter, a half cup of melted butter, and two cups of powdered sugar in a bowl.
- Stir everything together until it is well combined. The mixture will be thick.
- Press this peanut butter mixture evenly into the bottom of an 8×8-inch pan lined with parchment paper.
- To make the chocolate topping, melt one cup of semi-sweet chocolate chips with one tablespoon of peanut butter in the microwave.
- Stir the chocolate until it is completely smooth.
- Pour the melted chocolate over the peanut butter layer in the pan.
- Spread the chocolate into a smooth, even layer.
- Place the pan in the refrigerator for at least one hour, until the chocolate is firm.
- Lift the bars out of the pan using the parchment paper overhang.
- Slice into small squares and serve.
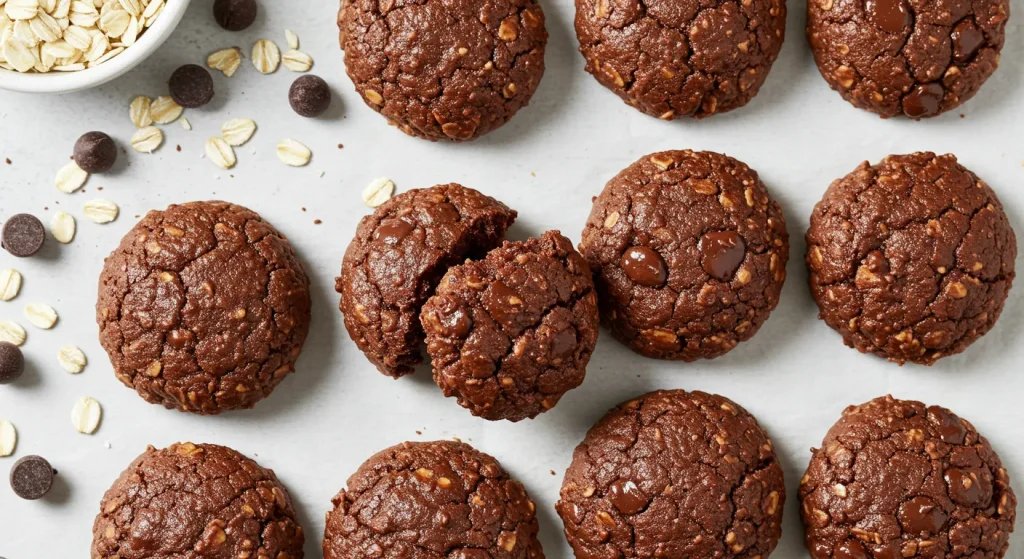
7. No-Bake Chocolate Oatmeal Cookies
A classic, old-fashioned no-bake cookie that is made on the stovetop in just a few minutes. They are chewy, chocolatey, and so easy.
Recipe Method
- In a medium saucepan, combine two cups of sugar, a half cup of milk, and one stick of butter.
- Bring this mixture to a rolling boil over medium heat and let it boil for exactly one minute.
- Remove the saucepan from the heat immediately after one minute.
- Stir in a half cup of unsweetened cocoa powder and a half cup of creamy peanut butter.
- Stir in one teaspoon of vanilla extract.
- Finally, stir in three cups of quick-cooking oats until everything is well combined.
- Working quickly, drop spoonfuls of the mixture onto sheets of wax paper or parchment paper.
- Let the cookies sit at room temperature for about 30 minutes to cool and set up.
- They will firm up as they cool.
- Store them in an airtight container.
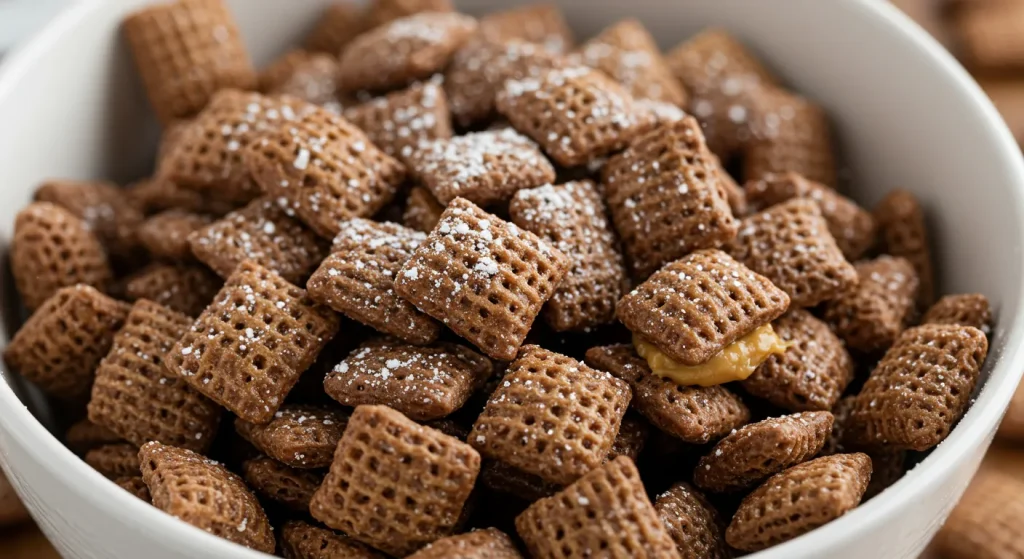
8. Chocolate Peanut Butter “Puppy Chow”
A highly addictive and crunchy snack mix made from Chex cereal, chocolate, peanut butter, and powdered sugar. It is perfect for parties.
Recipe Method
- In a large, microwave-safe bowl, combine one cup of semi-sweet chocolate chips, a half cup of creamy peanut butter, and a quarter cup of butter.
- Microwave the mixture in 30-second intervals, stirring in between, until it is completely melted and smooth.
- Add nine cups of Rice or Corn Chex cereal to the melted chocolate mixture.
- Stir very gently until the cereal is evenly coated.
- Pour one and a half cups of powdered sugar into a large, 2-gallon resealable plastic bag.
- Add the chocolate-coated cereal to the bag with the powdered sugar.
- Seal the bag tightly and shake, shake, shake!
- Continue shaking until all the cereal pieces are completely coated in the powdered sugar.
- Spread the puppy chow out on a baking sheet to cool and dry completely.
- Store in an airtight container.
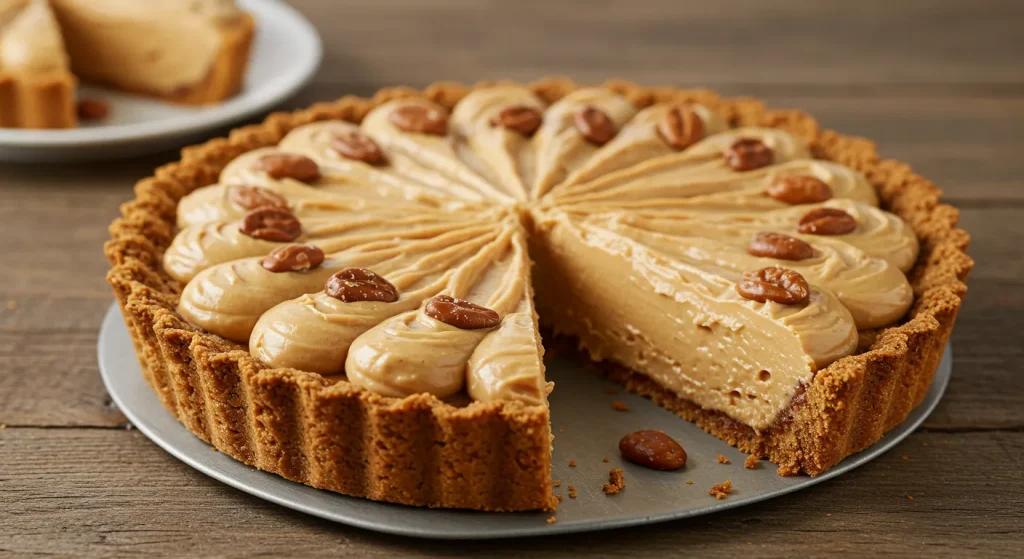
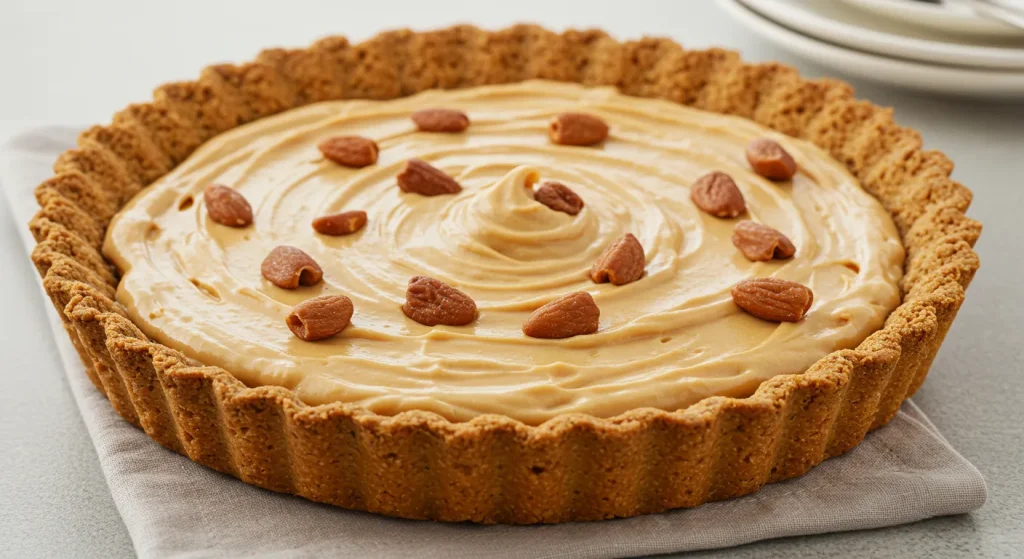
9. Peanut Butter Pie
A rich, creamy, and decadent no-bake pie that is a dream for any peanut butter lover. It uses a pre-made crust to keep it incredibly simple.
Recipe Method
- Start with a pre-made 9-inch Oreo or graham cracker pie crust.
- In a large bowl, beat one 8-ounce block of softened cream cheese with one cup of creamy peanut butter until smooth.
- Beat in one cup of powdered sugar until it is well combined.
- In a separate bowl, whip one cup of heavy cream until stiff peaks form.
- Gently fold the whipped cream into the peanut butter mixture until it is light and fluffy.
- You can also use an 8-ounce container of thawed whipped topping (Cool Whip) instead of making your own whipped cream.
- Spoon the creamy peanut butter filling into the prepared pie crust.
- Smooth the top with a spatula.
- Chill the pie in the refrigerator for at least 4 hours, or until it is firm.
- Before serving, you can garnish it with a drizzle of chocolate sauce and some chopped peanut butter cups.
10. “Buckeye” Peanut Butter Balls
These are simple, bite-sized candies that taste just like the famous Ohio buckeye. They are a perfect, easy treat for the holidays or any time of year.
Recipe Method
- In a large bowl, combine one and a half cups of creamy peanut butter with one stick of softened butter.
- Use an electric mixer to beat them together until they are smooth.
- Gradually beat in about three to four cups of powdered sugar until a stiff, but pliable, dough forms.
- Roll the peanut butter mixture into small, 1-inch balls and place them on a parchment-lined baking sheet.
- For the classic buckeye look, insert a toothpick into the top of each ball.
- Chill the peanut butter balls in the freezer for about 30 minutes.
- While they are chilling, melt one bag of semi-sweet chocolate chips in the microwave.
- Holding the peanut butter ball by the toothpick, dip about three-quarters of it into the melted chocolate, leaving a small circle of peanut butter visible at the top.
- Place the dipped balls back on the parchment paper and remove the toothpicks.
- Chill in the refrigerator until the chocolate is firm.

Fruity & Fresh Delights
These no-bake desserts are all about celebrating the fresh, vibrant, and juicy fruits of the season. They are light, refreshing, and often naturally sweet.
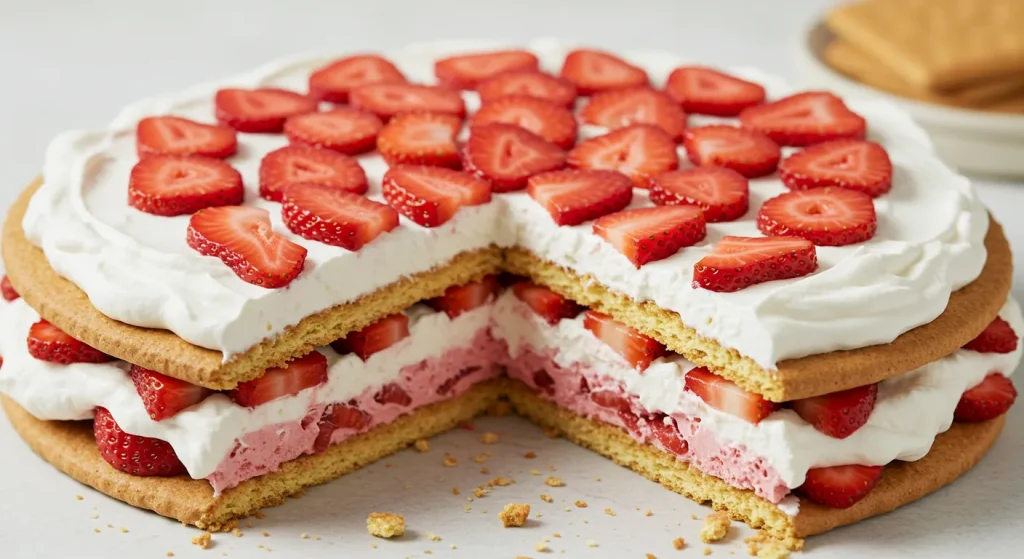
11. Classic Strawberry Icebox Cake
An old-fashioned, classic dessert that is incredibly simple but always impressive. It is made by layering graham crackers, a creamy filling, and fresh strawberries.
Recipe Method
- In a bowl, beat one 8-ounce block of softened cream cheese with a quarter cup of powdered sugar and one teaspoon of vanilla.
- Gently fold in one 8-ounce container of thawed whipped topping.
- Thinly slice one pound of fresh strawberries.
- In the bottom of an 8×8-inch pan, arrange a single layer of whole graham crackers.
- Spread about one-third of the cream cheese mixture over the graham crackers.
- Arrange a layer of the sliced strawberries on top of the cream.
- Repeat the layers two more times: graham crackers, cream, strawberries.
- Finish with a final layer of the cream mixture on top.
- Cover the pan and chill the icebox cake in the refrigerator for at least 4 hours, or overnight.
- During this time, the graham crackers will soften and become cake-like.
- Garnish with a few fresh strawberries before slicing and serving.
12. Easy Berry Trifle
A trifle is a beautiful, layered dessert that looks incredibly impressive but is very easy to assemble. It is perfect for showcasing summer berries.
Recipe Method
- You will need three main components: a cakey layer, a creamy layer, and a fruit layer.
- For the cake layer, use store-bought angel food cake or pound cake, cut into 1-inch cubes.
- For the creamy layer, use one large box of instant vanilla pudding, prepared according to the package directions.
- For the fruit layer, use a mix of fresh summer berries like sliced strawberries, blueberries, raspberries, and blackberries.
- In a large, clear glass trifle bowl, start with a layer of the cake cubes.
- Top the cake with a layer of the prepared vanilla pudding.
- Add a generous layer of the mixed fresh berries.
- Repeat the layers until you reach the top of the bowl.
- Finish the trifle with a generous layer of whipped cream (from a can is fine!).
- Garnish the top with a beautiful arrangement of fresh berries. Chill for at least one hour before serving.

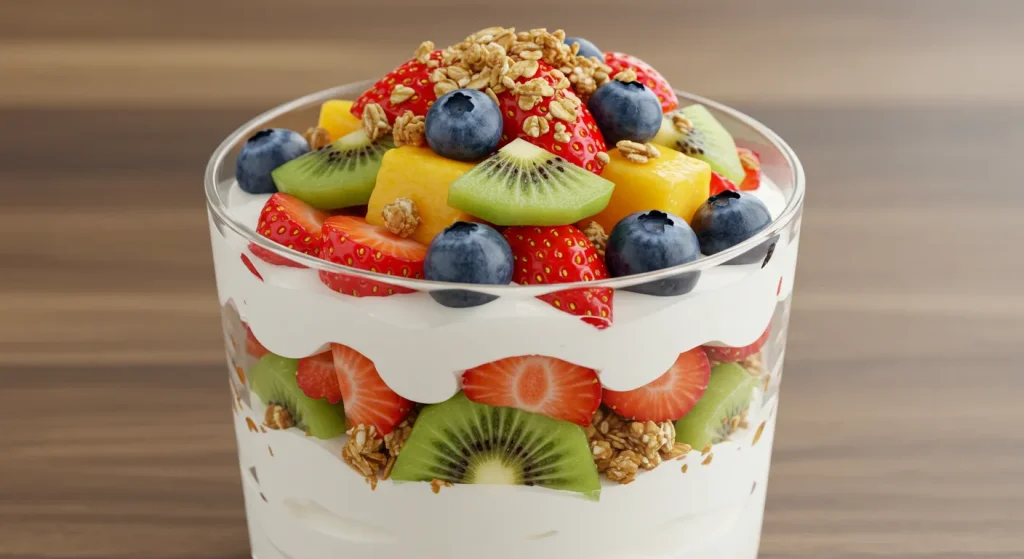
13. Fresh Fruit and Yogurt Parfaits
A very simple, healthy, and beautiful no-bake dessert or breakfast. It is all about layering fresh fruit, creamy yogurt, and crunchy granola.
Recipe Method
- Choose clear glasses or jars to show off the beautiful layers.
- Start with a layer of your favorite granola at the bottom of the glass.
- Add a layer of plain or vanilla Greek yogurt.
- Add a layer of fresh, chopped fruit. A mix of berries works beautifully.
- Repeat the layers one more time: granola, yogurt, fruit.
- The layers should be neat and distinct.
- Finish the parfait with a final dollop of yogurt.
- Garnish with a few pieces of fruit and a sprig of fresh mint.
- These are best assembled right before serving to keep the granola crunchy.
- This is a healthy, protein-packed dessert that is full of color and texture.
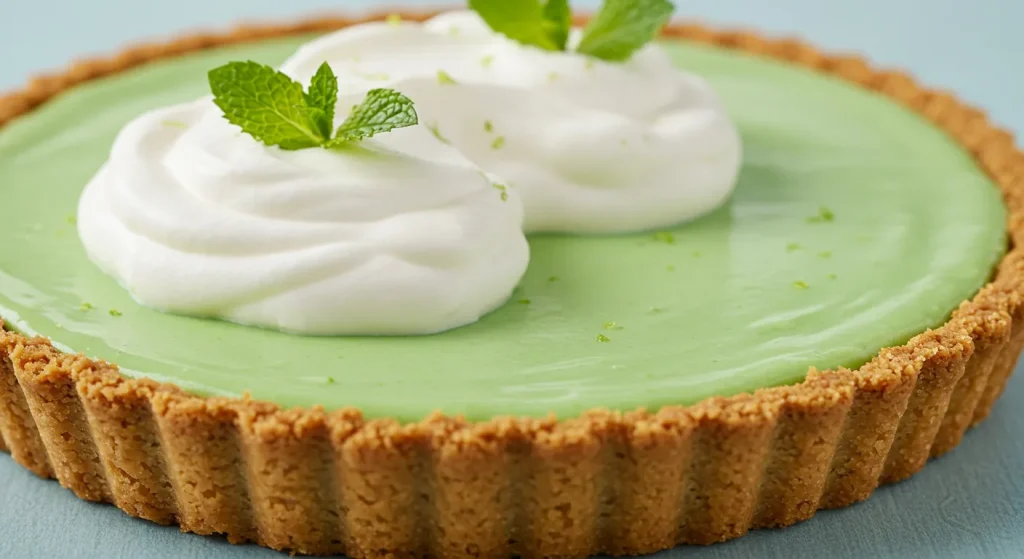
14. No-Bake Key Lime Pie
Get all the tangy, tropical flavor of a Key lime pie without ever turning on your oven. This recipe is incredibly fast and easy.
Recipe Method
- Start with a store-bought, 9-inch graham cracker pie crust.
- To make the easy, no-bake filling, whisk together one 14-ounce can of sweetened condensed milk with a half cup of Key lime juice.
- You can use fresh or bottled Key lime juice.
- The mixture will start to thicken as you whisk, thanks to the reaction between the milk and the acidic lime juice.
- You can also fold in a half cup of whipped topping to make the filling lighter and fluffier.
- Pour the tangy lime filling into the prepared pie crust.
- Chill the pie in the refrigerator for at least 2 to 3 hours, until it is firm and completely set.
- Serve the chilled pie with generous dollops of whipped cream.
- Garnish with a sprinkle of lime zest and some thin lime slices.
- This is the ultimate refreshing and easy summer pie.
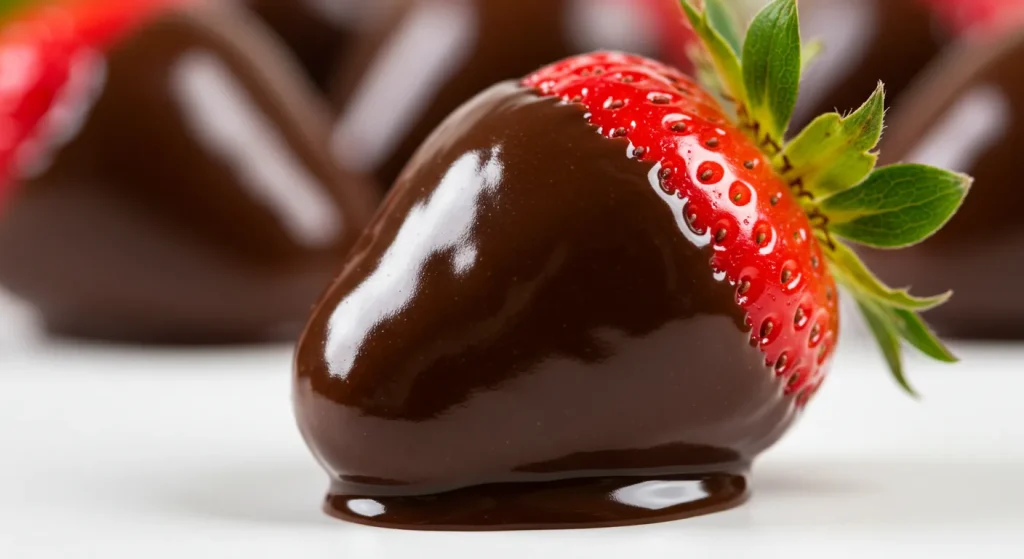
15. Chocolate-Covered Strawberries
A classic, elegant, and surprisingly simple dessert. Plump, juicy strawberries dipped in rich, melted chocolate is a timeless combination.
Recipe Method
- Start with one pound of fresh, ripe strawberries. Wash and dry them very, very thoroughly. Any moisture will cause the chocolate to seize.
- Line a baking sheet with parchment or wax paper.
- Melt one bag of good quality semi-sweet or dark chocolate chips in a microwave-safe bowl.
- Microwave in 30-second intervals, stirring in between, until the chocolate is almost completely melted.
- Stir the chocolate until it is smooth and glossy.
- Hold each strawberry by its green stem.
- Dip the strawberry into the melted chocolate, leaving a little bit of red showing at the top.
- Let any excess chocolate drip off.
- Place the chocolate-dipped strawberry on the prepared baking sheet.
- You can also drizzle the strawberries with melted white chocolate for a decorative touch.
- Chill the strawberries in the refrigerator for about 15 to 30 minutes, until the chocolate is firm.
Kid-Friendly Fun & Party Favorites
These no-bake recipes are perfect for getting the kids involved in the kitchen. They are fun, easy, and always a hit at parties.
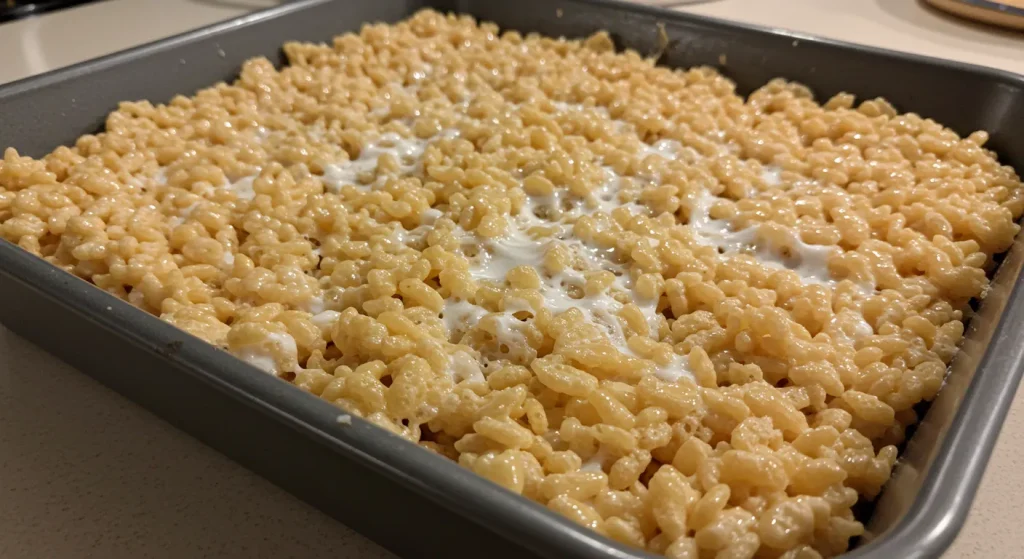
16. Rice Krispie Treats
A nostalgic, childhood favorite that is gooey, chewy, and requires just three ingredients. They are the ultimate no-bake bar.
Recipe Method
- In a large saucepan, melt one 10-ounce bag of marshmallows with a quarter cup of butter over low heat.
- Stir constantly until the mixture is completely melted and smooth.
- Remove the pan from the heat.
- Stir in one teaspoon of vanilla extract.
- Add six cups of Rice Krispies cereal to the marshmallow mixture.
- Stir gently until the cereal is evenly coated.
- Press the mixture evenly into a buttered 9×13-inch pan. Use a buttered spatula or a piece of wax paper to press it down firmly.
- Let the treats cool completely at room temperature for about one hour.
- Cut them into squares and serve.
- You can add sprinkles or a drizzle of melted chocolate for a more festive look.
17. “Dirt” Pudding Cups
A classic, fun dessert for kids. It is a layered pudding dessert that looks like dirt and worms, but tastes delicious.
Recipe Method
- First, crush one package of Oreo cookies in a food processor or a plastic bag until they resemble fine dirt.
- Prepare one large box of instant chocolate pudding according to the package directions.
- In individual clear plastic cups or a large trifle bowl, begin layering.
- Start with a layer of the chocolate pudding.
- Add a layer of the crushed Oreo “dirt.”
- Repeat the layers until the cup is full, ending with a final layer of Oreo dirt on top.
- Chill the pudding cups for at least 30 minutes.
- Just before serving, stick a few gummy worms into the top of each cup so they look like they are crawling out of the dirt.
- You can also add a small, faux flower for a “garden” look.
- Kids absolutely love this fun and silly dessert.

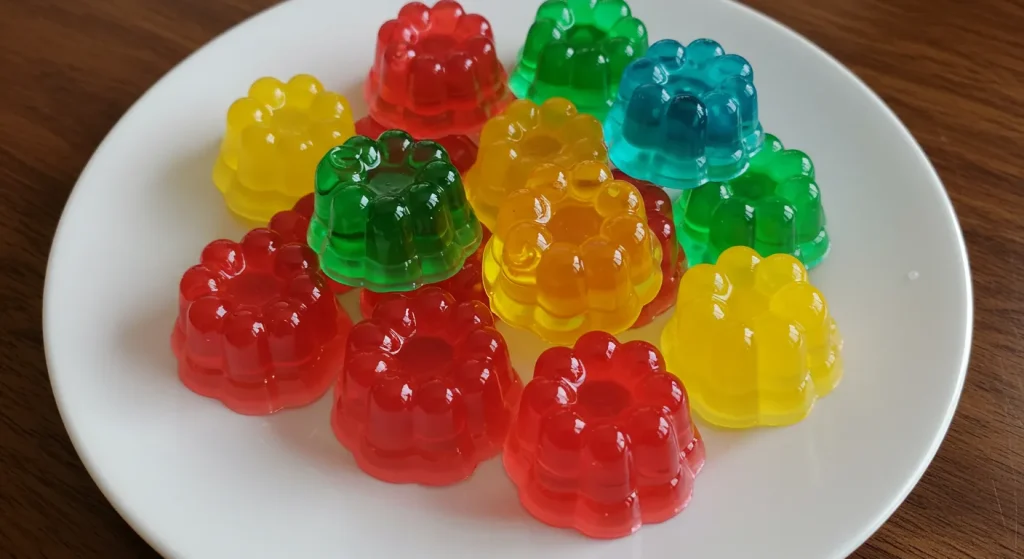
18. Jell-O Jigglers
A fun, jiggly, and classic kid-friendly treat. Using less water than the box calls for makes the Jell-O firm enough to cut into shapes.
Recipe Method
- In a bowl, combine one large, 6-ounce box of your favorite flavor of Jell-O gelatin mix with one and a quarter cups of boiling water.
- Stir for about two minutes, until the gelatin powder is completely dissolved.
- Do not add any cold water.
- Pour the mixture into a shallow 8×8-inch or 9×13-inch pan.
- Place the pan in the refrigerator and chill for at least 3 hours, or until the Jell-O is very firm.
- Once it is firm, you can use cookie cutters to cut the Jell-O into fun shapes.
- Gently lift the shapes out of the pan with a spatula.
- This is a fun and interactive treat that kids love to eat with their hands.
- You can create a rainbow effect by making several different colors of Jell-O.
- Store the jigglers in an airtight container in the refrigerator.
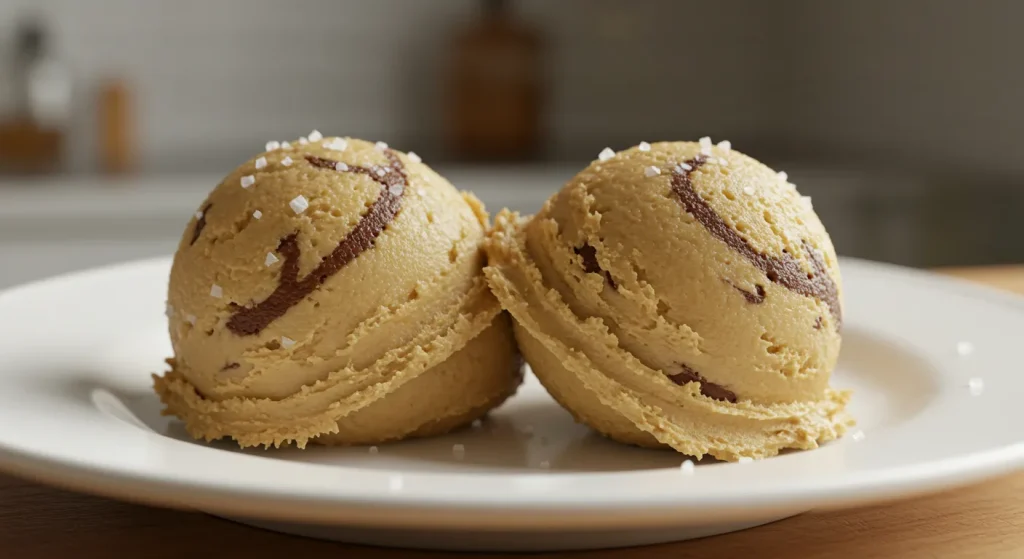
19. Edible Cookie Dough
Safe-to-eat, raw cookie dough is a dream come true. This recipe uses heat-treated flour and no eggs, so it is completely safe to eat uncooked.
Recipe Method
- To make the flour safe to eat, spread two cups of all-purpose flour on a baking sheet.
- Bake it in a 350°F (175°C) oven for just 5 minutes to kill any potential bacteria. Let it cool completely.
- In a large bowl, use an electric mixer to beat one cup of softened butter with a half cup of white sugar and one cup of packed brown sugar until fluffy.
- Beat in two teaspoons of vanilla extract and a half cup of milk.
- Gradually mix in the heat-treated flour and one teaspoon of salt until a dough forms.
- Stir in one to two cups of mini chocolate chips.
- This edible cookie dough can be eaten with a spoon right out of the bowl.
- You can also roll it into small balls and chill them.
- Store it in an airtight container in the refrigerator.
- It is a perfect treat for a sleepover or a movie night.
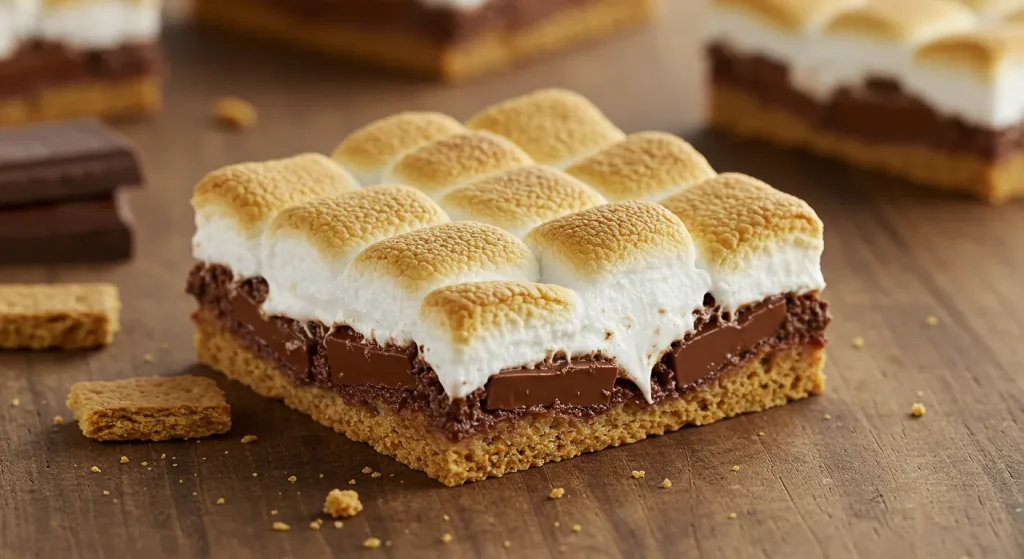
20. S’mores Bars
Get all the gooey, delicious flavor of a classic campfire s’more, but in an easy, no-bake bar form.
Recipe Method
- Line an 8×8-inch pan with parchment paper.
- Arrange a single layer of whole graham crackers in the bottom of the pan.
- In a large, microwave-safe bowl, melt one 10-ounce bag of marshmallows with a quarter cup of butter.
- Stir in one and a half cups of semi-sweet chocolate chips until they are mostly melted but still have some shape.
- Working quickly, pour the marshmallow and chocolate mixture over the graham cracker layer.
- Spread it out into an even layer.
- Top the marshmallow layer with another single layer of graham crackers, pressing them down gently.
- Chill the bars in the refrigerator for at least two hours, until they are firm.
- Use the parchment paper to lift the bars out of the pan.
- Cut into squares and serve.
Elegant & Impressive Desserts
These no-bake desserts look and taste incredibly sophisticated and impressive, but they are secretly very easy to make. They are perfect for a special occasion or a dinner party.
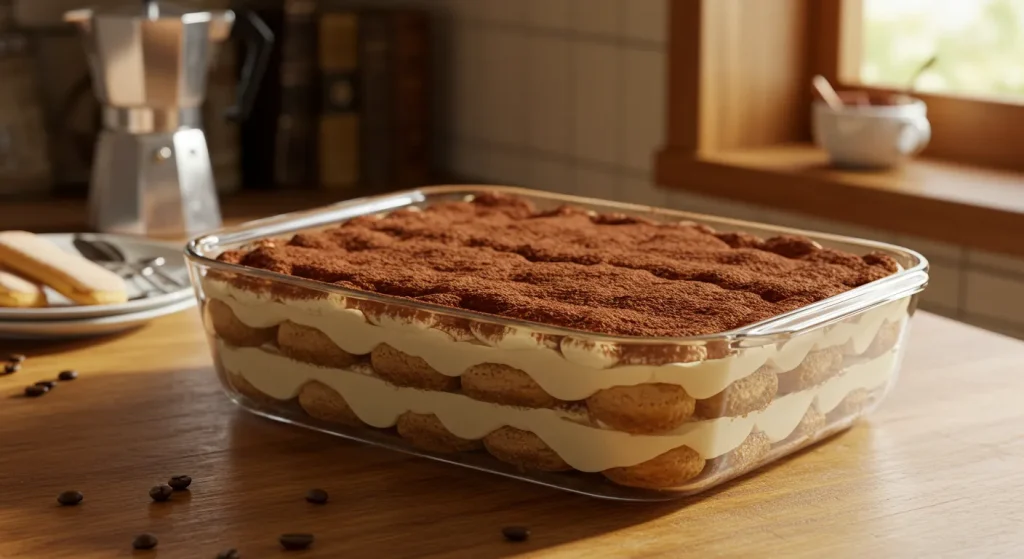
21. Classic Tiramisu
A classic Italian dessert made by layering coffee-soaked ladyfinger cookies with a rich and creamy mascarpone cheese mixture.
Recipe Method
- First, brew one cup of very strong coffee or espresso and let it cool completely.
- In a large bowl, whisk together six large egg yolks with three-quarters of a cup of sugar until the mixture is pale and thick.
- Gently fold in one 16-ounce container of mascarpone cheese until it is just combined.
- In a separate, clean bowl, whip the six egg whites until they form stiff peaks.
- Gently fold the stiff egg whites into the mascarpone mixture. This will make the filling light and airy.
- Quickly dip each ladyfinger cookie into the cooled coffee. Do not let them get too soggy.
- Arrange a single layer of the coffee-dipped ladyfingers in the bottom of a serving dish.
- Spread half of the creamy mascarpone mixture over the ladyfingers.
- Repeat with another layer of dipped ladyfingers and the remaining mascarpone mixture.
- Chill the tiramisu for at least 6 hours, or preferably overnight.
- Just before serving, dust the top generously with unsweetened cocoa powder.
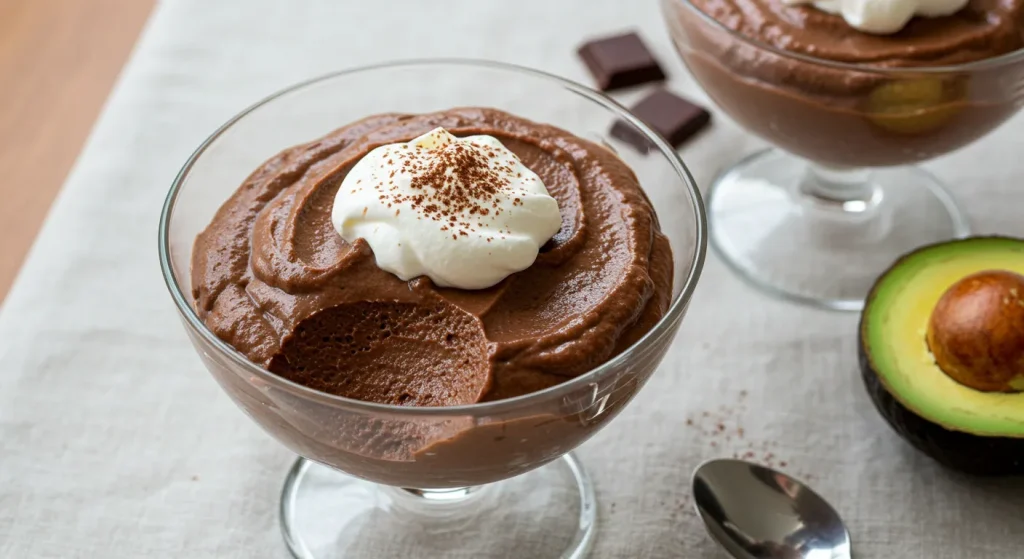
22. Chocolate Avocado Mousse
This is a secretly healthy dessert that tastes incredibly rich and decadent. The avocado creates a silky smooth and creamy texture without any dairy.
Recipe Method
- In a high-powered blender or a food processor, combine the flesh of two ripe avocados.
- Add a half cup of unsweetened cocoa powder and a half cup of a liquid sweetener like maple syrup or agave.
- Add a quarter cup of a plant-based milk, like almond or coconut milk.
- Add one teaspoon of vanilla extract and a pinch of salt.
- Blend on high speed until the mixture is completely and totally smooth. You may need to stop and scrape down the sides.
- Taste the mousse and adjust the sweetness if needed.
- Spoon the mousse into small, individual serving dishes or glasses.
- Chill the mousse in the refrigerator for at least one hour to let it firm up.
- No one will ever guess that the secret ingredient is avocado.
- Serve chilled, topped with fresh raspberries or a dollop of coconut cream.
23. Lemon Posset
A classic, elegant, and incredibly simple British dessert that requires only three ingredients. It is a creamy, set pudding with a bright, intense lemon flavor.
Recipe Method
- In a medium saucepan, combine two cups of heavy cream with two-thirds of a cup of granulated sugar.
- Heat the mixture over medium heat, stirring, until the sugar has completely dissolved.
- Bring the cream and sugar mixture to a gentle boil and let it boil for exactly three minutes.
- Remove the pan from the heat.
- Stir in a half cup of fresh lemon juice. The mixture will start to thicken immediately.
- Let the mixture cool for a few minutes.
- Pour the lemon cream into small, elegant serving glasses or ramekins.
- Chill the possets in the refrigerator for at least 3 hours, or until they are completely set and firm.
- The texture should be like a silky, rich pudding.
- Serve chilled, perhaps with a small shortbread cookie on the side.

24. Panna Cotta with Berry Coulis
Panna Cotta is an Italian dessert of sweetened cream set with gelatin. It is incredibly elegant, and the no-bake version is very simple to make.
Recipe Method
- To make the panna cotta, sprinkle one packet of unflavored gelatin over a quarter cup of cold milk in a small bowl. Let it sit for 5 minutes to bloom.
- In a saucepan, gently heat one and a half cups of heavy cream with a half cup of sugar and one teaspoon of vanilla.
- Heat until the sugar dissolves. Do not let it boil.
- Remove the cream from the heat and whisk in the bloomed gelatin mixture until it is completely dissolved.
- Pour the cream mixture into small, lightly oiled ramekins or molds.
- Chill the panna cotta in the refrigerator for at least 4 hours, or until it is firm.
- To make a simple berry coulis, simmer one cup of fresh or frozen berries with a tablespoon of sugar until the berries break down. Strain the sauce.
- To serve, you can either serve the panna cotta in the ramekins or unmold it onto a plate.
- Drizzle the cooled berry coulis over the top.
- Garnish with fresh berries.

25. Chocolate Truffles
Making your own decadent chocolate truffles is surprisingly easy. This simple recipe uses just two main ingredients.
Recipe Method
- Start with eight ounces of a very good quality semi-sweet or dark chocolate, finely chopped.
- Place the chopped chocolate in a heatproof bowl.
- In a small saucepan, heat a half cup of heavy cream just until it begins to simmer around the edges. Do not let it boil.
- Pour the hot cream directly over the chopped chocolate.
- Let the mixture sit, undisturbed, for five minutes. This will gently melt the chocolate.
- After five minutes, gently whisk the mixture, starting from the center and working your way out, until a smooth, glossy ganache forms.
- You can stir in a teaspoon of vanilla extract or a tablespoon of a liqueur like Grand Marnier for extra flavor.
- Let the ganache cool and then chill it in the refrigerator for about two hours, until it is firm enough to scoop.
- Use a small spoon or a melon baller to scoop the ganache and roll it into small balls with your hands.
- Roll the finished truffles in your choice of toppings, like unsweetened cocoa powder, chopped nuts, or sprinkles.

Conclusion
And there you have it. 25 incredible, easy, and completely no-bake dessert recipes that are perfect for satisfying any sweet tooth.
This summer, you can have a delicious, impressive dessert ready for any occasion without ever having to turn on your oven and heat up your house.
From classic creamy cheesecakes and rich chocolate treats to light and fruity delights, these recipes prove that you do not need to bake to create something truly special.
So embrace the ease and simplicity of no-bake desserts. Your family, your friends, and your cool kitchen will thank you for it.
Happy (no-bake) baking