Table of Contents
- Why DIY Door Hangers Are the Perfect Summer Refresh
- The “Hello Summer” Watermelon Slice Wood Cutout
- Upcycled Garden Hose Wreath with Faux Florals
- Rustic Burlap Ice Cream Cone Hanger
- Bright Citrus Lemon Wreath for a Zesty Welcome
- Painted Wooden Pineapple Welcome Sign
- Floral Filled Straw Hat Door Decor
- Nautical Rope and Seashell Wreath
- Elevating Your Summer Curb Appeal
- Curating Your Entryway: Questions Answered
Enhancing the architectural entry of a property requires a keen eye for both structural integrity and aesthetic balance. While the selection of premium materials like oak flooring or custom millwork sets the foundation for a professional space, the final exterior details define the character of a building. A well-crafted door hanger serves as a focal point that bridges the gap between industrial design and personal expression.
Mastering these seasonal accents involves understanding the principles of scale and composition used in formal floor plans. Utilizing durable weather-resistant materials ensures that your handmade creations withstand the elements while maintaining their visual impact. These projects offer a sophisticated way to integrate color and texture into a facade, whether you are managing a corporate office or a private residence.
Our curated guide explores fifteen innovative designs that prioritize quality craftsmanship and practical execution. From modern minimalist wreaths to vibrant botanical displays, each idea provides a step-by-step approach to elevating your curb appeal. These DIY solutions allow property owners to implement high-end design concepts through accessible and rewarding creative techniques.
Why DIY Door Hangers Are the Perfect Summer Refresh
Your front entryway serves as the handshake of your home. It establishes the initial atmosphere before a guest ever steps across the threshold.
Summer offers a unique opportunity to refresh this space. The season demands vibrant colors and textures that reflect the energy of the outdoors.
A custom DIY door hanger provides an instant curb appeal boost. It allows you to inject personality into the exterior without a major renovation.
Design is not just what it looks like and feels like. Design is how it works.
Functionality is just as important as aesthetics here. Unlike fragile dried wreaths, wooden or metal hangers withstand summer humidity and heat.
These pieces also bridge the gap between exterior architecture and interior styling. They create a visual lead-in to your personal design palette.
If you are cultivating a specific architectural look, such as one of those pretty cottage exterior designs, a floral hanger adds the perfect finishing touch.
Crafting these items yourself allows for total quality control. You can select marine-grade sealants and UV-resistant paints to ensure longevity.
Choosing the Right Materials for Heat and Sun
The durability of your door hanger depends heavily on material choice. Direct sunlight can warp standard craft wood or fade cheap fabrics quickly.
When selecting a base, consider the exposure of your entryway. A covered porch offers more protection than a door facing direct southern sun.
| Material | Heat Resistance | Fade Resistance | Best Application |
|---|---|---|---|
| Birch Plywood | High | Medium | Painted rounds or cutouts |
| Burlap Fabric | Medium | Low (unless treated) | Bows and rustic accents |
| Galvanized Metal | Very High | High | Modern farmhouse styles |
| Faux Greenery (UV) | High | High | Wreath hybrids & florals |
Using the correct finish is vital for structural integrity. A clear coat of polyurethane protects your handiwork from moisture and UV rays.
The entry is the first impression of the home, so it should set the tone for what’s to come. It’s the perfect place to take a risk.
Shea McGee, Studio McGee Design Guide
Beyond the visual impact, these projects are highly cost-effective. You can often repurpose leftover materials from other renovations.
For example, if you recently completed some elegant DIY teacher appreciation week ideas, you likely have leftover ribbons or paints perfect for this task.
Ultimately, a summer door hanger is a small detail with a massive impact. It signals that your home is cared for, curated, and ready for the season.
Curb Appeal Secrets
- Seal the Deal: Always finish your wood or painted hangers with a marine-grade sealant or UV-resistant polyurethane to prevent warping from summer humidity and fading.
- Sun-Smart Selection: If your front door faces south and gets direct sunlight, prioritize materials like galvanized metal or UV-treated faux greenery over standard fabrics to ensure longevity.
- Cohesive Styling: Use paint colors or ribbons that match your interior entryway decor to create a seamless visual transition from the outdoors in.
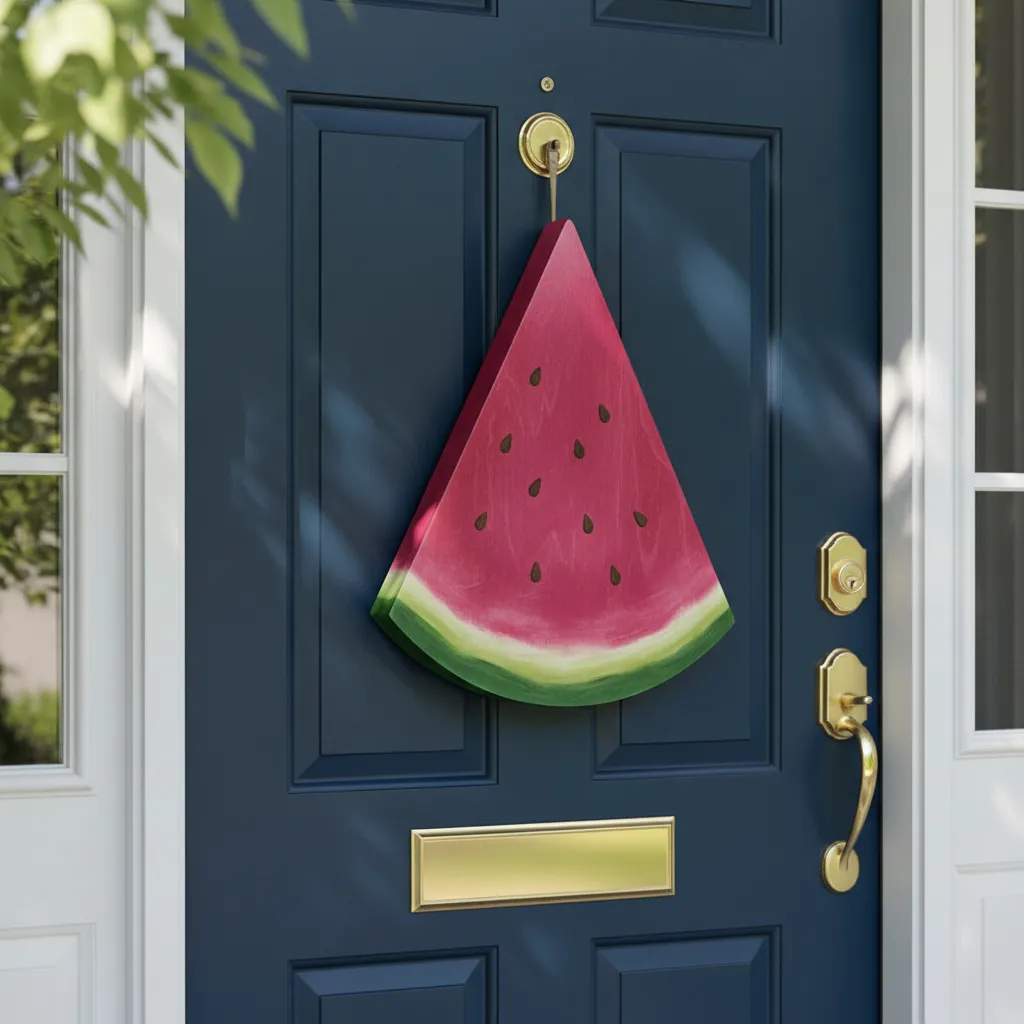
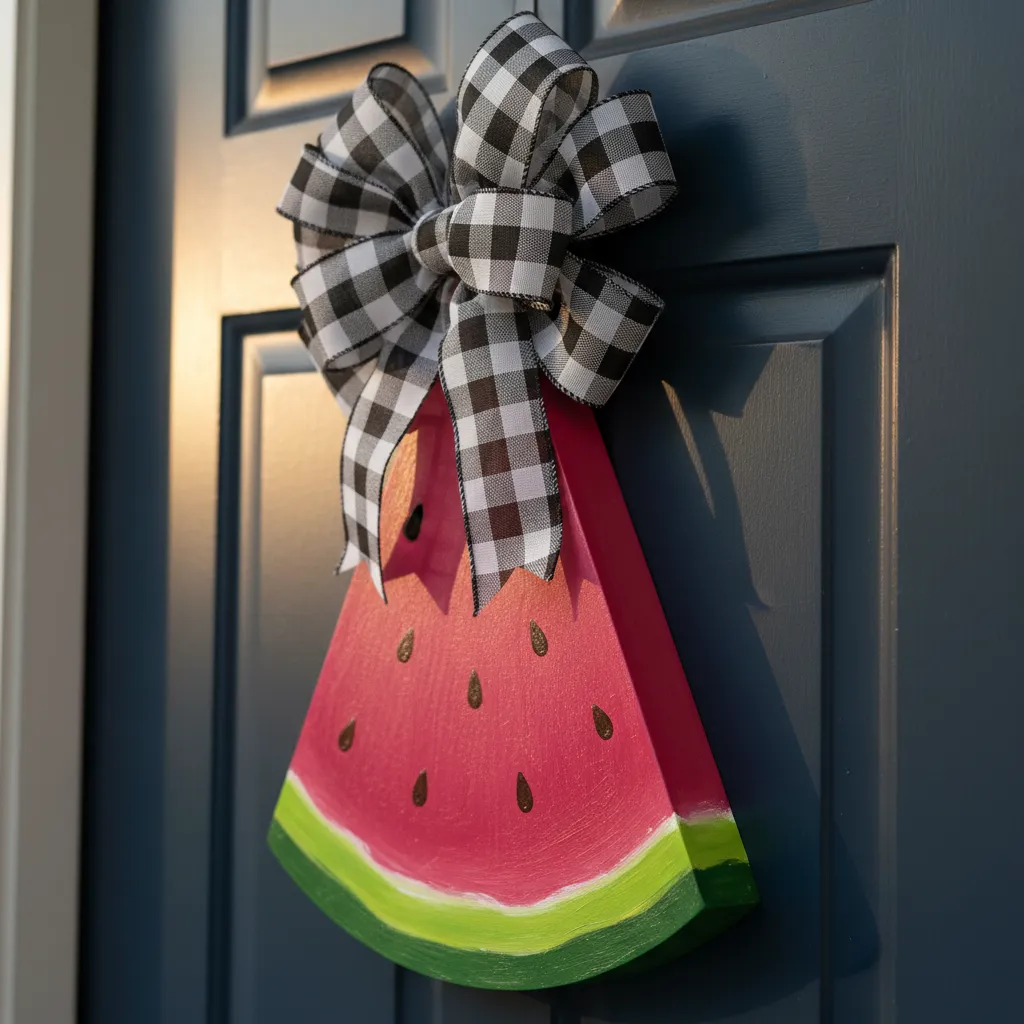
The “Hello Summer” Watermelon Slice Wood Cutout
Nothing captures the essence of the season quite like a vibrant slice of watermelon. This wooden cutout design brings an immediate pop of color to your entryway. It acts as a cheerful focal point.
The key to this project is selecting the right base material. A birch plywood round offers a smooth surface that takes paint exceptionally well. It is lightweight enough to hang without heavy hardware.
Start by sanding the edges of your wood cutout to remove splinters. A professional finish relies on preparation. Smooth edges prevent the paint from peeling later due to moisture.
A front door should be a smile that welcomes the world.
Creating the Realistic Texture
To achieve a dimensional look, layer your acrylic paints carefully. Start with a deep emerald green for the outer rind. Blend this into a lighter lime green to mimic the organic skin of the fruit.
For the center, avoid a flat red paint. Mix a bright magenta with a true red to get that juicy, summer hue. Leave a thin band of raw wood or white paint between the rind and the red for the pith.
Crafting this piece might make you thirsty. While the paint dries, you could try one of these Refreshing Summer Drinks Nonalcoholic with Redbull Recipes to stay cool.
Hand-painting the seeds adds character to the design. Use a teardrop shape in black paint, randomly placed near the center. Imperfect placement looks more natural than a rigid pattern.

Weatherproofing and Assembly
Durability is the most critical aspect of exterior decor. You must seal the wood to protect it from humidity and UV rays. An exterior-grade spar urethane provides the strongest barrier against rain.
When painting exterior wood, always coat the back and edges as thoroughly as the front to prevent warping from moisture absorption.
Bob Vila, How to Paint Wood
Attach a sturdy hanging mechanism once the sealer cures. A heavy-duty jute rope stapled to the back adds rustic charm. Ensure the staples are short enough not to puncture the front of the wood.
Finish the look with a large, volumetric bow. A black and white buffalo check ribbon contrasts beautifully with the pink fruit. Secure it with floral wire for easy removal if it needs cleaning.
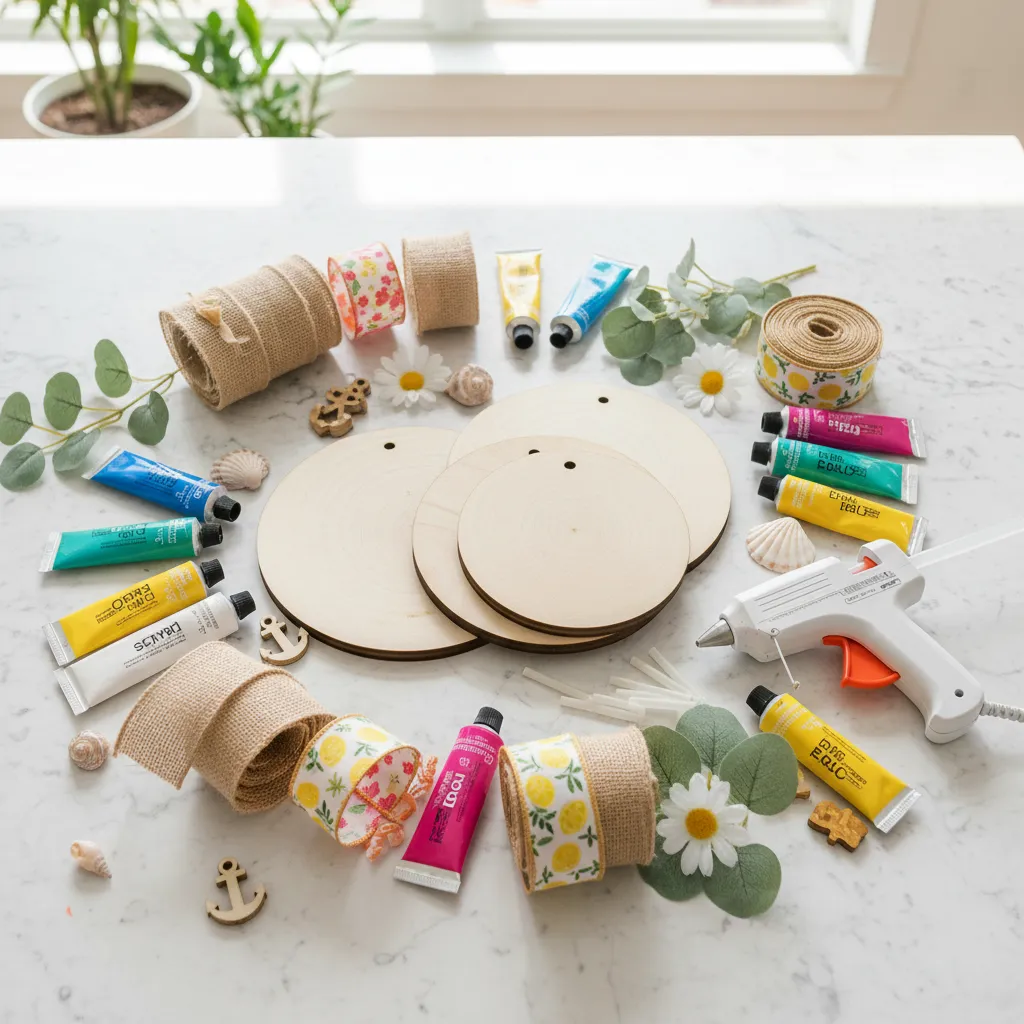
Essential Supply Checklist
Gathering high-quality materials ensures your project lasts for years. Here is what you need to achieve this specific look:
- Birch Plywood Round: 18-inch diameter, 1/4 inch thick.
- Exterior Acrylic Paints: Emerald green, lime green, white, magenta, black.
- Sealant: Water-based spar urethane (satin finish).
- Ribbon: 2.5-inch wired burlap or patterned fabric.
- Tools: Sanding block, staple gun, assorted paintbrushes.
Maker’s Masterstroke
- Add a tiny white ‘highlight’ dot to each black seed to give them a glossy, three-dimensional look.
- Use a sea sponge to lightly dab white paint between the green rind and red fruit for a realistic, textured pith transition.
- Apply a layer of gesso before your color to ensure the red stays vibrant and doesn’t soak too deeply into the wood grain.
Upcycled Garden Hose Wreath with Faux Florals
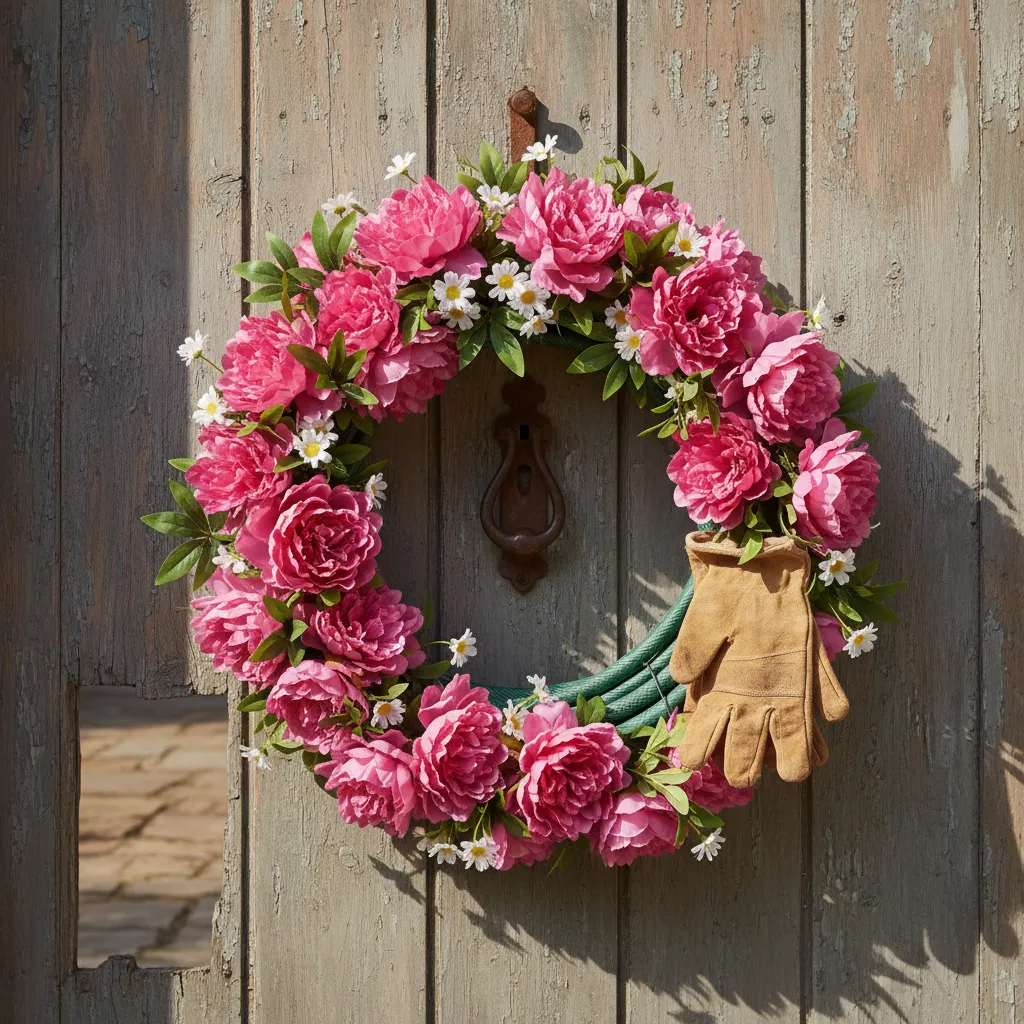
Transforming a retired garden hose into a door hanger offers a playful twist on traditional decor. This project blends industrial utility with soft florals.
The rubber texture contrasts beautifully with silk blooms. It creates a narrative of growth and gardening right at your main entry point.
This design choice withstands weather better than dried vines. It adds a pop of color that remains vivid throughout the hottest months of the year.
Upcycling is not just about reducing waste; it is about reimagining the story of an object to create something entirely new.
The coiled shape naturally mimics a classic wreath form. However, the unexpected material draws the eye and sparks conversation immediately.
This whimsical style complements various architectural looks. It is particularly striking when paired with 21 Pretty Cottage Exterior Designs You’ll Love.
Materials and Fabrication
Select a hose that is flexible yet sturdy. Older rubber hoses often have a matte finish that looks more sophisticated than shiny modern vinyl.
Clean the hose thoroughly with warm soapy water before starting. This ensures adhesives and zip ties grip the surface securely during assembly.
Coil the hose three to four times to create a substantial base. Secure the loops tightly with heavy-duty zip ties in at least three places.
Tuck the cut ends of the hose toward the back of the wreath. This hides the raw edges and maintains a polished, professional appearance.
The best way to welcome guests is with a front door that tells a story about the people who live inside.
Nate Berkus, Architectural Digest
Decorating the Base
Arrange your faux florals in a crescent shape on one side. This asymmetrical layout feels modern and prevents the design from looking cluttered.
Use hot glue or floral wire to attach the stems to the rubber. Incorporate gardening gloves or a small hand trowel for added thematic charm.
For those who enjoy crafting on a budget, this mirrors the creativity found in Elegant DIY Teacher Appreciation Week Ideas on a Budget.
Ensure your door hook can support the weight of the rubber. A magnetic hook or an over-the-door metal hanger is usually the safest option.
Adjust the foliage so it cascades naturally. The goal is to make the flowers look as if they are sprouting directly from the garden tool.
Curb Appeal Hack
- Apply a UV-resistant clear spray to your silk flowers to prevent the sun from fading their vibrant colors over time.
- Use green or black heavy-duty zip ties to secure the coils, then hide them by nesting your largest floral blooms directly over the tie points.
- If your hose is too stiff to coil, soak it in a bucket of warm water or leave it in the sun for 20 minutes to make the rubber more pliable.
Rustic Burlap Ice Cream Cone Hanger
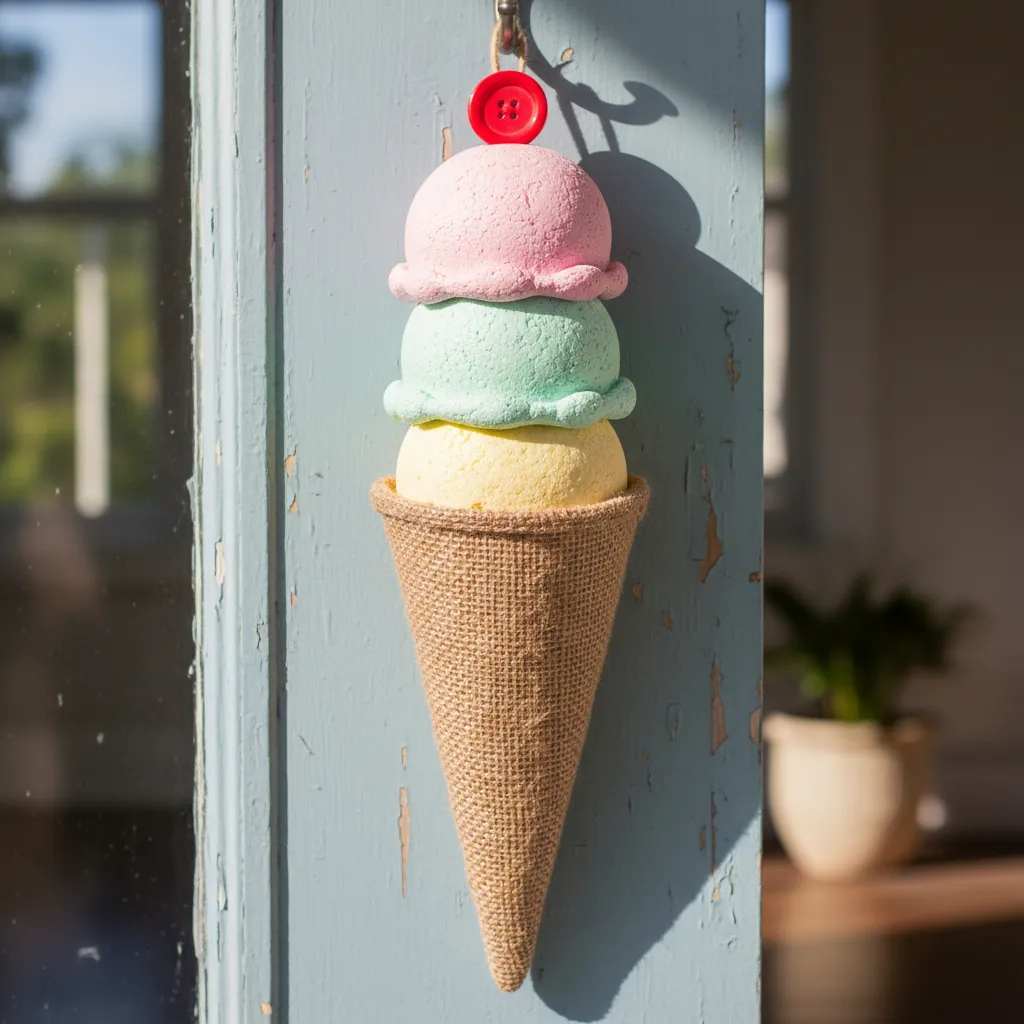
Embrace rustic charm with a playful twist. This DIY project combines the raw, earthy texture of burlap with the whimsical silhouette of a classic ice cream cone.
The result is a piece that feels both nostalgic and stylish. Its durable materials make it a perfect accent to enhance your home’s curb appeal all summer long.
Essential Materials for Your Burlap Cone
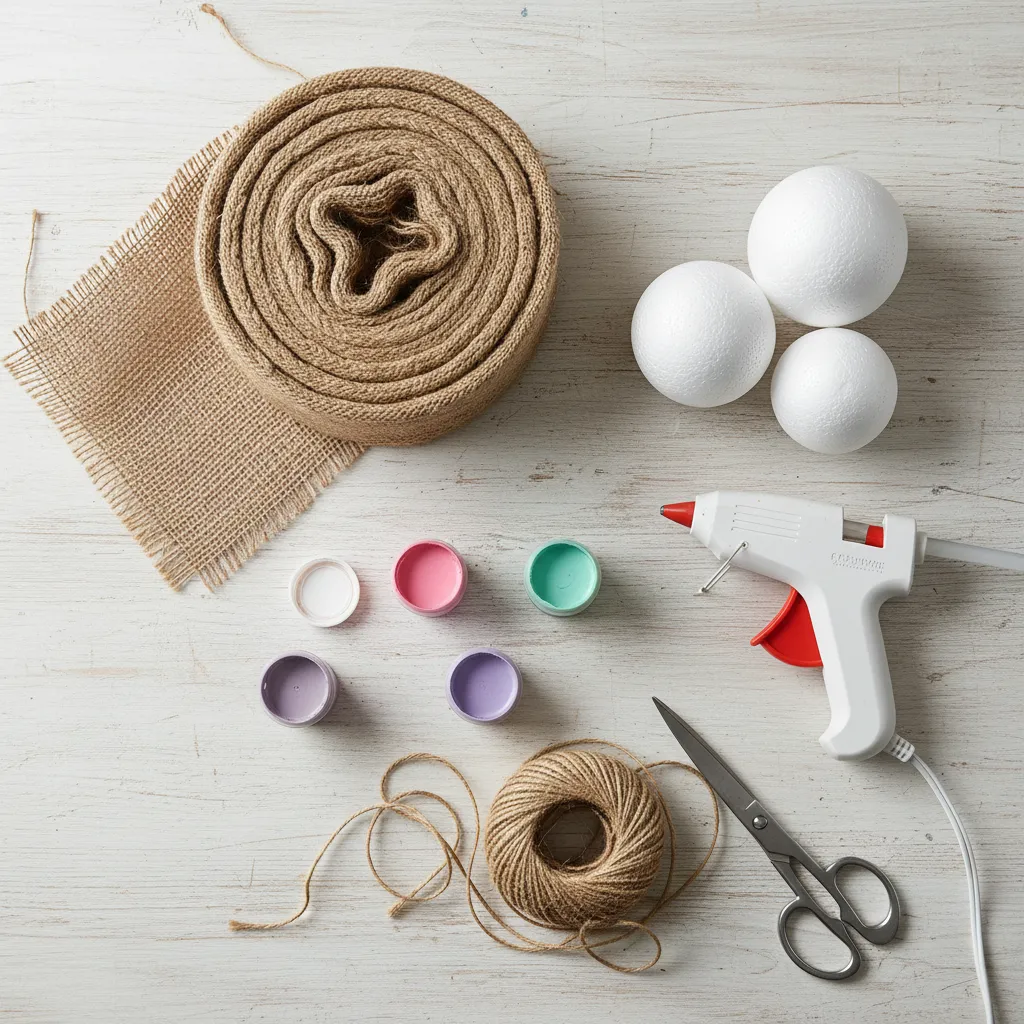
Gathering the right components is the first step in this creative endeavor. Most of these items are readily available at any local craft store.
- Natural burlap fabric
- Cardboard or a thin foam sheet
- Styrofoam balls (3-4 inches in diameter)
- Acrylic craft paint in pastel colors
- Hot glue gun and glue sticks
- Sharp scissors
- Jute twine or decorative ribbon for hanging
- Optional: Faux cherry, buttons, or beads for “sprinkles”
Step-by-Step Crafting Guide
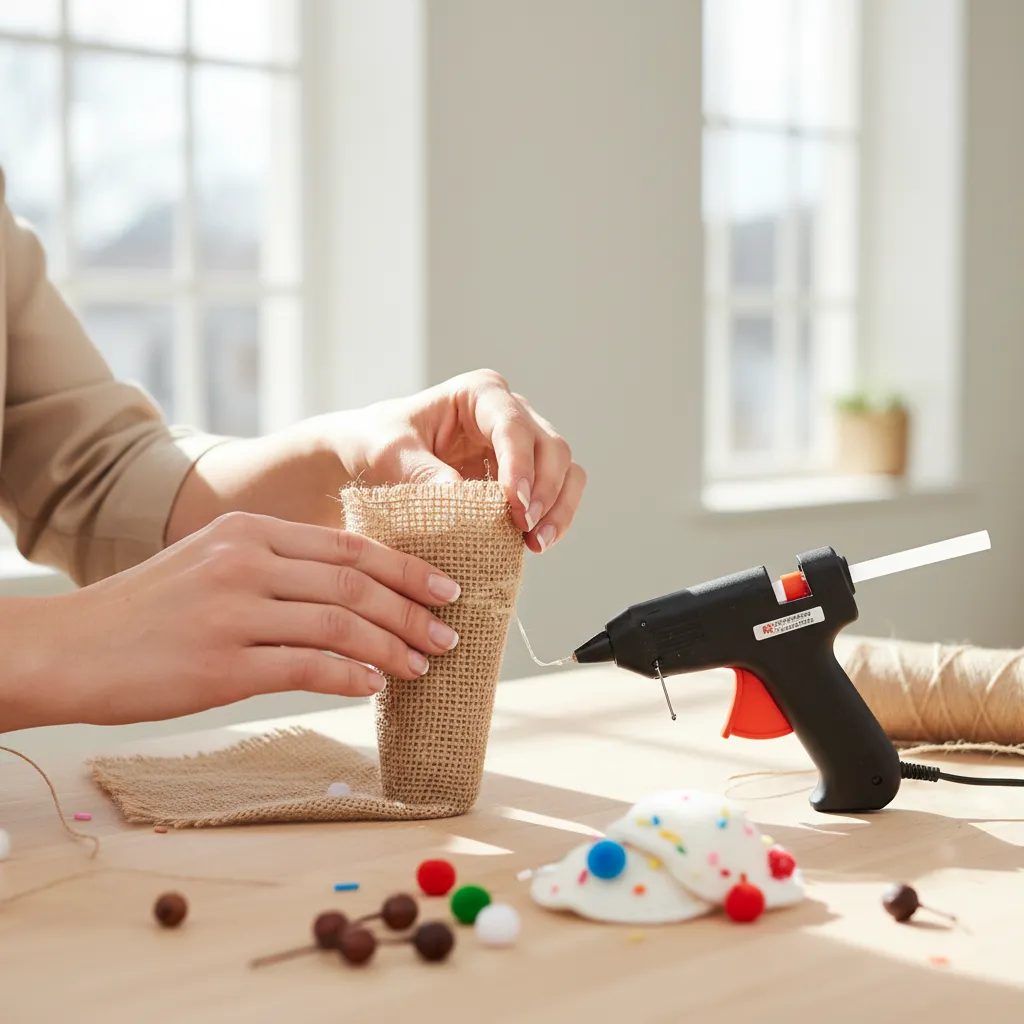
Follow these simple instructions to assemble your charming door hanger. The key to a polished look is patience and attention to detail during assembly.
- Form the Cone: Cut a quarter-circle shape from your cardboard. Roll it into a cone and secure the seam with hot glue for structural integrity.
- Wrap in Burlap: Cut a piece of burlap slightly larger than your cone. Tightly wrap it around the cardboard, securing it with hot glue as you go. Trim any excess fabric.
- Create the Scoops: Paint each Styrofoam ball a different pastel color to represent ice cream flavors. Apply a second coat if needed for a vibrant finish. Let them dry completely.
- Assemble Your Treat: Using a generous amount of hot glue, attach the painted “scoops” to the top opening of the cone. Stack them in an appealing arrangement.
- Add Final Details: Glue your faux cherry to the top scoop. Attach a loop of twine or ribbon to the back of the cone for easy hanging on your door.
Handmade decor transforms a house into a home, one charming detail at a time.
Styling for Maximum Curb Appeal
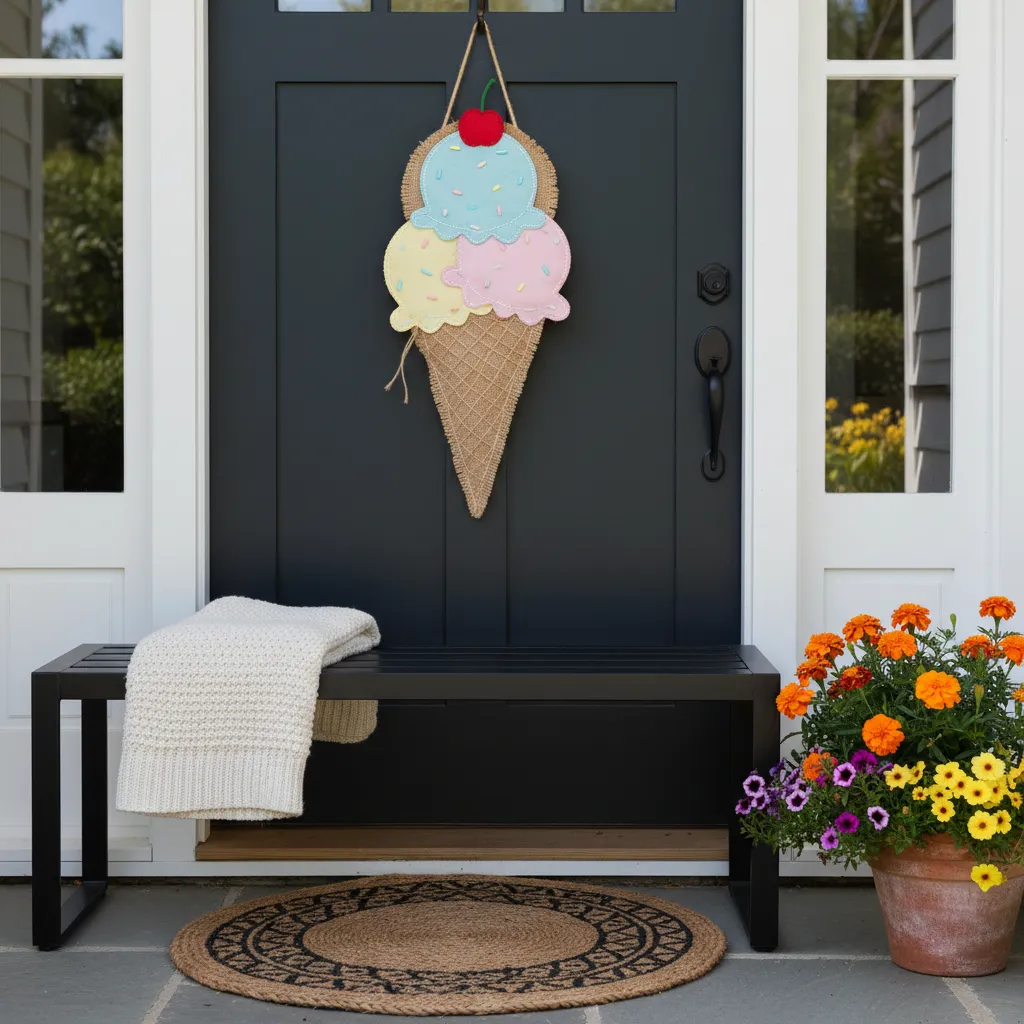
This door hanger’s neutral burlap base pairs beautifully with nearly any door color. It stands out against bold navy, classic red, or even a simple white door.
The design complements farmhouse, coastal, and cottage-style exteriors perfectly. It adds a touch of handmade warmth that elevates your entire entryway’s spatial dynamics.
The playful ice cream theme is a cheerful greeting for guests. It’s a fun way to celebrate the season, much like enjoying a bowl of creamy banana ice cream homemade on a warm day.
The front door is the handshake of the house. It’s the first thing people see and touch, so it should be welcoming and reflect your personal style.
John Gidding, TODAY
Sweet Style Secrets
- To give your burlap cone an authentic waffle look, use a brown permanent marker or fabric paint to lightly draw a diagonal grid pattern across the fabric before gluing.
- If you’re hanging your creation outdoors, spray the finished piece with a clear UV-resistant sealer to prevent the burlap from fraying and the paint from fading in the sun.
- For realistic-looking ‘sprinkles,’ glue on small colorful seed beads or cut tiny strips of colorful felt and attach them to the Styrofoam scoops with a dab of glue.
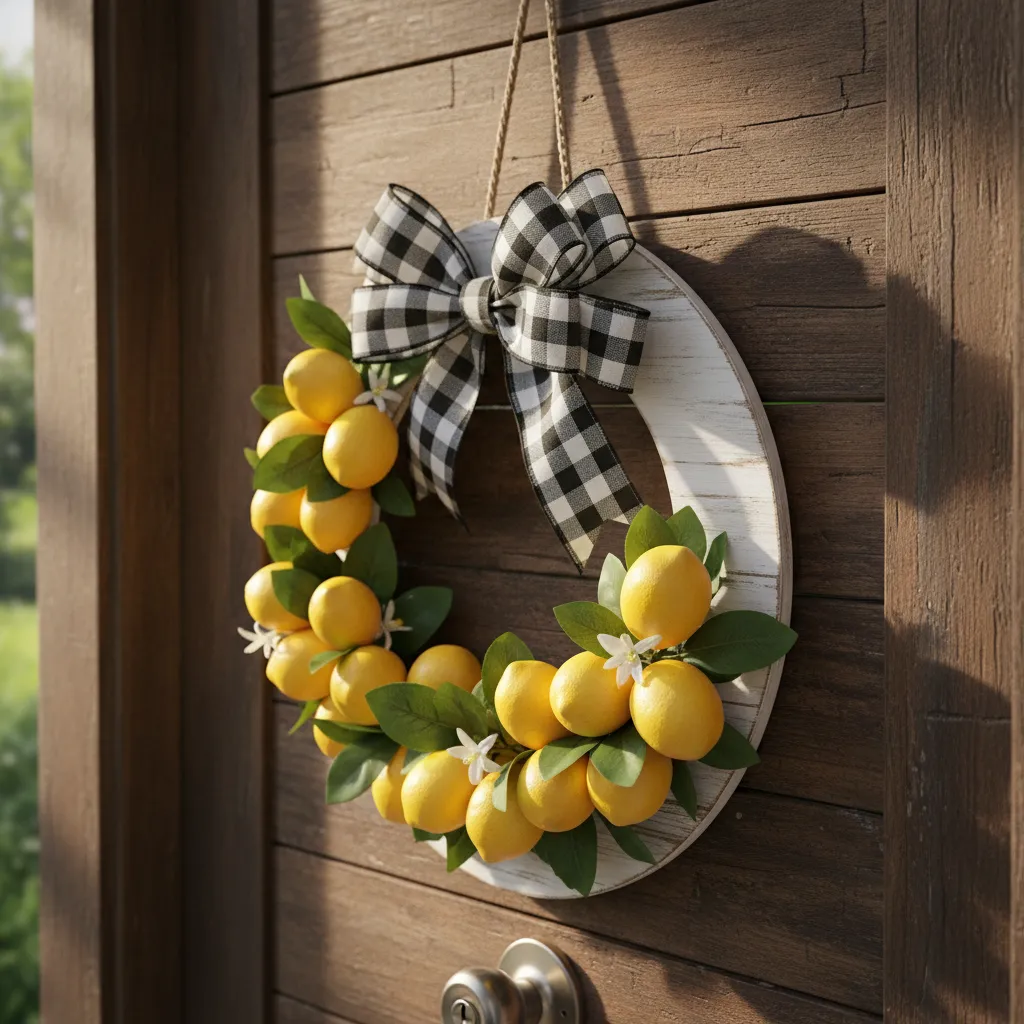
Bright Citrus Lemon Wreath for a Zesty Welcome
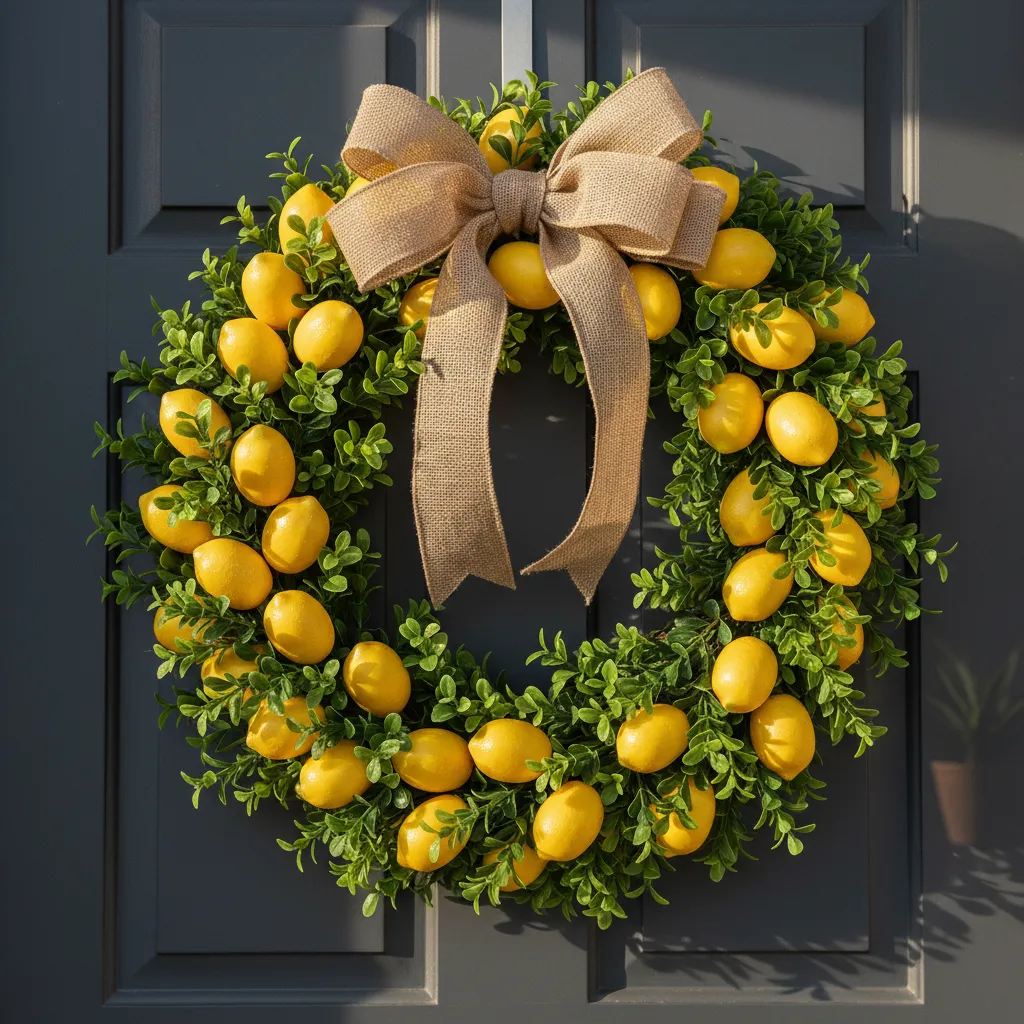
Nothing signals the arrival of warmer months quite like the vibrant pop of yellow. A lemon wreath instantly brightens your entryway, offering a cheerful greeting to guests. The contrast of waxy green leaves against rough faux fruit creates a texture that feels organic and fresh.
This design choice improves curb appeal by creating a distinct focal point against neutral door colors. Whether you have a dark navy door or a crisp white one, the yellow palette stands out. It establishes a welcoming atmosphere before anyone even steps inside.
Your front door is the smile of your home; make it bright, welcoming, and impossible to ignore.
Gathering Your Materials
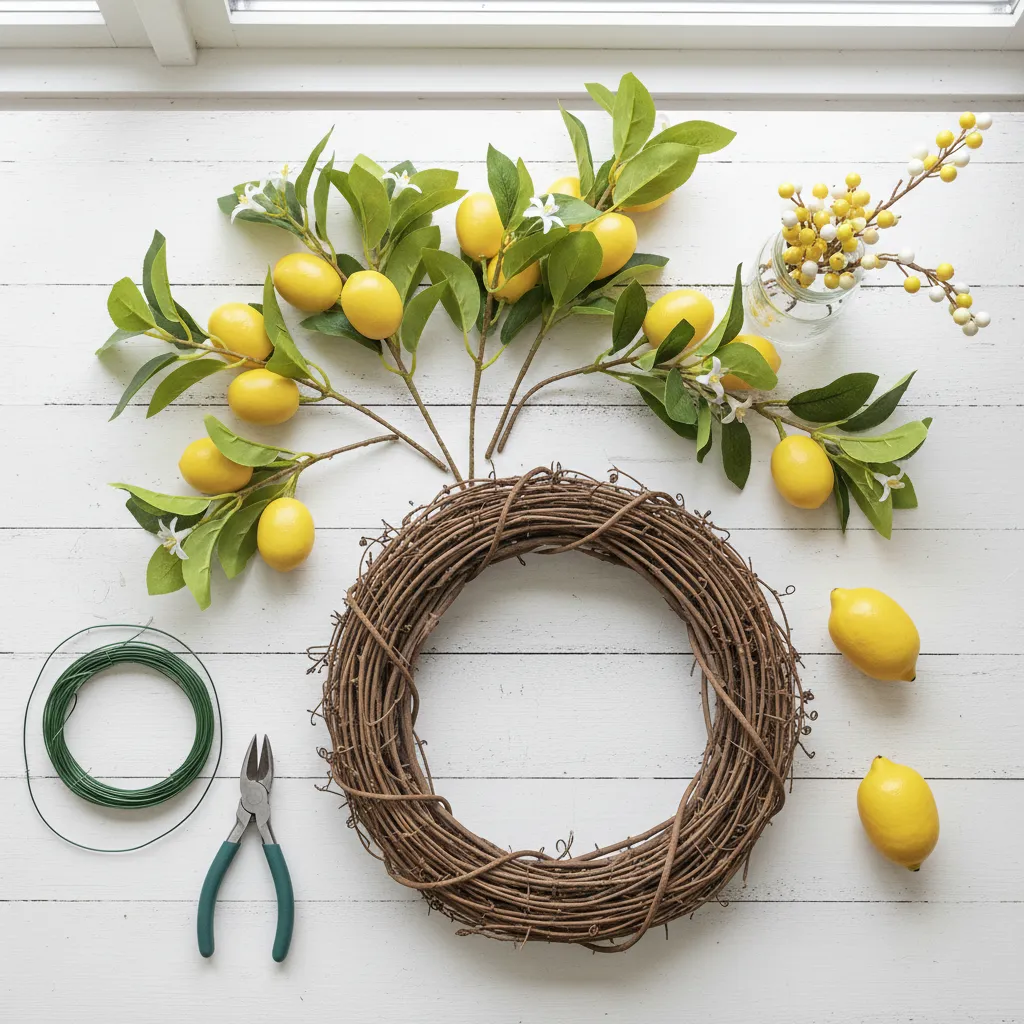
To achieve a professional finish, select high-quality faux stems that mimic real botanicals. The goal is to balance durability with aesthetic appeal. Using a grapevine base ensures structural integrity while adding a rustic touch that complements the citrus theme.
- Grapevine Wreath Base: Choose an 18-inch diameter for standard doors to maintain proper scale.
- Faux Lemon Stems: Look for varying sizes of fruit to create a natural, unforced appearance.
- Greenery Fillers: Boxwood or eucalyptus sprigs add depth and hide the mechanical elements.
- Floral Wire & Hot Glue: Essential for securing heavy elements against wind and weather.
- Ribbon: Black and white stripes or natural burlap provide a sophisticated finishing touch.
Assembly and Styling
Start by inserting the greenery into the grapevine weave to establish the overall shape. Secure the stems with floral wire for added durability. This base layer creates a lush backdrop that allows the yellow fruit to pop without overwhelming the visual flow.
Next, layer in the lemon stems, grouping them in odd numbers for better spatial dynamics. As you craft this zest-inspired piece, you might feel inspired to extend the theme to your kitchen. You can learn to master lemoncello recipes to serve guests as they admire your handiwork.
Finish the wreath by attaching a bow at the bottom or top, depending on your preference. A bottom placement feels more modern and relaxed, while a top bow offers traditional elegance. Ensure the wreath hanger matches your door hardware for a cohesive look.
The entry is the first impression of your home… It sets the tone for what’s to come.
Shea McGee, Homes & Gardens
Consider the lighting in your entryway when placing your wreath. Direct sunlight can fade faux materials over time, so apply a UV-resistant spray if your door faces south. This simple step preserves the vibrant palette and ensures your decor lasts for seasons.
The Squeeze on Style
- Enhance the sensory experience by tucking a few sprigs of dried eucalyptus or adding a drop of lemon essential oil to the grapevine for a scent that matches the visual.
- To ensure your heavy faux lemons stay in place during windy weather, use a double-anchor method by applying hot glue to the stem before wrapping it tightly with 22-gauge floral wire.
- Apply a matte UV-protectant spray to your finished wreath to prevent the vibrant yellow pigments from fading if your front door receives direct afternoon sunlight.
Painted Wooden Pineapple Welcome Sign
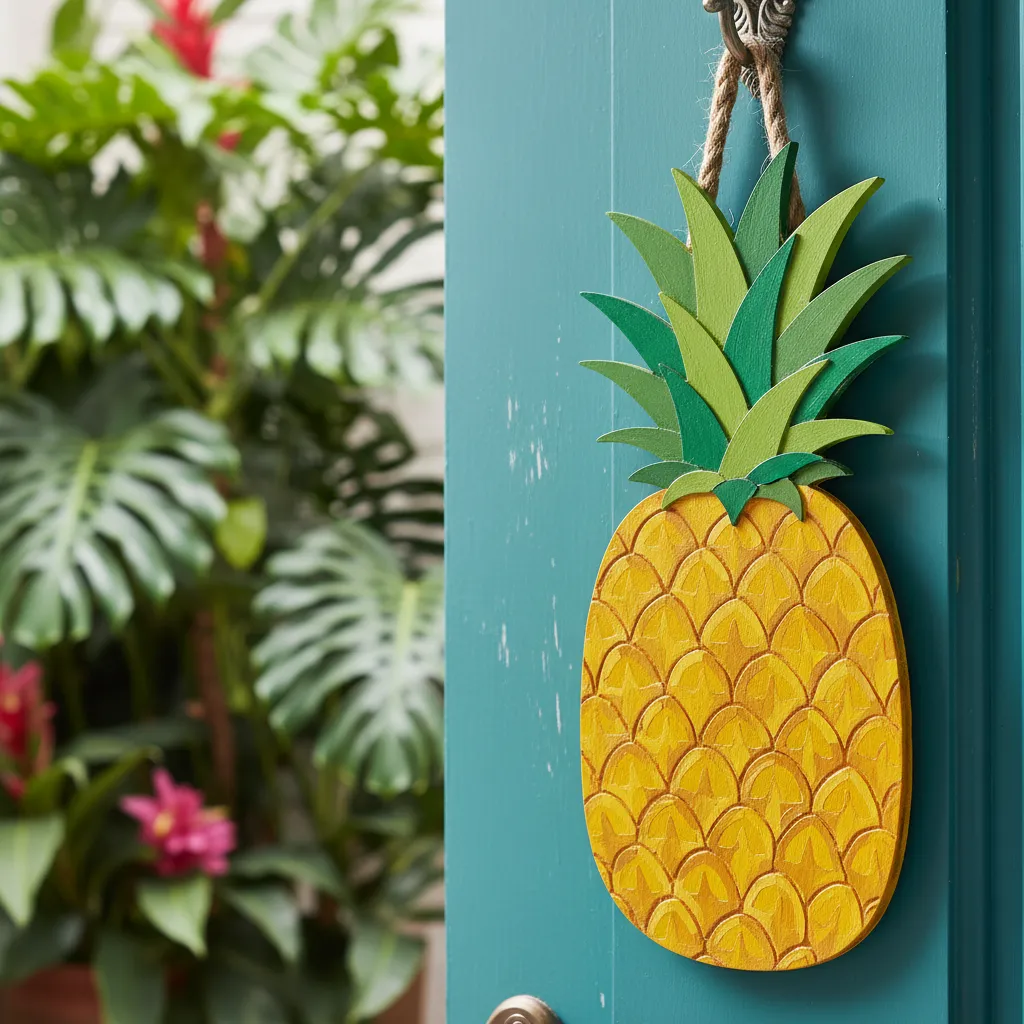
The pineapple has long served as the universal symbol of hospitality in home decor. It instantly signals warmth to anyone approaching your threshold.
Crafting a wooden pineapple sign offers a tactile charm that store-bought vinyl decals simply cannot match. The depth of the wood adds architectural interest.
This project allows you to blend organic textures with vibrant summer colors. It acts as a cheerful focal point that brightens the entire porch.
A handmade welcome sign transforms a house into a home before the door even opens.
Selecting Materials and Paints
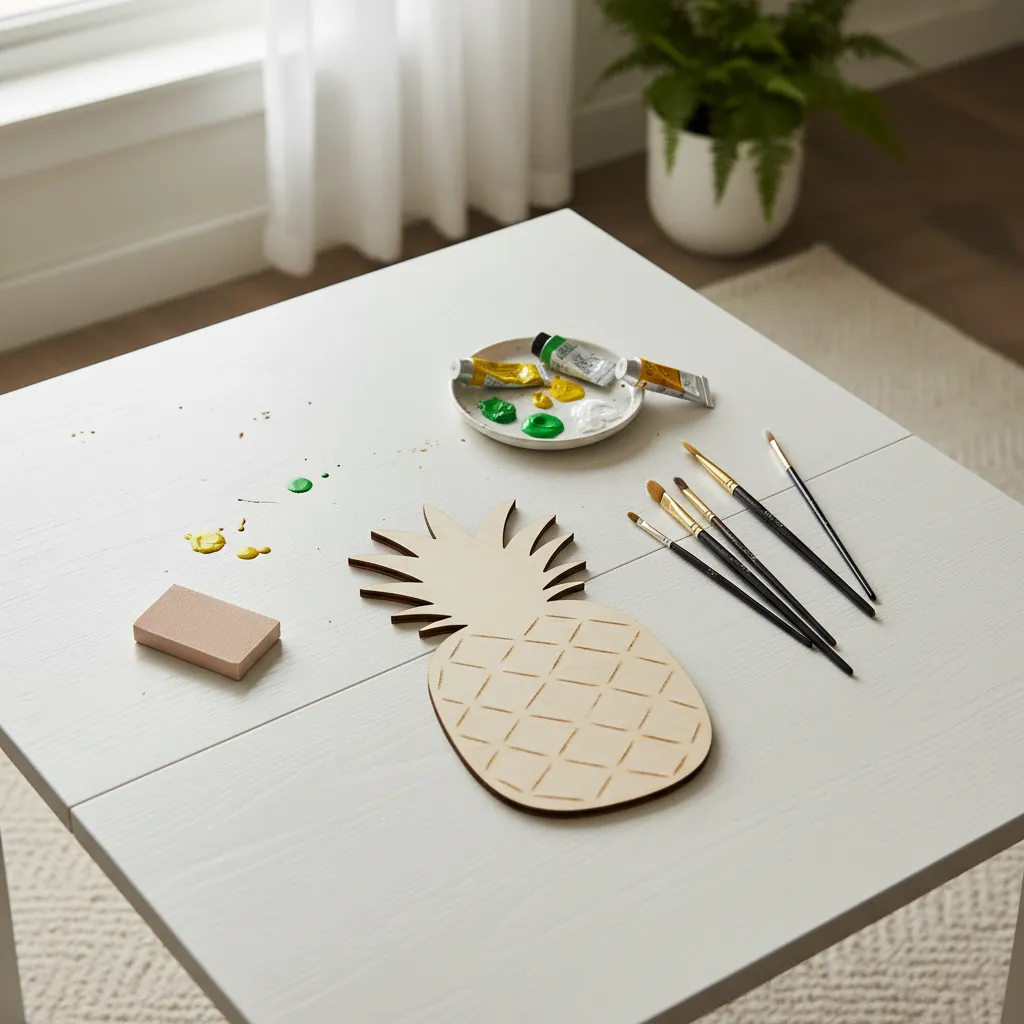
Start with a piece of high-quality birch plywood, roughly a quarter-inch thick. This wood offers a smooth grain that accepts paint beautifully.
Birch is lightweight yet durable enough to withstand the swinging motion of a door. Avoid MDF for exteriors as it swells when exposed to humidity.
For the finish, select heavy-body acrylics in vibrant yellows and leafy greens. These pigments provide excellent coverage and resist fading in sunlight.
While working on this project, you might find yourself inspired to host a gathering. Consider pairing your new decor with refreshing summer drinks nonalcoholic with Redbull recipes to keep your guests cool.
The entry is the first impression of your home… it sets the tone for the rest of the house.
Shea McGee, Studio McGee Entryway Guide
Step-by-Step Fabrication Guide
Achieving a professional look requires patience during the preparation phase. Follow these specific steps to ensure structural integrity and visual appeal.
- Sand the Edges: Use 220-grit sandpaper to smooth the rough edges of your jigsaw cutout. This prevents splinters and paint bleeding.
- Apply Primer: Coat both sides with an exterior-grade wood primer. This seals the grain and ensures your topcoat creates a vivid finish.
- Layer the Colors: Paint the body in a golden yellow. Once dry, add cross-hatching details in a darker ochre to mimic the fruit’s texture.
- Detail the Crown: Use a fine liner brush to add definition to the green leaves. A mix of lime and hunter green adds realistic depth.
Design Aesthetics Comparison
Your paint choices should complement your home’s existing exterior palette. Review this comparison to choose the best style for your architecture.
| Design Style | Color Palette | Recommended Texture | Best For |
|---|---|---|---|
| Classic Coastal | Gold, Sage, Cream | Smooth Satin Finish | Traditional Cottages |
| Rustic Farmhouse | Mustard, Olive, Brown | Distressed/Sanded | Brick or Wood Siding |
| Modern Pop | Neon Yellow, Teal | High Gloss Enamel | Mid-Century Modern |
Weatherproofing and Installation
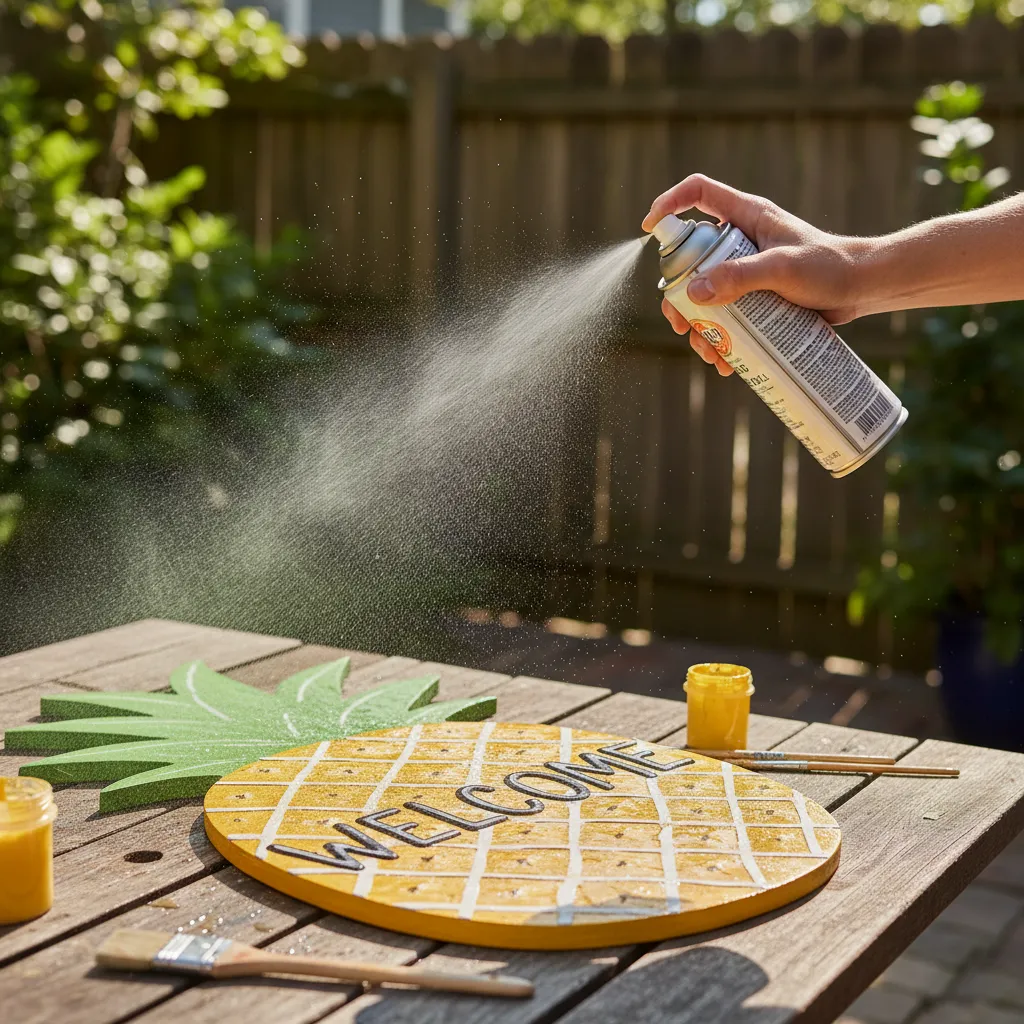
Durability is paramount for outdoor decor. You must apply a marine-grade spar urethane to protect the wood from UV rays and moisture.
Apply at least three thin coats, allowing ample drying time between each. This clear shell prevents warping and keeps the colors saturated.
For hanging, use heavy-duty jute twine or a galvanized wire loop. Secure it to the back with short wood screws rather than hot glue.
Once your sign is ready, consider how it integrates with your broader porch setup. You can find inspiration in these 30 traditional entryway decorating ideas with stairs that feel inviting to complete the look.
A well-placed bow made of burlap or grosgrain ribbon adds a final touch of softness. Secure it firmly to the handle to withstand summer breezes.
Artisan Secrets
- Use a mesh produce bag as a stencil over your base coat to easily achieve a consistent cross-hatch texture on the pineapple’s body.
- Apply small adhesive felt bumpers to the back of the sign to prevent it from rattling against the door or scratching the paint.
- For the green crown, use a dry-brushing technique with a lighter shade on the leaf tips to create a sun-bleached, dimensional effect.
Floral Filled Straw Hat Door Decor
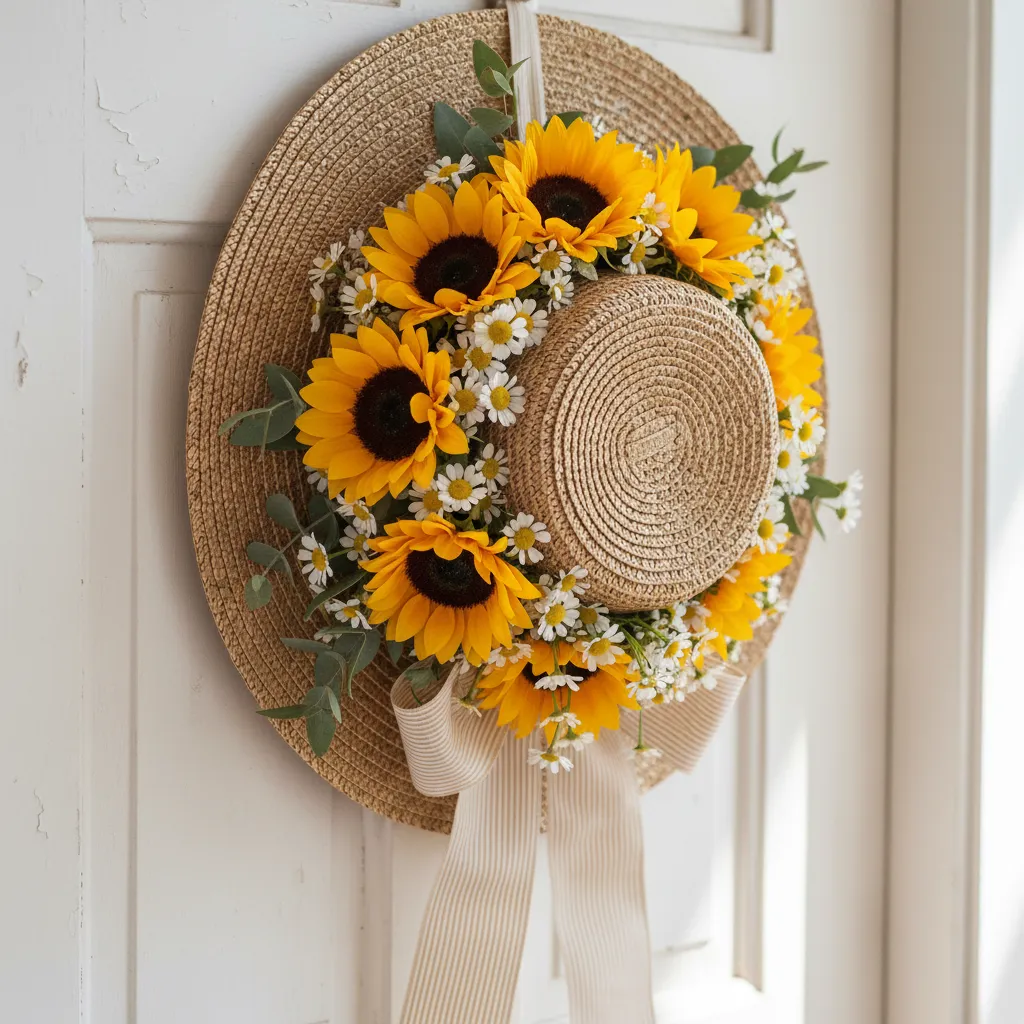
Repurposing a wide-brimmed straw hat into a door hanger offers a charming nod to nostalgic summer days. It blends rustic textures with vibrant blooms.
This design choice moves away from traditional circular wreaths. It creates a vertical focal point that draws the eye upward, enhancing the door height.
The golden hues of natural straw provide a warm neutral background. This allows bright florals like peonies or sunflowers to truly pop against the wood.
A straw hat on the door whispers that summer has arrived and stayed for sweet tea.
Functionally, this decor is incredibly lightweight. It reduces strain on delicate door hinges compared to heavy, water-logged evergreen wreaths.
The soft brim also acts as a buffer. It prevents scratching on the door’s finish when the wind blows or when the door opens and closes frequently.
This aesthetic pairs perfectly with vintage living room ideas that emphasize old-world elegance. It bridges the gap between indoor charm and outdoor appeal.
Materials and Assembly
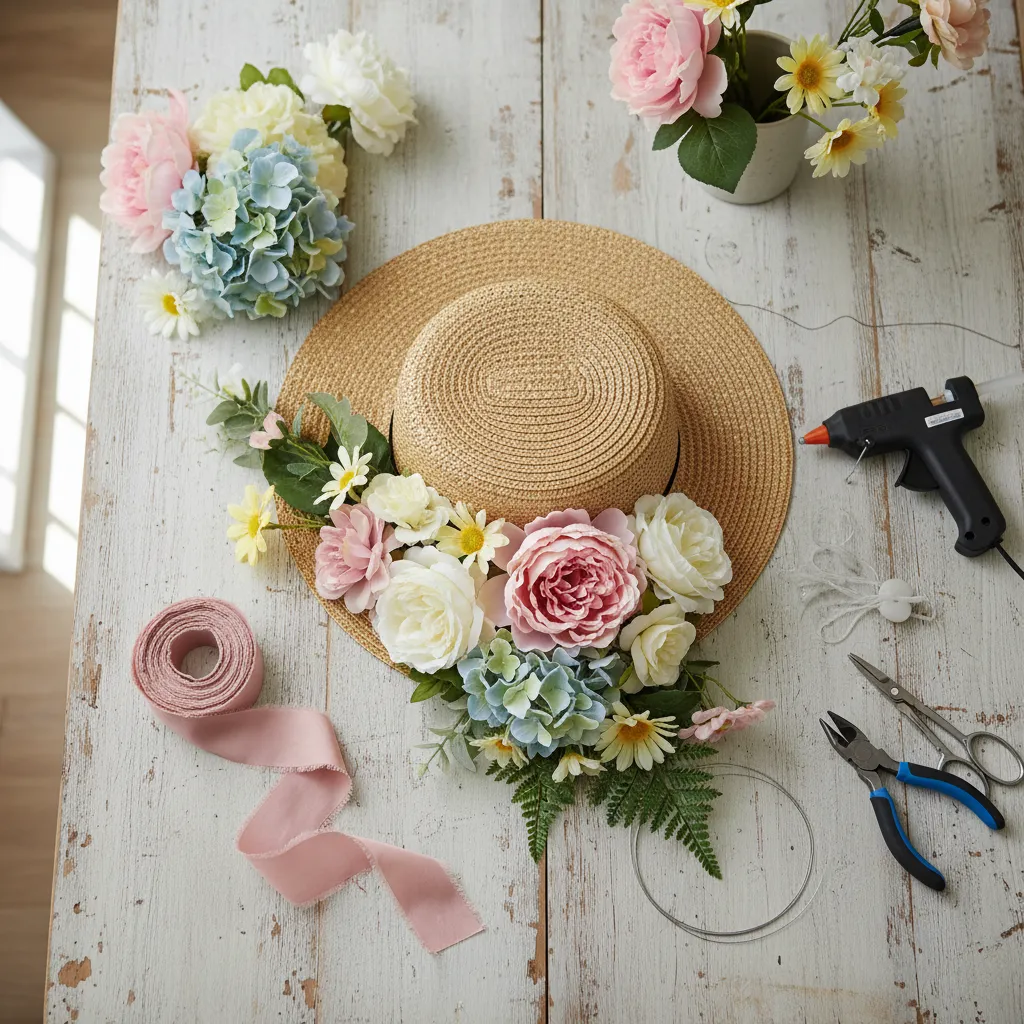
Creating this look requires minimal tools but yields high visual impact. You can source most items from local thrift stores or craft shops.
- Straw Hat: Choose a stiff-brimmed hat for structural integrity.
- Faux Florals: Select silk flowers for a realistic look that withstands heat.
- Wide Ribbon: Grosgrain or burlap adds texture and secures the hanging loop.
- Floral Wire: essential for securing stems without relying solely on glue.
- Command Hook: Use a clear outdoor version for damage-free hanging.
Begin by arranging greenery at the base of the hat crown. This establishes a lush backdrop for your larger statement blooms.
Secure the stems with floral wire poked through the straw weave. This mechanical bond is more durable than hot glue, especially in direct sunlight.
Add a generous bow to the top or bottom of the arrangement. The ribbon adds softness and ties the color palette together with the exterior paint.
Your front door is the first thing people see when they walk up to your house, so make it count. A seasonal update shows you care about your home.
Editor, Better Homes & Gardens
If you love cozy tiny cottage houses, this hat decor is the perfect exterior accent. It adds character without overwhelming a smaller entryway.
Ensure the hat is hung at eye level for the best effect. This placement ensures the floral details are visible from the street.
Cottage Style Secrets
- Opt for floral wire over hot glue to secure your stems, as it prevents the arrangement from shifting or melting during high-heat summer afternoons.
- To keep the hat from flipping or flapping in the wind, discretely tuck a small weighted pouch or a few heavy coins into the bottom fold of the brim.
- Layer your textures by mixing high-quality silk blooms with dried elements like lavender or eucalyptus for a more realistic, multidimensional look.
Nautical Rope and Seashell Wreath
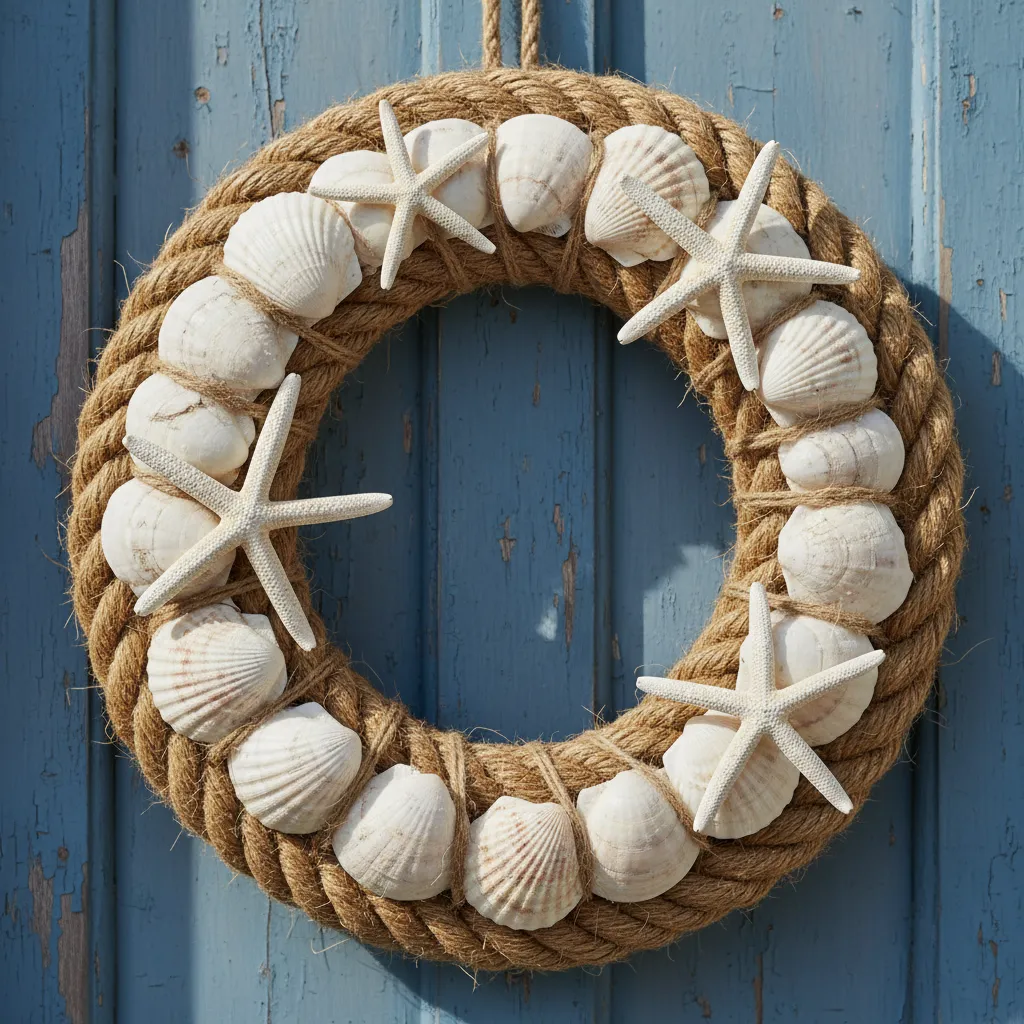
Evoke the spirit of the seaside with a wreath that combines rugged durability and delicate beauty. Thick manila rope offers a coarse texture that contrasts beautifully with smooth shells.
This design instantly transforms a standard entryway into a breezy retreat. It works exceptionally well on painted wood doors where the natural beige tones can truly pop against the color.
Your front door is the first thing people see; it’s the handshake of your home. Make sure it feels like you.
Emily Henderson, Front Door Makeover Ideas
Selecting the Right Materials
Beyond aesthetics, this choice proves highly functional for exterior exposure. Synthetic or treated natural fibers withstand humidity and direct sunlight better than fragile dried florals.
When planning your entryway, consider how the exterior decor transitions into the interior. A nautical wreath pairs well with traditional entryway decorating ideas that emphasize natural light.
To ensure your creation lasts through the season, prioritize high-quality adhesives. Standard crafting glue may melt in the summer heat, so high-temperature silicone is essential.
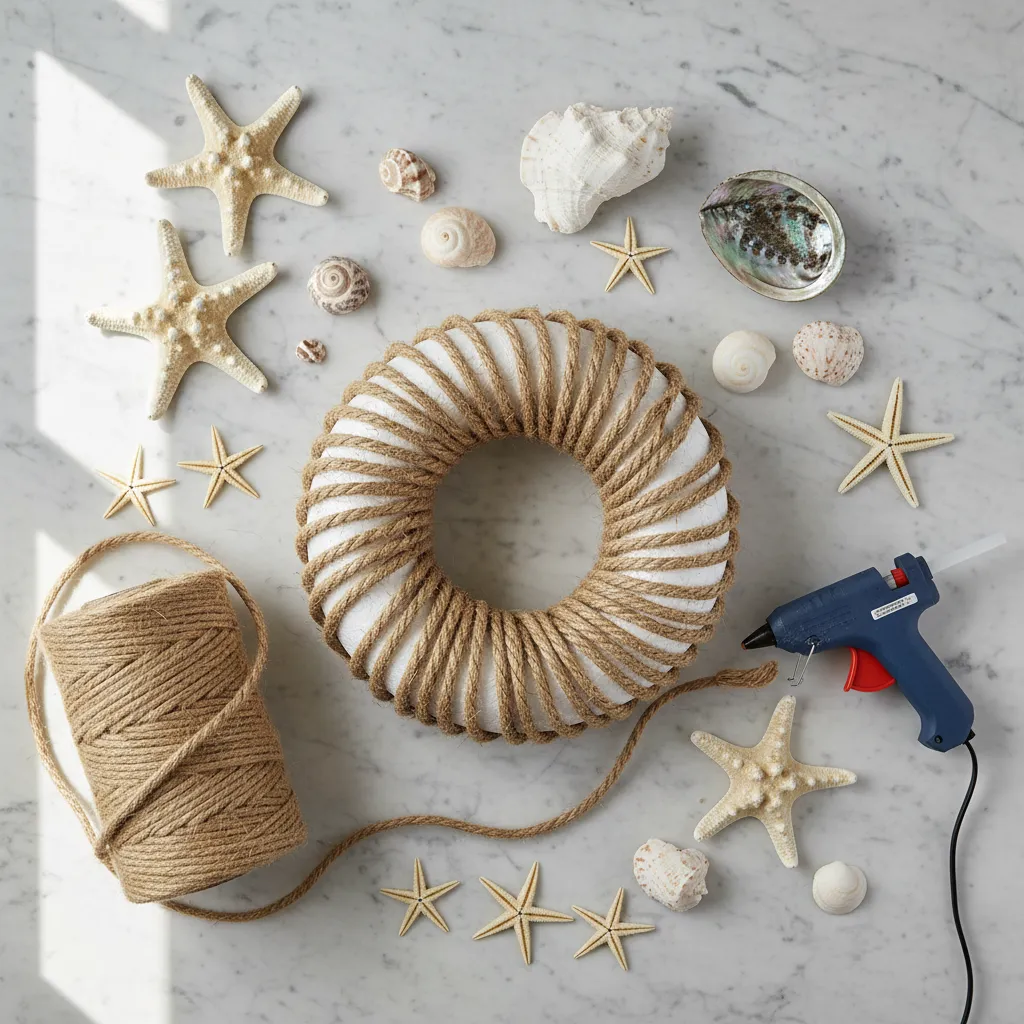
Essential Crafting Checklist:
- Base Form: A 14-inch extruded polystyrene foam ring provides a lightweight yet rigid foundation.
- Textile: 1/2-inch Manila or Sisal rope creates the necessary visual weight and tactile finish.
- Adhesive: High-temp hot glue sticks or industrial E6000 for heavy shell clusters.
- Accents: Starfish, sand dollars, and bleached scallop shells for organic variety.
Assembly and Styling Techniques
Begin by securing the rope end to the back of the form with hot glue. Wrap the rope tightly around the ring, ensuring no gaps reveal the white foam underneath.
Create a focal point using odd numbers of shells. Grouping three varied sizes creates a visually pleasing cluster rather than a chaotic scatter across the surface.
Coastal style is about bringing the serenity of the sea to your doorstep, one texture at a time.
This rustic texture complements various architectural styles. It adds warmth to modern coastal homes and enhances stunning dream house exteriors featuring wood siding or crisp stucco.
Finish the piece with a loop of wide burlap ribbon. This reinforces the organic palette while providing a secure mechanism for hanging on standard door hooks.
Seaside Styling Secrets
- Seal the ends of your rope with clear tape or a small dab of glue before wrapping to prevent messy fraying and ensure a professional finish.
- For maximum durability against wind and heat, use a ‘double-bond’ method: apply E6000 for a permanent hold and a dot of hot glue for instant placement.
- Perform a ‘dry run’ by laying out your shell clusters before gluing to ensure the weight is evenly distributed so your wreath hangs perfectly straight.
Elevating Your Summer Curb Appeal
Creating a summer door hanger is more than a craft project; it is an architectural statement. It sets the tone for your entire home exterior.
By selecting durable materials like birch or galvanized metal, you ensure your design withstands the harsh summer elements with grace.
Whether you prefer a modern farmhouse look or a vibrant floral display, these small details bridge the gap between structure and style.
Embrace the opportunity to refresh your entryway. A well-crafted door hanger is the perfect handshake for your home this season.
Curating Your Entryway: Questions Answered
Apply a high-quality UV-resistant clear coat or polyurethane. Marine-grade sealants work best for south-facing doors exposed to intense heat.
Birch plywood is excellent for smooth painting, while cedar offers natural rot resistance. Avoid untreated pine, which warps easily in humidity.
Standard hot glue often melts in direct summer heat. Use high-temperature industrial glue or E6000 adhesive to ensure elements stay secure.
Use an over-the-door metal hook or a heavy-duty magnetic hook for steel doors. Avoid nails or screws that compromise the weather seal.