
Table of Contents
- The Versatile Rolling Utility Cart
- Styled Countertop Tray Arrangement
- Rustic Floating Shelves Display
- Repurposed Vintage Dresser Station
- The Hidden Cabinet Appliance Garage
- Café-Style Chalkboard Wall Backdrop
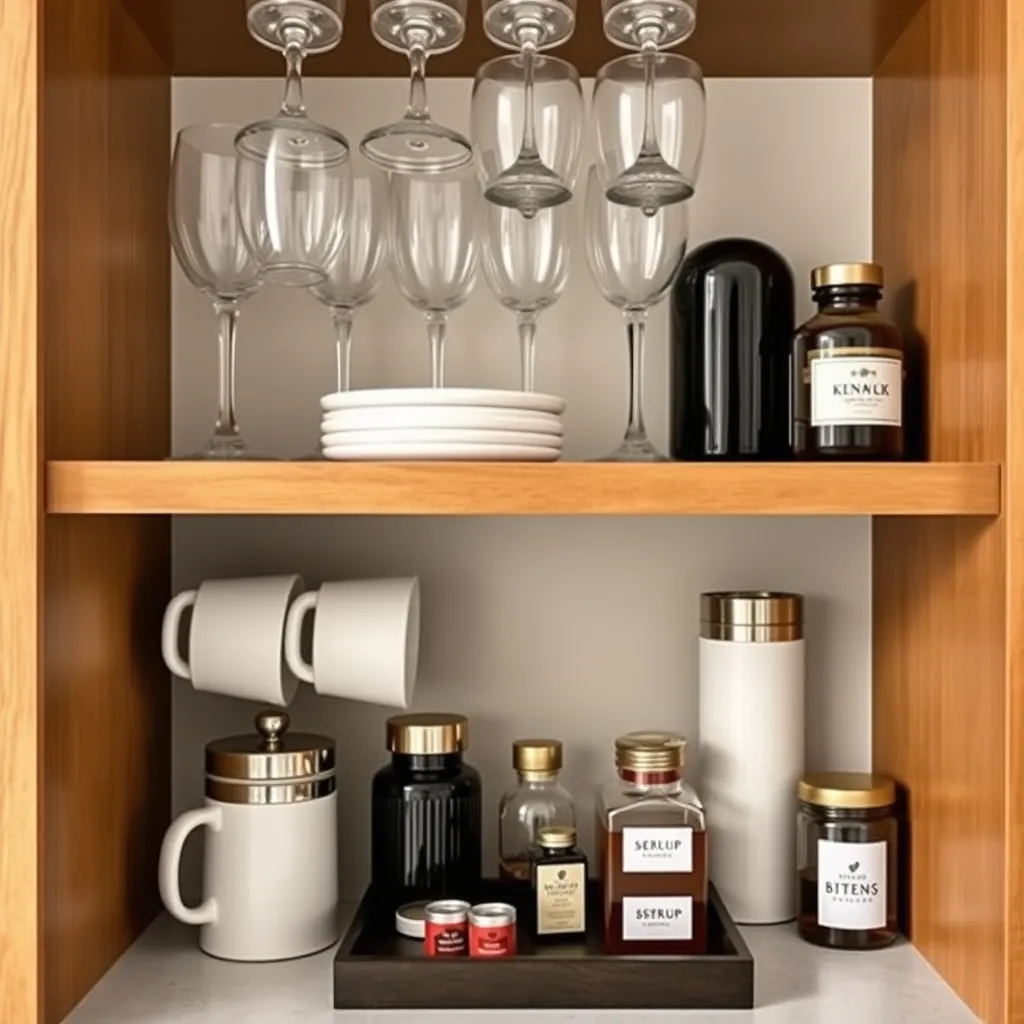
- Wall-Mounted Mug Rack Display
- Integrated Bookshelf Coffee Nook
- The Modern Farmhouse Buffet Table
- Open-Concept Baker’s Rack Stand
- The Compact Corner Wedge
- Modular Pegboard Organization Wall
- Day-to-Night Coffee and Wine Bar
- Tiered Countertop Stand for Syrups
- Window Ledge Bistro Setup
- Brewing Your Perfect Sanctuary
- Expert Insights: Crafting Your Coffee Nook
Creating a dedicated coffee station requires a strategic approach to floor plan optimization and spatial flow.
Whether you are integrating a nook into a professional office or a residential kitchen, understanding the structural layout is essential for long-term functionality.
Proper site selection ensures that plumbing access and electrical requirements align seamlessly with your daily routine.
Once the foundation is established, the selection of materials defines the character of the space.
High-quality cabinetry and durable countertops serve as the primary structural components; meanwhile, choosing the right flooring ensures longevity in high-traffic areas.
A well-executed design balances technical precision with high-end finishes to create a cohesive architectural statement.
The final phase involves layering decorative elements and handmade touches that reflect your personal style.
DIY makers can explore custom shelving and curated accessories to elevate the aesthetic without compromising the professional framework.
These simple yet effective ideas transform a standard corner into an inspiring destination for productivity and relaxation.
The Versatile Rolling Utility Cart
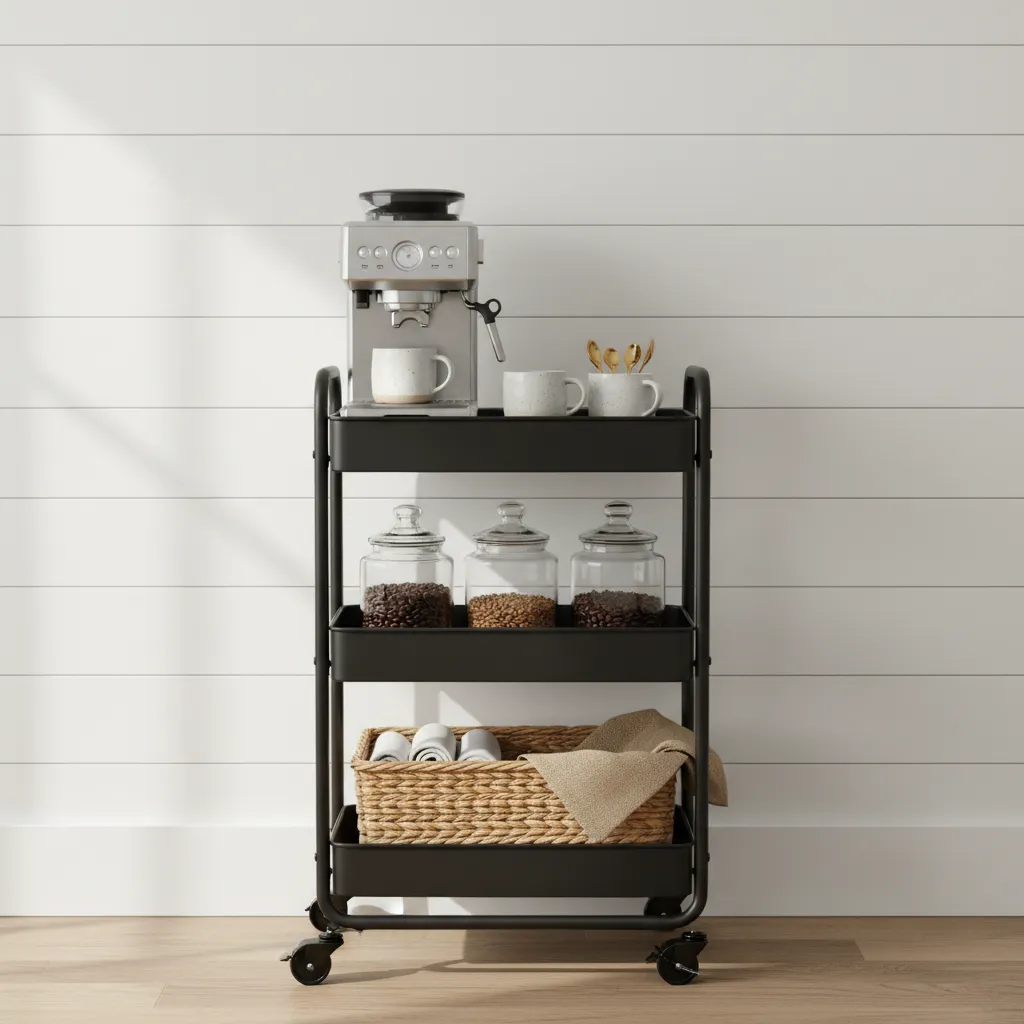
For homeowners grappling with limited square footage, a rolling utility cart is a superior design solution. It creates a dedicated coffee zone without requiring permanent cabinetry.
The beauty of this setup lies in its spatial dynamics. You can wheel the station into the kitchen for the morning rush, then tuck it away when not in use.
Design is not just about how it looks and feels. Design is about how it works.
Choosing the Right Material
Selecting the right finish is crucial for integrating the cart into your existing decor. A matte black metal cart offers a sleek, industrial look that fits modern lofts.
Conversely, a cart with raw wood shelves introduces warmth and organic texture. This choice complements farmhouse or bohemian interiors by softening the room’s palette.
Consider the tactile experience of the handles and the durability of the casters. High-quality wheels ensure smooth movement over rugs and hardwood floors alike.
| Feature | Metal Utility Cart | Wooden Bar Cart |
|---|---|---|
| Durability | High; resistant to spills and heat. | Moderate; requires coasters for hot items. |
| Aesthetic | Industrial, modern, and utilitarian. | Warm, traditional, and substantial. |
| Maintenance | Easy to wipe down; stain-resistant. | Needs polishing; sensitive to moisture. |
| Mobility | Typically lightweight and agile. | Often heavier and more stationary. |
Strategic Zoning and Organization
To maximize functionality, treat each tier of the cart as a distinct zone. The top shelf should house your primary machinery and daily essentials for easy access.
Use the middle tier to curate your flavor profile. This is the ideal spot to arrange glass bottles of easy homemade coffee syrup recipes for a pop of color.
Bar carts are the ultimate multi-taskers. They can hold everything from your morning coffee essentials to your evening cocktail supplies.
The Editors, House Beautiful
The bottom shelf is perfect for bulk storage. Place a woven basket here to hide bags of beans or extra linens, keeping the visual weight balanced and grounded.
If you prefer rich add-ins, keep a small insulated carafe on the bottom tier. This allows you to serve homemade creamer for coffee without running to the fridge.
Styling for Visual Impact
Functionality should not compromise aesthetics. Soften the hard lines of a metal cart by draping a linen towel over the handle or adding a small trailing plant.
Quick Styling Checklist:
- Layer Heights: Place tall syrup bottles behind short mugs to create visual depth.
- Add Greenery: A small succulent or fern adds life to the industrial materials.
- Container Consistency: Decant sugar and beans into matching glass jars for a cohesive look.
- Lighting: Clip a small battery-operated lamp to the side for a warm ambient glow.
The Cart Curator’s Guide
- Maximize your cart’s footprint by attaching magnetic hooks to the metal frame for hanging milk frothers, dish towels, or measuring spoons.
- Line your shelves with clear silicone mats or patterned contact paper to protect against spills and dampen the sound of clinking glass jars.
- Ensure your cart features lockable casters to keep the station steady and secure while you are tamping espresso or pouring hot water.
Styled Countertop Tray Arrangement
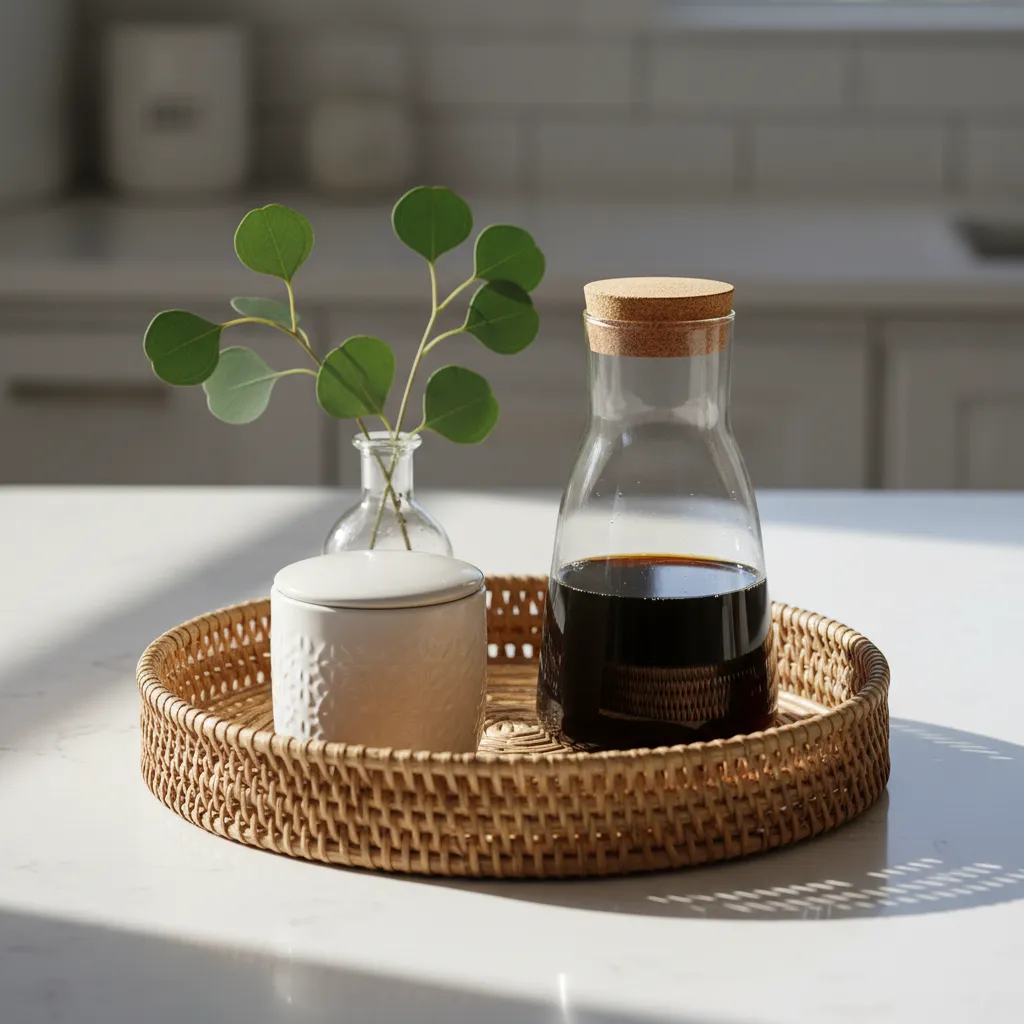
A well-styled tray acts as a visual anchor for your coffee station. It serves a vital purpose by grouping small items to reduce visual clutter.
This simple addition transforms scattered accessories into a cohesive vignette. It defines the zone without requiring a renovation or heavy lifting.
Choose a material that contrasts beautifully with your existing countertops. A woven rattan texture warms up cool quartz or polished marble surfaces.
Alternatively, a slate or matte metal tray adds sleek elegance to butcher block. The contrast ensures the coffee bar stands out as a focal point.
Design creates culture. Culture shapes values. Values determine the future.
Function Meets Aesthetics
Beyond looks, a tray improves the functionality of your kitchen workspace. It catches stray coffee grounds and sugar spills to protect the counter.
This makes cleaning effortless and quick during busy mornings. You can lift the entire arrangement to wipe the surface underneath in one motion.
Use the tray to corral your daily essentials like spoons and sweeteners. This keeps high-traffic items accessible yet neatly organized within boundaries.
Trays are one of the most versatile styling tools. They ground your accessories and make a collection of small objects feel intentional rather than messy.
Shea McGee, Studio McGee Styling Guide
Layering Your Tray Essentials
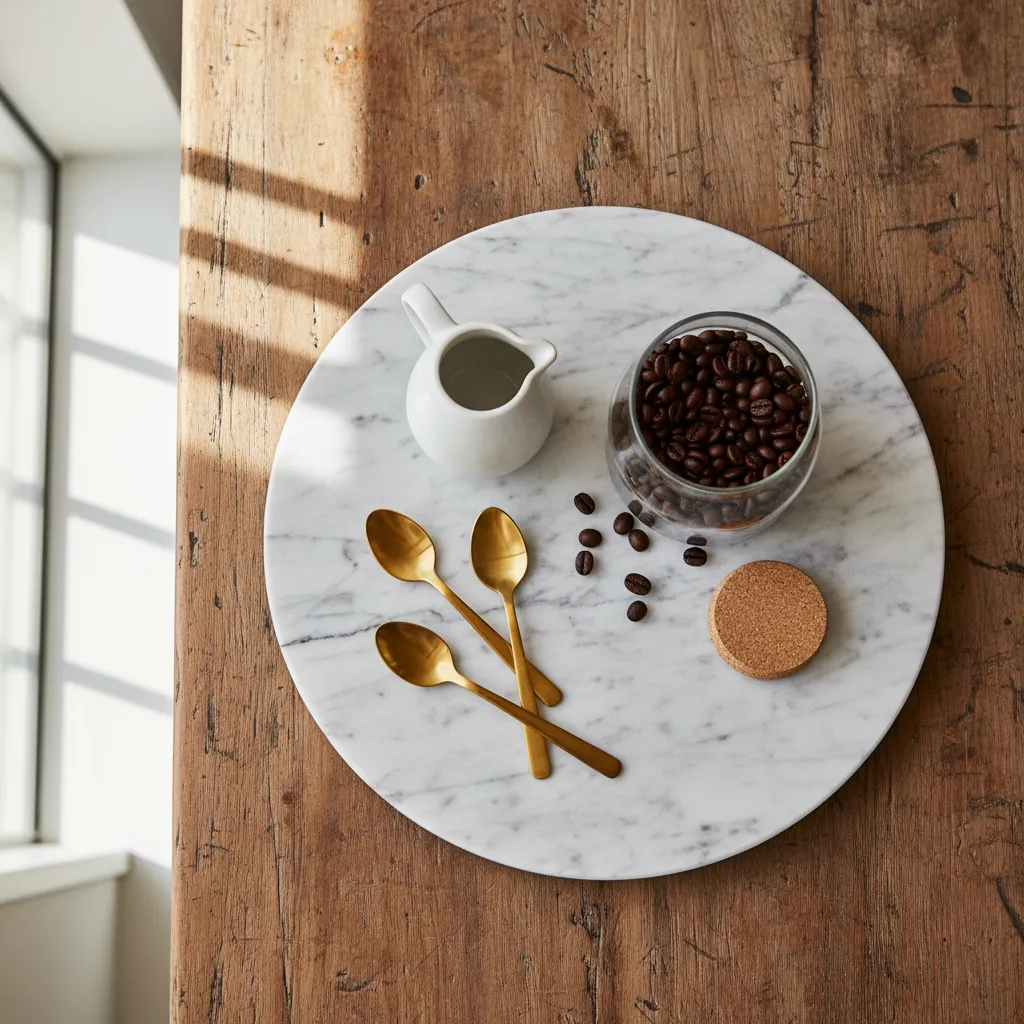
Start by placing your largest items on the tray first to establish balance. A tall French press or a stack of ceramic mugs works well as a sturdy base.
Incorporate glass decanters for a streamlined and professional look. These vessels are perfect for displaying easy homemade coffee syrup recipes.
Finally, add a touch of life with a small potted succulent or fresh blooms. This organic element softens the hard lines of ceramic and glass wares.
Use the checklist below to ensure your tray feels balanced and complete. Striking the right balance prevents the tray from looking overcrowded.
Tray Styling Checklist
- The Anchor: One tall item (carafe, plant, or grinder) to add vertical interest.
- The Texture: A small stack of linen napkins or a wooden spoon jar for warmth.
- The Container: A lidded canister for sugar or beans to hide visual noise.
- The Sparkle: A metallic element like a brass spoon or gold-rimmed mug.
- The Organic: Fresh greenery or dried florals to bring life to the vignette.
Remember to leave some negative space on the tray for a relaxed feel. Crowding too many items can make the station look chaotic instead of curated.
Rotate your decor seasonally to keep the space feeling fresh and current. A small bowl of pinecones in winter or citrus in summer adds charm.
Designer’s Styling Hack
- Apply the ‘Rule of Three’ by grouping items of varying heights; use a tall carafe, a medium-sized plant, and a small dish for spoons to create a balanced pyramid effect.
- Place a small linen cloth or decorative coaster inside the tray to provide a soft landing spot for mugs and protect the tray surface from heat or rings.
- Leave approximately 25% of the tray surface as ‘negative space’ to ensure the arrangement looks curated and intentional rather than overcrowded.
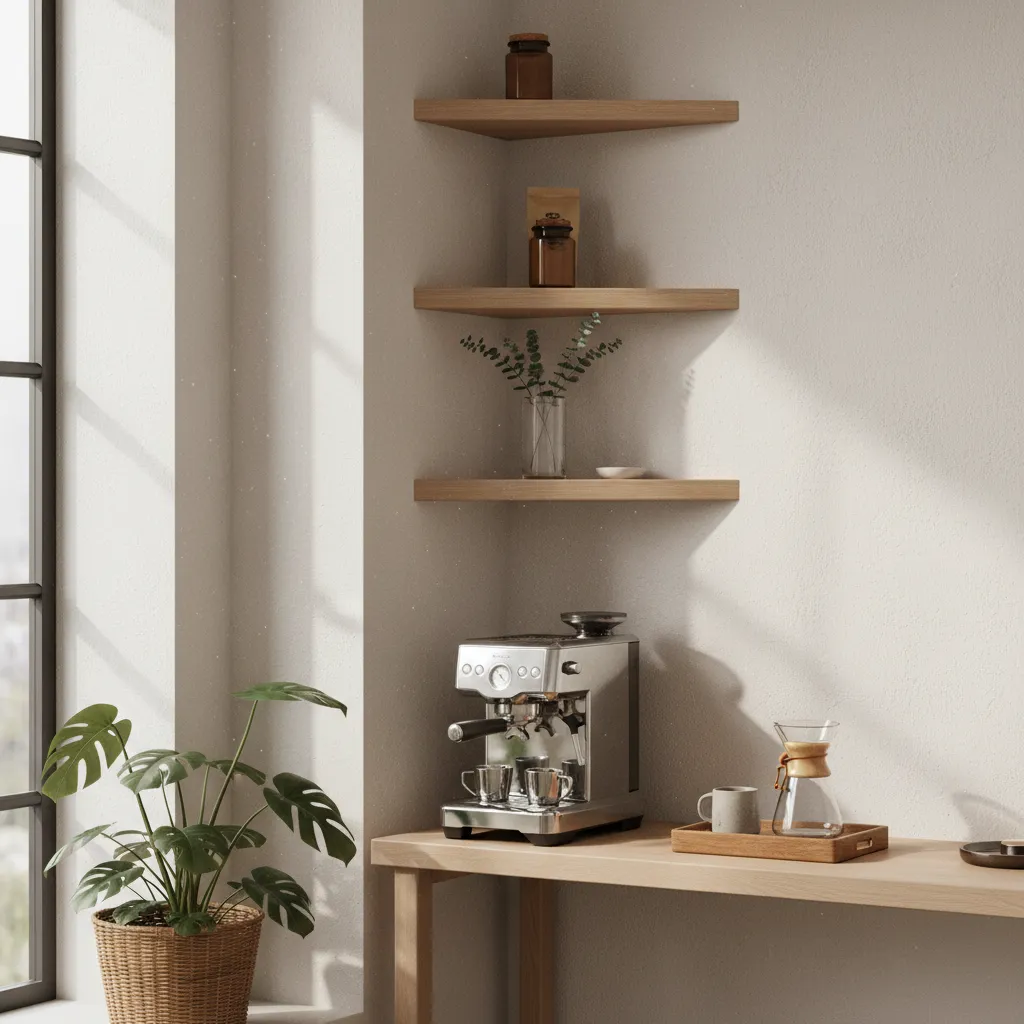
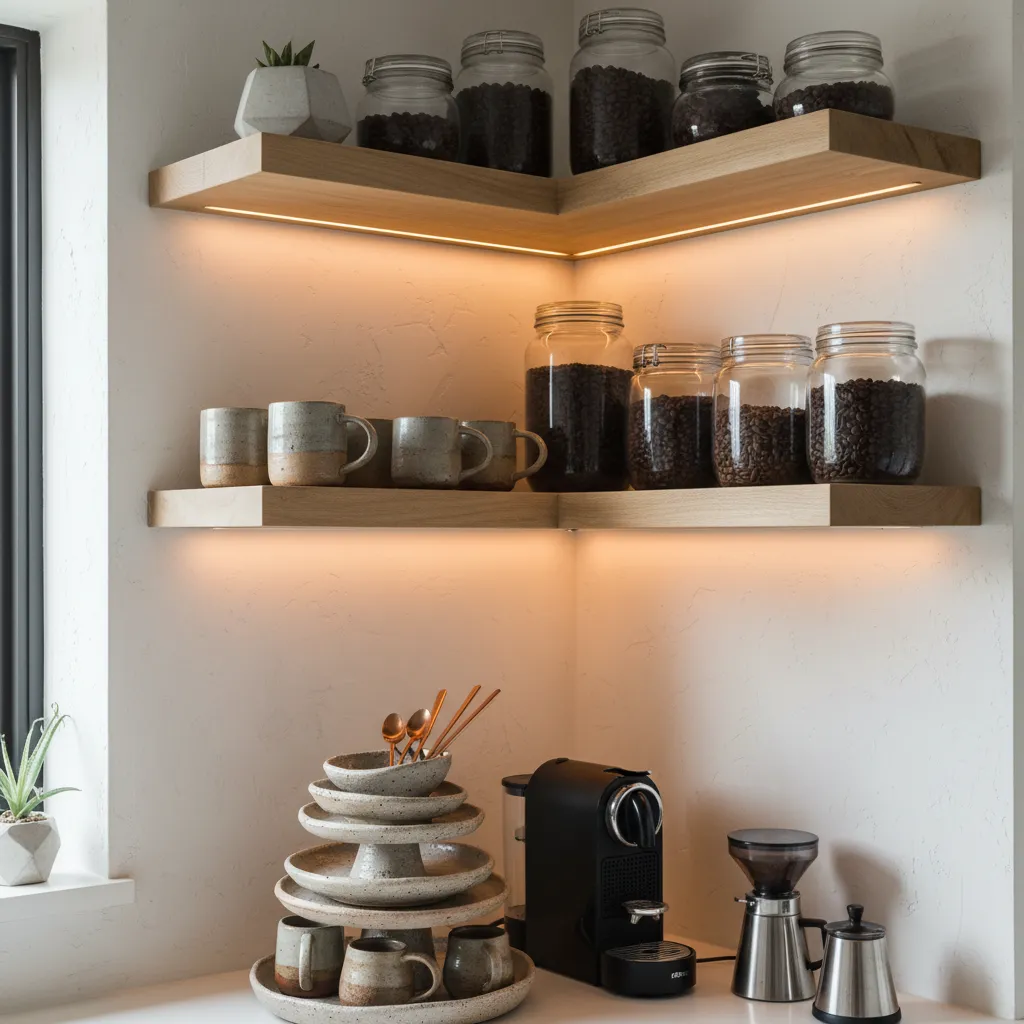
Rustic Floating Shelves Display
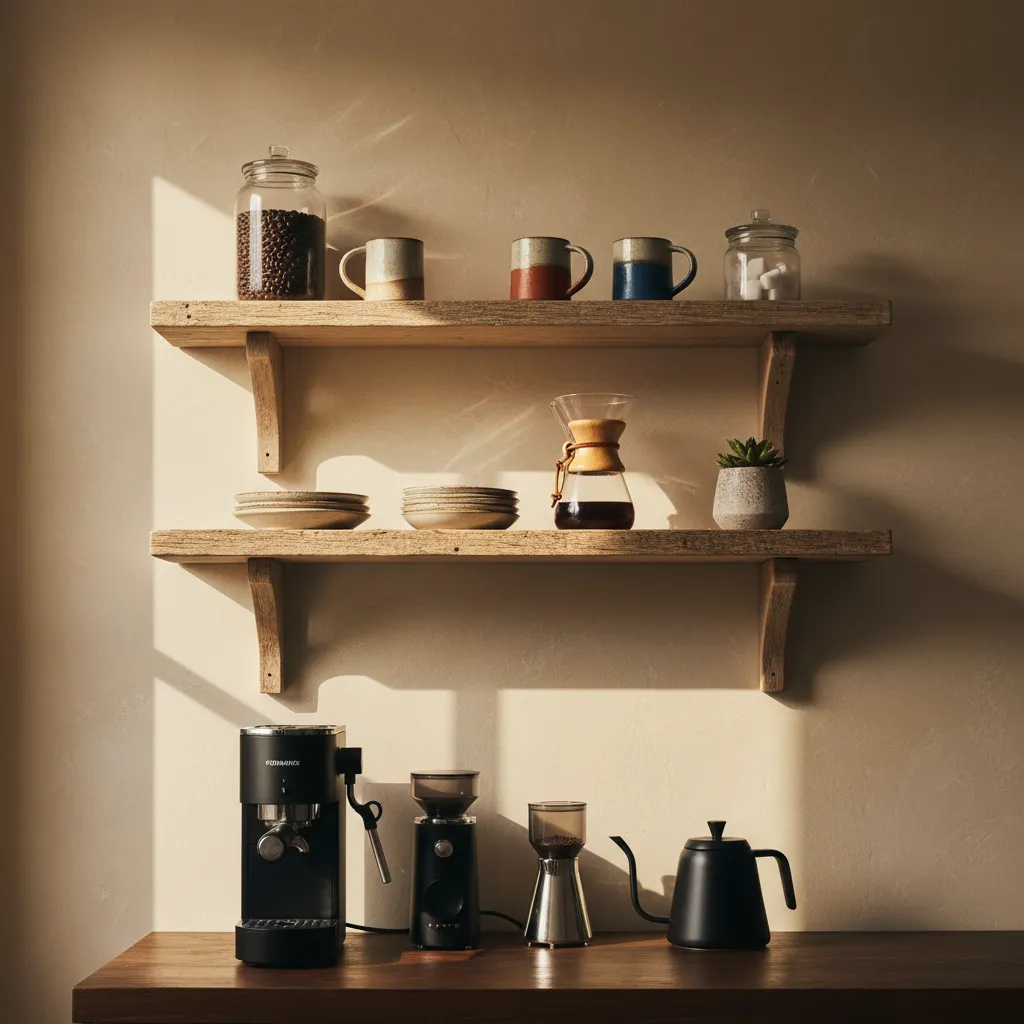
Floating shelves instantly open up a room, creating an airy feel that bulky cabinets cannot match. The texture of raw, reclaimed wood adds immediate warmth to your coffee nook.
This design choice invites guests to serve themselves, making the space both beautiful and practical. The lack of doors encourages you to keep your display organized and curated.
Open shelving turns your daily essentials into a living gallery of your morning ritual.
Structural Considerations and Installation
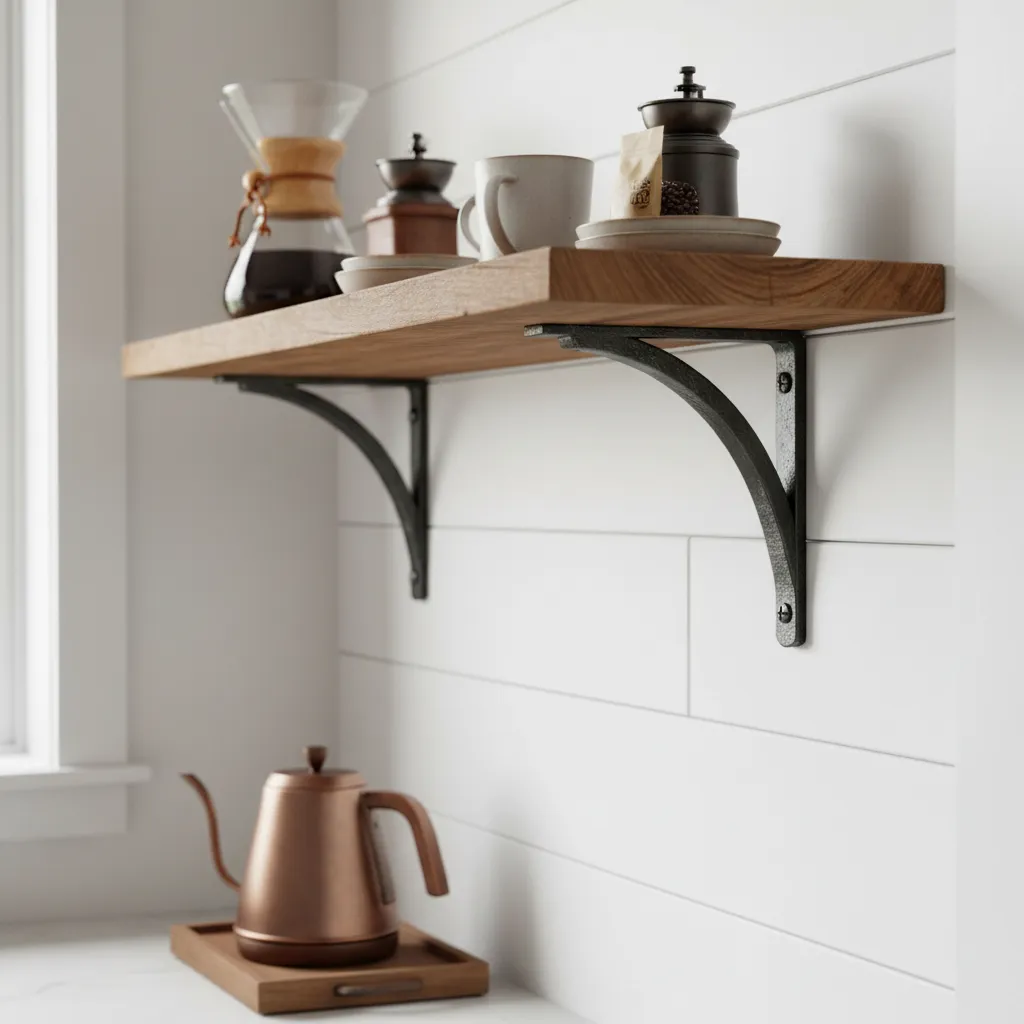
Structural integrity is paramount when displaying heavy ceramics. Ensure you mount brackets into studs to support the weight of mugs and canisters.
A well-anchored shelf can hold substantial weight, offering peace of mind alongside aesthetic appeal. Balance is key when styling these open surfaces to avoid visual clutter.
When styling open shelves, vary the height and scale of objects. It creates a rhythm that keeps the eye moving.
Shea McGee, Studio McGee Shelf Styling Guide
Mix practical items like coffee grounds with decorative greenery or vintage art. You can display ingredients used to craft Starbucks drinks recipes and homemade refreshers for easy access.
Selecting the Right Wood Tone
Choosing the correct timber changes the entire atmosphere of the station. Lighter woods feel Scandinavian, while dark stains evoke a traditional library feel.
| Wood Type | Aesthetic Vibe | Durability |
|---|---|---|
| Reclaimed Oak | Rustic & Textural | High (Very Hard) |
| Walnut | Modern & Rich | Medium-High |
| Pine | Farmhouse & Soft | Low (Prone to Dents) |
| Maple | Clean & Minimal | High (Smooth Grain) |
If you love vintage living room ideas inspired by old-world elegance, use iron brackets. This small hardware detail bridges the gap between industrial utility and cozy farmhouse charm.
Shelfie Secrets
- Always use a spirit level during installation to ensure your mugs stay put and prioritize anchoring into wall studs for heavy ceramic collections.
- Create visual depth by layering larger canisters at the back and staggering smaller items like succulents or vintage espresso cups in the foreground.
- Apply a matte clear sealant to reclaimed wood shelves to protect the timber from steam and coffee splashes while maintaining that raw aesthetic.
Repurposed Vintage Dresser Station
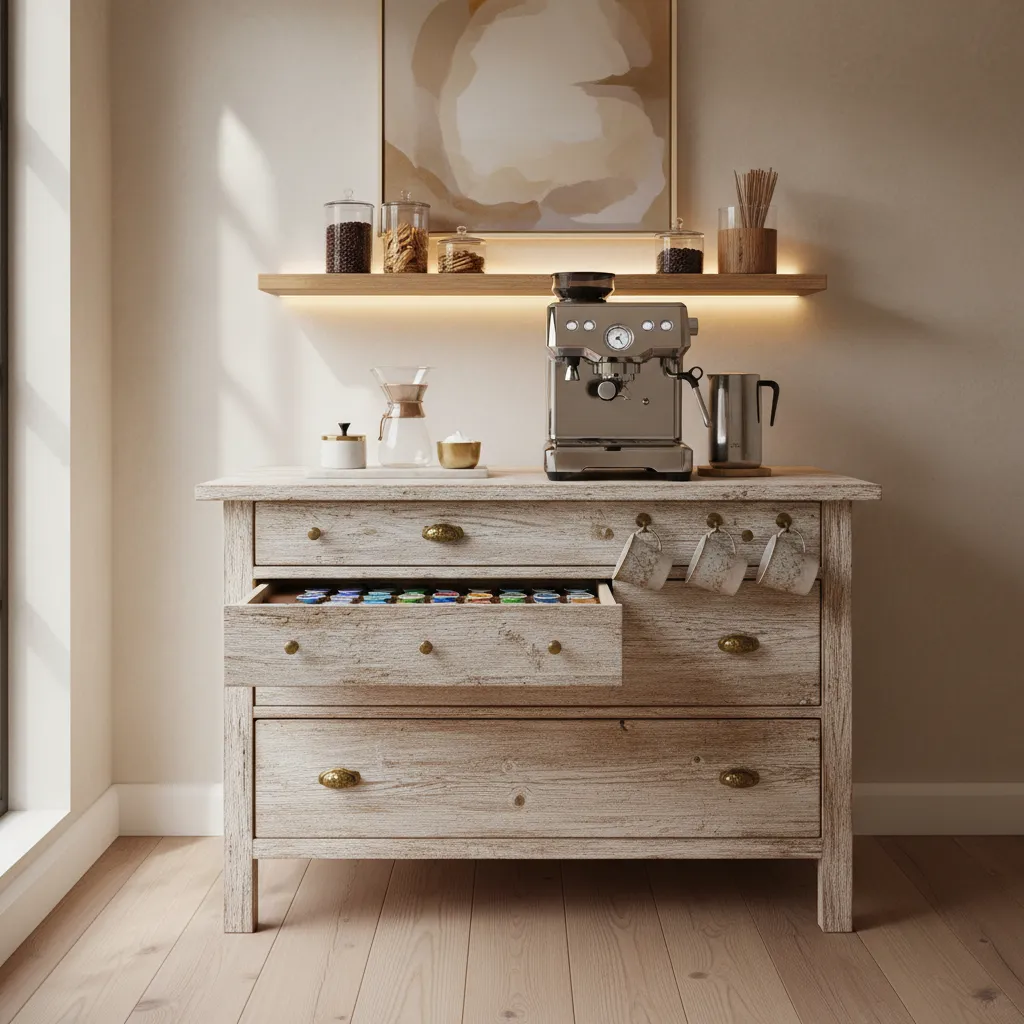
Transforming a vintage dresser into a coffee station adds instant soul to your kitchen or dining area. The worn texture of old wood creates a warm contrast against sleek, modern espresso machines.
Functionality is the primary advantage of this design choice. Deep drawers offer ample hidden storage for bulky bags of beans, filters, and mugs, keeping the countertop completely clutter-free.
This approach works exceptionally well if you appreciate vintage living room ideas and want that aesthetic to flow into your culinary spaces. It grounds the room with history.
Vintage isn’t just old furniture; it is a story waiting to be retold in your morning routine.
Preparing the Surface
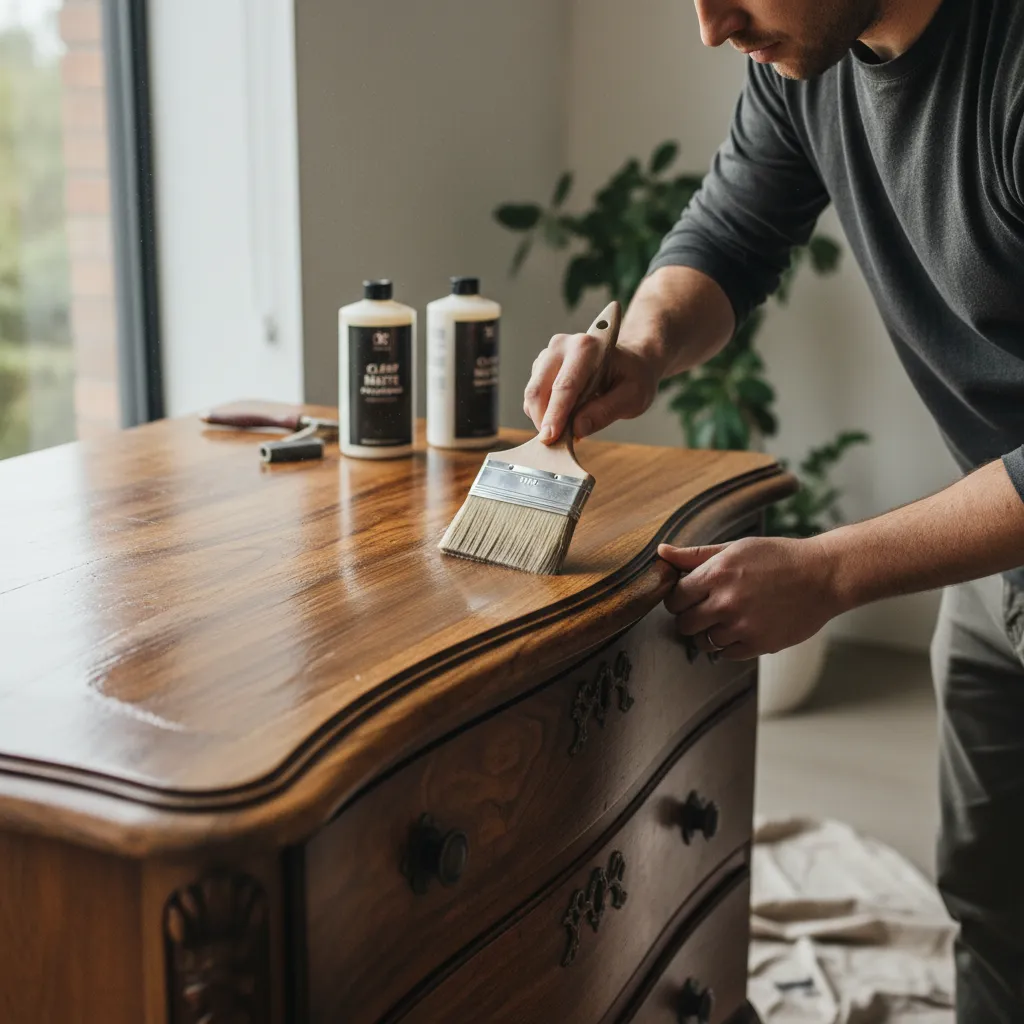
Original dressers were not designed to handle heat and moisture. You must seal the top surface to prevent water rings and steam damage. A marine-grade matte polyurethane is the best option here.
This finish preserves the aged look of the wood while creating an invisible barrier. It allows you to wipe up spills easily without worrying about warping or staining the antique veneer.
Every room needs a touch of black, just as it needs at least one antique piece.
Jan Showers, Glamorous Rooms
Drawer Organization Checklist
To maximize the utility of your new station, you need to zone the interiors of the drawers effectively. Here are the essential modifications needed for a functional workflow.
- Waterproof Liners: Line every drawer with a non-slip, waterproof mat to protect the wood from spills or sticky syrup residue.
- Drawer Dividers: Use bamboo or acrylic dividers to separate coffee pods, tea bags, and sugar packets into neat rows.
- Hardware Update: Consider swapping old handles for brass cup pulls to modernize the look while maintaining a classic feel.
- Mug Storage: Dedicate the deepest drawer to stacking mugs or storing your whipped coffee recipe whisk and frother.
Lighting is the final touch for this setup. Place a small, warm-toned lamp on the corner of the dresser to create an inviting glow for early morning brewing sessions.
Station Styling Secrets
- Drill a small hole in the back panel to thread power cords through, keeping the top surface sleek and wire-free.
- Add heavy-duty locking casters to the base to turn your heavy dresser into a mobile serving station for entertaining.
- Mount a vintage brass towel bar to the side of the dresser to keep linen tea towels within easy reach.
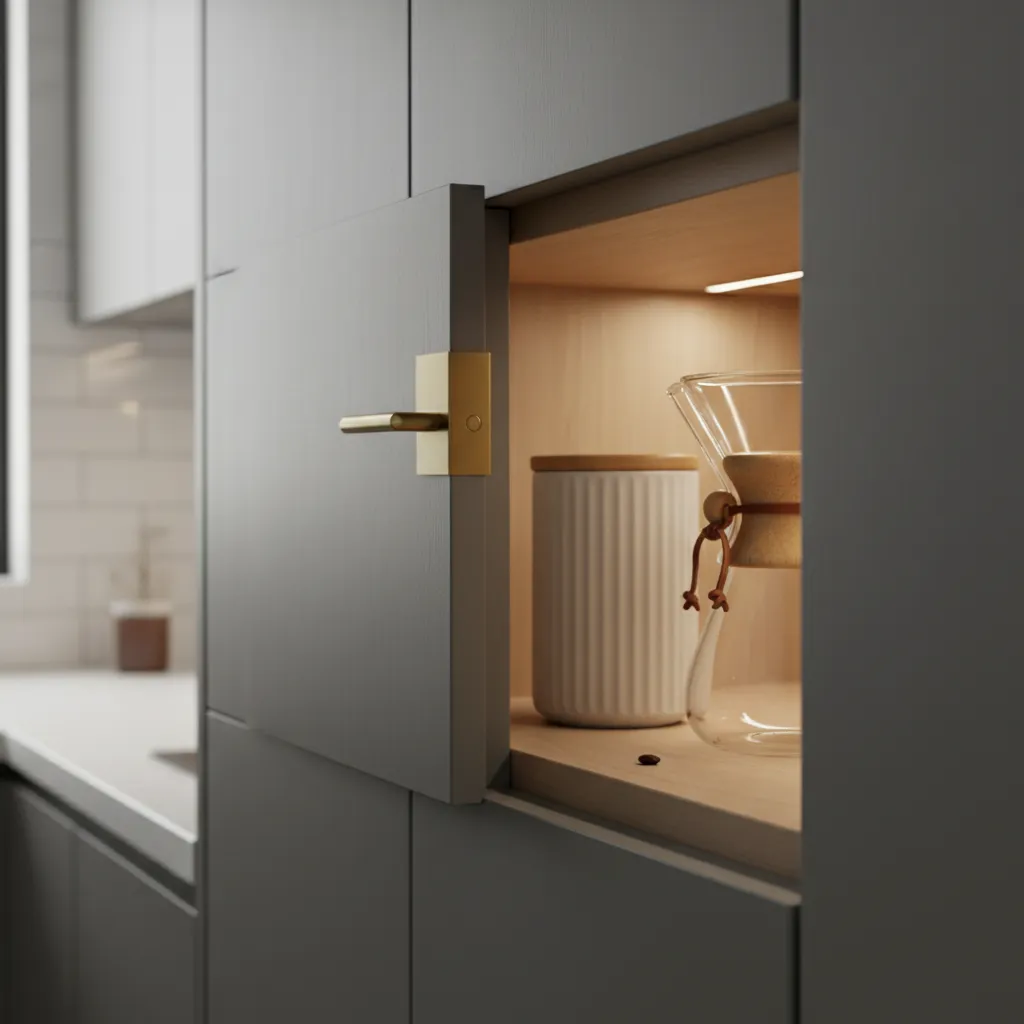
The Hidden Cabinet Appliance Garage

The appliance garage has evolved far beyond the clunky corner units of the past. It is now a sophisticated architectural feature.
This design choice keeps your countertops pristine while ensuring your morning ritual remains easily accessible.
Imagine a seamless wall of cabinetry that looks like a standard pantry. With a gentle touch, retractable doors slide back to reveal a fully stocked coffee bar.
The aesthetic appeal lies in the reduction of visual noise. When the doors are closed, the room feels expansive and serene.
Upon opening, warm LED strip lighting activates to showcase your machine against a textured backsplash, perhaps a raw stone or matte tile.
Functionality is the core driver of this design. It allows for permanent placement of heavy machines without lifting or moving them.
Proper spatial planning is essential. Just as you might explore 15 Closet Organization Ideas for Small Closets and Tight Spaces, the principles of efficient storage apply here.
True luxury in design is the ability to conceal functionality until the very moment it is needed.
Critical Design Elements for Success
To create a functional appliance garage, you must address power and steam management early in the blueprint phase.
Install electrical outlets at the back of the cabinet to keep cords hidden. This eliminates the need to unplug devices after every use.
Consider the height of your tallest appliance. You need ample clearance for the machine and room to access water tanks or bean hoppers.
Select durable interior materials. The shelf floor should be water-resistant, such as quartz or sealed wood, to handle inevitable spills.
With a designated spot for everything, you can easily store jars of sugar or even your Homemade Creamer for Coffee Heavy Cream Recipe if a mini-fridge is integrated nearby.
Here is a checklist of non-negotiable features for a high-functioning hidden station:
- Retractable Doors: Pocket or tambour doors prevent obstruction of the walkway when the station is in use.
- Internal Power Strip: Ensure you have enough plugs for the grinder, kettle, and espresso machine.
- Pull-Out Shelf: A sliding tray allows you to pull the machine forward for easier refilling and steam ventilation.
- Task Lighting: Motion-sensor lights ensure you can see your measurements clearly in the early morning.
- Ventilation: Ensure there is airflow to prevent moisture buildup from hot steam escaping your brewer.
An appliance garage is the hero of the clutter-free countertop, offering a permanent home for daily-use gadgets without sacrificing aesthetic appeal.
Editorial Team, Real Simple
This hidden approach creates a distinct zoning effect. It separates the “beverage zone” from the “prep zone,” improving kitchen traffic flow.
When entertaining, you can leave the doors open to invite guests to serve themselves. When the party ends, simply close the doors to hide the mess.
The Hidden Advantage
- Install a heavy-duty pull-out shelf so you can slide steam-producing appliances out from under the cabinetry during use to prevent long-term moisture damage.
- Add a motion-activated LED light strip inside the garage to ensure perfect visibility during early mornings without needing to flip multiple switches.
- Line the base with a custom-cut silicone mat or a piece of matching quartz to protect the cabinetry from heat and make cleaning up spills or grounds effortless.
Café-Style Chalkboard Wall Backdrop
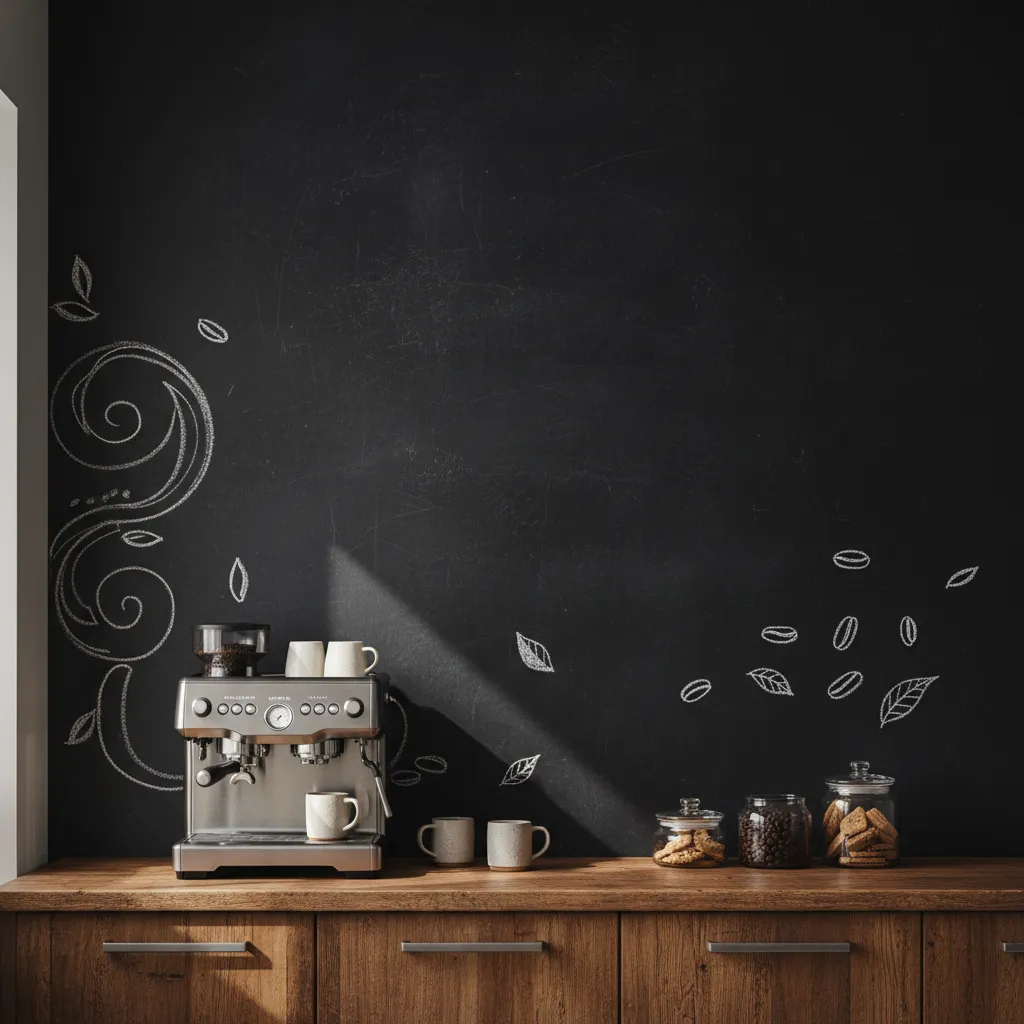
Transforming a plain wall into a chalkboard surface instantly adds depth and cafe culture to your home. The matte black finish absorbs light, allowing your shiny espresso machine to pop.
This design choice is not merely aesthetic; it serves as a functional hub for your kitchen. You can display rotating seasonal menus or write down grocery needs as you brew your morning cup.
A chalkboard wall turns a static room into a living canvas, inviting creativity with every cup of coffee poured.
Barista’s Canvas Guide
- Season your new chalkboard by rubbing the side of a chalk stick over the entire surface and erasing it to prevent permanent ghosting of your first drawings.
- Opt for liquid chalk markers to achieve crisp, professional-looking lettering without the mess of traditional chalk dust near your espresso machine.
- Frame the edges of your chalkboard wall with thin wood trim or molding to create a sophisticated, built-in look that mimics a high-end coffee house.
Choosing the Right Paint and Texture
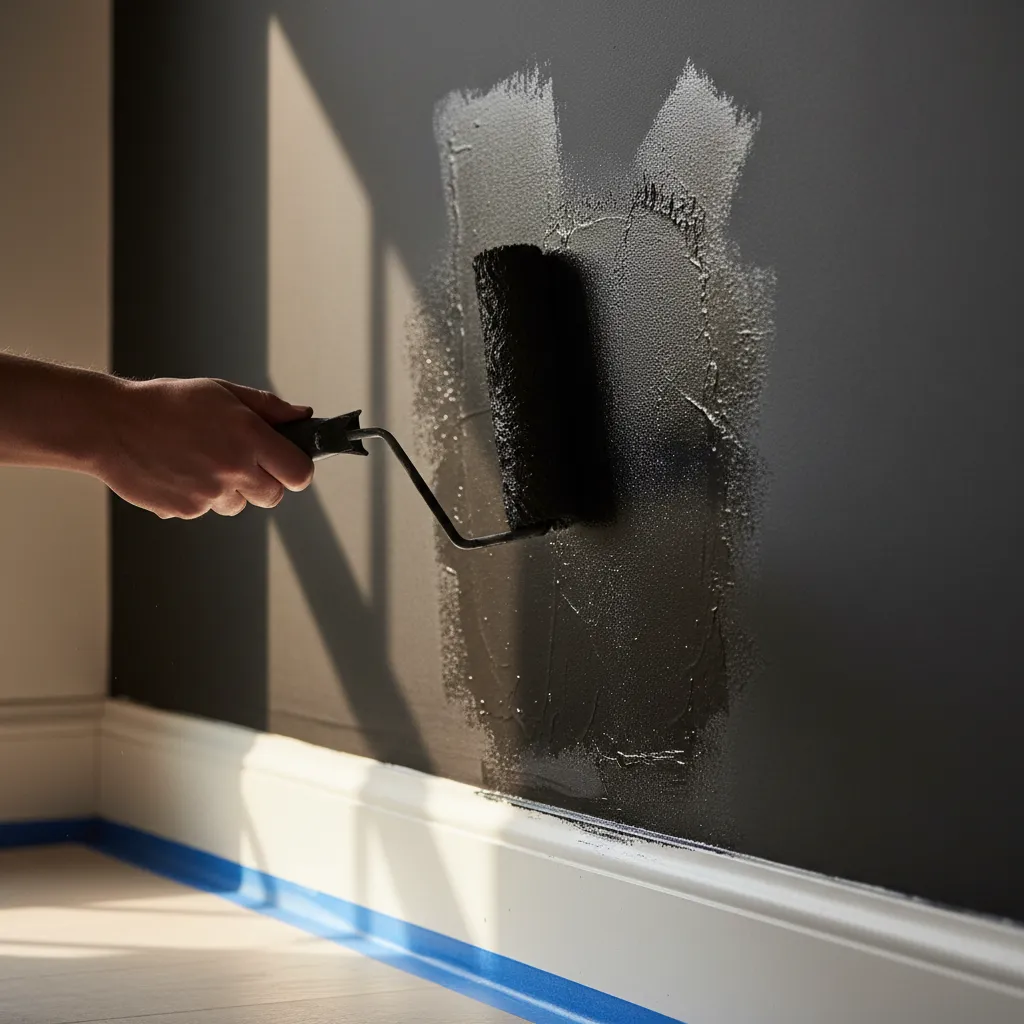
For a professional finish, the smoothness of the wall is paramount. Texture on the drywall will make writing difficult and legible text nearly impossible. Sand the area thoroughly before painting.
Consider using magnetic chalkboard paint for added utility.
This allows you to magnetize recipe cards, such as a printed Whipped Coffee Recipe: Design Your Perfect Morning Ritual, directly to the backsplash.
Dark walls are incredibly glamorous and enveloping. They make everything you put against them look more expensive and curated.
Abigail Ahern, Colour Confidence Guide
The Finish Line
- For a glass-smooth writing surface, use 220-grit sandpaper between paint coats to eliminate any lingering drywall imperfections.
- If opting for magnetic paint, apply at least three to four thin coats before the final chalkboard finish to ensure a strong hold for recipe cards.
- Don’t shy away from deep charcoals or midnight navys; dark matte finishes act as a sophisticated backdrop that makes metallic kitchenware pop.
Styling Your Menu Board
The typography you choose sets the mood for the entire station. Mix script fonts for headings with simple block letters for list items to mimic the look of an authentic Italian bistro.
If you lack steady handwriting, use stencils to create permanent headers like “Menu” or “Brew.” This keeps the design clean while allowing you to update the specific drink items below.
List your favorite beverages to inspire guests. You might feature Craft Starbucks Drinks Recipes Diy Homemade Refreshers during the summer or warm ciders in the autumn.
Chalk Medium Comparison
Selecting the right writing tool affects both the vibe and the maintenance of your wall. Here is how standard chalk compares to liquid markers.
| Feature | Standard Chalk Sticks | Liquid Chalk Markers |
|---|---|---|
| Visual Texture | Dusty, soft, vintage aesthetic | Opaque, vibrant, sharp lines |
| Precision | Low; best for large art | High; excellent for small text |
| Cleanability | Wipes off easily with dry cloth | Requires wet cloth or solvent |
| Durability | Smudges easily if touched | Smudge-resistant once dry |
Bistro Board Mastery
- Season your chalkboard before first use by rubbing the side of a chalk stick over the entire surface and wiping it clean to prevent permanent ‘ghosting’ from markers.
- Use a ruler and light pencil marks to create invisible guidelines, ensuring your drink lists stay perfectly straight and professional.
- Keep a pack of cotton swabs nearby to act as a precision eraser for cleaning up edges or fixing small spelling mistakes without ruining the whole board.
Seasoning the Surface
Before writing your first word, you must “season” the wall. This prevents “ghosting,” where the first thing you write remains permanently visible even after erasing.
- Wait for Cure Time: Allow the paint to cure for at least 3 days before touching it with chalk.
- Cover with Chalk: Take a piece of white chalk and rub the entire side over the whole surface.
- Wipe Clean: Use a dry cloth to wipe away the dust. This leaves a cloudy, authentic slate look.
Chalkboard Masterclass
- Always use standard white chalk for seasoning, as dustless or colored chalk can leave waxy residues that are difficult to remove.
- Work in both vertical and horizontal strokes during the initial seasoning to ensure every micro-pore of the texture is filled.
- If you ever deep-clean your wall with a damp cloth, re-season it once dry to keep that smooth, ghost-free writing surface.
Wall-Mounted Mug Rack Display
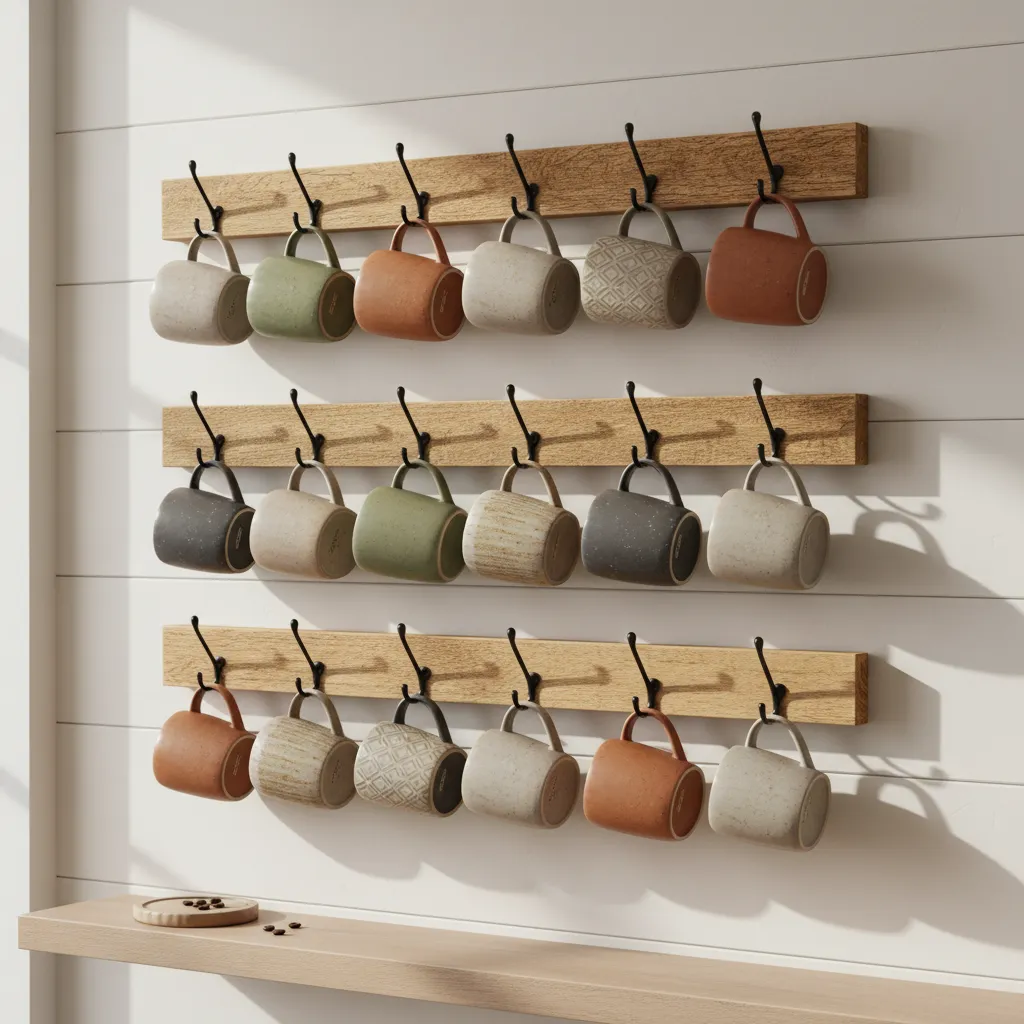
Vertical space is often the most underutilized asset in a kitchen. A wall-mounted mug rack solves storage issues while acting as art.
This design choice frees up valuable cabinet real estate. It keeps your favorite vessels within arm’s reach during your morning ritual.
Visual texture is key here. Imagine raw oak boards paired with matte black hooks. This creates a warm and industrial aesthetic.
Vertical storage turns everyday clutter into a curated gallery of your life’s comforts.
If you are struggling with limited square footage in other rooms, similar principles apply when you explore 15 closet organization ideas for small closets and tight spaces.
Selecting the Right Materials

The material of your rack dictates the atmosphere of the coffee bar. Metal grids offer a sleek and modern vibe suitable for urban lofts.
Reclaimed wood brings history and warmth to the space. It pairs beautifully with ceramic stoneware and vintage glassware.
Ensure the hardware is sturdy. Coffee mugs are deceptively heavy. Anchor your rack into studs to ensure structural integrity.
Your home should tell the story of who you are, and be a collection of what you love.
Nate Berkus, Nate Berkus Interiors
Styling for Visual Flow
Group your mugs by color palette for a cohesive look. A gradient of blues or creams creates a soothing visual rhythm on the wall.
Once your station is set, fill those mugs with a classic black coffee recipe for diet conscious mornings.
Leave negative space between items. Overcrowding the rack can make the area look cluttered rather than intentionally styled.
Consider the ergonomics of height. Place your daily-use cups on the middle hooks for effortless accessibility.
| Rack Style | Visual Aesthetic | Installation Difficulty |
|---|---|---|
| Accordion Peg | Vintage / Cottage | Low (Single anchor) |
| Rail & S-Hook | Industrial / Chef | Medium (Leveling required) |
| Floating Shelf | Minimalist / Scandi | High (Hidden brackets) |
| Pallet Wood | Farmhouse / Rustic | Medium (Heavy anchors) |
Curator’s Corner
- Mix and match handle directions to prevent clashing and maximize hook capacity on smaller racks.
- Rotate your collection seasonally or by color theme to keep your kitchen gallery looking fresh and intentional.
- Install a small battery-operated puck light above the rack to highlight the texture of handmade ceramics and create a cozy evening glow.
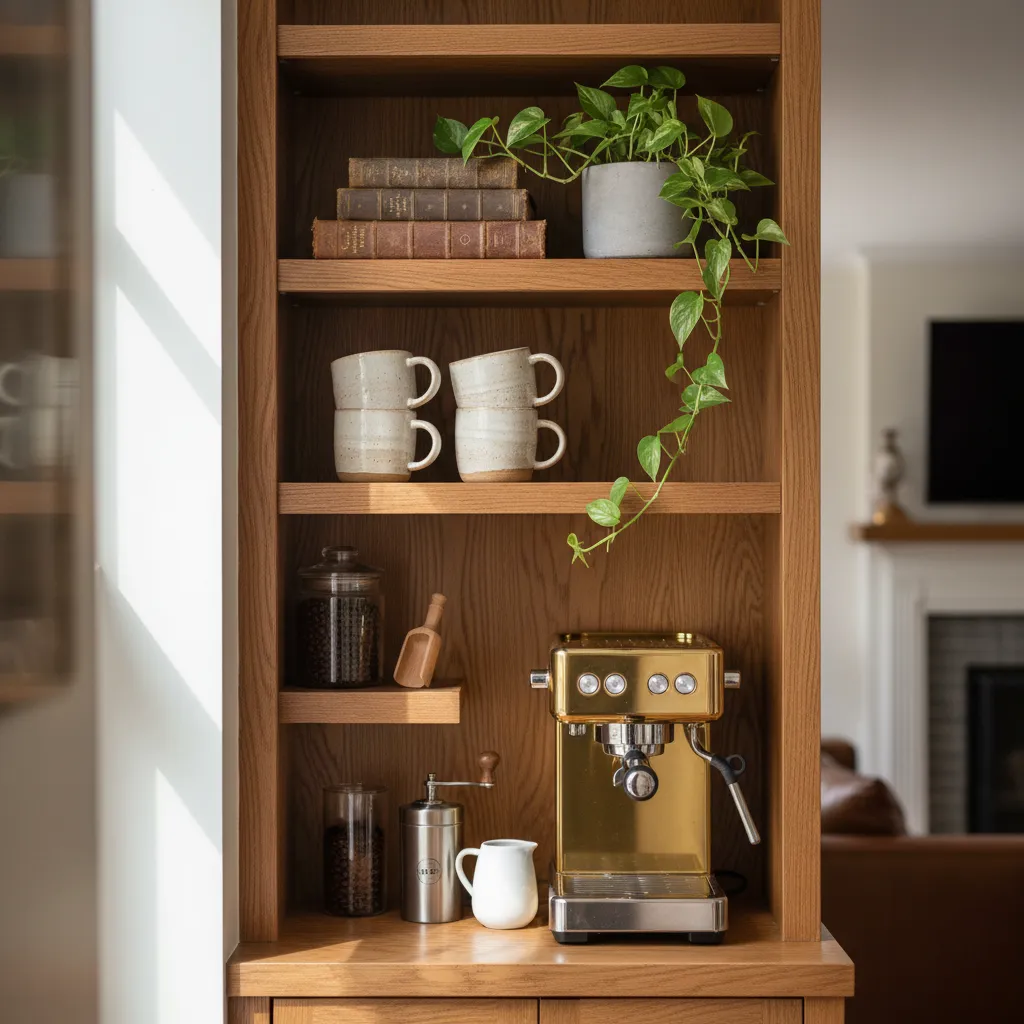
Integrated Bookshelf Coffee Nook
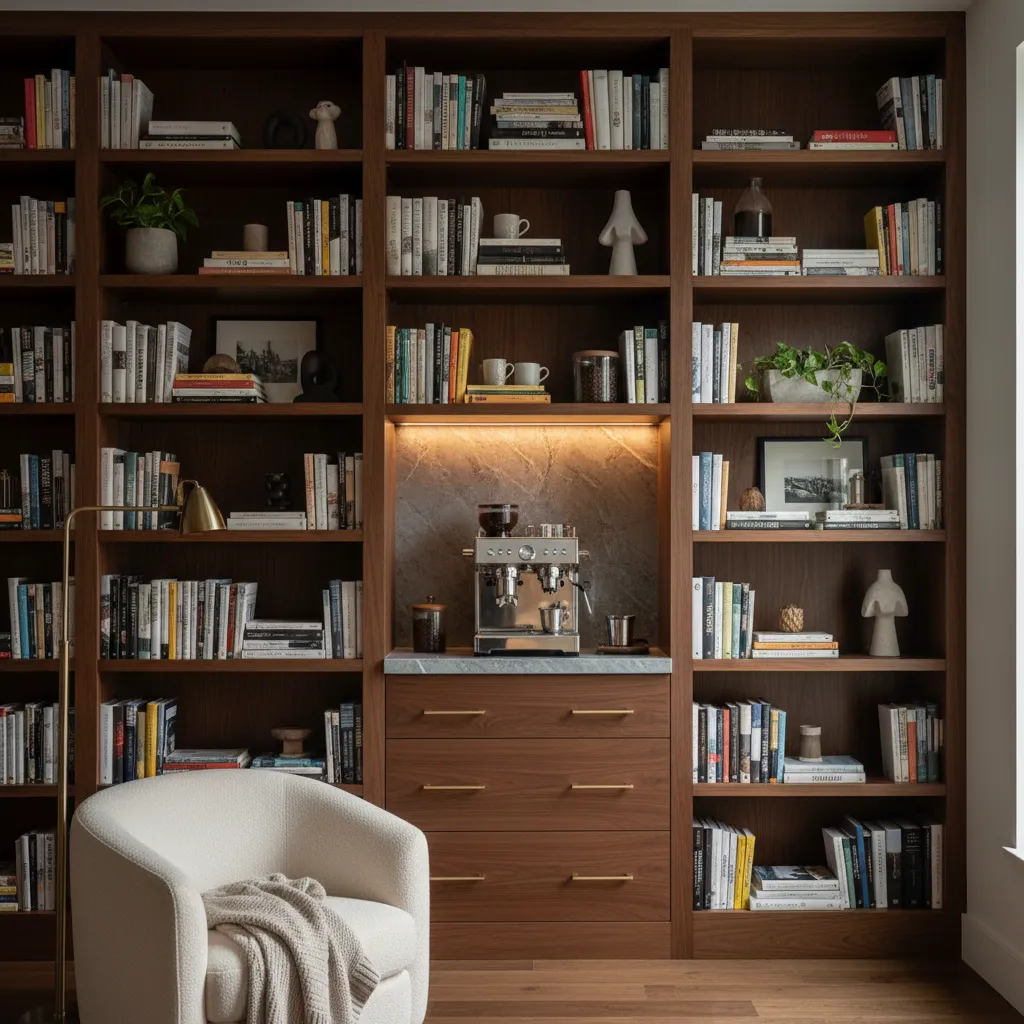
For true bibliophiles, merging a private library with a caffeine station creates the ultimate sanctuary. This design maximizes vertical storage.
By integrating your coffee setup into existing shelving, you anchor the room with a functional focal point. It blends utility with leisure.
To execute this renovation, select a waist-high shelf to serve as your main countertop. You must ensure the shelf structure is reinforced.
A standard bookshelf shelf may sag under the weight of a heavy espresso machine. Add subtle brackets underneath for necessary structural integrity.
Ensure the shelf immediately above provides enough clearance for steam vents. You do not want moisture warping your precious hardcover collections.
Drill a discrete grommet hole in the back panel to manage electrical cords. This maintains a clean visual flow and prevents unsightly cable clutter.
I always say that books are the soul of a room. When you mix them with functional items, you create a space that feels lived-in and authentic.
Shea McGee, Studio McGee Design Philosophy
Styling Your Literary Coffee Corner
The aesthetic success of this nook relies on balancing negative space. Do not overcrowd the station with too many appliances or loose accessories.
Incorporate varying textures to prevent the look from feeling flat. Mix smooth ceramic mugs with rough linen napkins and leather-bound spines.
If you are looking for more inspiration on setting up reading areas, explore these cozy home library ideas.
Lighting is crucial for this specific setup. Install rechargeable puck lights or LED strips under the upper shelf to highlight the workspace.
This ambient lighting creates a warm glow that invites you to linger. It transforms a simple utility shelf into a high-end display feature.
To keep the area practical, consider using a tray to corral spoons and sugar. This protects the wood surface from potential spills or heat damage.
For a truly relaxing atmosphere, follow cozy room decor tips to blend the nook with the rest of the room.
Below is a checklist of essential elements to ensure your bookshelf bar is both safe and stylish.
| Element | Purpose | Pro Tip |
|---|---|---|
| Moisture Barrier | Protects wood from steam/spills. | Use a stone or glass tray under the machine. |
| Cable Management | Hides unsightly power cords. | Use a hole saw to create a clean rear exit. |
| Task Lighting | Illuminates the brewing area. | Choose warm 2700K LEDs for a cozy vibe. |
| Reinforced Shelf | Supports heavy equipment. | Check weight limits before installation. |
A room without books is like a body without a soul, but a library with coffee is a home with a heart.
This integration creates a seamless transition between intellectual stimulation and sensory comfort. It turns a wall into an experience.
The Curated Corner
- Apply a clear matte sealant to the designated ‘countertop’ shelf to prevent permanent coffee rings and stains without altering the natural look of the wood.
- Ensure at least 6-8 inches of clearance above your machine to allow steam to dissipate freely and prevent moisture from warping the book spines on the shelf above.
- Install a cord-management grommet at the very back of the shelf to keep power cables tucked away and maintain the streamlined aesthetic of your library wall.
The Modern Farmhouse Buffet Table

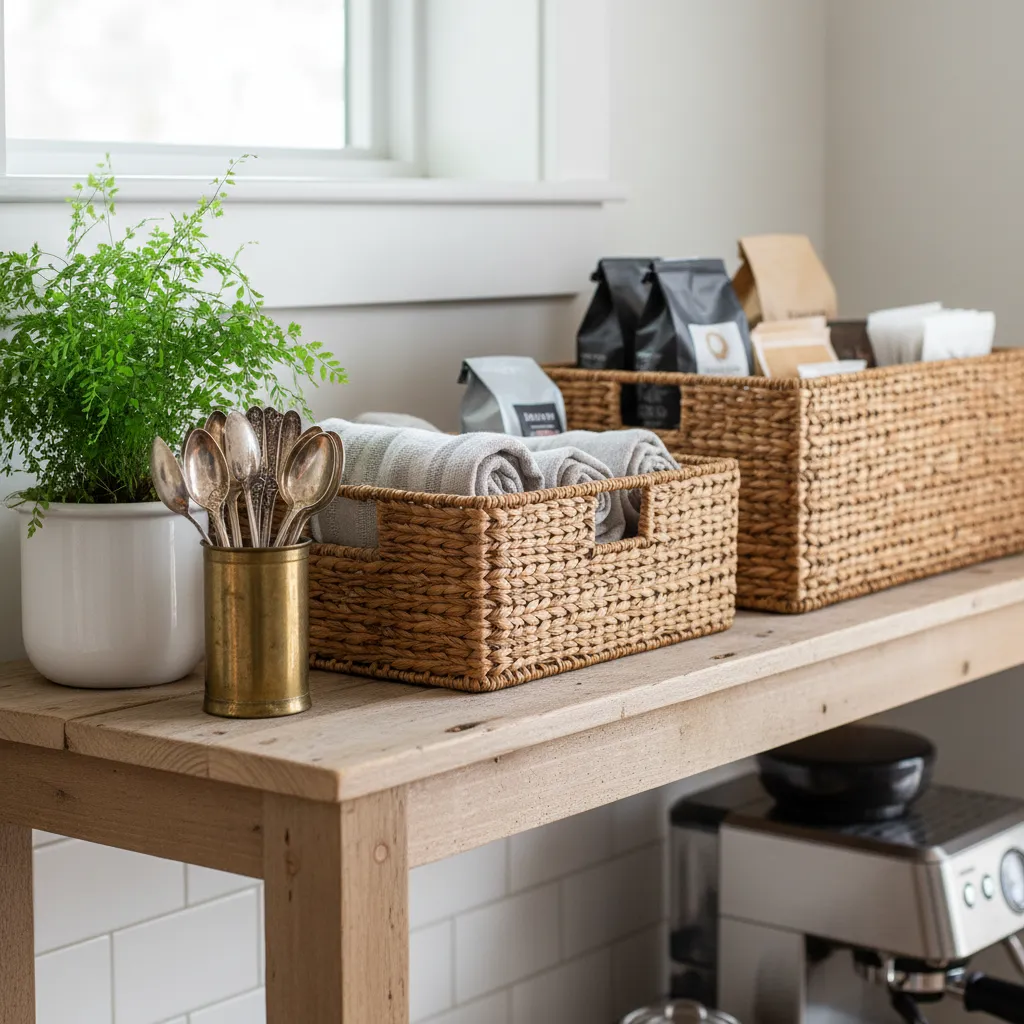
Repurposing a dining room buffet is a brilliant way to anchor your coffee station. It offers ample surface area for large espresso machines.
The deep drawers provide hidden storage for bags of beans and filters. This keeps the visual clutter to a minimum, preserving a clean look.
Visually, the blend of raw wood and matte black metal creates a grounded aesthetic. It perfectly balances rustic charm with modern utility.
Farmhouse style isn’t just about the look; it is about creating a space that feels lived-in, loved, and ready to serve.
Selecting the Right Foundation
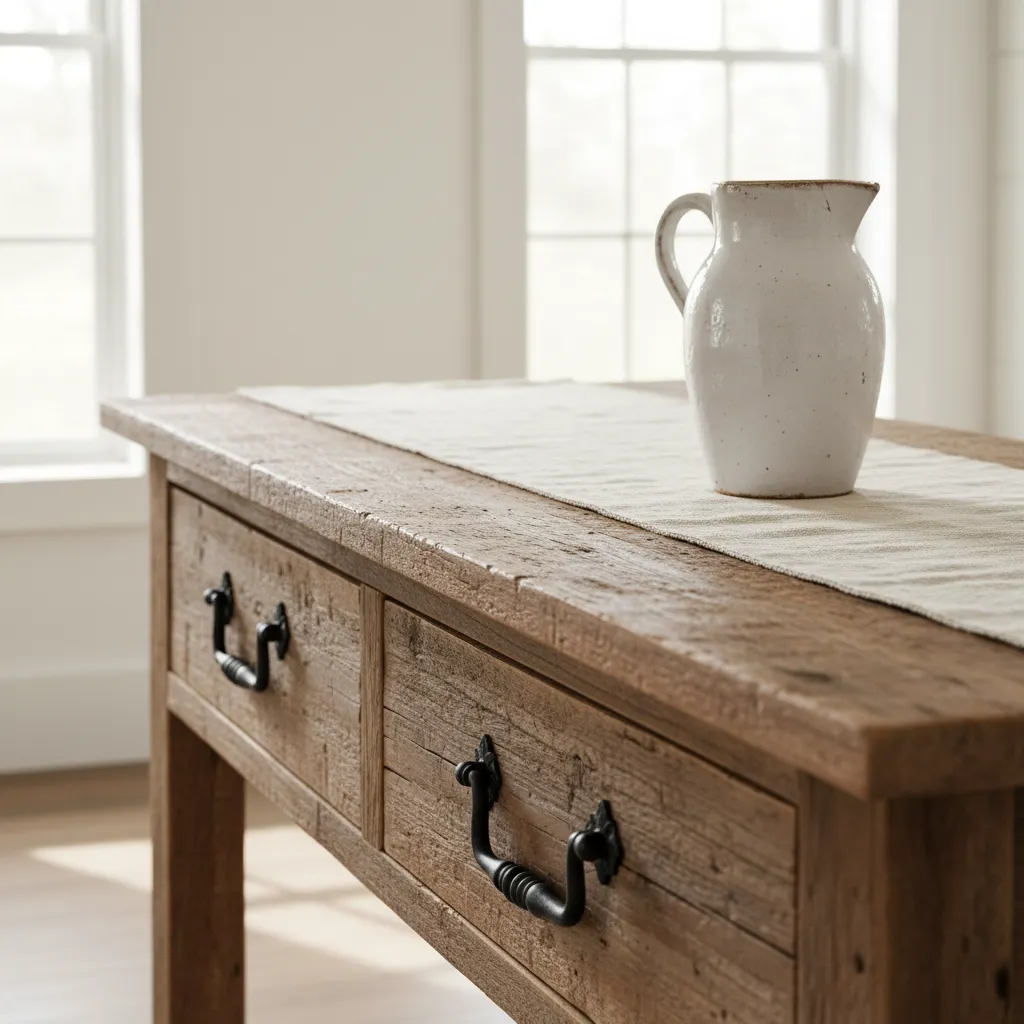
Look for solid wood pieces with visible grain or distressed paint finishes. These textures hide coffee spills better than high-gloss lacquer.
Ensure the height is comfortable for pouring, typically around 34 to 36 inches. A piece with sturdy legs ensures stability when tamping espresso.
To enhance the atmosphere, incorporate elements that soften the hard edges. You can apply 50 cozy room decor tips to make the station inviting.
Functional Zoning and Styling
Grouping items on a galvanized metal or wood tray keeps the countertop tidy. This zoning technique prevents visual clutter on the wide surface.
Use clear glass canisters for beans and sugar to add a touch of sparkle. This allows you to monitor your stock levels at a glance.
Reserve one corner of the buffet for fresh pastries or seasonal treats. A plate of homemade cinnamon rolls adds an irresistible aroma to the display.
Decoration is not enough. Good design must function.
Bunny Williams, An Affair with a House
Farmhouse Coffee Bar Essentials
Achieving this look requires a balance of texture and practicality. The following items help bridge the gap between storage and style.
- Woven Baskets: Use these in open lower shelves to hide extra mugs or linens.
- Matte Black Hardware: Swap out existing knobs for cup pulls to modernize the piece.
- Ceramic Pitchers: Ideal for holding wooden stirrers or long spoons.
- Wooden Risers: Elevate your syrup bottles to create varying heights.
- Linen Runner: Softens the wood top and catches minor drips or spills.
Lighting is the final element that brings the buffet table to life. A pair of sconces above the station provides necessary task lighting for brewing.
The Designer’s Coffee Corner
- Instantly modernize a vintage buffet by swapping dated knobs for matte black cup pulls or minimalist leather tabs for a polished farmhouse look.
- Protect your wood finish from heat and condensation by placing a marble pastry slab or a heavy-duty galvanized tray beneath your espresso machine.
- Add battery-operated puck lights underneath floating shelves to showcase your mug collection and provide a warm, high-end glow without extra wiring.
Open-Concept Baker’s Rack Stand

A baker’s rack offers a perfect blend of industrial utility and cottage charm. It utilizes vertical space effectively, making it ideal for compact kitchens or dining areas.
The open shelving creates a sense of airiness that prevents the room from feeling cluttered. This spatial dynamic allows you to display beautiful ceramicware rather than hiding it.
Choose a rack with mixed materials like matte black steel and raw oak for a sophisticated finish. The contrast adds texture while ensuring structural integrity for heavy espresso machines.
Arrange your ingredients in clear glass canisters to monitor supply levels easily.
This setup is perfect for hosting, allowing guests to see options for a Guide to Fun Drinks to Make at Home instantly.
Open storage turns your daily rituals into a visual display of life’s simple pleasures.
Use the lower shelves for heavier items like bulk coffee bags or syrup bottles. This keeps the unit grounded and safe, maintaining the proper center of gravity for the furniture.
Use “S” hooks on the wire racks to hang coffee mugs. This frees up shelf space and adds a layer of visual interest that breaks up the horizontal lines of the shelving.
Baker’s Rack Zoning Strategy
To prevent the rack from looking messy, you must apply strict zoning rules. Grouping items by function ensures a smooth workflow during your morning routine.
- Top Tier: Reserve this for lightweight decorative items, vintage tins, or a small trailing plant to soften the metal edges.
- Middle Tier: This is your “Action Zone.” Place the coffee maker and grinder here at waist height for ergonomic brewing.
- Bottom Tier: Utilize woven baskets here to conceal unsightly cords, backstock bags of beans, or cleaning supplies.
- Side Hooks: Hang towels or aprons here to keep textiles accessible but away from the heating elements of your machine.
In small kitchens, vertical storage is your best friend. A baker’s rack adds significant storage footprint without the permanence of built-in cabinetry.
The Spruce Editors, The Spruce
Lighting is crucial for this open-concept setup. Clip-on brass reading lights can be attached to the frame to provide focused task lighting without requiring hardwiring.
Once styled, this station becomes the focal point of your morning routine. It provides the perfect stage to experiment with flavors inspired by Top Dunkin Iced Coffee Drinks to Try.
Baker’s Rack Pro Hacks
- Maximize your vertical storage by using ‘S’ hooks on the side rails to hang mugs and measuring spoons, keeping the main shelves clear for your espresso machine.
- Maintain stability by placing heavy bulk coffee bags or syrup bottles on the lowest tier to lower the unit’s center of gravity.
- Apply the ‘Action Zone’ rule: keep your most-used brewing equipment at waist height for better ergonomics during your morning routine.
The Compact Corner Wedge
The corner wedge strategy turns neglected nooks into functional hubs. By using a triangular footprint, you maximize square footage without disrupting traffic flow in small kitchens.
Visualize a warm oak corner cabinet. The natural grain adds organic texture. Paired with a soft ambient glow from an under-shelf LED, it becomes a cozy morning focal point.
Small corners hold the biggest potential for daily rituals and quiet luxury.
Maximizing Vertical Layers
Floating shelves are essential here. They draw the eye upward, making the ceiling feel higher. This setup works perfectly in minimalist tiny houses where every inch counts.
The best coffee stations are those that are tucked into a corner, out of the way of the main cooking area but still easily accessible.
Martha Stewart, MarthaStewart.com
By grouping essentials on a tiered ceramic tray, you keep the countertop clear. It allows you to organize beans and popular coffee flavors while maintaining a tidy appearance.
Essential Corner Materials
Selecting the right materials ensures durability and style. Choosing items that match your existing cabinetry creates a seamless flow within the room’s spatial dynamics.
- Floating Shelves: Use raw wood for a rustic touch or matte black for a modern edge.
- Corner Console: A wedge-shaped table fits flush against walls, preventing dust traps.
- Task Lighting: Install a small battery-powered puck light under the top shelf for a warm glow.
Matte black hardware offers a sleek contrast against white tile. This structural integrity ensures your setup remains sturdy even with a heavy espresso machine on top.
Soft task lighting beneath a floating shelf eliminates shadows. It highlights the spatial dynamics of the corner, making the brewing process feel like a curated experience.
Corner-Curation Secrets
- Utilize a tiered lazy Susan or a corner-shaped riser to double your storage capacity without increasing the footprint.
- Install motion-sensor puck lights underneath your floating shelves to instantly illuminate your brewing station as you approach.
- Angle your espresso machine at 45 degrees within the wedge to maximize reachable counter space for your mugs and milk frother.
Modular Pegboard Organization Wall
Vertical storage is a game changer for compact kitchens. A modular pegboard utilizes wall space to improve traffic flow around your counters.
The raw texture of birch plywood or matte metal adds a modern touch. It creates a focal point that is both beautiful and highly functional.
Great design thrives when every tool has a home, and every home is within reach.
Texture and Layout Flexibility
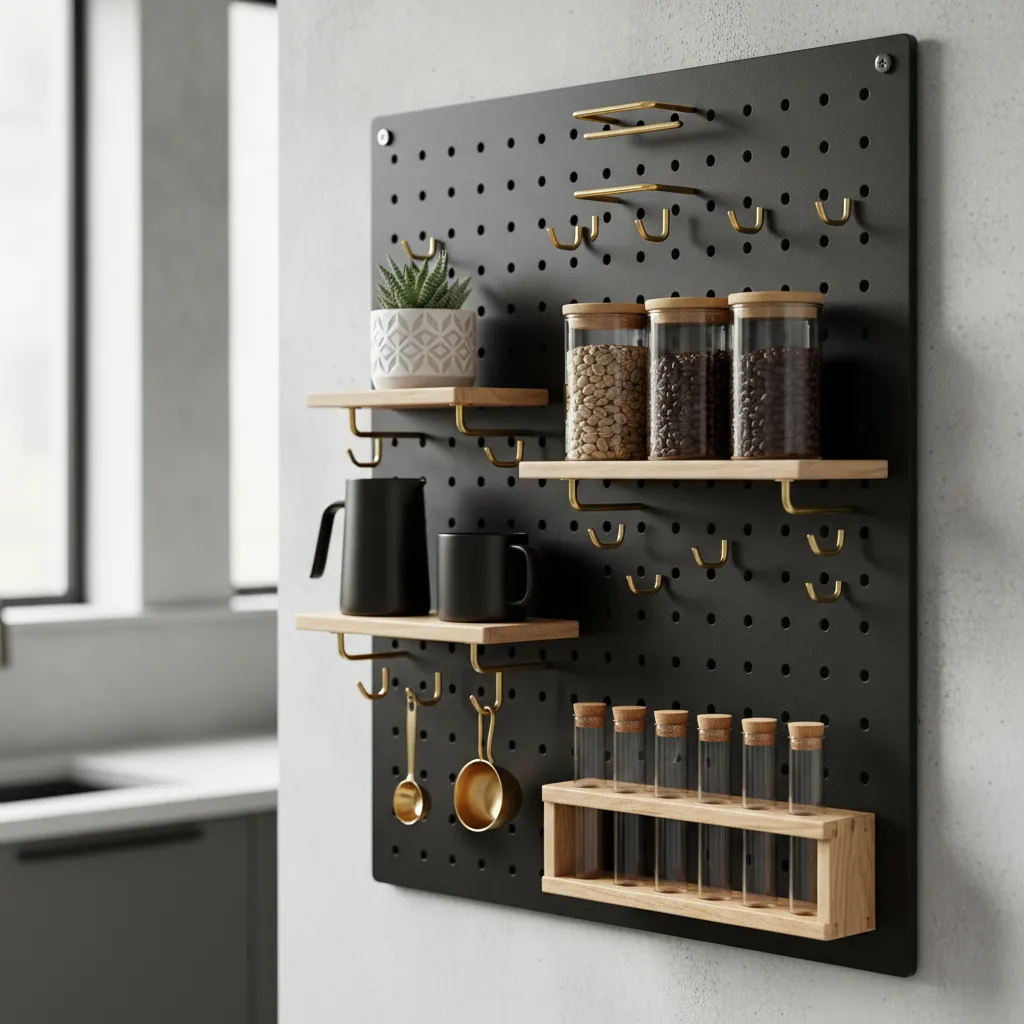
Pegboards allow you to customize your layout instantly. You can move hooks to fit new mugs or larger carafes as your collection grows.
The spatial dynamics of your coffee station improve when tools are within reach. It turns a cluttered corner into a professional brewing zone.
Consider the aesthetic of Nordic minimalism to keep the look clean. This style often uses light woods and simple silhouettes to reduce visual noise.
A pegboard is a living system. It should evolve with your habits, keeping your most-used items at eye level for maximum efficiency.
Shira Gill, Professional Organizer and Author
Material Comparison for Durability
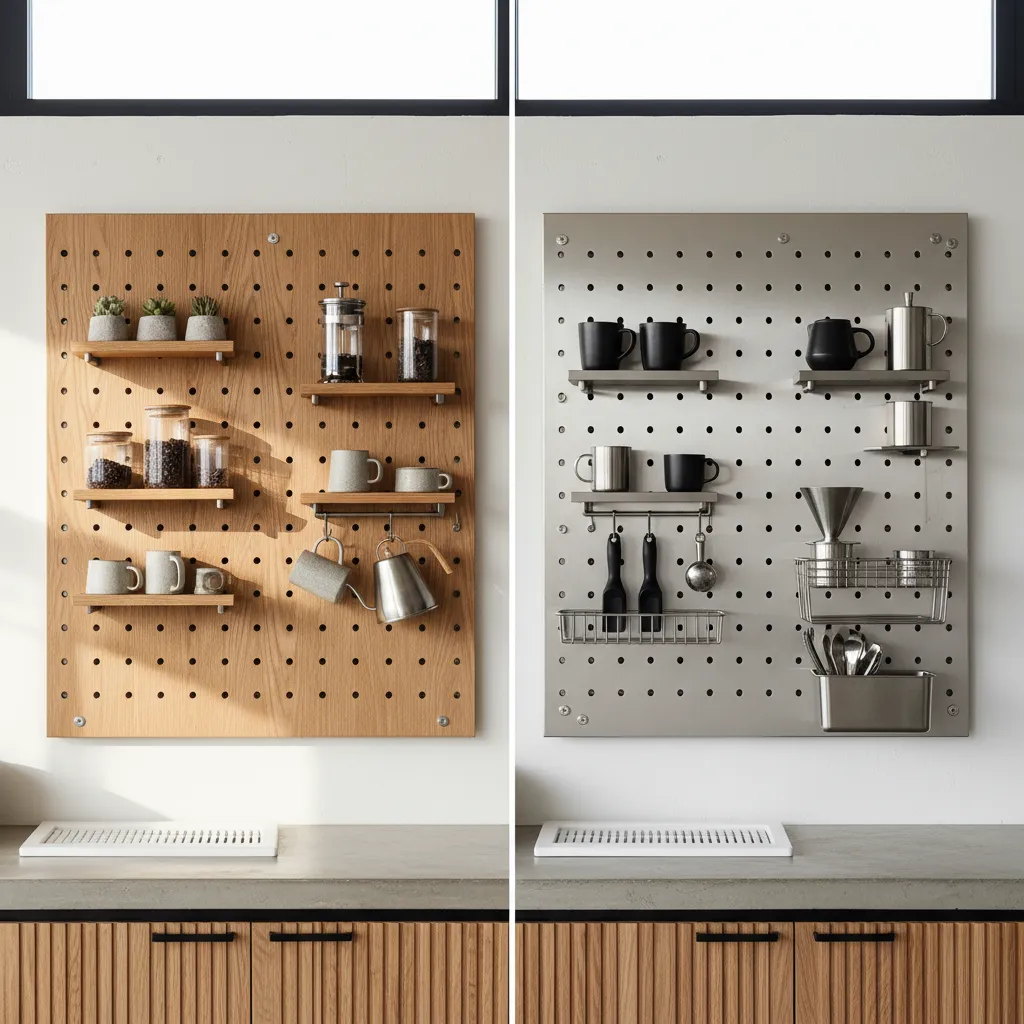
Choosing the right material affects the mood and longevity of your bar. Wood offers a warm, organic feel while steel provides industrial durability.
| Material | Vibe | Best For |
|---|---|---|
| Birch Wood | Warm & Airy | Residential Kitchens |
| Stainless Steel | Industrial & Sleek | High-Traffic Areas |
| Acrylic | Modern & Invisible | Minimalist Spaces |
According to the National Kitchen and Bath Association, storage is the top priority for 60 percent of renovators. Pegboards address this need perfectly.
Use small baskets on the board to hold spoons and stirrers. This keeps your countertop clear for preparing fun beverages and seasonal treats.
Lighting also plays a vital role in this setup. A small spotlight directed at the board highlights the craftsmanship of your favorite mugs and accessories.
- Zoning: Group similar items like filters and beans together.
- Height: Mount the board at eye level to prevent straining.
- Hooks: Use rubber-coated hooks to protect delicate mug handles.
- Balance: Mix functional tools with a small plant for color.
By treating the wall as a canvas, you combine ergonomics with style. This approach ensures your morning ritual remains seamless and visually inspiring.
The Efficiency Edit
- Group your essentials by frequency of use; place your daily filters at eye level and seasonal carafes on the higher rungs.
- To protect delicate ceramic handles, opt for rubber-coated hooks or add small felt pads to the board’s surface to prevent scratching.
- Integrate a small magnetic strip onto your pegboard to neatly hold metal stirrers, teaspoons, or small metal canisters for a streamlined look.
Day-to-Night Coffee and Wine Bar
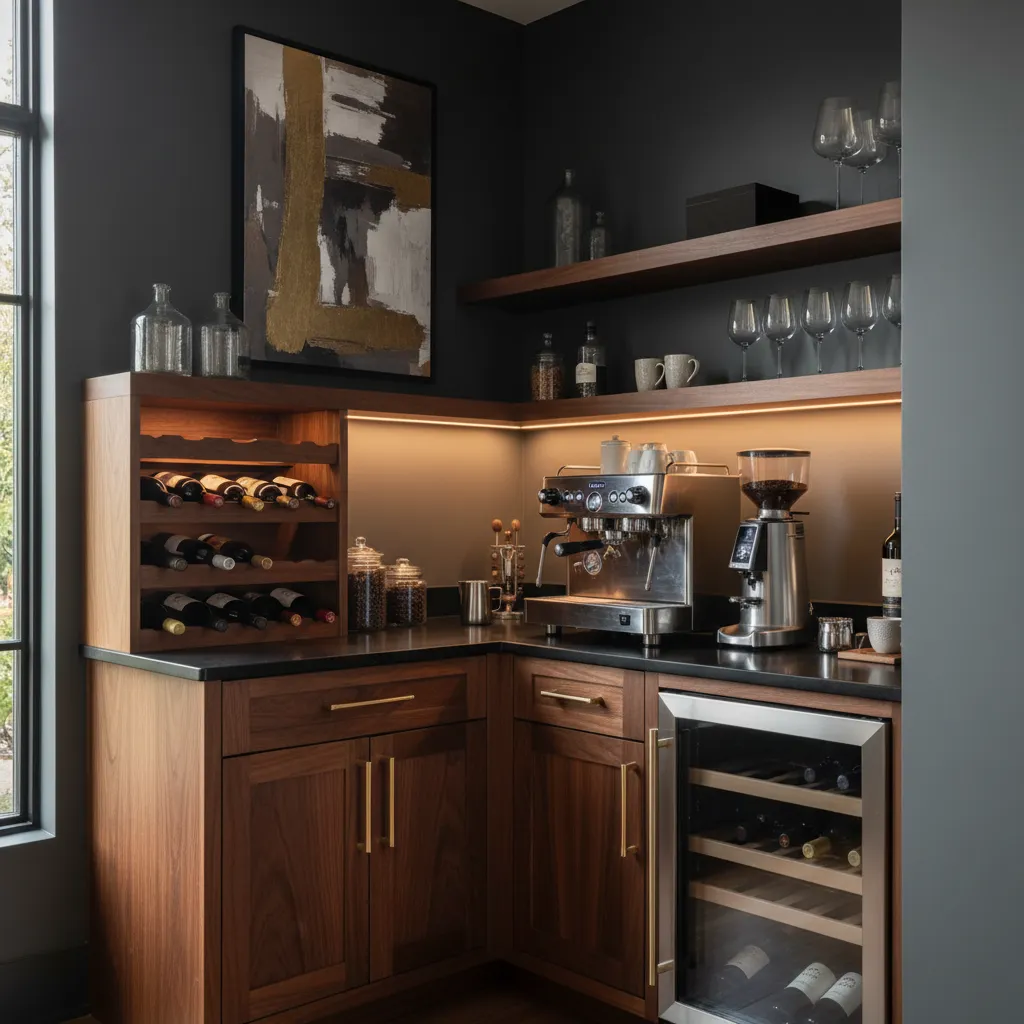
A dual-purpose station maximizes spatial dynamics. By day, it serves as a caffeine hub. By night, it becomes a lounge for entertaining guests.
Focus on textures like smooth marble or raw wood to define the zone. Use ambient lighting, such as dimmable puck lights, to shift the mood as the sun sets.
Design your space to evolve with your needs, blending morning rituals with evening relaxation.
Smart Zoning and Storage
Functionality relies on clever zoning. Store beans on one side, while keeping openers on the other. This ensures a logical traffic flow during busy mornings.
Incorporate a small tray to group disparate items. This keeps the counter organized and visually cohesive. It also makes cleaning the surface much easier.
Use an aesthetic guide to balance colors. Matching containers provide a high-end, bespoke feel for your station.
A home bar should be as functional as it is beautiful, ensuring every tool has a home within reach.
Bobby Berk, Architectural Digest
Essential Elements for Every Shift
Selecting the right equipment is vital for durability. Invest in an espresso machine and a wine rack that fits the existing cabinetry for a built-in look.
Consider preparing signature drinks for guests. Having go-to recipes ensures the transition to cocktail hour is stress-free.
- Morning: French press, ceramic mugs, and airtight bean canisters.
- Evening: Crystal glassware, cocktail shakers, and a sleek corkscrew.
- Transition: Seasonal syrups, citrus garnishes, and linen napkins.
| Element | Coffee Use | Wine/Cocktail Use |
|---|---|---|
| Glassware | Insulated Mugs | Stemmed Glasses |
| Accessories | Milk Frother | Shaker and Jigger |
| Storage | Bean Tins | Wine Cradle |
The Seamless Shift
- Install smart dimmable lighting to automatically transition from bright morning energy to a warm, moody evening glow at a scheduled time.
- Use a decorative mirrored tray to corral both coffee syrups and cocktail bitters, adding depth and reflecting ambient light during evening hours.
- Invest in versatile double-walled glassware that functions elegantly for both hot lattes and chilled spirits, reducing the need for double the storage.
Tiered Countertop Stand for Syrups
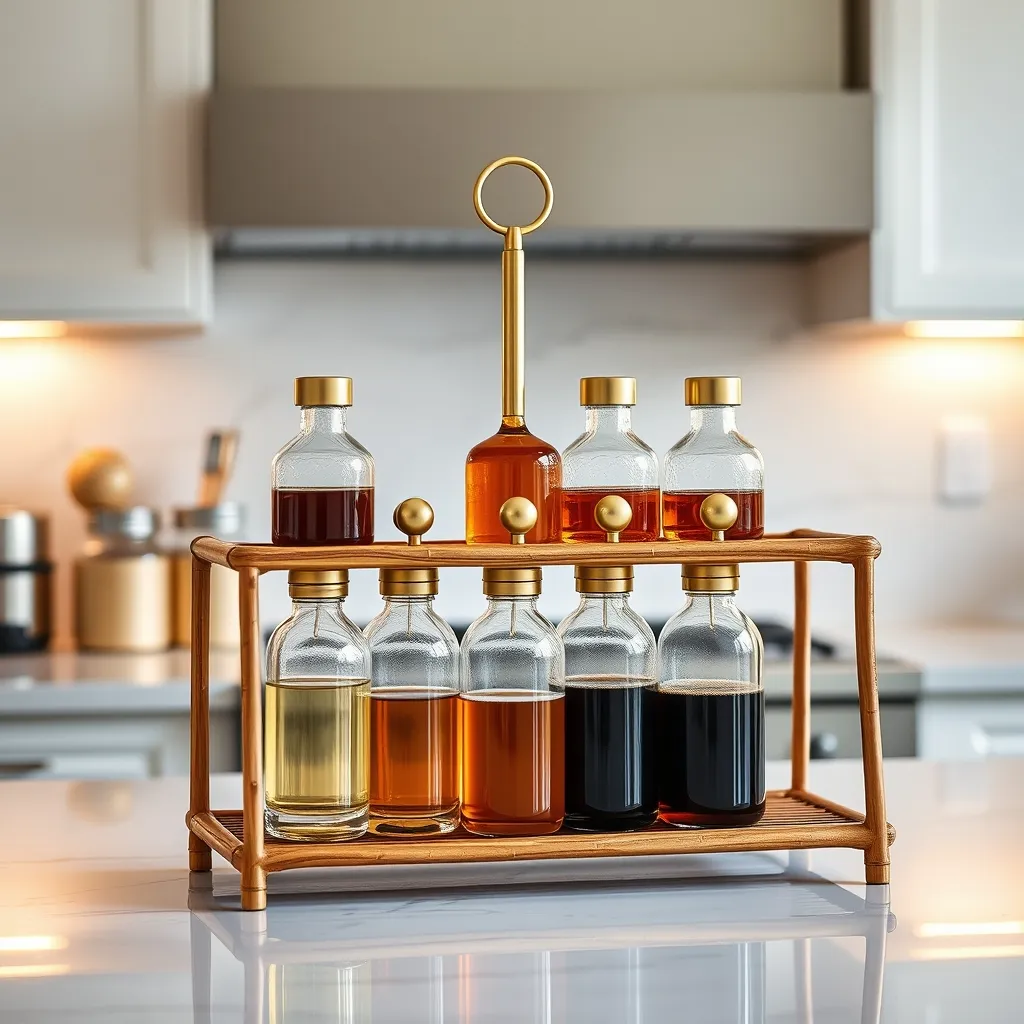
A tiered stand maximizes vertical spatial dynamics on your kitchen counter. This design choice effectively clears the clutter of loose bottles.
It creates a focused zone for your flavoring syrups. This makes it easier to customize your daily cup or recreate 7 Brew drinks at home.
Vertical storage transforms a messy countertop into a professional, curated coffee experience.
Choosing the Right Textures
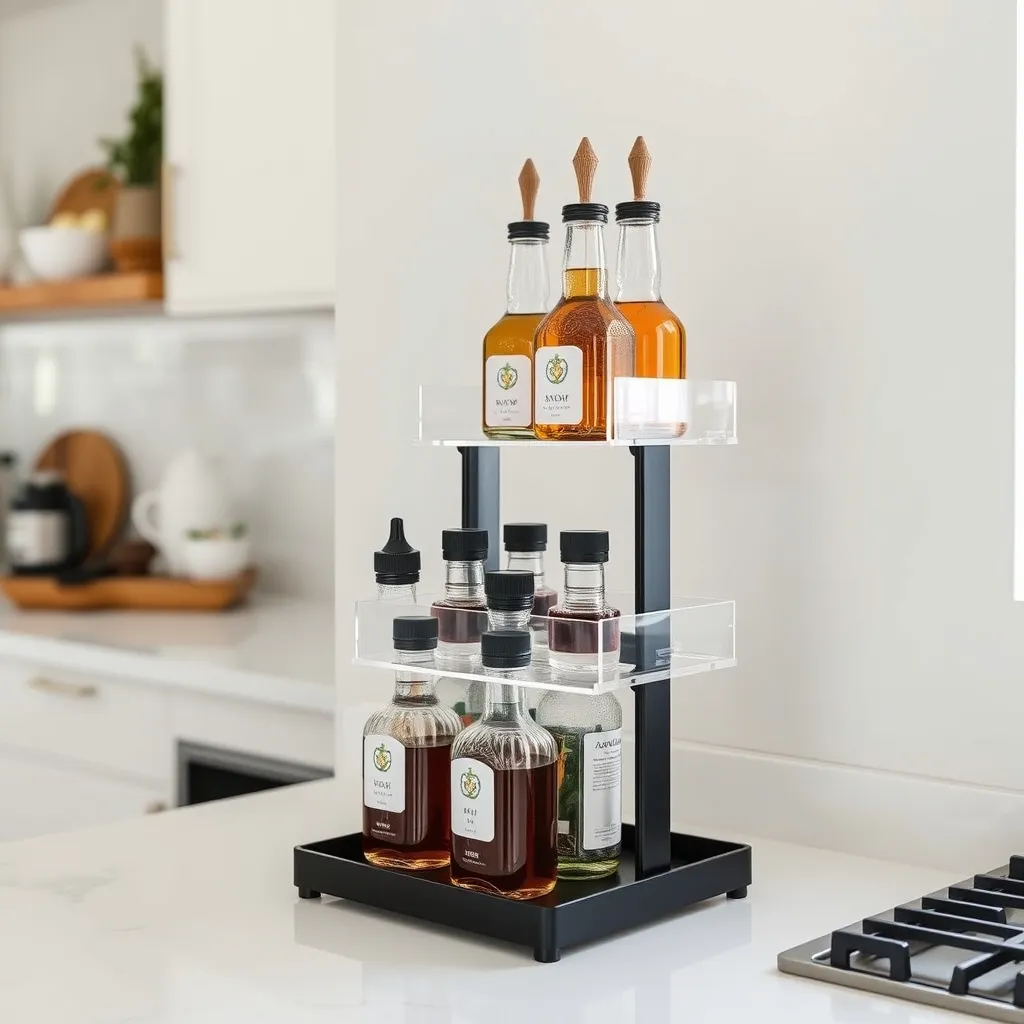
Selecting the right material influences the room atmosphere. Raw wood steps offer an organic, rustic feel that pairs well with artisan ceramic mugs.
For a modern look, choose clear acrylic. This material disappears into the background, allowing the rich colors of the syrups to take center stage.
Maintaining a clean flow is vital in small spaces. A tiered layout ensures that every label is visible, preventing double-buying and unnecessary waste.
| Material | Visual Texture | Functional Benefit |
|---|---|---|
| Raw Wood | Warm, organic | Adds structural warmth |
| Clear Acrylic | Minimalist, airy | Improves spatial flow |
| Matte Metal | Sleek, industrial | High durability |
The key to any organized space is creating a home for every item. A tiered tray acts as a pedestal for your most-used ingredients.
Emily Henderson, Kitchen Organization Ideas
Research shows organized workspaces improve focus. Clutter can reduce overall productivity by up to 40 percent in high-traffic kitchen areas.
Consider the lighting in your coffee nook. Position your stand where ambient light can catch the glass bottles to create a warm, inviting glow.
This setup also works for those looking to try a black coffee recipe for diet goals by keeping sugar-free options handy.
Barista’s Styling Secret
- Group your syrups by flavor profile or usage frequency to streamline your morning routine and make selection effortless.
- Add small silicone drip mats or coasters to each tier to catch sticky residue, making cleanup as simple as a quick rinse.
- Decant syrups into uniform glass bottles with waterproof labels for a high-end, cohesive look that rivals your favorite coffee shop.
Window Ledge Bistro Setup
Transforming a window ledge into a bistro coffee bar maximizes unused spatial dynamics. It creates a sun-drenched focal point for the room.
Natural light enhances the texture of raw wood or stone ledges. This setup offers a bright, airy atmosphere for your morning brew.
A window ledge coffee bar turns a simple morning routine into a sun-drenched European retreat.
Maximizing Narrow Ledges
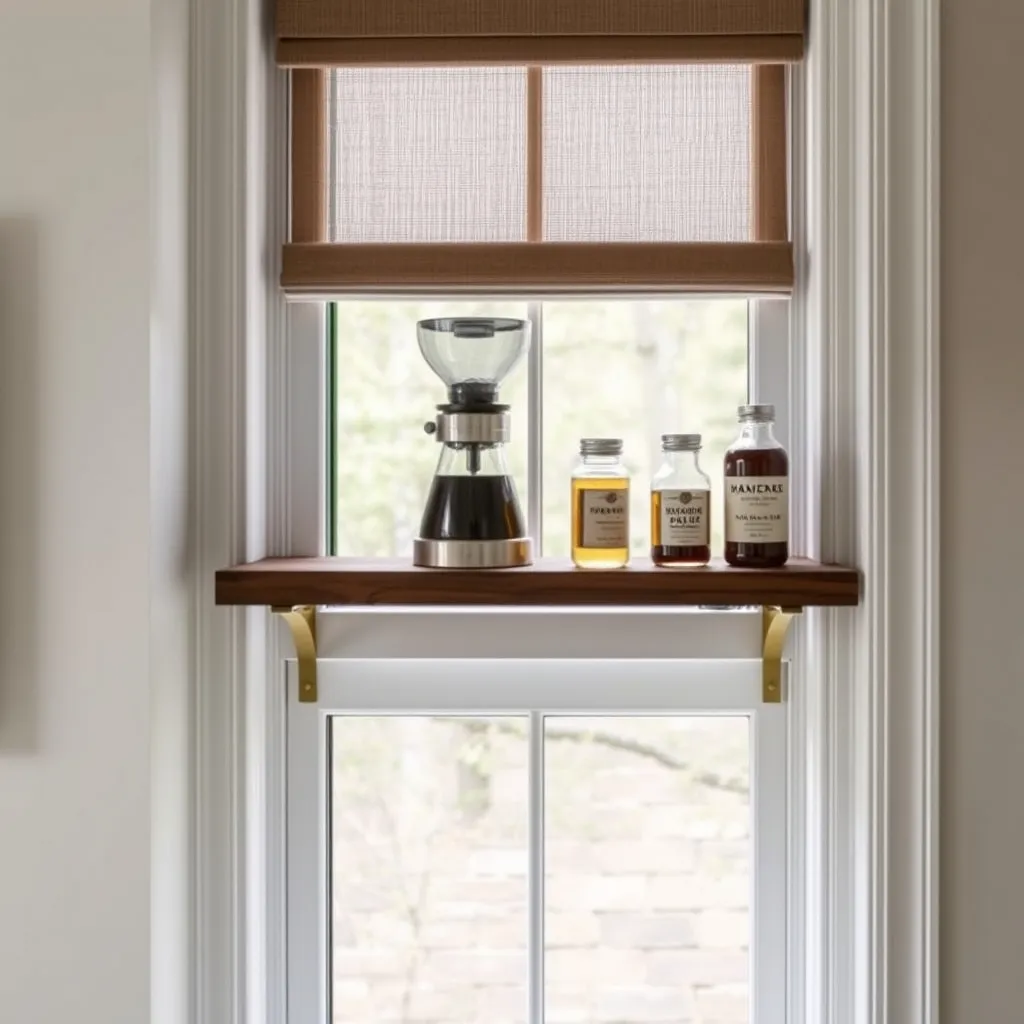
If your ledge is narrow, add a bracketed shelf extension. This improves functionality by providing space for grinders and syrup bottles.
You can use this extra depth to prepare an aesthetic drink prep area that feels organized.
Design is about the ritual; your coffee bar should be a sensory experience that grounds you for the day.
Athena Calderone, Vogue Living
Seating and Spatial Flow
Pair the ledge with slim bar stools to save floor space. This ensures a smooth traffic flow in small kitchens or living areas.
This approach works well in minimalist tiny houses where every inch of zoning matters for daily comfort.
Place a small tray to corral items. This prevents the area from looking cluttered while showcasing your favorite ceramic mugs.
- Surface: Choose moisture resistant materials like sealed wood or quartz.
- Lighting: Rely on natural ambient lighting during the day.
- Storage: Use vertical hooks on the window frame for mugs.
- Greenery: Add a small potted herb for a fresh scent.
Bistro Bar Blueprint
- Install floating brackets to extend a narrow sill, creating a stable platform for heavy espresso machines or grinders.
- Use a mirrored tray to corral your coffee essentials; it reflects natural light and prevents the ledge from looking cluttered.
- Opt for weather-treated finishes on wood ledges to protect against condensation and occasional spills from open windows.
Brewing Your Perfect Sanctuary
Creating a home coffee bar blends functional architecture with personal style. Whether using a rolling cart or a built-in nook, focus on efficiency and aesthetic harmony.
Your station should be a tactile experience that enhances your morning ritual. By organizing with intent, you transform a simple corner into a sophisticated design statement.
Ultimately, a well-crafted coffee zone simplifies your routine. Use these ideas to build a space that is as durable as it is beautiful, tailored to your unique lifestyle.
Expert Insights: Crafting Your Coffee Nook
You only need about two feet of counter or floor space. A compact utility cart or a floating shelf can create a professional-grade station in even the smallest apartments.
Opt for non-porous materials like sealed metal or stone. These resist heat and spills, ensuring your station remains pristine and durable through years of daily use.
Use vertical zoning. Place heavy equipment on the bottom, mugs at eye level, and syrups in between. This layered approach maximizes utility while maintaining a clean, curated look.
Absolutely. A sleek, matte black cart or a minimalist desk extension provides a sophisticated energy boost. It keeps your workspace tidy while adding professional hospitality.