Table of Contents
- Essential Materials Checklist for DIY Graduation Centerpieces
- Rustic Mason Jar Trios with Glitter Dipped Bases and Baby’s Breath
- The “Then and Now” Four-Sided Memory Lane Photo Vases
- Future Healer Apothecary Jars: A Sweet Tribute to Nursing Majors
- Literary Legends Vintage Book Stacks with Cap and Diploma Accents
- School Spirit Hydrangea Arrangements Using University Color Palettes
- Industrial Geometric Terrariums for Engineering and Tech Majors
- The “Smart Cookie” Edible Tiered Tray Centerpiece with Custom Toppers
- Designing a Lasting Legacy
- Design Dilemmas Solved
Planning a graduation celebration requires the same precision as drafting a structural floor plan. Every element must serve a purpose within the space, ensuring that the layout facilitates movement and conversation. From selecting durable surfaces to optimizing the ambient lighting, the foundation of your event sets the stage for meaningful recognition.
Once the spatial logistics are secure, attention shifts to the finer materials that define the atmosphere. High quality finishes and thoughtful decor choices bridge the gap between a functional room and a festive environment. Centerpieces act as the focal points of your design, drawing guests together at tables that reflect both sophistication and personal achievement.
Creating these decorative elements by hand allows for a level of customization that professional services rarely match. This guide provides detailed instructions for crafting centerpieces that are both structurally sound and visually stunning. By following these practical steps, you can achieve a professional aesthetic that elevates the entire celebration while honoring the hard work of the graduate.
Essential Materials Checklist for DIY Graduation Centerpieces
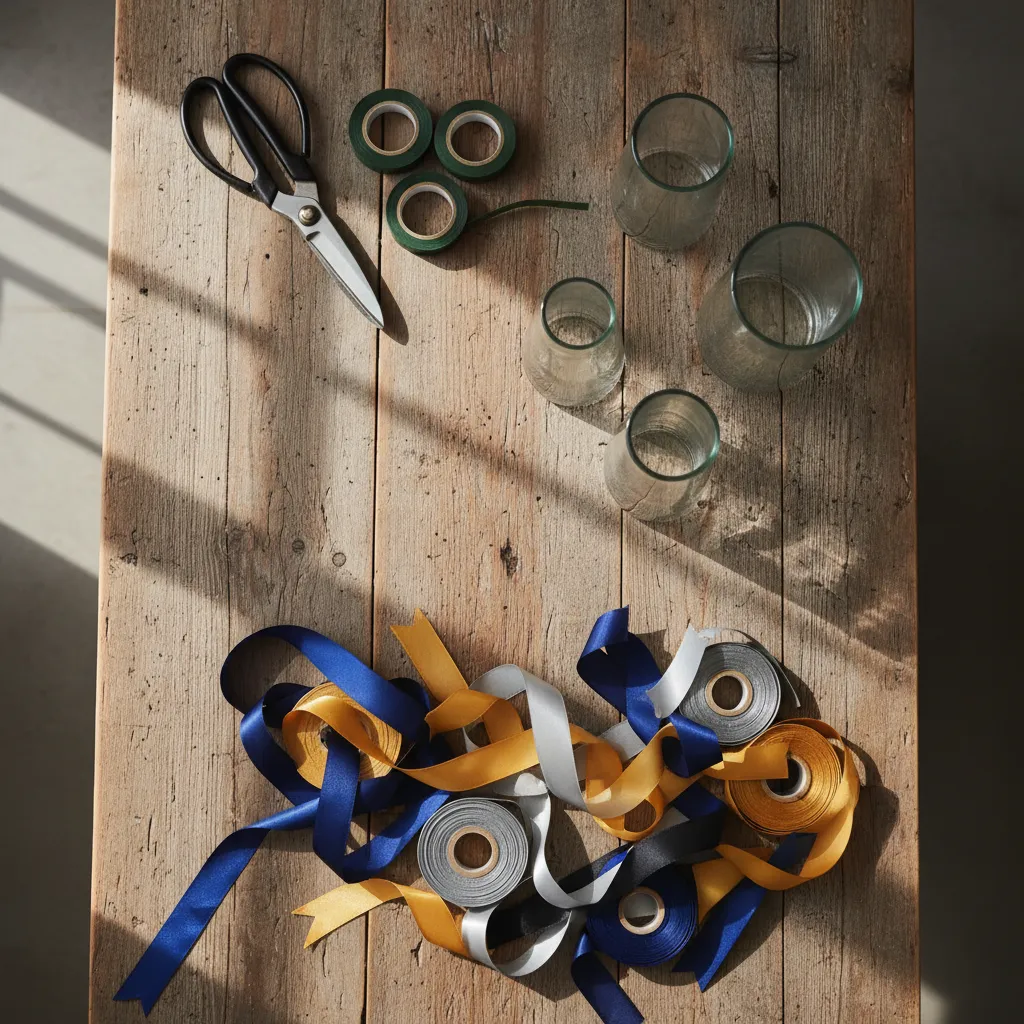
Creating a professional tablescape requires more than just enthusiasm. You need a curated toolkit to ensure structural integrity and visual flow.
Gathering the right materials beforehand prevents last-minute stress. A well-prepared station allows you to focus purely on the creative arrangement.
The details are not the details. They make the design.
Foundational Vessels and Structures
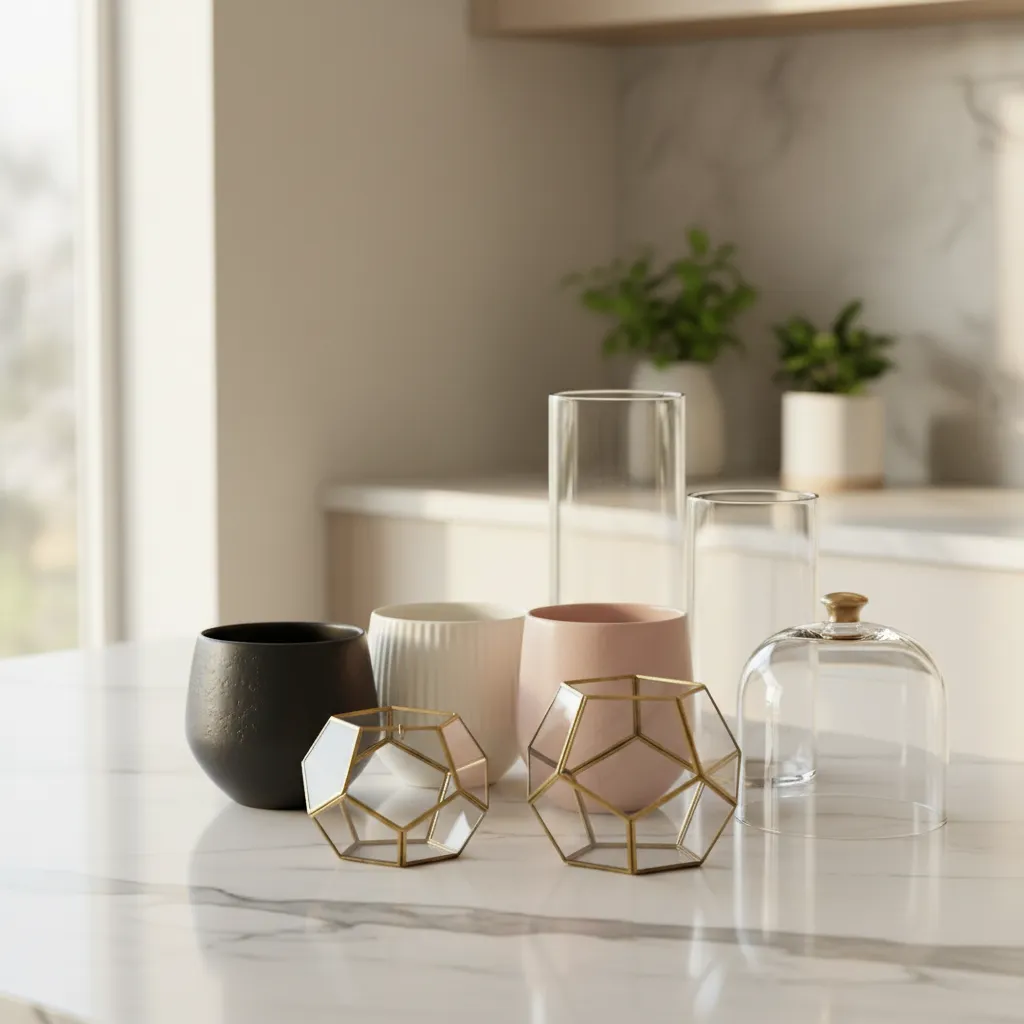
The vessel sets the aesthetic tone for the entire room. Clear glass offers modern elegance, while rustic crates add warmth to the atmosphere.
Select containers that complement the venue’s lighting. Reflective surfaces amplify ambient glow, whereas matte finishes absorb light for a cozy feel.
For those seeking broader inspiration on thematic consistency, our guide on Creative High School Graduation Party Ideas offers excellent styling context.
- Cylinder Vases: Ideal for height and drama.
- Mason Jars: Perfect for casual, farmhouse styles.
- Floral Foam (Soaked): Essential for keeping fresh blooms hydrated.
- Chicken Wire: Provides invisible structural support inside wide vases.
When designing a table, always consider the eye line. Centerpieces should either be low enough to see over or tall enough to see under.
Mindy Weiss, Mindy Weiss Party Consultants
Mechanics and Adhesives
The “mechanics” are the hidden heroes of design. These tools ensure your arrangement withstands the duration of the party without shifting.
High-quality floral tape is essential for securing stems. It provides a seamless look that hides the internal structure of your arrangement.
| Tool Category | Specific Item | Primary Function |
|---|---|---|
| Cutting | Floral Shears | Clean cuts to maximize water uptake |
| Binding | Paddle Wire | Securing heavy stems or garlands |
| Adhesive | Floral Putty | Anchoring pin frogs or foam to vases |
| Support | Grid Tape | Creating structure on open-mouthed vases |
Decorative Fillers and Accents
Texture adds depth to your arrangement. Consider mixing smooth glass beads with rough burlap ribbons to create a sophisticated visual contrast.
Lighting elements are crucial for evening events. Battery-operated fairy lights woven through the base create a magical, warm ambient glow.
If you are arranging a display for a larger venue or stage, review our Senior Table Display for Church insights for scaling up.
Essential Accents Checklist:
- Table Runners: Anchors the centerpiece visually.
- Scatter: Confetti, faux pearls, or wood slices.
- Ribbon: Incorporate school colors subtly.
- Card Holders: For table numbers or photos.
Designer Secrets for Success
- Create a grid with clear floral tape over wide-mouth vases to keep stems perfectly upright and spaced evenly.
- Always cut stems at a 45-degree angle under water to prevent air bubbles and ensure your graduation blooms stay fresh all night.
- Incorporate battery-operated fairy lights into your glass fillers to hide the mechanics while adding an elegant evening glow.
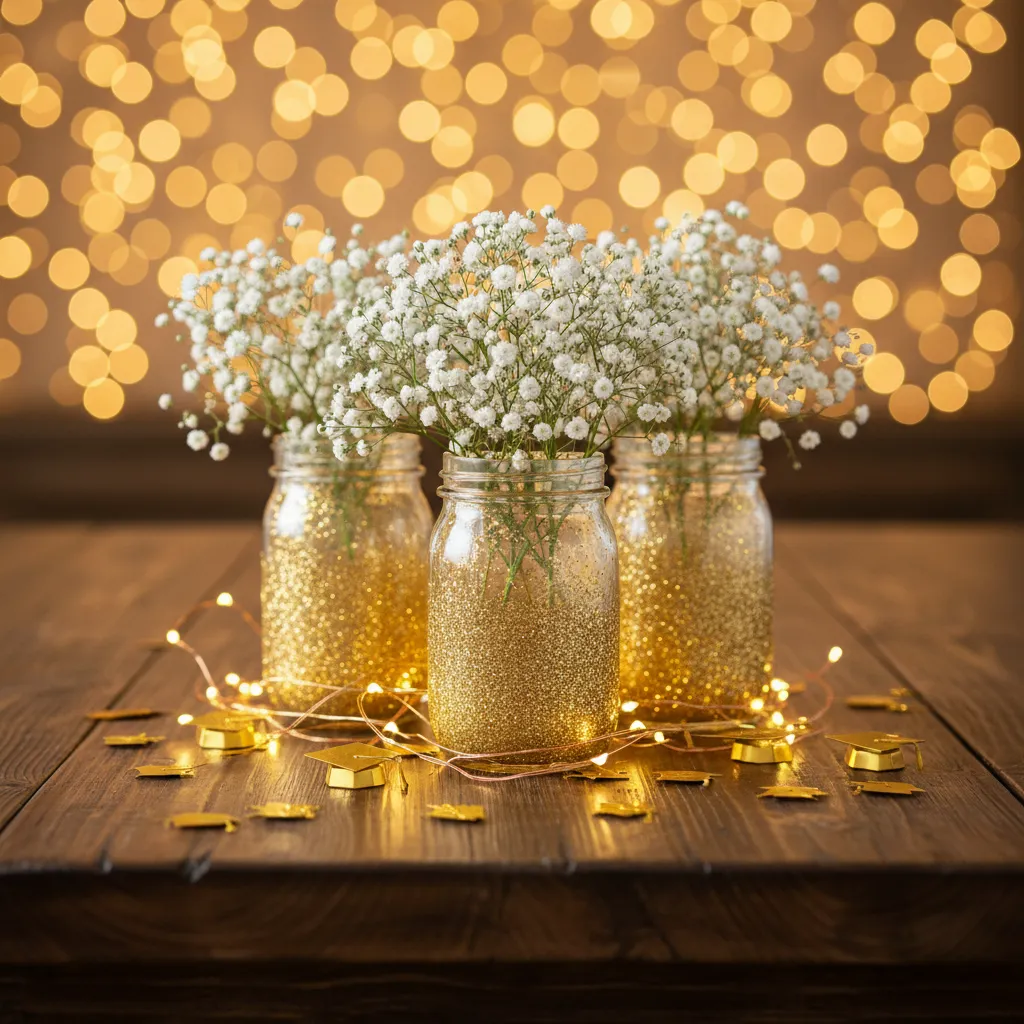
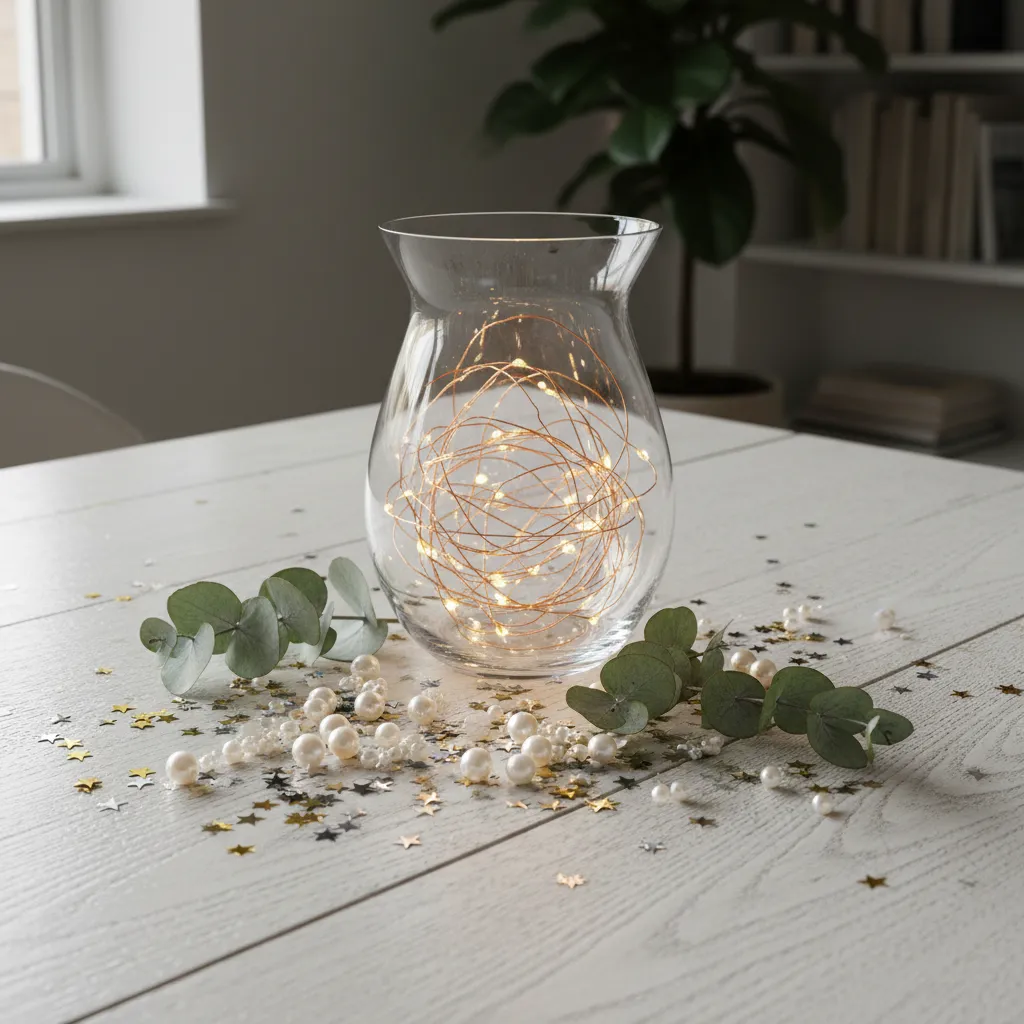
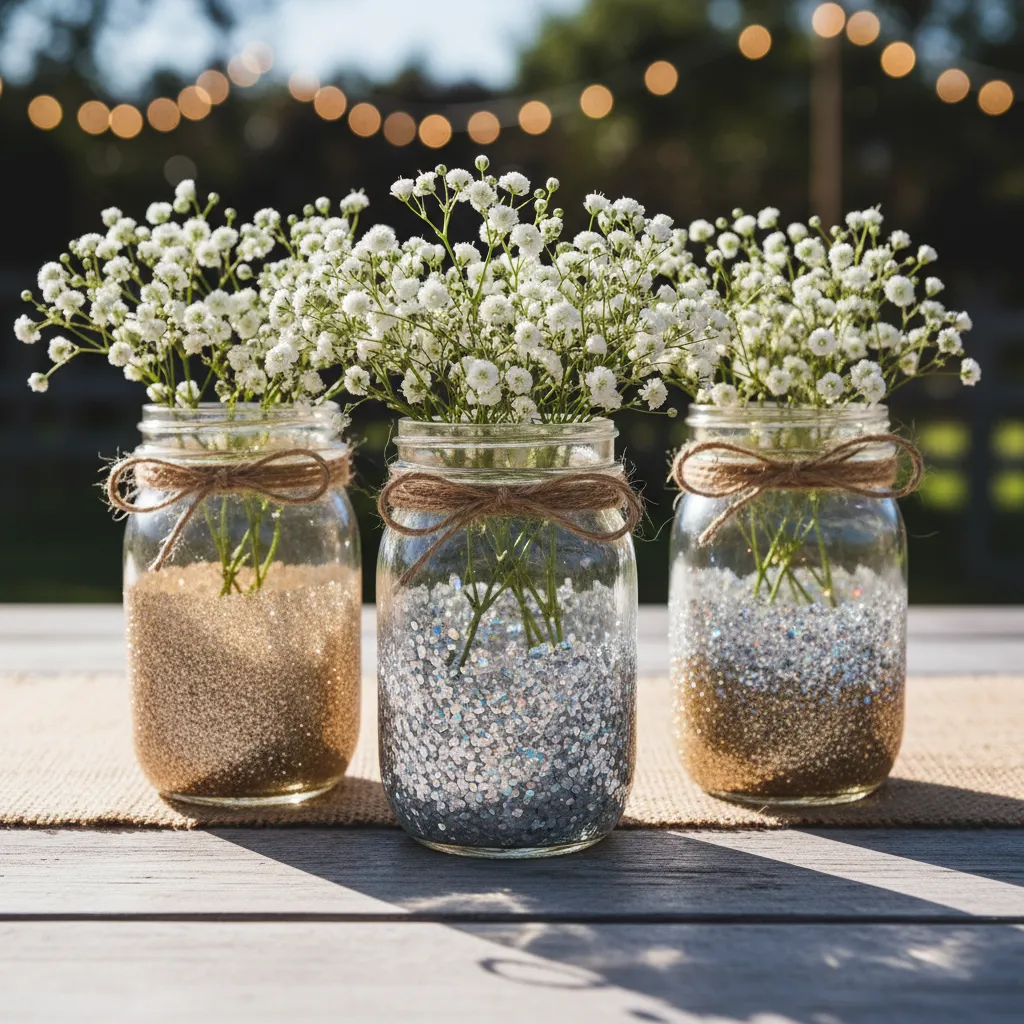
Rustic Mason Jar Trios with Glitter Dipped Bases and Baby’s Breath
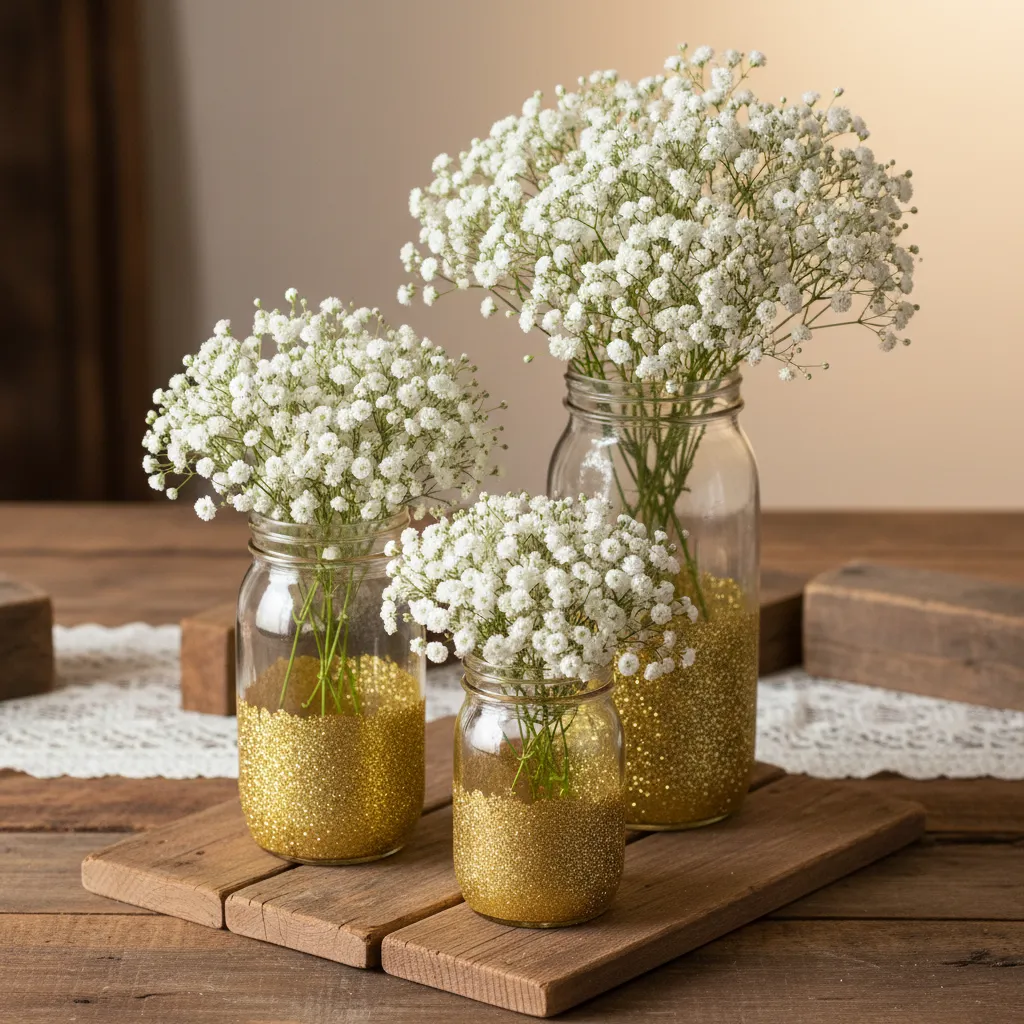
Blending farmhouse aesthetics with celebratory sparkle creates a stunning visual balance. The clear glass contrasts beautifully with the textured glitter base.
This design choice anchors the table setting without overwhelming the visual space. It allows for open conversation across the table while maintaining style.
For a cohesive look, match the glitter color to the graduate’s school colors. This customization adds a personal touch that guests immediately recognize.
Rustic charm anchors the memory, while glitter reflects the bright future ahead.
Baby’s Breath, or Gypsophila, provides an affordable yet elegant floral element. Its cloud-like structure softens the hard edges of the glass jars.
When arranged in a trio, the variation in height creates a dynamic focal point. This prevents the table landscape from looking flat or one-dimensional.
If you enjoy crafting custom decor, you can easily adapt techniques found in creative high school graduation party ideas for this project.
Selecting the Right Glitter Grain
The type of glitter you choose significantly impacts the final light reflection. Consider the ambient lighting of your venue when making this selection.
Fine glitter offers a subtle shimmer suitable for daytime events. Chunky glitter reflects more light, making it ideal for evening parties with dim lighting.
| Glitter Type | Visual Effect | Best Application |
|---|---|---|
| Ultra-Fine Dust | Satin-like, metallic finish | Elegant, formal luncheons |
| Standard Craft | Classic sparkle, distinct grains | Casual backyard gatherings |
| Chunky Hexagon | High-reflectivity, disco effect | Evening dance floors |
| Glass Glitter | Vintage, antique patina | Rustic farmhouse themes |
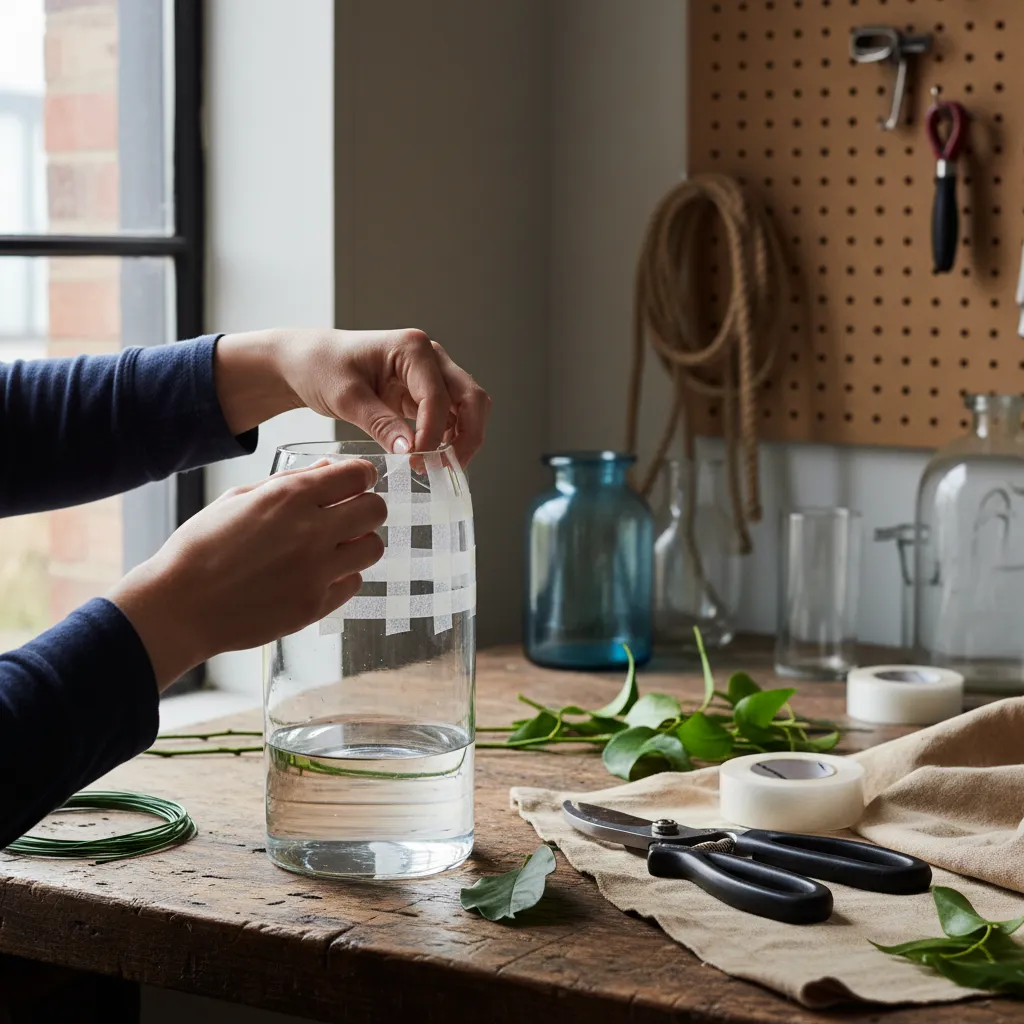
Step-by-Step Assembly Guide
Creating these centerpieces requires patience and steady hands. Ensure you have a clean workspace to avoid glitter contamination on the upper glass.
Using masking tape creates a crisp line between the clear glass and the glittered base. This sharp contrast is the hallmark of a professional finish.
- Clean the Surface: Wipe the jar exterior with rubbing alcohol to remove oils.
- Define the Line: Apply painter’s tape horizontally around the jar at your desired height.
- Apply Adhesive: Brush a generous layer of Mod Podge or decoupage glue below the tape.
- Add Texture: Pour glitter over the wet glue over a catch-tray to minimize waste.
- Seal the Deal: Once dry, apply a top coat of sealant to prevent shedding.
This method ensures durability, allowing you to transport the jars without losing the design. Similar techniques are used in Americana crafts for creating lasting vintage decor.
Centerpieces should never block the view of guests across the table. Keep arrangements below 14 inches or above 24 inches to ensure easy conversation flow.
David Tutera, The Big White Book of Weddings
To enhance the rustic appeal, place the jars on a slice of raw wood or a burlap runner. This layering of textures adds depth to your table design.
Finally, consider adding battery-operated fairy lights inside the baby’s breath. The hidden lights will create an ethereal glow as the evening progresses.
Crafty Creator Secrets
- To prevent glitter shedding on your tablecloth, apply a final thin layer of clear spray sealant or a second coat of Mod Podge over the dried glitter base.
- For a fuller and more structured look, bundle your Baby’s Breath with clear floral tape before placing it in the jars to maintain that perfect cloud-like shape.
- If you are using real water for the flowers, wipe the jar’s interior with a microfiber cloth before filling to ensure no stray glitter particles cloud the water.
The “Then and Now” Four-Sided Memory Lane Photo Vases

This centerpiece concept acts as a visual timeline, bridging nostalgia with modern design. It transforms standard table decor into a conversation starter.
The core structure usually consists of a square glass vessel or a wooden lantern frame. This four-sided approach ensures visibility from every seat.
Guests naturally rotate around the table to view the progression of the graduate’s life. This physical interaction improves the spatial flow of the room.
Great design captures a moment in time while celebrating the journey it took to get there.
Material Selection and Textures
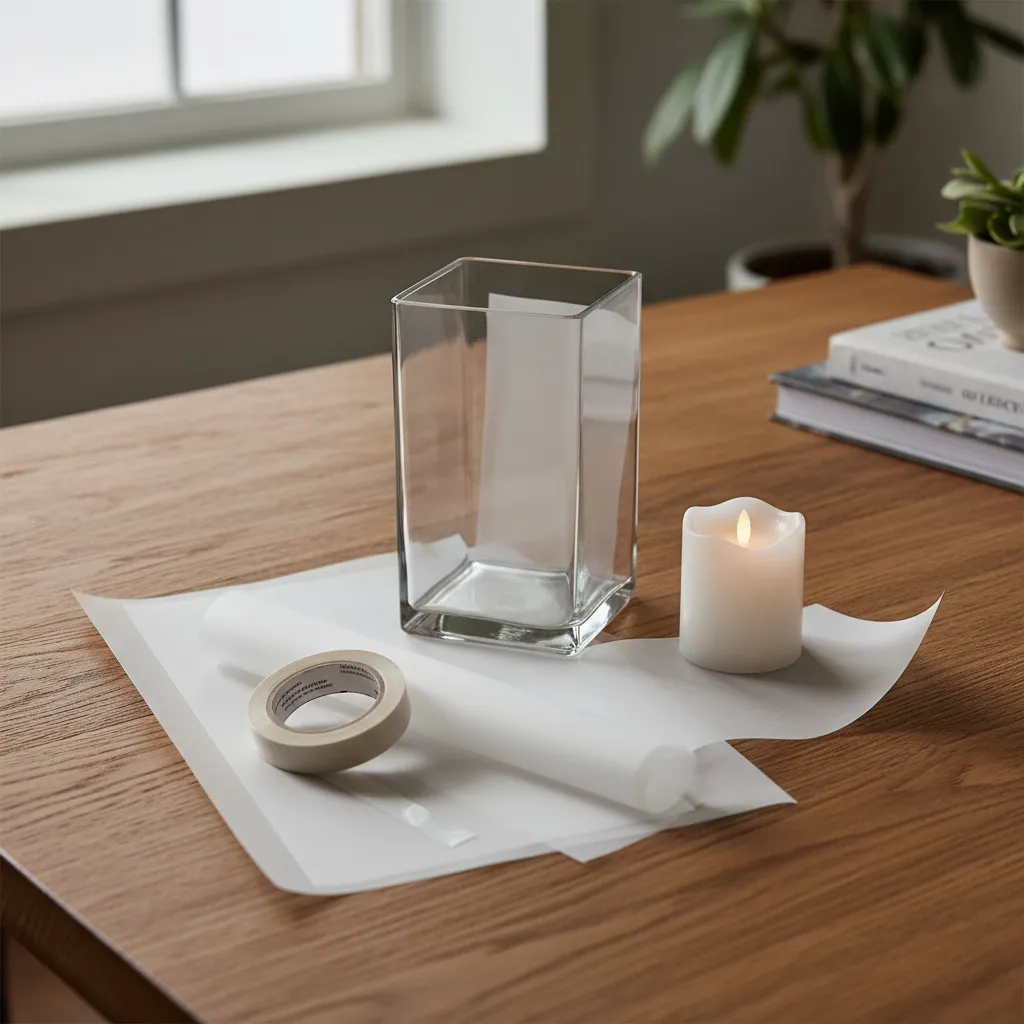
For a contemporary aesthetic, utilize high-clarity glass vessels. The transparency allows for an internal light source to create a warm, ambient glow.
Printing photos on vellum paper is the secret to this “luminary” look. The semi-translucent material allows light to filter through the image softly.
If you prefer a rustic theme, consider using timber frames. You can enhance these by using wood burning art techniques to etch the year into the base.
The contrast between the matte photo paper and the glossy glass adds necessary depth. This prevents the centerpiece from looking flat under venue lights.
Lighting is the jewelry of the space. It adds the sparkle and sets the mood. It effectively changes the look and feel of the room.
Colin Cowie, Colin Cowie Lifestyle
Assembly Checklist for Durability
Constructing these requires precision to ensure they withstand the duration of the event. A sloppy assembly can peel away as the room heats up.
- Vellum Paper (Heavyweight): Prevents curling near the heat source.
- Archival Double-Sided Tape: Ensures photos stay clear and adhered without yellowing.
- LED Pillar Candles: Provides the necessary glow without the fire hazard of real wax.
- Weighted Base Filler: Clear marbles or white sand stabilize the vase against bumping.
These vessels also function beautifully as focal points for a dedicated senior display table near the entryway.
Grouping three vases of varying heights creates a tiered architectural effect. This variation keeps the eye moving and adds professional polish.
Ensure the photos are high-contrast black and white. This unifies the color palette, regardless of when the original photos were taken.
The Luminary Edit
- Curate Chronologically: Assign each side of the vase to a different life stage; infancy, childhood, adolescence, and graduation; to guide guests through a literal walk down memory lane as they rotate the centerpiece.
- The Mirror Trick: Place a small circular craft mirror at the base of the vessel before adding your LED candle to reflect light upward and give the vellum images a professional, high-end backlit glow.
- External Attachment: For a cleaner look and easier post-event cleanup, use ultra-thin clear adhesive dots to secure vellum to the exterior of the glass; this prevents the paper from warping due to heat trapped inside the vessel.
Future Healer Apothecary Jars: A Sweet Tribute to Nursing Majors
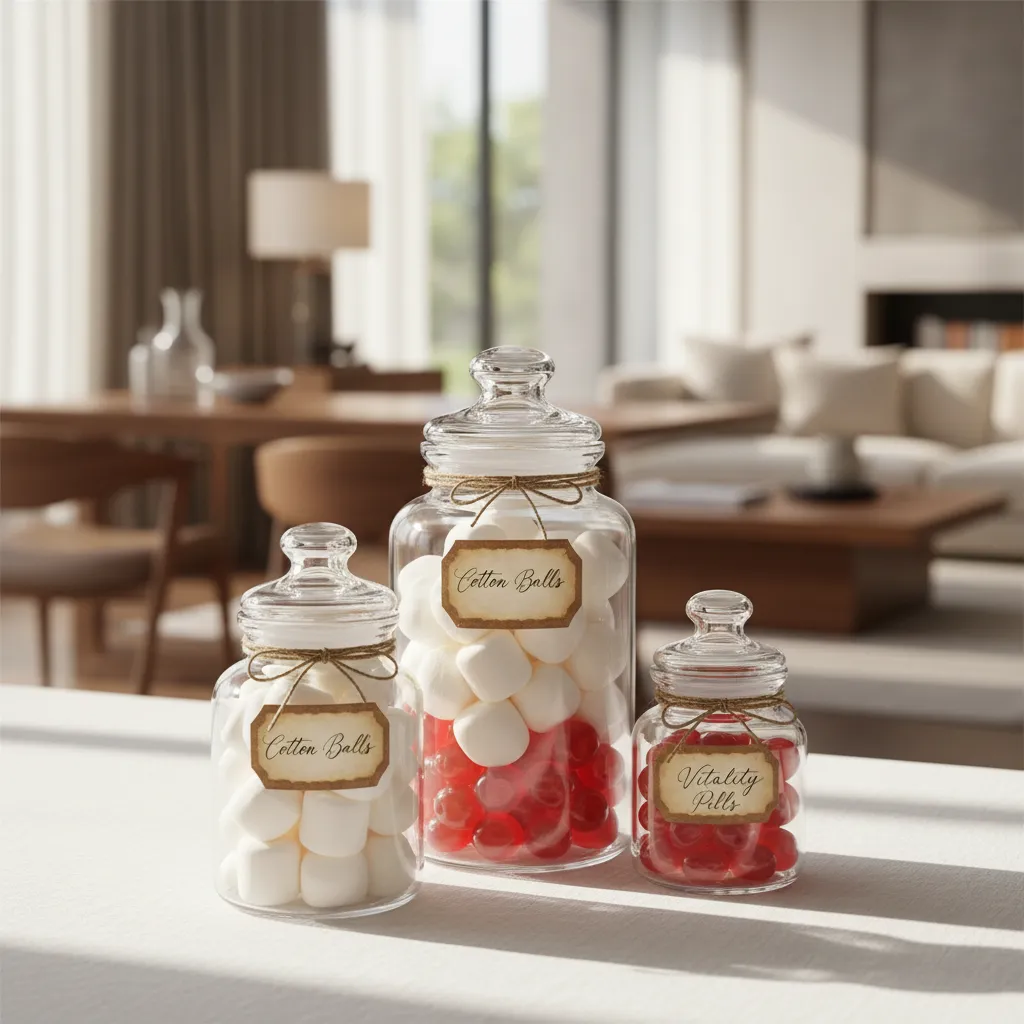
Clear glass vessels instantly elevate a dessert station by playing with light and transparency. They allow the contents to become part of the decor palette.
For a nursing graduate, this concept bridges the gap between clinical precision and celebration. The glass mimics medical equipment while holding sweet rewards.
Design is where precision meets personality; celebrate the journey with details that tell a story.
Curating the Clinical Palette
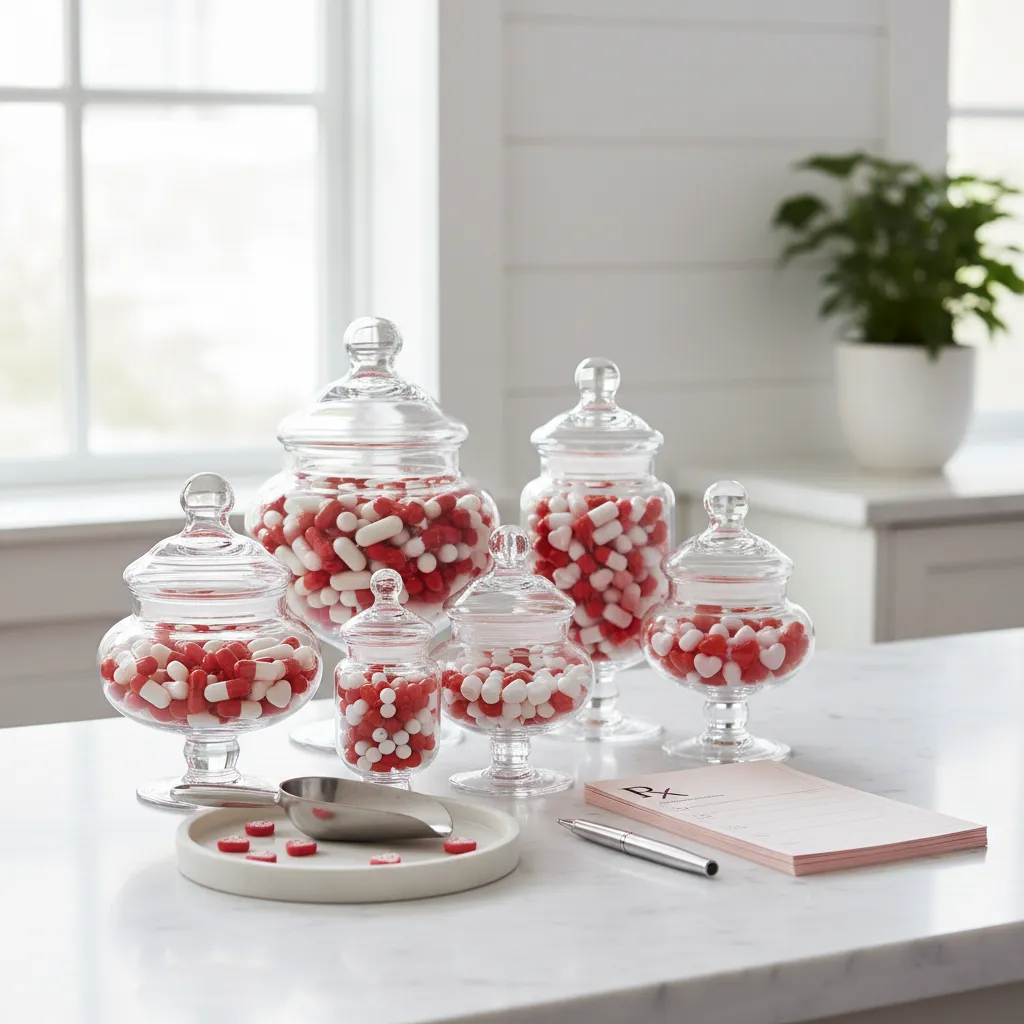
To achieve a sophisticated look, stick to a strict color scheme. A palette of red and white mimics the traditional colors of the medical field effectively.
Utilize jars of varying heights to create engaging spatial dynamics. This draws the eye upward and prevents the table display from looking flat or cluttered.
Texture plays a vital role here. Contrast smooth glass against the rough texture of linen napkins or chic tablescape ideas involving rustic wood.
The “Prescription” Menu
The success of this centerpiece relies on clever labeling. You are transforming ordinary sweets into “medical supplies” through creative association.
Functionality is key for guest interaction. Ensure the mouth of each jar is wide enough for a scoop to fit comfortably to maintain hygiene.
Hand-written labels add a layer of craftsmanship. You can achieve this look by mastering vintage decor techniques like tea-staining paper tags.
| Candy Filler | Medical Label | Visual Effect |
|---|---|---|
| Large Marshmallows | Cotton Balls | Soft, matte white texture |
| Red Hots / Cinnamon | Vitality Pills | Glossy, vibrant red pop |
| White Pretzels | Skeleton Bones | Complex, structural shape |
| Green M&Ms | Happy Pills | Smooth, uniform color |
| Licorice Strings | IV Lines | Linear, dark contrast |
Your home should be a reflection of who you are, where you’ve been, and where you’re going.
Erin Gates, Elements of Style
Arranging these jars requires attention to flow. Place the tallest jar in the center back to act as the primary focal point of the arrangement.
Flank the center jar with medium-sized vessels. This triangular composition is visually pleasing and ensures stability on the table surface.
The Curator’s Rx
- Elevate your apothecary jars by using stacks of nursing textbooks or vintage wooden crates as risers to add height and academic flair to the display.
- Add an interactive element by filling clean, needle-less plastic syringes with red fruit sauce or chocolate syrup to serve as ‘boosters’ for the treats.
- Incorporate a playful touch on your labels by including ‘dosage’ instructions, such as ‘Take two for immediate stress relief’ or ‘Administer as needed for post-grad joy.’
Literary Legends Vintage Book Stacks with Cap and Diploma Accents

For the graduate who cherishes literature, antique volumes offer a sophisticated foundation. Vintage books provide immediate architectural height and rich texture to your table arrangement.
Seek out hardcovers featuring worn leather bindings or faded cloth covers with gold-leaf spines. These elements catch ambient light and establish a sense of timeless wisdom.
This aesthetic pairs beautifully with vintage living room concepts that prioritize old-world elegance. The result is a display that feels curated rather than manufactured.
Stack tomes in groups of three or five to generate organic visual interest. Vary the angles slightly to prevent rigidity and ensure structural stability for top-heavy items.
The best chapters of your life are yet to be written.
Curating the Cap and Scroll Details

Position the graduation cap atop the highest stack as the primary focal point. Ensure the tassel hangs freely without obstructing essential sightlines across the dining table.
If you are sourcing books from your own cozy home library shelves, choose titles that reflect the graduate’s personal journey. This adds a layer of narrative depth to the decor.
Roll a piece of heavy cream cardstock to mimic a diploma. Secure it with a satin ribbon that matches the school colors to integrate the party palette subtly.
Books are the best decoration. They have character, they have soul, and they make a room feel inhabited and warm.
Billy Baldwin, Architectural Digest Profile
To ensure the centerpiece remains functional during the meal, keep the footprint compact. The following checklist outlines the essential layers for a balanced composition.
Styling Layers Checklist
- Base Layer: Large, dark-colored hardcovers to anchor the arrangement visually.
- Middle Layer: Slightly smaller volumes in complementary earth tones or school colors.
- Accent Texture: A small succulent or preserved moss placed on the table surface for contrast.
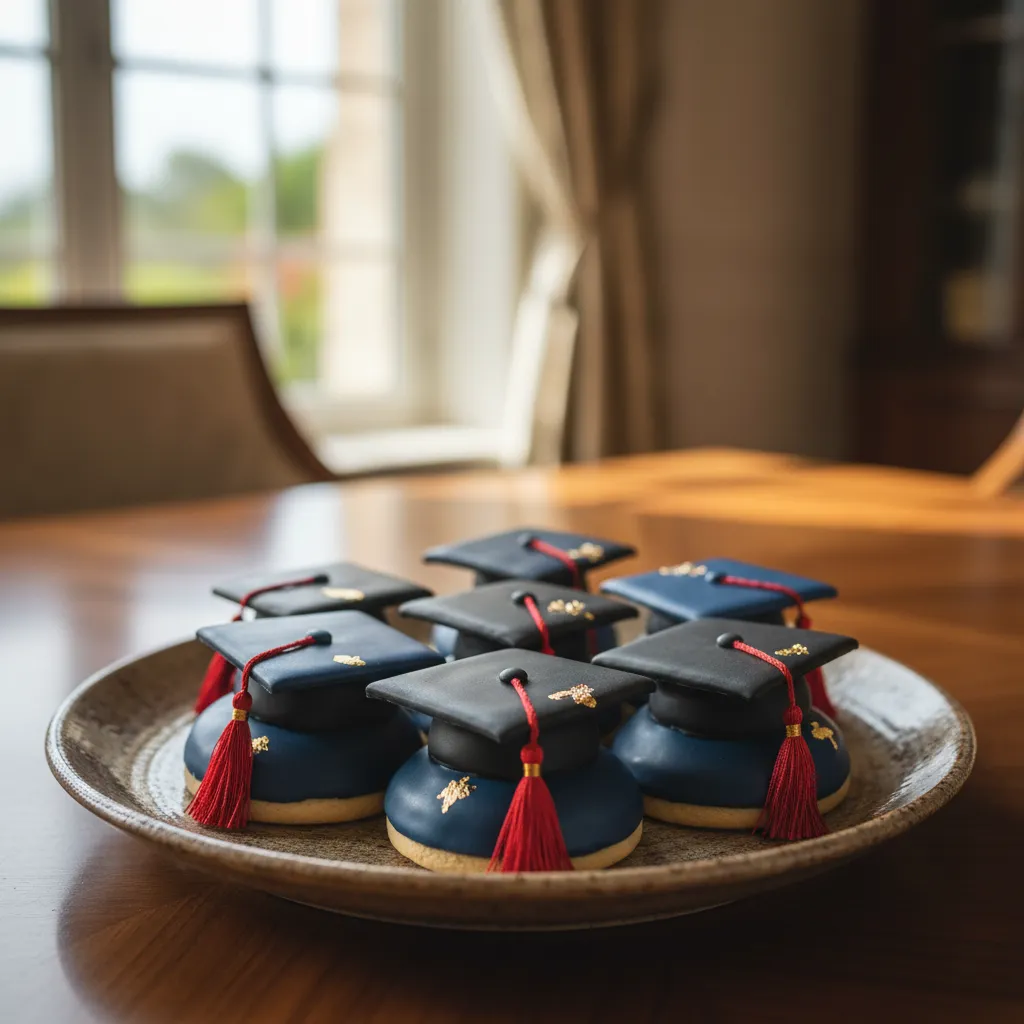
- Height Element: The mortarboard cap perched at a slight angle on the top book.
- Lighting: Battery-operated tea lights tucked near the spine to illuminate the gold lettering.
This design choice creates a studious yet celebratory atmosphere. It honors the academic achievement while serving as an elegant conversation starter for guests.
The Scholar’s Secret
- Apply a small amount of museum wax between the book layers to ensure the stack remains stable throughout the dinner party.
- Incorporate one or two of the graduate’s actual textbooks or thesis journals to add a personal, authentic chapter to the display.
- For a professional finish, steam the graduation cap’s tassel beforehand to remove kinks and ensure it drapes perfectly over the book spine.
School Spirit Hydrangea Arrangements Using University Color Palettes
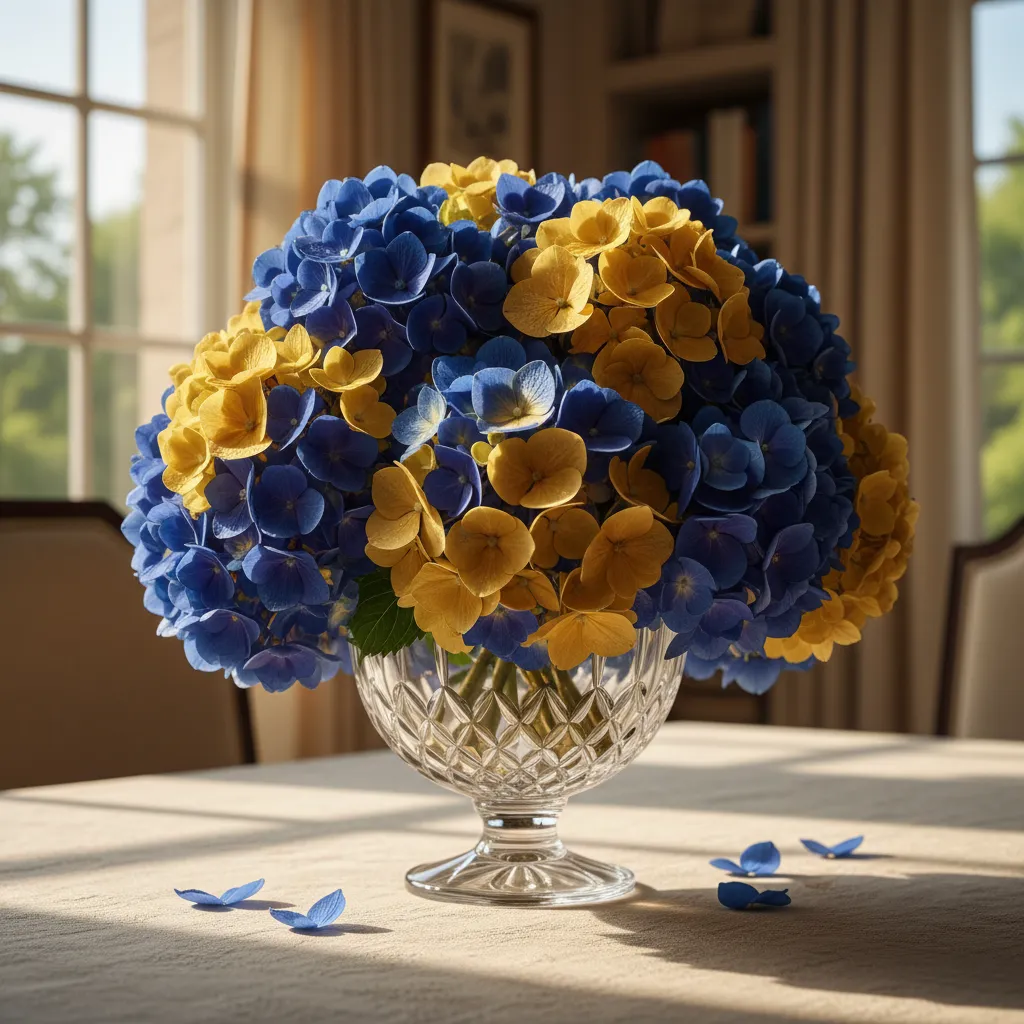
Hydrangeas offer a natural canvas for celebrating academic achievements. Their voluminous blooms create instant visual impact on guest tables. By selecting specific varieties, you can subtly introduce university colors. This approach elevates school spirit into a sophisticated design statement.
The key is balancing school pride with elegant design principles. Avoid overwhelming the space with saturated plastic decorations. Instead, rely on the organic hues of the petals and strategic accents. This creates a cohesive look that feels curated rather than commercial.
True elegance in design aligns personal achievement with the timeless beauty of nature.
Natural Pigments vs. Tinting Techniques
Nature provides a stunning array of blues, purples, and whites. However, specific school colors like crimson or bright gold require intervention. Use high-quality floral sprays on white Limelight hydrangeas for these hues. This ensures the palette matches the alma mater without looking artificial.
For a softer approach, utilize the natural spectrum of the flower. Endless Summer varieties shift from pink to blue based on soil pH. This allows you to grow your own seasonal spring decor elements. Planning ahead allows for a truly organic color match.
Flowers are the most cost-effective way to transform a room.
Preston Bailey, Preston Bailey Designs
Vessels that Anchor the Aesthetic
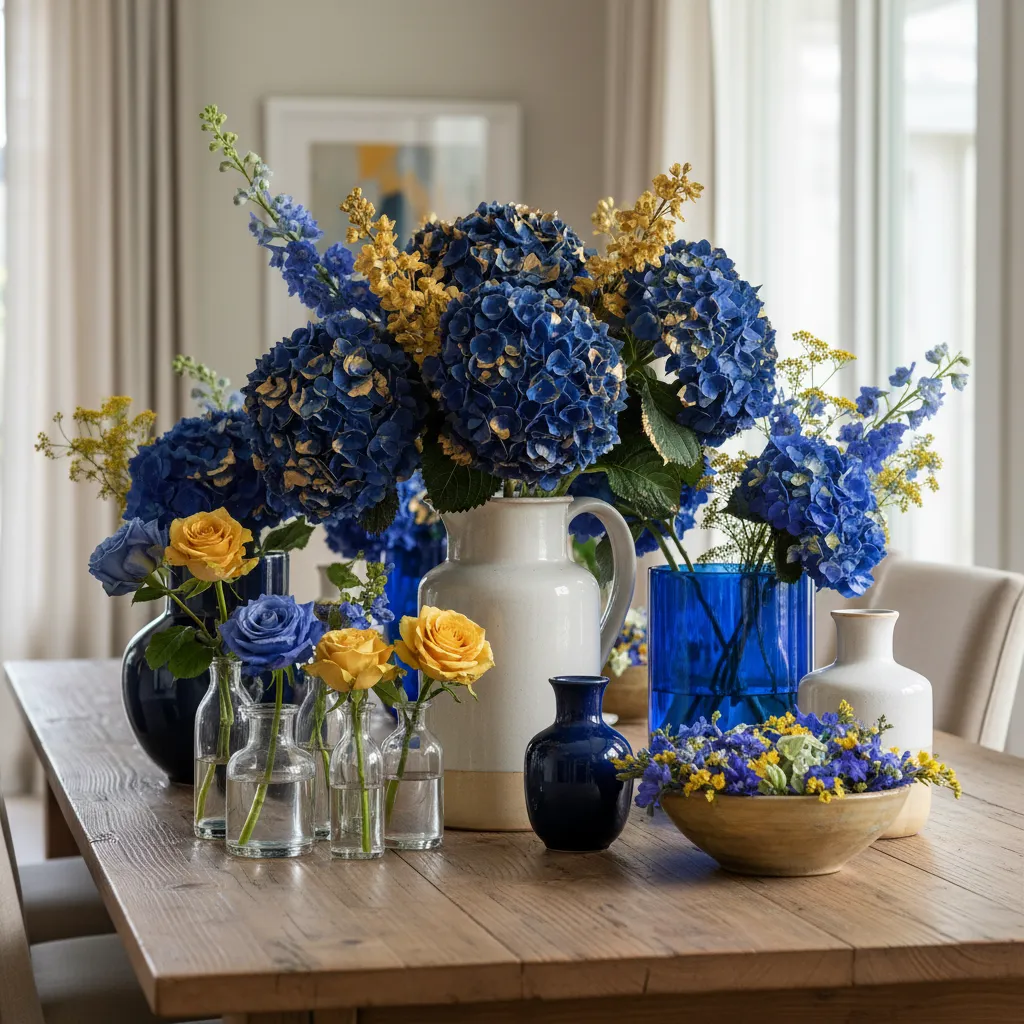
The container defines the arrangement’s formality and functionality. Clear glass cylinders offer a modern, clean look suitable for minimalist themes. Ceramic pitchers introduce a rustic, warm texture to the table. Ensure the vessel height encourages conversation rather than blocking it.
Consider wrapping the interior of a clear vase with waterproof ribbon. This hides the stems and introduces a secondary school color stripe. It adds a tailored finish similar to a graduation stole. This detail integrates the vessel into the overall theme seamlessly.
Color Pairing Formulas
To achieve a professional look, focus on complementary textures and tones. The following guide helps you pair hydrangea base colors with accents to match common university palettes.
| School Palette | Hydrangea Base | Botanical Accent | Visual Effect |
|---|---|---|---|
| Navy & Gold | Deep Blue Nikko Blue | Dried Craspedia (Billy Balls) | Regal and architectural contrast. |
| Crimson & Gray | Tinted White Mophead | Dusty Miller foliage | Soft texture with bold focal points. |
| Purple & White | Royal Purple Merritt’s Supreme | White Baby’s Breath | Classic elegance with high volume. |
| Green & White | Lime Green Annabelle | White Roses or Tulips | Fresh, organic, and modern. |
| Orange & Blue | Blue Endless Summer | Orange Asiatic Lilies | Vibrant, high-energy complementary split. |
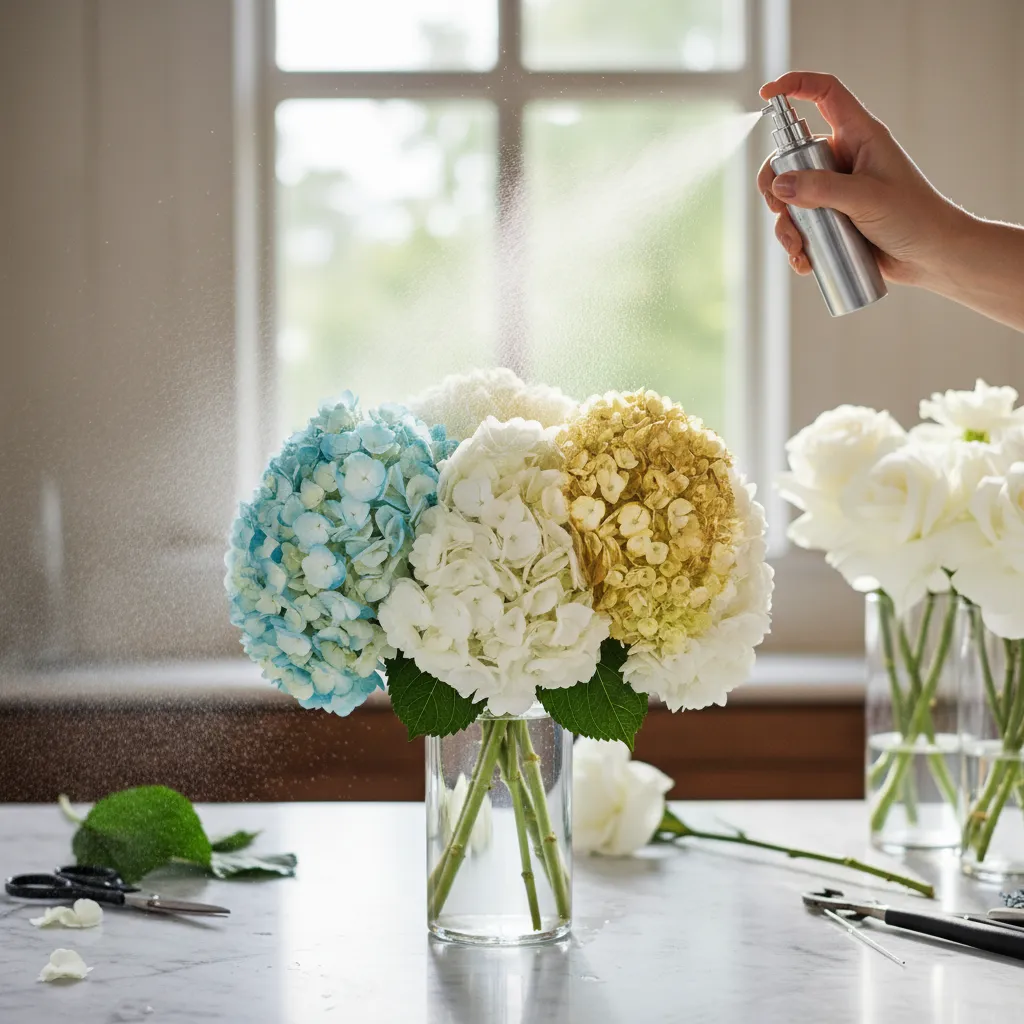
Ensuring Longevity Throughout the Event
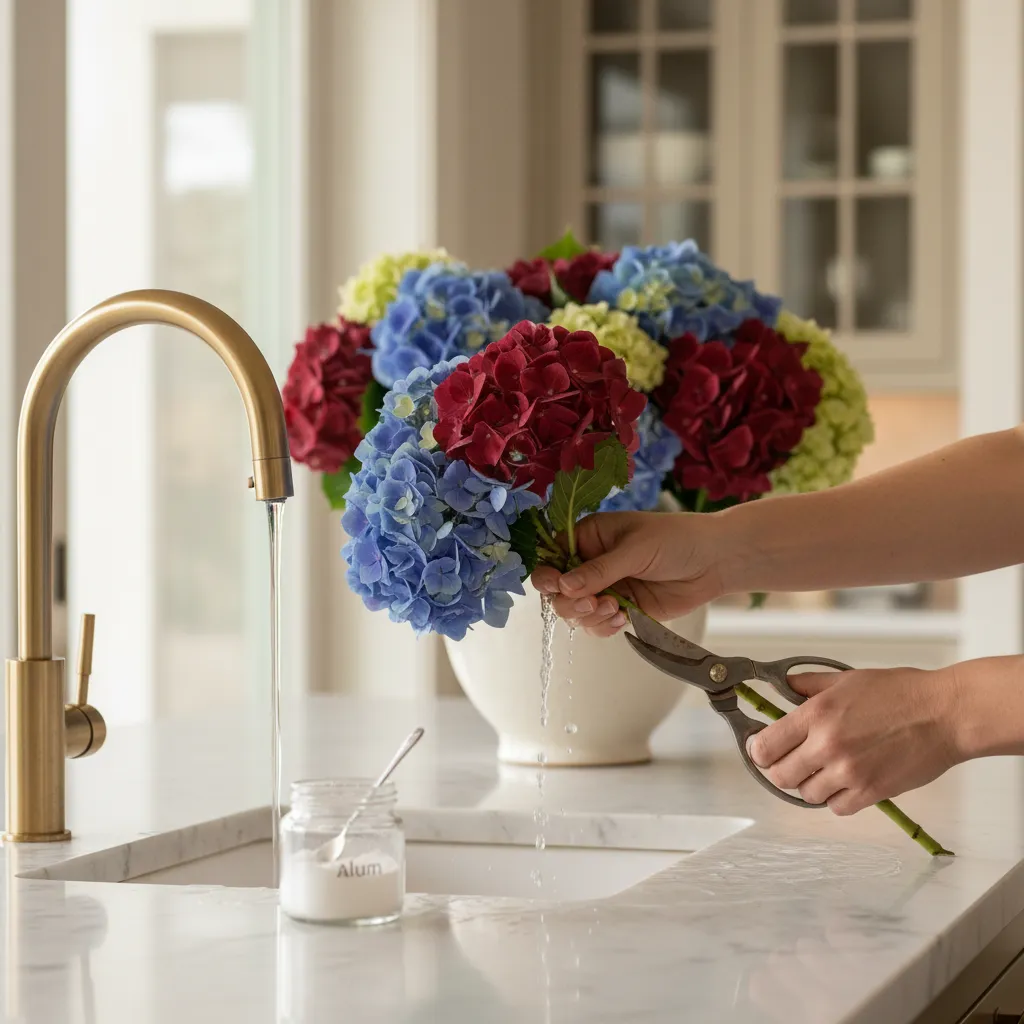
Hydrangeas are notorious for wilting if not properly hydrated. Cut stems at a forty-five-degree angle under warm running water. Dip the cut ends into alum powder to keep the vascular pathways open. This simple step is vital for structural integrity.
Keep the arrangements out of direct sunlight to maintain petal turgidity. If you are hosting outdoors, mist the blooms periodically with cool water. This preserves the “fresh from the garden” look. Proper care ensures your centerpieces last through the final toast.
When selecting your location, consider the ambient temperature. Avoid placing these arrangements near heat sources or hot coffee stations where steam rises. Cooler spots maximize the lifespan of the blooms.
Alumni Styling Secrets
- Dip freshly cut stems in alum powder; commonly found in the spice aisle; to prevent wilting and keep your school-spirited blooms perky for the entire celebration.
- To incorporate a secondary university color without adding more flowers, line the inside of a clear glass vase with waterproof ribbon to hide stems and add a polished design element.
- When nature doesn’t provide the exact match, use professional floral spray on white hydrangeas to achieve difficult hues like deep crimson or vibrant gold while maintaining a natural look.
Industrial Geometric Terrariums for Engineering and Tech Majors

Engineering and technology graduates appreciate design that highlights structure and precision. Geometric terrariums serve as the perfect focal point for these celebrations.
These vessels celebrate mathematical beauty through their faceted glass planes and exposed welding. The aesthetic is clean, modern, and intellectually stimulating.
The interplay of raw materials defines this look. Cold metal frames contrast beautifully with the organic softness of succulents or moss placed inside.
Functionality is paramount in these arrangements. Their low profile ensures guests can converse easily across the table without visual obstruction.
Design is where science and art break even.
Constructing the Look
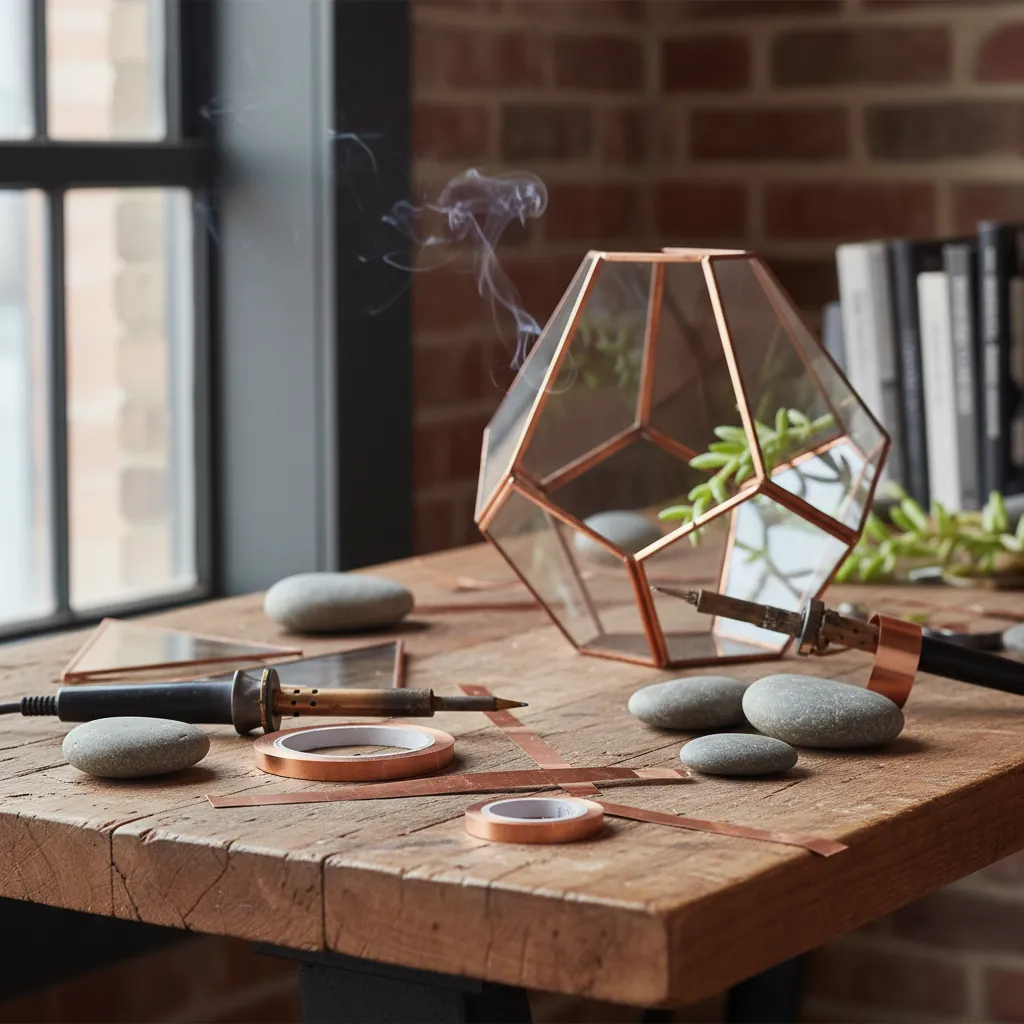
You can achieve this look by sourcing multifaceted glass containers often found in home decor stores. Look for shapes like dodecahedrons or pyramids.
For a cohesive theme, incorporate materials that mimic building supplies. Concrete coasters or slate tiles make excellent bases for the glass structures.
If you enjoy hand-crafted details, similar precision is required when you create geometric art using wood burning tools.
Fill the bottom of the terrarium with layers of white gravel and activated charcoal. This not only looks architectural but improves drainage for the plants.
I believe that when you walk into a room, you should see the architecture first, then the furniture, then the objects.
Kelly Hoppen, Kelly Hoppen Interiors
Lighting and Flora Integration
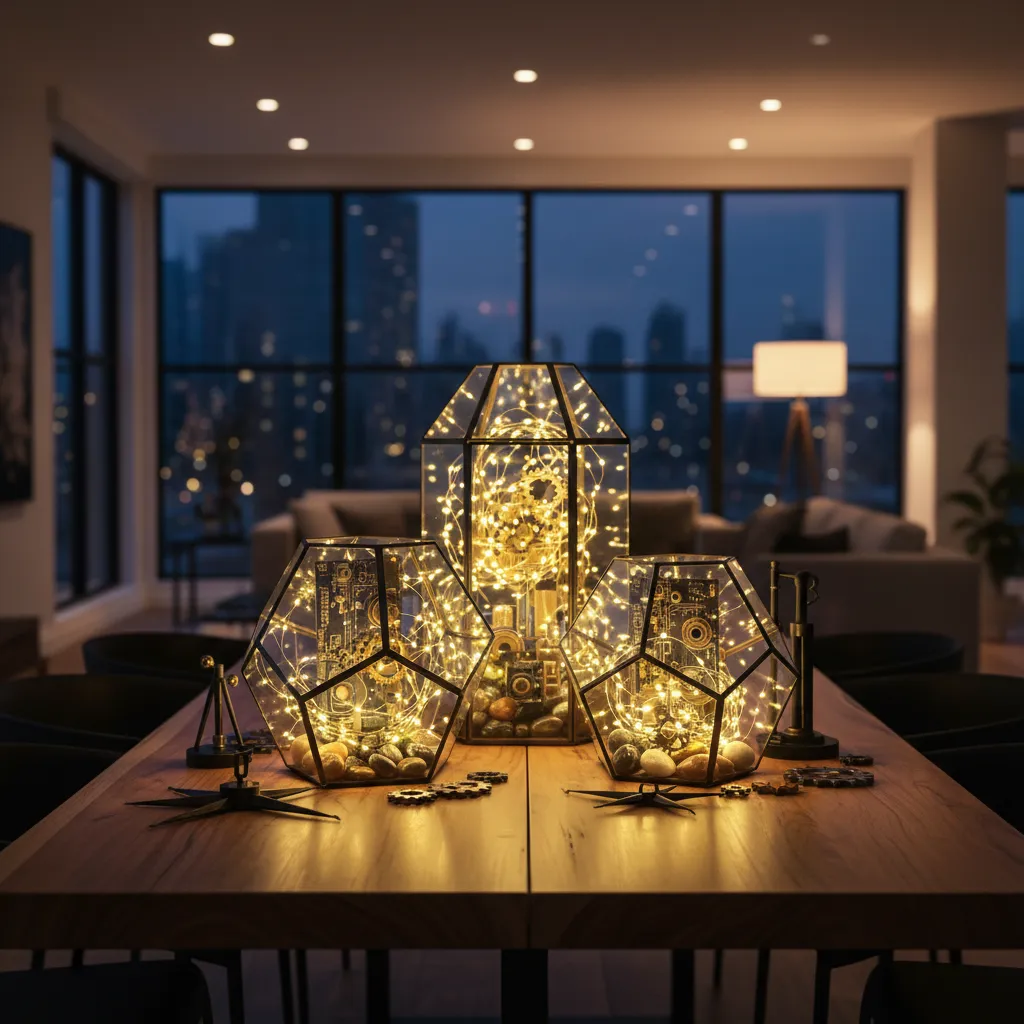
Lighting is crucial for creating an atmosphere that feels sophisticated rather than sterile. Use copper-wire fairy lights woven among the plants.
The copper wire mimics electrical circuitry, subtly nodding to electrical engineering majors. The warm white LEDs soften the hard edges of the metal frames.
Choose robust botanicals like air plants or Echeveria. These require minimal water and maintain their sculptural shape throughout the event.
Integrating living elements into structured designs is a key concept in fresh and airy home styling suitable for modern spaces.
Essential Component Checklist
To execute this industrial theme effectively, ensure you gather the right elements. This list balances the raw industrial vibe with party-ready elegance.
- Vessel: Black or copper patina glass terrariums in geometric shapes.
- Base Layer: White architectural stones or polished river rocks.
- Illumination: Battery-operated copper wire LEDs (warm white).
- Greenery: Tillandsia (air plants) or faux high-quality succulents.
- Accent: Small gears, nuts, or bolts scattered in the gravel as “confetti.”
Precision Styling Hacks
- Use a long-handled lab pipette or a precision syringe to water succulents without leaving unsightly water spots on the geometric glass planes.
- Utilize magnetic pickup tools or long mechanical tweezers to perfectly position decorative gears and air plants within narrow-angled vessels.
- Apply a thin layer of glass sealant or anti-fog spray to the interior panels to ensure structural clarity if the venue’s humidity levels fluctuate.
The “Smart Cookie” Edible Tiered Tray Centerpiece with Custom Toppers
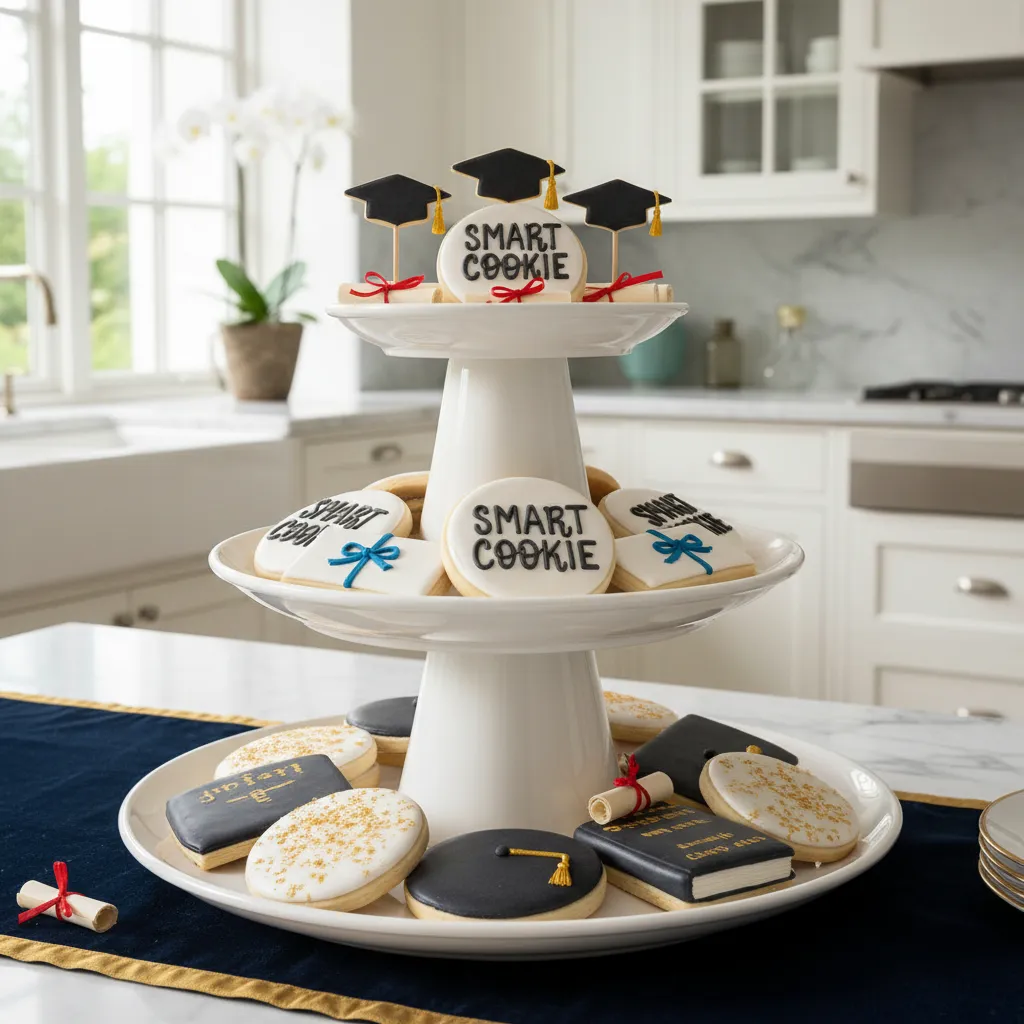
A tiered tray serves as a functional focal point. It draws the eye upward and organizes snacks in a vertical layout. This setup optimizes traffic flow during busy celebrations.
Functional design meets sweet rewards in this setup. It allows guests to serve themselves easily. The vertical layers ensure every cookie is visible and accessible.
A smart cookie centerpiece isn’t just a treat. It is a visual victory lap.
Choosing the Perfect Tray Foundation
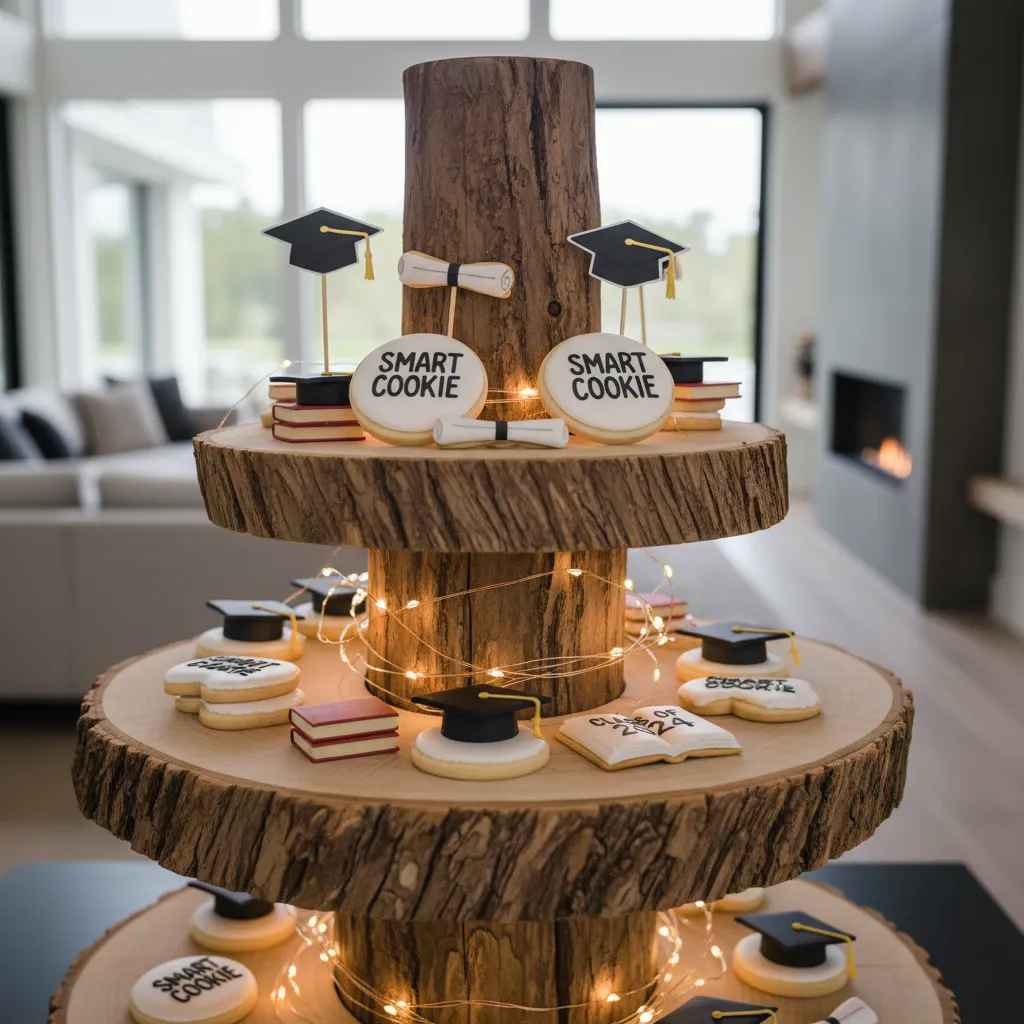
Natural wood trays provide a rustic, organic texture. This material contrasts beautifully with smooth icing. These trays are often found in smart coffee bar ideas for their versatility.
Ceramic options offer a sleek, modern finish. They reflect light and create a clean aesthetic. This choice is ideal for high-end graduation parties with a formal palette.
Tiered stands are a hostess’s best friend. They offer a way to display abundance without clutter.
Martha Stewart, MarthaStewart.com
Consider the durability of your chosen material. Heavy ceramic offers high stability for outdoor use. Lightweight metal is easy to move between the kitchen and the patio.
| Material | Texture Style | Best Environment |
|---|---|---|
| Raw Wood | Rustic & Warm | Outdoor or Casual |
| Ceramic | Polished & Smooth | Indoor Formal |
| Galvanized Steel | Industrial & Matte | Modern Backyard |
Edible Elements and Custom Toppers
Select cookies that vary in size and shape. Use mortarboard shapes to reinforce the theme. A simple one-bowl baking guide can help you create easy base treats.
Custom toppers serve as the final touch. Attach small tassels or names to wooden picks. These details celebrate the graduate’s unique journey with personal flair.
- Miniature Tassels: Use school colors for a personalized touch.
- Edible Gold Leaf: Adds a layer of luxury to simple sugar cookies.
- Ribbon Diplomas: Roll small cookies to look like scrolls.
- Acrylic Signage: Place a small “Smart Cookie” sign at the peak.
Ambient lighting enhances the edible display. Place micro LED strands between the tiers. This creates a warm ambient glow that highlights the textures of the sweets.
Proper zoning on the table is essential. Place the tray in the center to allow 360-degree access. This prevents bottlenecks and keeps the party energy moving smoothly.
The Smart Hostess Guide
- Line wooden trays with parchment paper cut to size to prevent grease spots from buttery cookies while keeping the rustic look.
- To keep cookies fresh for hours, hide a small slice of white bread in a decorative bowl at the back of the tray to maintain moisture without affecting the flavor.
- Vary the heights within each tier by using small upside-down espresso cups as hidden risers for a more dynamic, professional display.
Designing a Lasting Legacy
Crafting graduation centerpieces blends structural precision with celebratory flair. These focal points transform simple tables into curated tributes to a graduate’s hard-earned success.
By balancing technical mechanics with artistic accents, you create a sophisticated atmosphere. These professional techniques ensure your arrangements remain stable and stunning all night.
Ultimately, a successful design honors the journey while looking toward the future. Use these insights to build a celebratory space that leaves a lasting impression on every guest.
Design Dilemmas Solved
Use floral putty to anchor vessels and weight the base with decorative stones or glass beads. This provides a stable foundation that resists movement during a busy party.
Keep designs below 12 inches or above 24 inches on slender stands. This prevents visual blocks, allowing guests to maintain eye contact and conversation across the table.
Fresh florals should be assembled 24 hours prior for peak vibrancy. If using dry elements or high-quality silk stems, you can complete construction weeks before the event.
Use school colors as subtle accents through ribbons or vase fillers. Balancing bold tones with neutral foundations creates a refined look rather than an overwhelming one.