Table of Contents
- 1. Choosing the Right Vessel: Ceramic Cartons and Food-Safe Liners
- 2. Melting Mastery: Tips for Smooth Chocolate and Preventing Seizing
- 3. The Classic ‘Carrot’ Strawberry: Orange Dip and Oreo Dirt
- 4. The ‘Variety Pack’ Aesthetic: Adding Chicks and Pastel Eggs
- 5. Gift-Ready Finish: Upcycled Packaging with Printable Tags
- The Final Polish: Elevating Your Easter Table
- Design Details & Practical Inquiries
Elevating a seasonal tablescape requires more than just thematic decor; it demands a keen understanding of spatial arrangement and material reuse.
By repurposing the humble egg carton as a structural vessel, one can create a modular centerpiece that balances geometric precision with organic textures.
This approach mirrors the principles of sustainable design, where every component serves both a functional and an aesthetic purpose.
The selection of materials plays a crucial role in achieving a sophisticated finish.
Choosing high quality strawberries and pairing them with neutral, paper based containers provides a textured backdrop that complements a variety of surfaces.
Whether you are styling a minimalist corporate boardroom or a rustic residential dining area, the contrast between the vibrant fruit and the industrial form of the carton offers a refined visual dialogue.
Mastering this DIY craft involves subtle technical nuances, from the precise placement of delicate greens to the strategic use of height and layering.
This guide provides actionable steps to transform basic household items into professional grade decor pieces. By focusing on these finer details, you can craft a memorable atmosphere that resonates with homeowners and designers alike.
1. Choosing the Right Vessel: Ceramic Cartons and Food-Safe Liners
The foundation of this Easter centerpiece lies in selecting a vessel that balances rustic charm with modern food safety standards. The texture of the container sets the tone for the entire display.
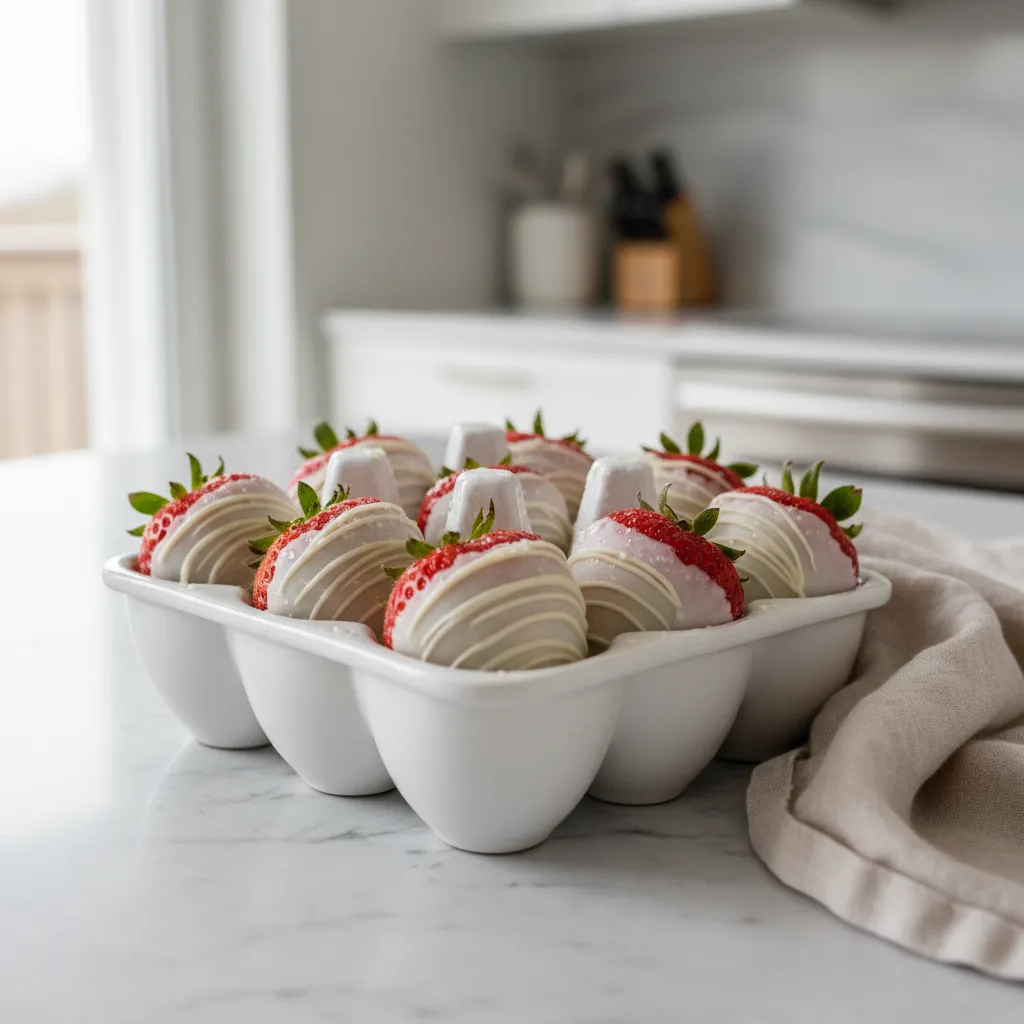
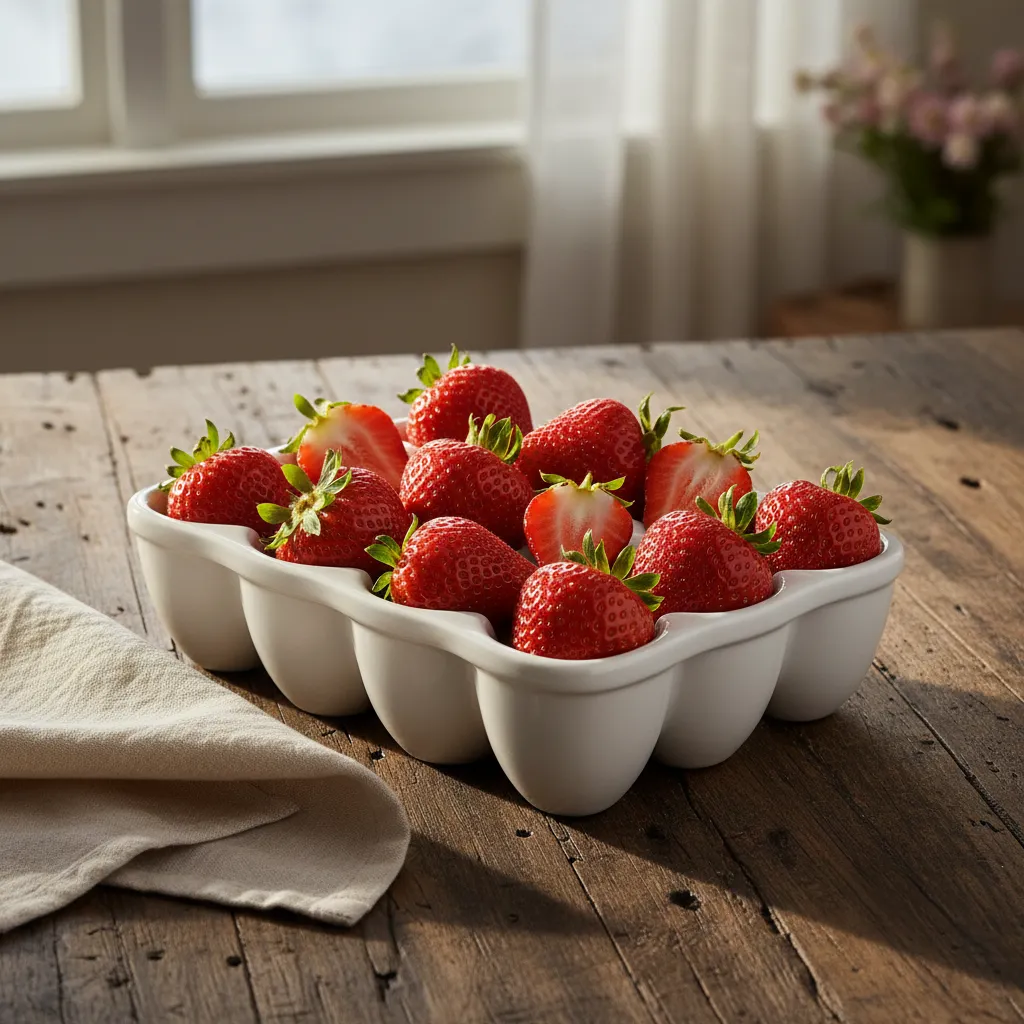
Currently, ceramic egg crates are the preferred choice for sophisticated tablescapes. They offer the nostalgic silhouette of a farm-fresh carton but feature a non-porous, glazed finish.
Glazed ceramic is impermeable, making it ideal for holding washed fruit without absorbing moisture or bacteria.
This ensures your Easter dessert presentation remains hygienic and visually crisp throughout the brunch.
True elegance in design is found where functionality meets an unexpected aesthetic form.
Stylist’s Note
- Chill your ceramic crate in the refrigerator for 30 minutes before serving; the dense material holds the cold, keeping chocolate eggs or fresh berries crisp throughout brunch.
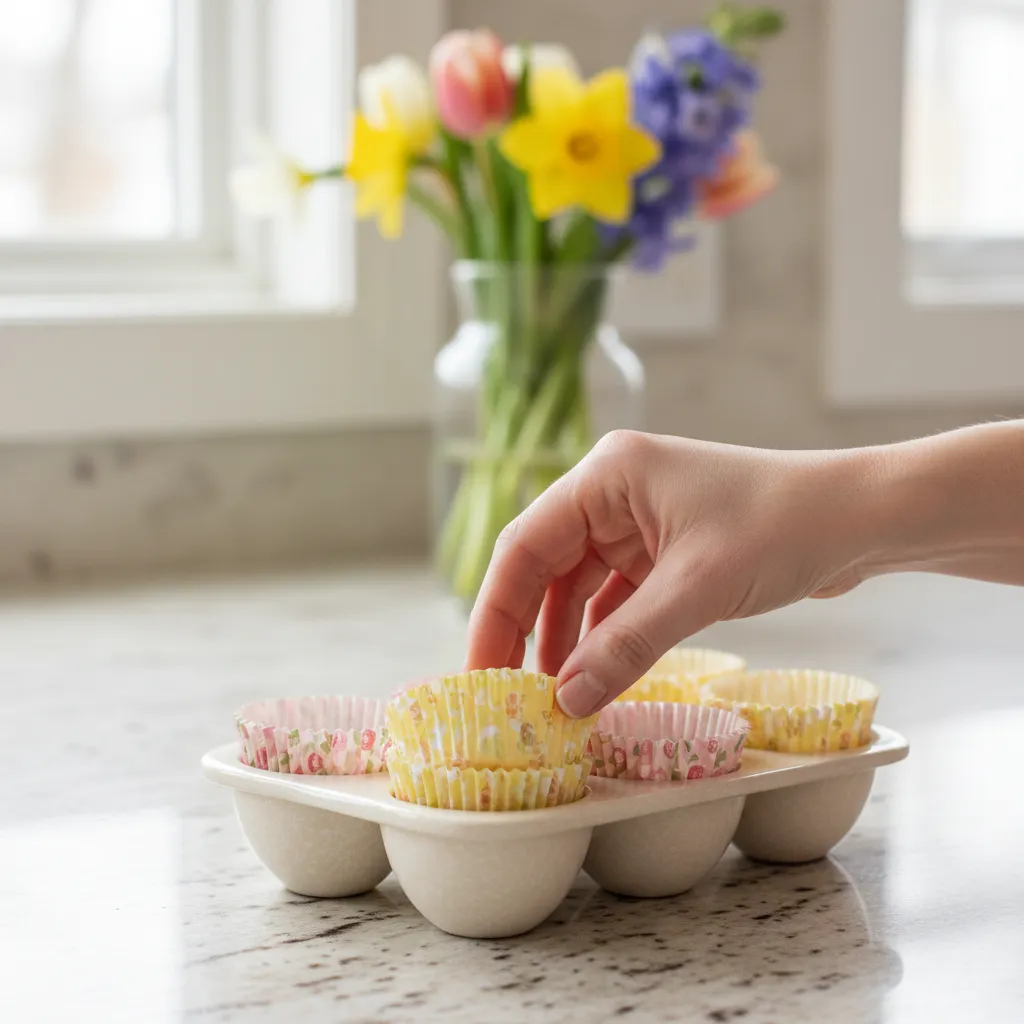
- If you love the look of a vintage paper carton but need it to be food-safe, tuck clear mini cupcake liners or small squares of parchment paper inside each cup to create an invisible barrier.
- Always check the underside of decorative ceramics for a ‘food safe’ mark, as some ornamental glazes are not formulated for direct contact with edibles.
Material Selection: Ceramic vs. Upcycled Paper
While traditional paper cartons possess a raw, vintage appeal, they pose significant challenges for direct food contact. Standard cardboard is highly porous and can harbor salmonella bacteria.
If you prefer the matte look of paper for a farmhouse aesthetic, you must never place food directly on the surface. Instead, reserve these for decorative shells or wrapped candies.
For fresh strawberries, especially those dipped in chocolate, a ceramic or glass vessel is essential. It provides a sturdy base that won’t sag under the weight of the fruit or moisture.
Integrating these durable vessels into your dining setup allows for better flow.
They work beautifully alongside elegant Easter lunch main dishes by adding a casual yet refined touch to the buffet line.
| Feature | Ceramic/Porcelain Crate | Upcycled Paper Carton | Clear Acrylic Holder |
|---|---|---|---|
| Durability | High (Heirloom quality) | Low (Single-use) | Medium (Scratch-prone) |
| Food Safety | Excellent (Non-porous) | Poor (Needs heavy lining) | Good (Washable) |
| Aesthetic | Timeless, polished, warm | Rustic, raw, temporary | Modern, minimalist, cold |
| Cleaning | Dishwasher safe | Cannot be cleaned | Hand wash only |
Styling Secret
- Love the rustic paper aesthetic? Nest a clear glass bowl inside the paper carton to safely hold fruit while maintaining that vintage farmhouse vibe without the hygiene risk.
- Chill your ceramic crates in the fridge for 20 minutes before serving; the dense material retains cold, keeping chocolate-dipped strawberries crisp and preventing melting.
- Never reuse paper cartons for fresh, unwrapped food. Since porous cardboard cannot be sanitized, reserve these purely for displaying wrapped candies or decorative faux eggs.
Safe Lining Techniques for Porous Cartons
If you must use a paper carton for its specific color or texture, proper lining is non-negotiable. This creates a barrier between the recycled pulp and your edible treats.
Standard cupcake liners are the most effective solution. They fit perfectly into the egg cups and introduce an additional layer of color to your palette.
Silicone baking cups are another reusable option. They add structure to the paper divots, ensuring that heavy chocolate-covered strawberries do not tip over during transport.
The details are not the details. They make the design.
Charles Eames, Eames Foundation
When selecting liners, opt for grease-proof varieties. These prevent butter or natural oils from the strawberries from seeping through and staining the carton underneath.
Consider the visual flow of the liners. Using a monochrome set creates a modern look, while alternating pastel shades can enhance a playful, spring-inspired theme.
Ultimately, the vessel dictates the formality of the event. A white ceramic piece elevates the space, while lined paper cartons suggest a relaxed, picnic-style gathering.
The Designer’s Edge
- Always opt for grease-proof liners to prevent oils from sweets or berries from seeping into the porous pulp and causing unsightly dark spots.
- For heavier treats, double-stack your liners or use a silicone base to provide extra structural support and keep the carton from sagging.
- Coordinate the color of your liners with your brand palette or the carton’s texture to transform a simple container into a high-end gift vessel.
2. Melting Mastery: Tips for Smooth Chocolate and Preventing Seizing
Achieving a porcelain-smooth finish on your strawberries requires the same attention to detail as applying a final coat of varnish to antique furniture.
The texture of your dipping medium defines the aesthetic of the final display. You want a consistent, glossy sheen that hardens with a satisfying snap.
Treat your kitchen workspace like a design studio. Clear the counters to ensure you have ample room for your “wet” and “dry” zones to prevent cross-contamination.
The essence of craftsmanship lies in mastering the materials before you even begin to build.
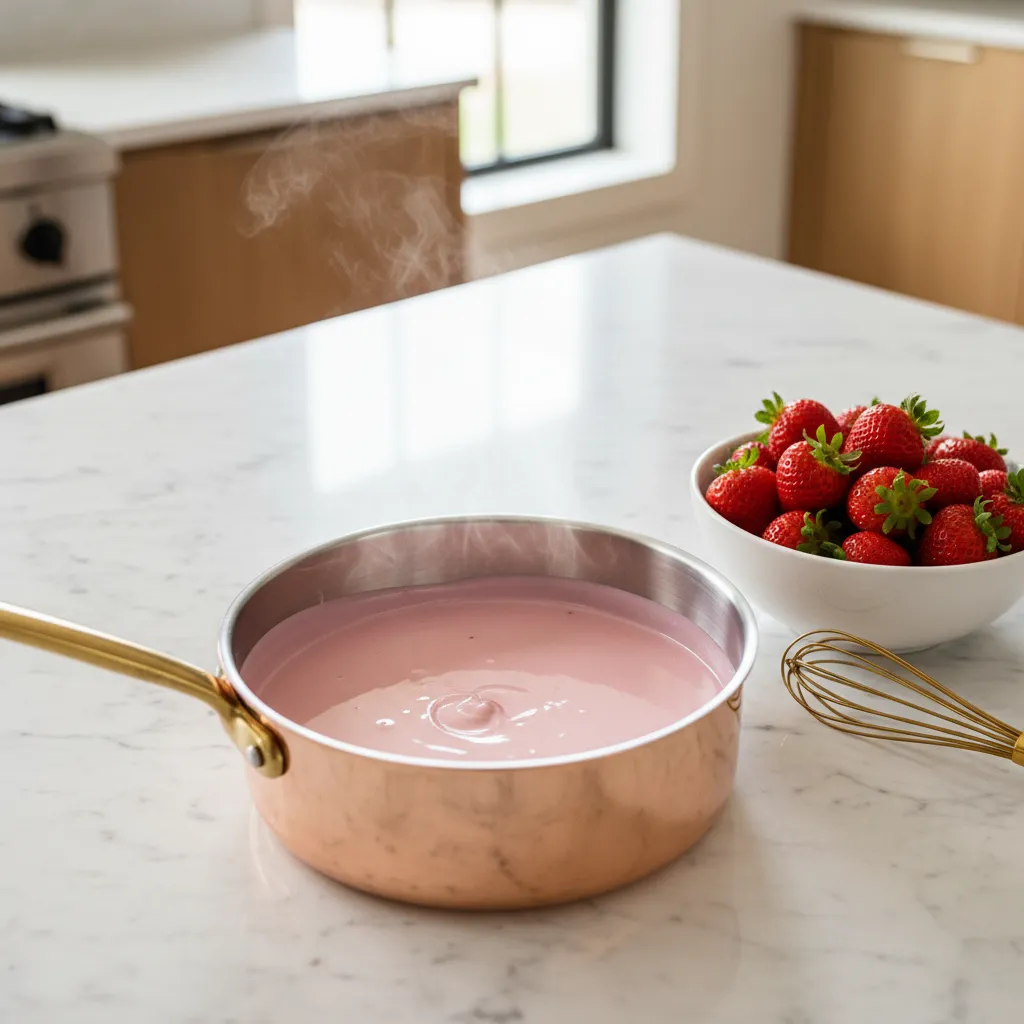
Melting chocolate is not just about heat application. It is about temperature control and patience. Rushing this process often results in scorched, unusable material.
This technique is essential for many 15 Easter Desserts Ideas Easy No Bake for Spring Hosting, where texture is paramount.
The Science of Seizing
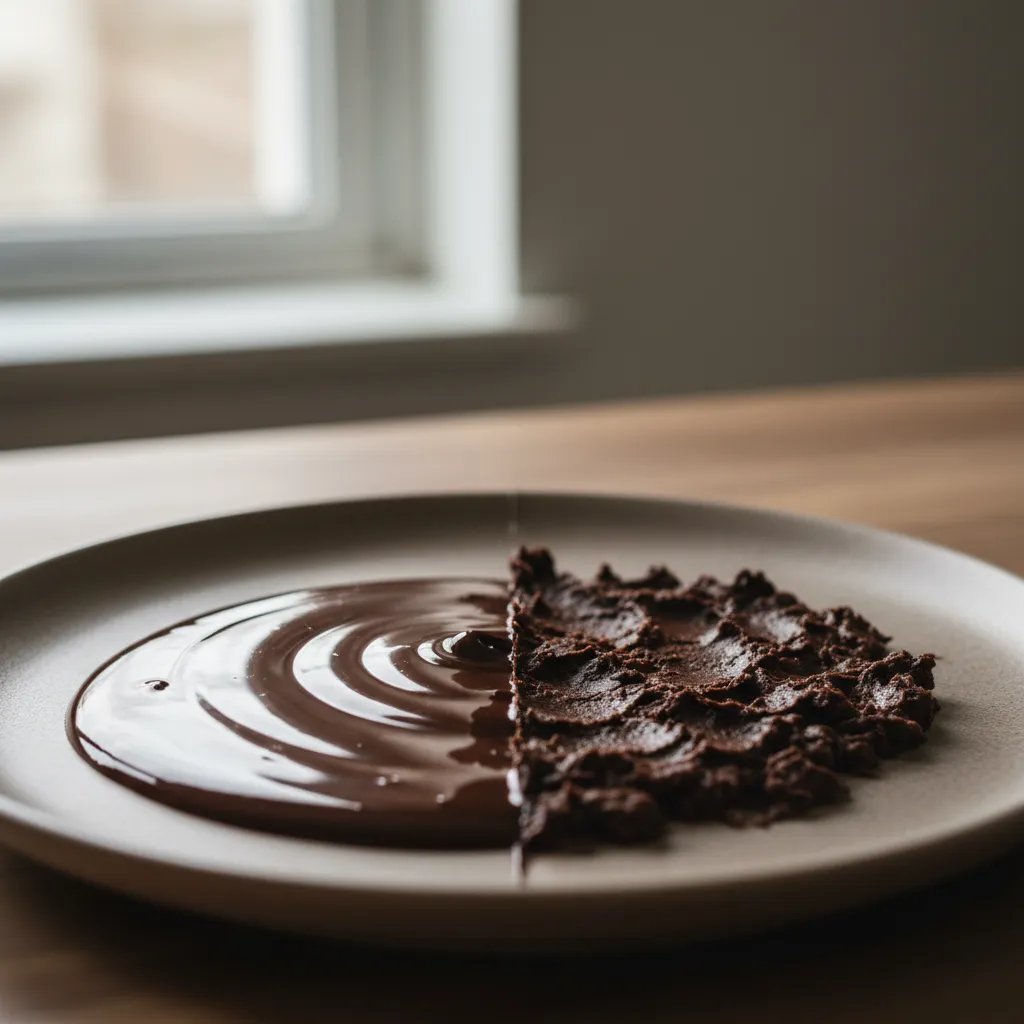
Water is the absolute enemy of melting chocolate. Even a tiny droplet of steam can cause the cocoa butter to separate from the solids.
This chemical reaction, known as seizing, turns your fluid dipping medium into a gritty, unworkable paste that resembles wet sand.
To avoid this, ensure all utensils, bowls, and spatulas are bone dry before they touch the chocolate. Avoid using wooden spoons, which retain moisture.
The details are not the details. They make the design.
Charles Eames, Eames Office
If you are using a double boiler, ensure the water in the bottom pot never touches the bottom of the top bowl to prevent overheating.
Selecting the Right Medium
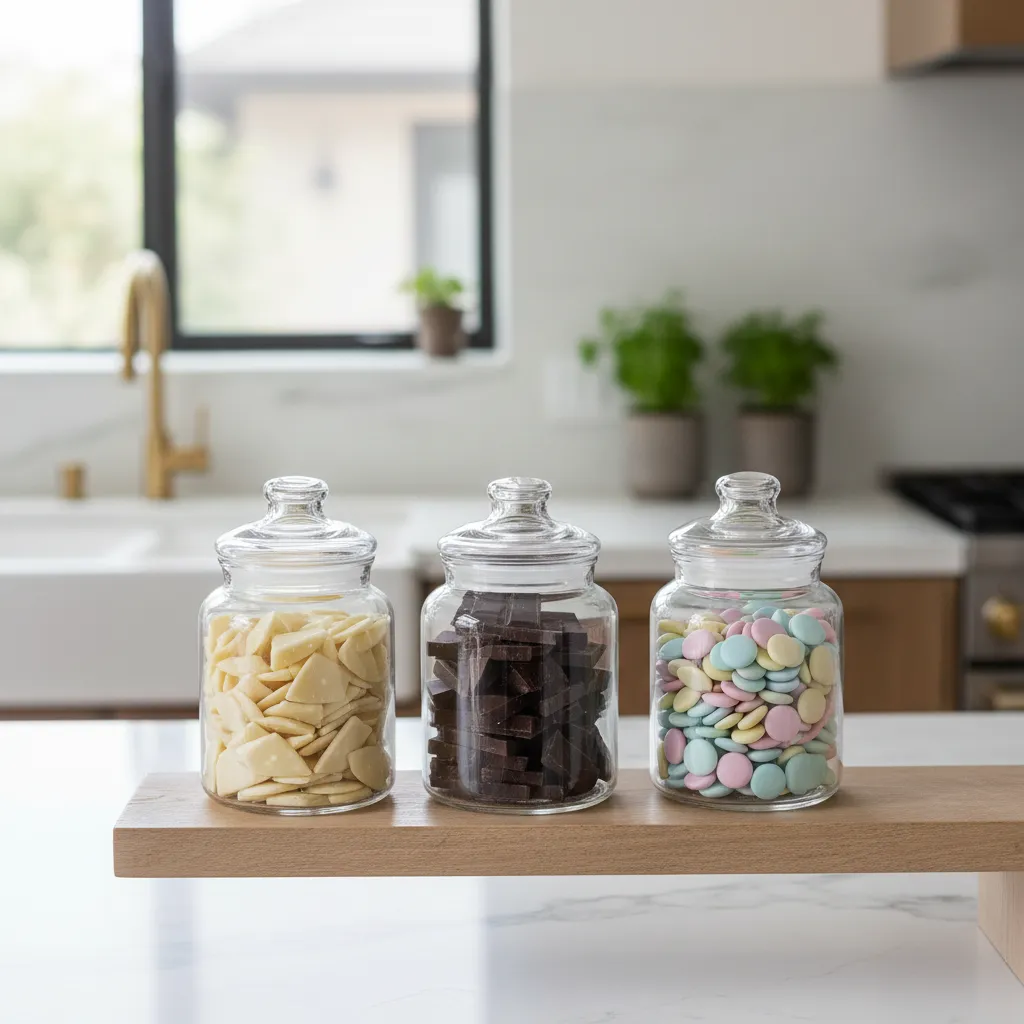
The type of chocolate you select impacts both the flavor profile and the visual finish. Not all chocolates are engineered for melting and dipping.
For this project, stability is key. You want a material that sets firm at room temperature so it does not smudge when placed in the egg carton.
Once you have mastered the dip, any surplus fruit can be repurposed into refreshing beverages, similar to the concepts found in our Strawberry Drinks from Starbucks: Order & Design Guide.
| Material Option | Visual Finish | Structural Integrity | Best Application |
|---|---|---|---|
| Candy Melts | Matte to Satin | High (Sets Fast) | Detailed decorating and color work |
| Couverture | High Gloss | Medium (Requires Tempering) | Professional gourmet dipping |
| Almond Bark | Semi-Gloss | High (Very Durable) | Beginner-friendly bulk coating |
| Chocolate Chips | Variable | Low (Contains Stabilizers) | Cookies, not recommended for dipping |
Operational Workflow for Melting
Establish a logical flow in your kitchen to maintain efficiency. Move from left to right: dry fruit, melting station, drying rack, and finally the carton.
- Chop Finely: If using bars, chop the chocolate into uniform, small shards. This ensures even heat distribution and faster melting.
- Short Intervals: If microwaving, heat in 30-second bursts. Stir vigorously between each interval to utilize residual heat.
- Add Oil: For a smoother consistency, add a teaspoon of coconut oil or shortening. This improves the “flow” of the chocolate.
- Test the Drip: Lift your spoon. The chocolate should flow like honey in a continuous ribbon, not globs.
Maintaining the temperature of your chocolate is crucial. If it begins to cool and thicken while you work, gently reheat it for 10 seconds.
The Master’s Touch
- Ensure every tool is bone-dry before starting, as even a single drop of moisture or steam will cause the chocolate to seize into an unworkable paste.
- Pull the chocolate from the heat while small lumps remain and stir continuously; the residual heat will finish the melt without risking a scorched or grainy texture.
- Stir in a half-teaspoon of refined coconut oil to improve the flow and achieve a professional, high-gloss finish that snaps perfectly when chilled.
3. The Classic ‘Carrot’ Strawberry: Orange Dip and Oreo Dirt
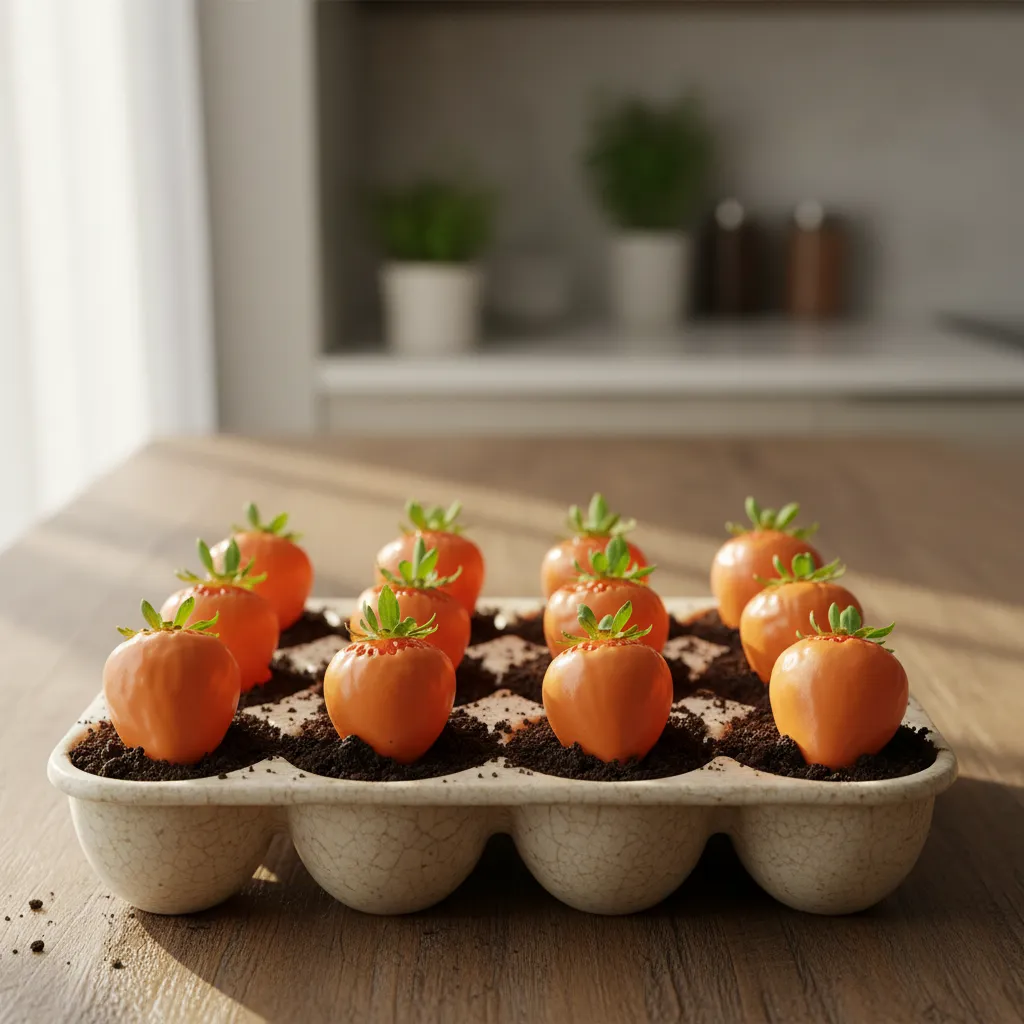
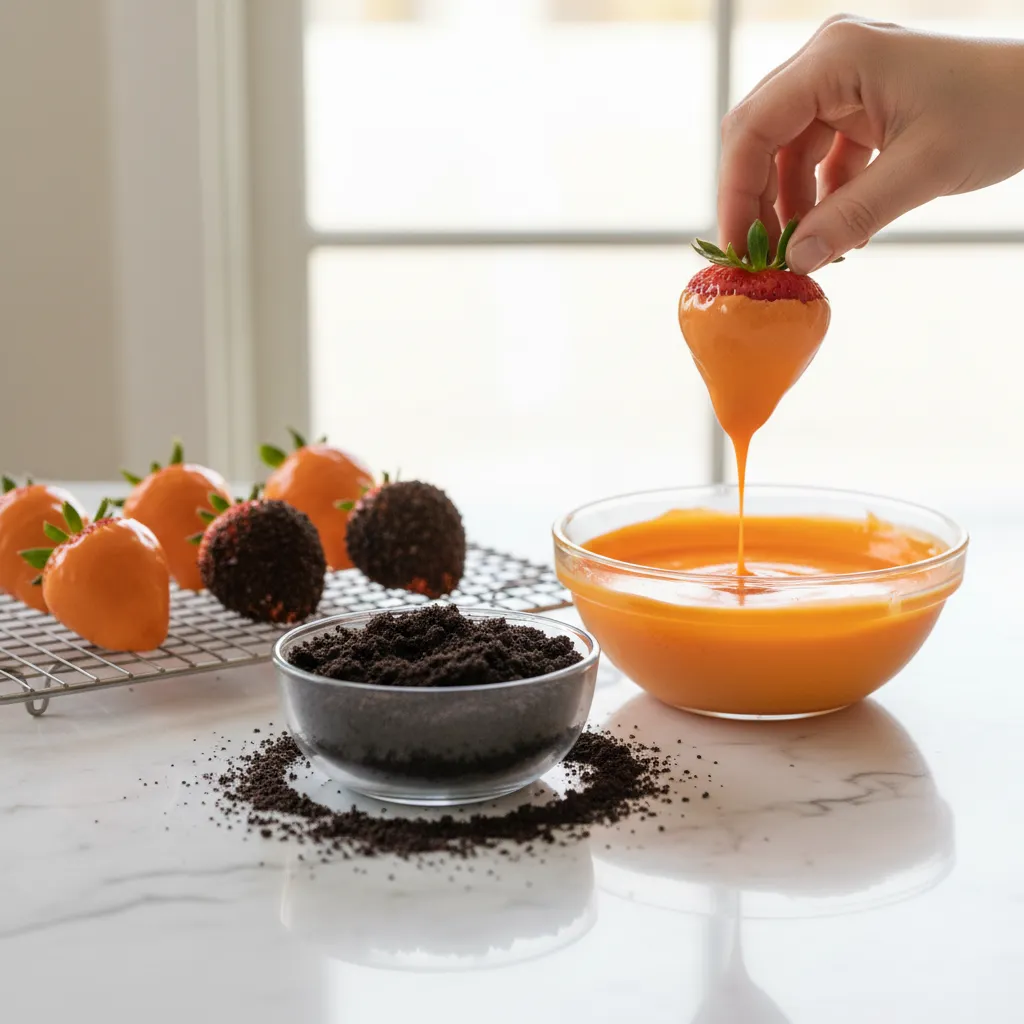
Transforming simple fruit into a whimsical garden requires a keen eye for color and texture. The “Carrot” strawberry is a classic trompe-l’œil.
This design mimics the spatial dynamics of a vegetable patch. The vibrant orange hue creates a striking focal point against the dark, crushed cookie “soil.”
To achieve the soil effect, pulverize chocolate sandwich cookies until they resemble rich earth. This granular texture contrasts beautifully with the fruit.
For those interested in similar culinary landscapes, this concept pairs perfectly with a broader Easter dirt cake casserole theme.
The mixture of textures and materials is what makes a space inviting. It is about the alchemy of the mix.
Kelly Wearstler, Elle Decor Interview
Architectural Assembly of the ‘Carrot’
The structural integrity of your edible garden relies on the density of the dirt. Fill each egg carton cup firmly to support the berry’s weight.
If you are hosting guests with dietary restrictions, consider swapping standard cookies for gluten free baking recipes alternatives.
Dip your strawberries in orange candy melts, ensuring a smooth finish. Let the excess drip off to maintain a sleek, tapered silhouette.
Once the coating sets, place them into the cookie dirt. The carton’s compartments naturally organize the fruit, improving the table’s visual flow.
Design Specification Checklist:
- Visual Contrast: Ensure the orange dip is opaque to fully conceal the red berry, maximizing the carrot illusion against the black soil.
- Texture Balance: Leave the cookie crumbs coarse rather than fine dust; this mimics the organic irregularity of real garden soil.
- Ergonomics: Select strawberries with long, sturdy stems or leafy green tops. This acts as the “carrot greens” and a functional handle.
- Stability: Fill the egg carton cups 3/4 full with crumbs before inserting the berry to ensure it stands upright without tipping.
- Finish: Use oil-based food coloring for white chocolate to prevent seizing, ensuring a professional, high-gloss finish.
Great design transforms the ordinary into the extraordinary, turning a simple berry into a moment of wonder.
Mastering the Illusion
- Thoroughly pat each strawberry dry before dipping; any residual moisture will cause the candy coating to seize or slide off the fruit.
- Use a toothpick inserted into the stem end for a 360-degree dip, then let it dry in a foam block to avoid flat spots on your ‘carrots’.
- Pulse the cookies in short bursts to maintain varied crumb sizes, which creates a more realistic and sophisticated soil texture than a fine powder.
4. The ‘Variety Pack’ Aesthetic: Adding Chicks and Pastel Eggs
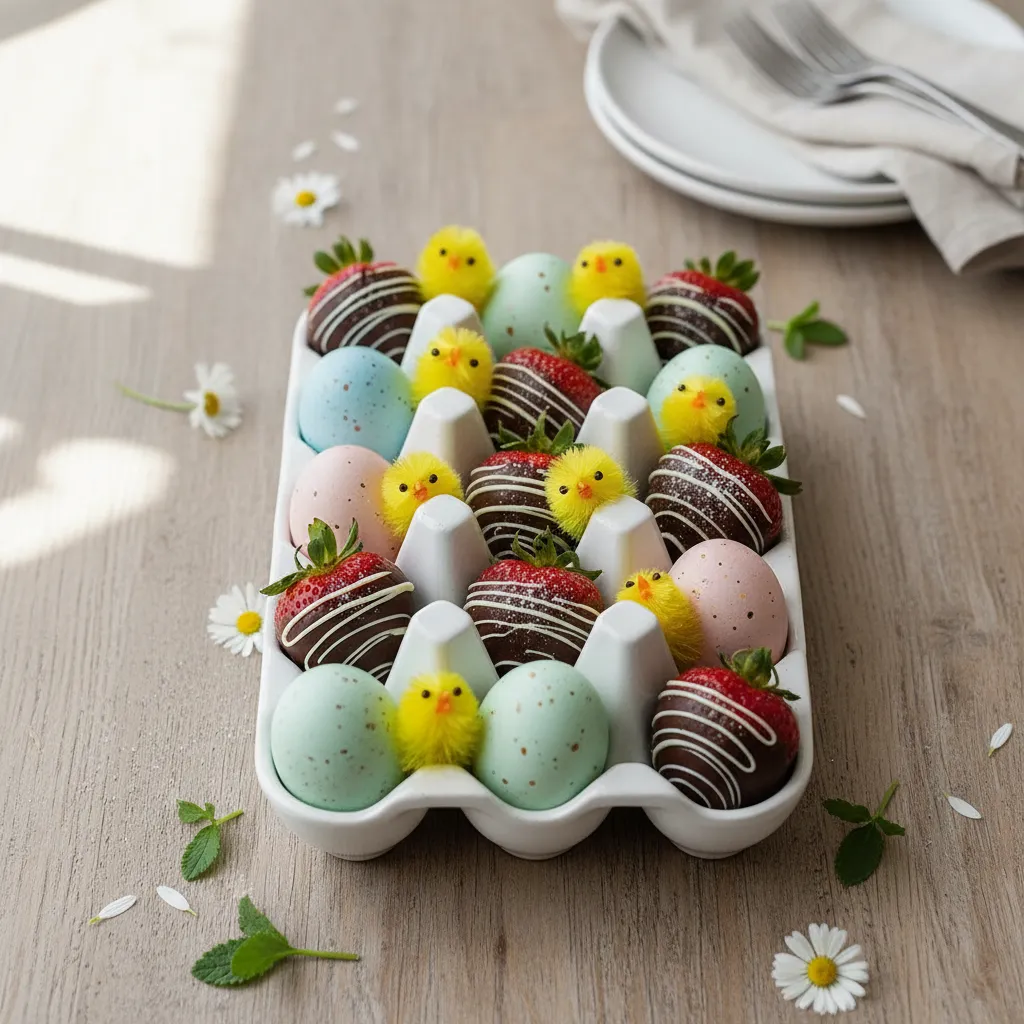
Creating a visually stimulating display requires breaking up the monotony of a single element. The “Variety Pack” aesthetic uses the egg carton as a grid for artistic expression.
By alternating strawberries with non-edible decor, you create a checkerboard effect that draws the eye.
This approach transforms a simple snack into a curated shadow box.
The carton acts as a structural framework, ensuring each item has its own distinct zone. This spacing prevents the arrangement from looking cluttered while maximizing the impact of each color.
Design is the balance between unity and variety; too much unity is boring, too much variety is chaos.
Integrating Textural Contrasts

Texture is a critical component of interior styling that applies perfectly to food presentation.
The glossy finish of chocolate-dipped strawberries provides a sleek, modern look. To soften this, introduce small chenille chicks into the empty carton slots.
The fuzzy texture of the chicks contrasts beautifully with the smooth chocolate and the rough pulp of the carton.
This tactile variety adds depth to the table setting. It creates a playful narrative that appeals to both children and adults during the holiday.
There are no rules for setting the table… only that it be memorable. It’s about creating an experience that lingers long after the guests have gone.
Charlotte Moss, Charlotte Moss: Entertaining
Pastel Palettes and Spatial Flow
Color theory plays a massive role in how appetizing a display looks.
The deep red of the strawberries acts as a strong anchor color. To balance this heavy tone, incorporate pastel eggs in shades of robin’s egg blue, soft lavender, or pale pink.
You can use foil-wrapped chocolate eggs or hand-painted wooden eggs for this purpose.
If you are planning a larger gathering, consider how these colors coordinate with your elegant Easter lunch menu ideas to ensure a cohesive theme throughout the dining space.
The arrangement should encourage a natural visual flow.
Place the brightest elements in the center and darker elements toward the edges. This technique creates a focal point that anchors the viewer’s attention immediately.
Composition Checklist for Carton Displays
Achieving the perfect “Variety Pack” look requires balancing multiple design elements. Use this composition guide to ensure your carton looks professional and intentional rather than messy.
| Design Element | Recommended Material | Visual Purpose |
|---|---|---|
| Anchor | Dark Chocolate Strawberry | Provides weight and establishes the primary focal point. |
| Softener | Chenille or Felt Chicks | Breaks up hard lines with soft, organic textures. |
| Highlight | Pastel Foil Eggs | Reflects ambient lighting to add sparkle and dimension. |
| Filler | Shredded Crinkle Paper | Elevates items physically and unifies the color palette. |
When assembling these cartons, consider the durability of your materials.
If using real dyed eggs, ensure they are dry before placing them near the strawberries to prevent color bleeding.
This attention to detail preserves the crisp, clean look of the presentation.
This method also aids in portion control for guests.
By mixing decor with dessert, you create a satisfying visual experience that feels abundant without requiring excessive amounts of food.
It pairs exceptionally well with elegant Easter appetizers, bridging the gap between decor and dining.
Designer Display Secrets
- Dry your dyed eggs thoroughly before assembly to prevent color bleeding onto the strawberries, ensuring your pastel palette remains crisp and clean.
- Anchor your display by placing the largest or darkest strawberries in the center and moving toward lighter pastel eggs at the edges to create a natural focal point.
- Incorporate a mix of textures; like glossy chocolate, fuzzy chenille, and matte paper; to add sophisticated depth to your arrangement.
5. Gift-Ready Finish: Upcycled Packaging with Printable Tags
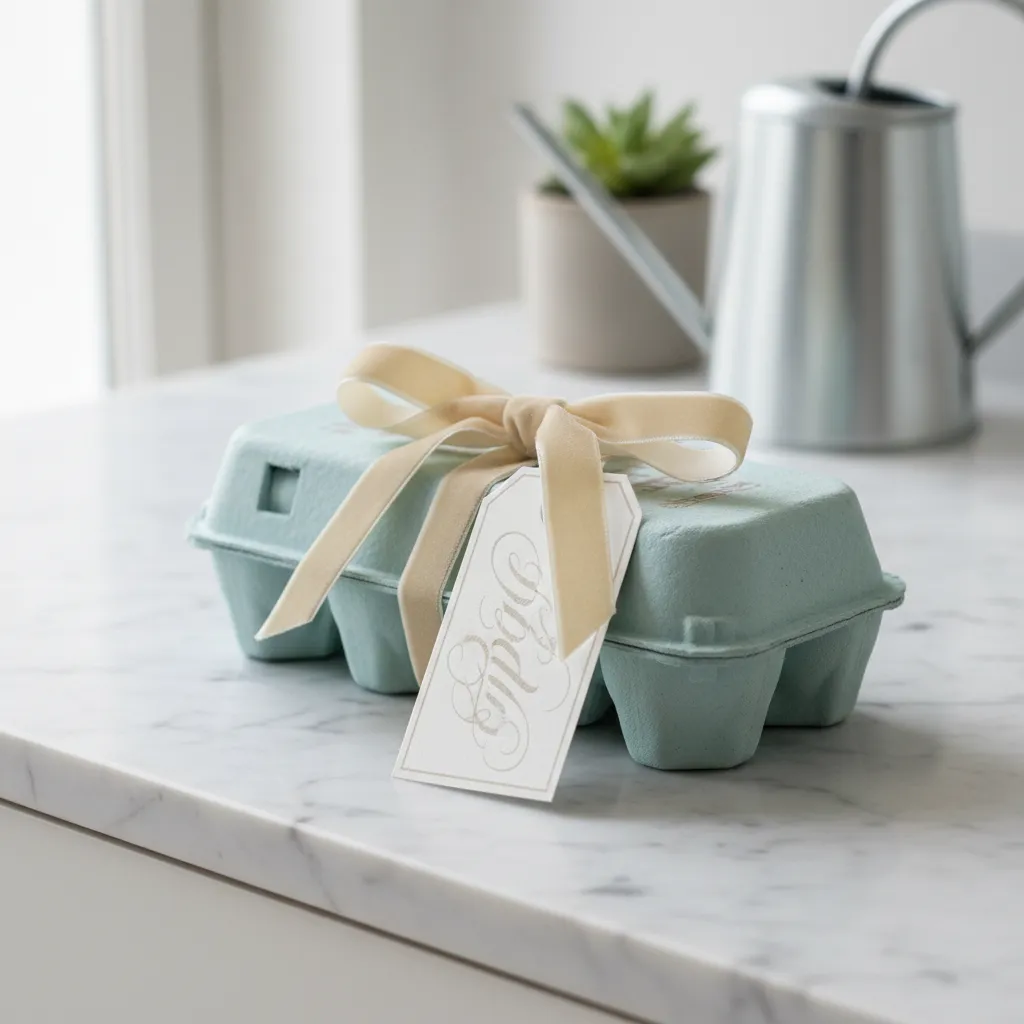
Transforming a standard pulp container into a bespoke gift vessel requires a keen eye for texture. The humble egg carton offers a raw, organic finish that contrasts beautifully with luxury treats.
To begin the upcycling process, assess the structural integrity of the carton. Ensure the lid closes securely without crushing the contents. This is crucial for maintaining the visual presentation.
Many designers currently favor a monochromatic palette. A coat of matte chalk paint in sage green or soft blush elevates the cardboard texture instantly. It creates a modern, sophisticated base.
True luxury lies in the transformation of the ordinary into the extraordinary through thoughtful details.
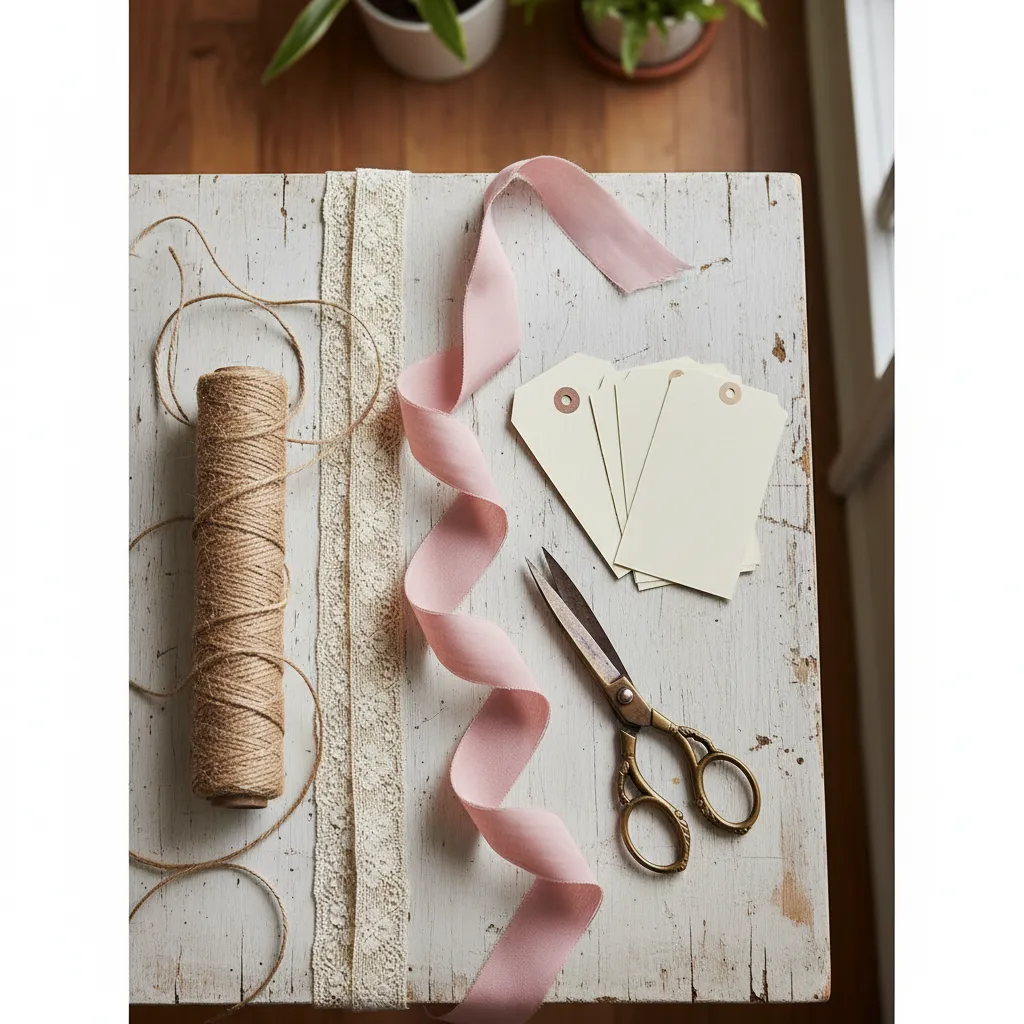
Selecting the Right Textiles
The choice of ribbon dictates the final aesthetic of your gift. This element introduces softness to the rigid lines of the carton. It acts as the primary focal point of the exterior design.
For a rustic farmhouse appeal, classic jute twine is unbeatable. However, for a more polished look, consider grosgrain or double-faced satin. The tactile experience begins before the box opens.
When securing the package, ensure the knot is tight enough to hold but easy to untie. This balance respects the recipient’s experience. You want the reveal to be effortless, not a struggle.
If you are crafting these for a larger group, this method rivals many Elegant DIY Teacher Appreciation Week Ideas on a Budget. It is cost-effective yet visually high-impact.
Printable Tags and Typography
The tag serves as the signature of your design. Avoid handwriting unless you possess professional calligraphy skills. Printed serif fonts on heavy cardstock convey a sense of permanence and quality.
Select paper with a weight of at least 80 lbs for durability. Textured linen paper adds another layer of sensory detail. The tag should be legible but not overpower the delicate nature of the box.
I believe that through the ritual of decoration we can truly make our lives transcend the ordinary.
Alexandra Stoddard, Living a Beautiful Life
Internal Presentation and Liners
The interior aesthetics are just as vital as the exterior. Food safety is paramount when dealing with porous materials like cardboard. A barrier is necessary to protect the fruit and the package.
Use unbleached parchment paper or wax tissue to line the cups. This prevents oil transfer from the chocolate to the carton. It also creates a clean, sanitary backdrop for the vibrant berries.
For those interested in vintage aesthetics, you might draw inspiration from Americana Crafts Diy 4th of July: Mastering Vintage Decor. Similar techniques apply here.
Below is a breakdown of material combinations to achieve specific design styles for your Easter gifts.
| Design Style | Ribbon Material | Tag Paper Choice | Carton Finish |
|---|---|---|---|
| Modern Farmhouse | Natural Jute Twine | Kraft Brown Cardstock | Raw/Unpainted Pulp |
| Soft Minimalist | Cream Velvet | White Linen Paper | Matte White Chalk Paint |
| Spring Garden | Pastel Satin | Vellum Overlay | Soft Lavender Wash |
| Rustic Luxe | Chiffon Silk | Handmade Cotton Paper | Charcoal/Slate Paint |
Finalize the presentation by trimming any excess ribbon at a sharp angle. This prevents fraying and looks professional. The result is a cohesive, gift-ready package that feels curated and personal.
The Designer’s Finish
- To achieve a seamless matte finish on porous pulp, use a cosmetic sponge to dab on chalk paint; this prevents brush marks and preserves the carton’s unique texture.
- For perfectly sized internal liners, wrap a square of parchment paper over the bottom of a spice jar and press it into the carton cup to create a professional, pre-molded shape.
- Elevate your printable tags by punching a hole and adding a small metal eyelet; it prevents the cardstock from tearing and adds an instant ’boutique’ feel to the packaging.
The Final Polish: Elevating Your Easter Table
Selecting the right vessel transforms simple fruit into a sculptural centerpiece. Whether you choose heirloom ceramic or lined paper, the foundation matters.
Prioritize food safety alongside aesthetics. A glazed finish ensures your display remains hygienic, while proper liners protect against porous surfaces.
By blending rustic forms with sophisticated materials, you create a tablescape that is both visually stunning and functionally sound.
Design Details & Practical Inquiries
No, standard cardboard is porous and can harbor bacteria like salmonella. Always use food-safe barriers, such as silicone cups or paper liners, to protect edibles.
Ceramic offers a non-porous, glazed surface that is food-safe and easy to clean. It provides the rustic look of a farm carton without the hygiene risks of recycled pulp.
Utilize silicone baking liners within the crate’s divots. These liners add friction and structural support, keeping top-heavy treats upright and secure.
Most glazed ceramic vessels are dishwasher safe, making cleanup efficient. However, always verify the manufacturer’s care instructions to preserve the glaze.