Table of Contents
- The Ergonomic Workflow Triangle: Positioning Water, Waste, and Power
- The “Look for Less” Minimalist Nook: A Complete Budget Breakdown
- Repurposing Vintage Dressers to Support Heavy Espresso Machines
- Small Space Mobile Carts with Smart Electrical Management
- Vertical Organization Systems for Syrups, Pods, and Accessories
- Curating Your Daily Ritual
- Design Dilemmas Solved
Integrating a dedicated coffee station requires more than just counter space; it demands a strategic approach to spatial planning and workflow.
Whether drafting a floor plan for a corporate office or retrofitting a kitchen nook, the placement of your brewing equipment impacts daily rhythms.
Considerations such as electrical loads, plumbing access for plumbed machines, and cabinet dimensions are foundational elements that ensure the station operates seamlessly within the surrounding environment.
Beyond structural constraints, the selection of materials plays a pivotal role in the longevity of the design.
High-traffic zones benefit from durable flooring options like porcelain tile or sealed hardwood that withstand moisture and heavy footfall.
Choosing the right countertop surfaces involves a careful analysis of heat resistance and maintenance requirements.
Durability meets elegance when premium finishes are paired with robust joinery techniques to create a lasting fixture.
The transition from technical installation to aesthetic curation allows for personal expression through custom carpentry and decor.
From installing floating shelves made of reclaimed lumber to organizing accessories with artisanal precision, the final styling dictates the atmosphere of the room.
We have curated twenty-five intelligent concepts that range from compact mobile carts to full-scale built-ins, offering reliable solutions for every builder and design enthusiast ready to optimize their caffeine rituals.
The Ergonomic Workflow Triangle: Positioning Water, Waste, and Power
Creating a functional coffee station requires more than just selecting stylish equipment. You must consider the spatial dynamics of your daily ritual.
The “Workflow Triangle” adapts the classic kitchen work triangle concept specifically for brewing. It connects your water source, the brewing device, and the waste disposal area.
When these three elements are positioned correctly, your movements become fluid. This prevents the frustration of crossing the room with a dripping portafilter.
Successful simple home coffee bar ideas anyone can create today always prioritize this logical flow. Aesthetics should support function, not hinder it.
True luxury in interior design is found in the seamlessness of the workflow; where every motion feels intentional and unhindered.
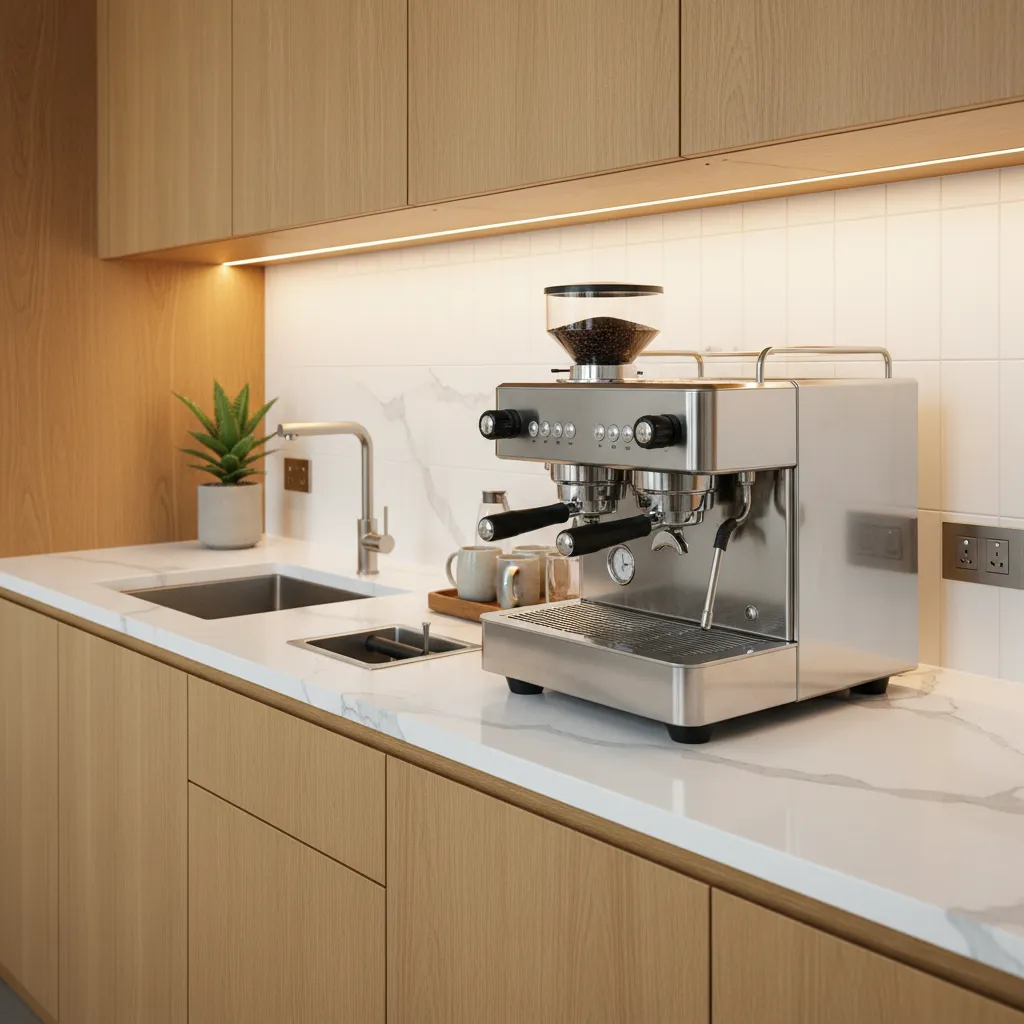
The Wet Zone: Water Integration
Water access is the anchor of your coffee station. Ideally, your machine sits within reach of a prep sink to allow for easy tank refilling and cleaning.
For a truly professional setup, consider a plumbed-in machine. This eliminates the need to manually refill reservoirs and creates a cleaner aesthetic.
If plumbing is not an option, place your machine near the edge of the counter. This allows you to slide it out easily to access the rear water tank.
The Power Hub: Amperage and Concealment
High-end espresso machines often require significant power. Ensure your designated circuit can handle the load without tripping, especially during the heating cycle.
Managing cord clutter is essential for maintaining a clean visual palette. Use appliance garages or recessed outlets to keep thick power cables out of sight.
We recommend installing outlets inside cabinetry for grinders. This allows you to drill a grommet hole in the countertop for a sleek, wire-free surface appearance.
To ensure a kitchen is functional, the work triangle is the most important element of the design… traffic lanes should not pass through the work triangle.
The National Kitchen & Bath Association, NKBA Planning Guidelines
The Waste Zone: Knock Boxes and Trash
The final step in the brewing process is discarding the spent puck. An integrated knock box installed directly into the countertop is the gold standard for ergonomics.
This “chute” style design allows coffee grounds to fall directly into a trash bin hidden in the cabinet below. It keeps wet grounds off your beautiful floors.
If you are mastering professional at home coffee recipes for a daily luxury, a dedicated waste zone prevents mess. It ensures your station remains pristine for the next cup.
Ergonomic Checklist for Station Setup
Before finalizing your floor plan, verify that your design meets these functional criteria. A well-planned space reduces physical strain during the morning rush.
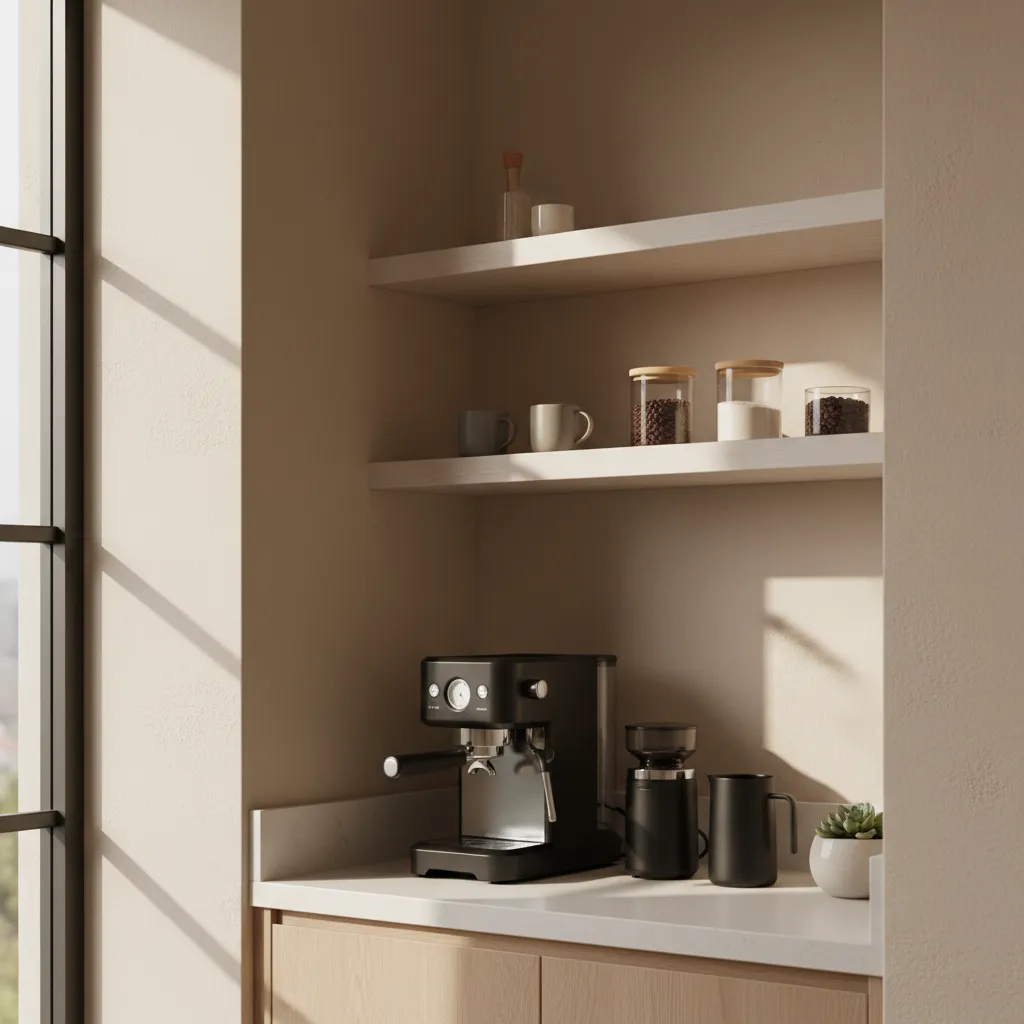
- Elbow Room: Ensure at least 18 inches of clear counter space next to the machine for tamping and milk texturing.
- Height Verification: Check that your machine fits under upper cabinets, leaving clearance for cup warming trays (usually 18-20 inches total).
- Dominant Hand Flow: Place the grinder on the left and the knock box on the right if you are right-handed to follow natural motion.
- Lighting: Install under-cabinet task lighting to illuminate the drip tray and steam wand area clearly.
Designer Insight
- Right-handed home baristas should arrange gear from left to right (Grinder > Machine > Knock Box) to eliminate cross-body movements and spills.
- Install a desk grommet behind your grinder to feed power cords directly into the cabinet below, creating a completely wire-free countertop aesthetic.
- Measure vertical clearance carefully; ensure at least 18 inches under upper cabinets so you can access top-loading water tanks without moving the heavy machine.
The “Look for Less” Minimalist Nook: A Complete Budget Breakdown
Creating a sanctuary for your morning brew does not require a contractor. A minimalist nook thrives on clean lines and negative space, proving that style is often a matter of subtraction.
Focus on contrasting textures like matte black metal against raw, unfinished oak. This interplay creates visual interest without the clutter of excessive accessories or bold colors.
Functionality dictates the layout in these compact spaces. Every tool must earn its place on the counter, ensuring a seamless flow from grinding beans to the final pour.
Minimalism isn’t about having less. It’s about making room for more of what matters; like the perfect cup of coffee.
Drafting the Structural Foundation
The backbone of a budget-friendly nook is often a “hacked” piece of furniture. A simple pine console can be elevated with a coat of charcoal chalk paint and modern brass hardware.
Floating shelves are essential for maintaining an airy atmosphere. They draw the eye upward, making tight corners feel spacious while keeping mugs within easy reach.
Consider installing a simple home coffee bar idea like a pegboard. This allows you to hang tools vertically, freeing up precious counter space for prep work.
I believe your home should tell the story of who you are, and be a collection of what you love. Don’t be afraid to mix high and low pieces.
Nate Berkus, Architectural Digest
The High-Low Mix Strategy
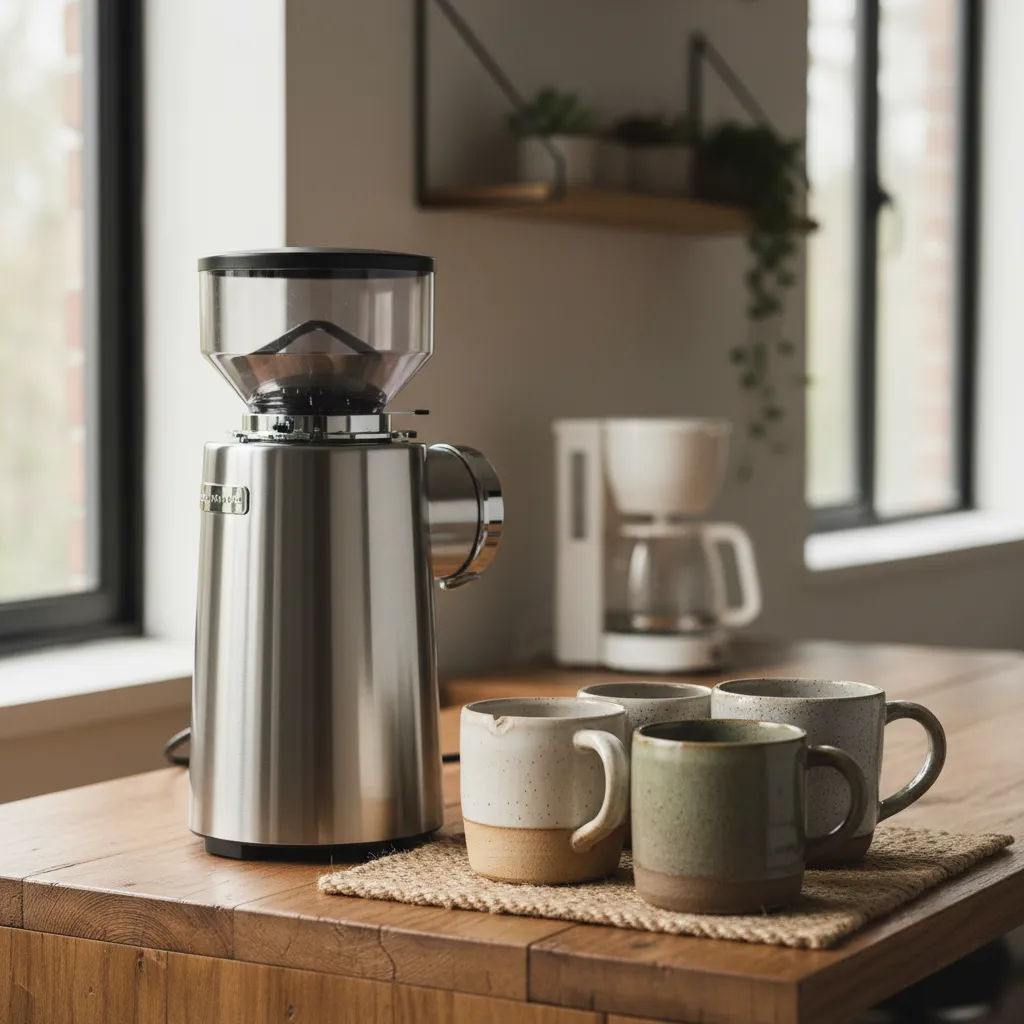
Allocate the bulk of your budget to the machinery. A quality burr grinder influences the taste of your whipped coffee recipe far more than an expensive mug ever could.
Save money on organization by utilizing thrifted glassware. Vintage amber jars serve as sophisticated storage for beans and sugar, adding warmth to the cool minimalist palette.
This approach balances aesthetic appeal with genuine utility. The result is a station that looks curated over time rather than purchased from a single catalog page.
To help you visualize the savings, here is a breakdown of how to achieve the look for significantly less by swapping retail staples for creative alternatives.
| Design Element | High-End Retail Cost | Budget “Look for Less” | Estimated Savings |
|---|---|---|---|
| Solid Walnut Console | $1,200+ | Upcycled Pine Dresser | $900 |
| Custom Floating Shelves | $300 | DIY Pine Boards & Brackets | $250 |
| Designer Canisters (3) | $150 | Thrifted Amber Glass | $135 |
| Hardwired Sconces | $400 | Rechargeable Puck Lights | $360 |
| Handmade Ceramic Mugs | $40/each | Matte Dipped Mugs | $30/each |
Sensory Details and Lighting
Lighting transforms a utilitarian counter into a cozy destination. Wireless, motion-sensor LED strips under a shelf provide a warm ambient glow without expensive electrical work.
Incorporate natural elements to soften the modern edges. A small potted succulent or a wooden tray introduces organic curves that break up the rigid lines of the equipment.
This attention to sensory detail invites you to pause. It turns the routine of caffeine consumption into a deliberate moment of peace before the busy day begins.
The Minimalist Edit
- Elevate thrifted storage jars by spray-painting the lids a uniform matte black or metallic gold to create a cohesive, designer look for pennies.
- To achieve high-end task lighting without the electrical bill, use rechargeable LED puck lights hidden behind the lip of your floating shelves.
- Prioritize the 80/20 budget rule: invest 80% of your funds into ‘workhorse’ equipment like your grinder, and source the remaining 20% of decor from thrift stores.
Repurposing Vintage Dressers to Support Heavy Espresso Machines
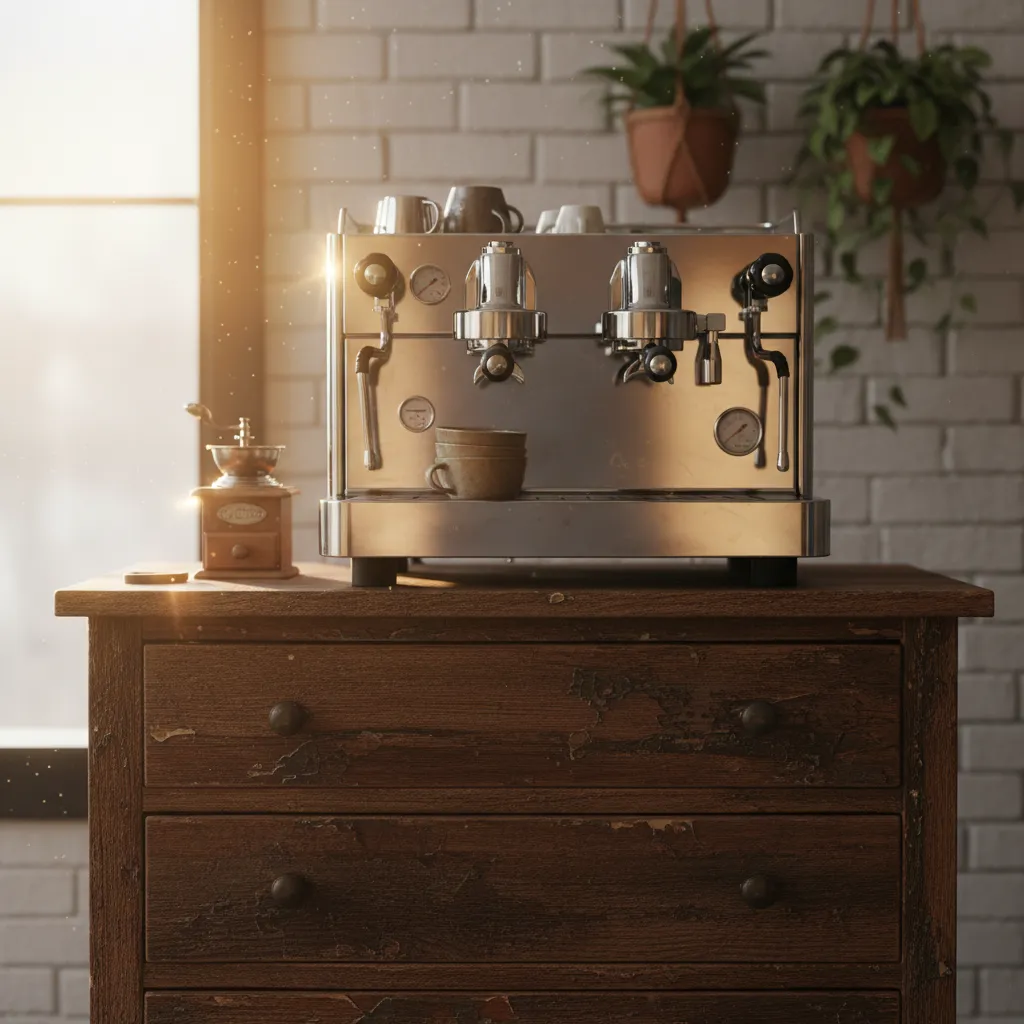
Transforming a vintage dresser into a coffee bar offers a unique blend of nostalgia and utility. The aged wood provides a warm counterpoint to sleek, modern espresso machines.
This approach is not merely aesthetic; it solves storage issues common in modern kitchens. Deep drawers easily swallow bags of beans, filters, and bulky cleaning supplies.
However, an espresso machine is significantly heavier than a stack of cotton shirts. You must assess the furniture’s structural integrity before placing expensive gear on it.
A piece of furniture with a past gives your morning ritual a sense of history and grounding.
Reinforcing the Structure for Weight
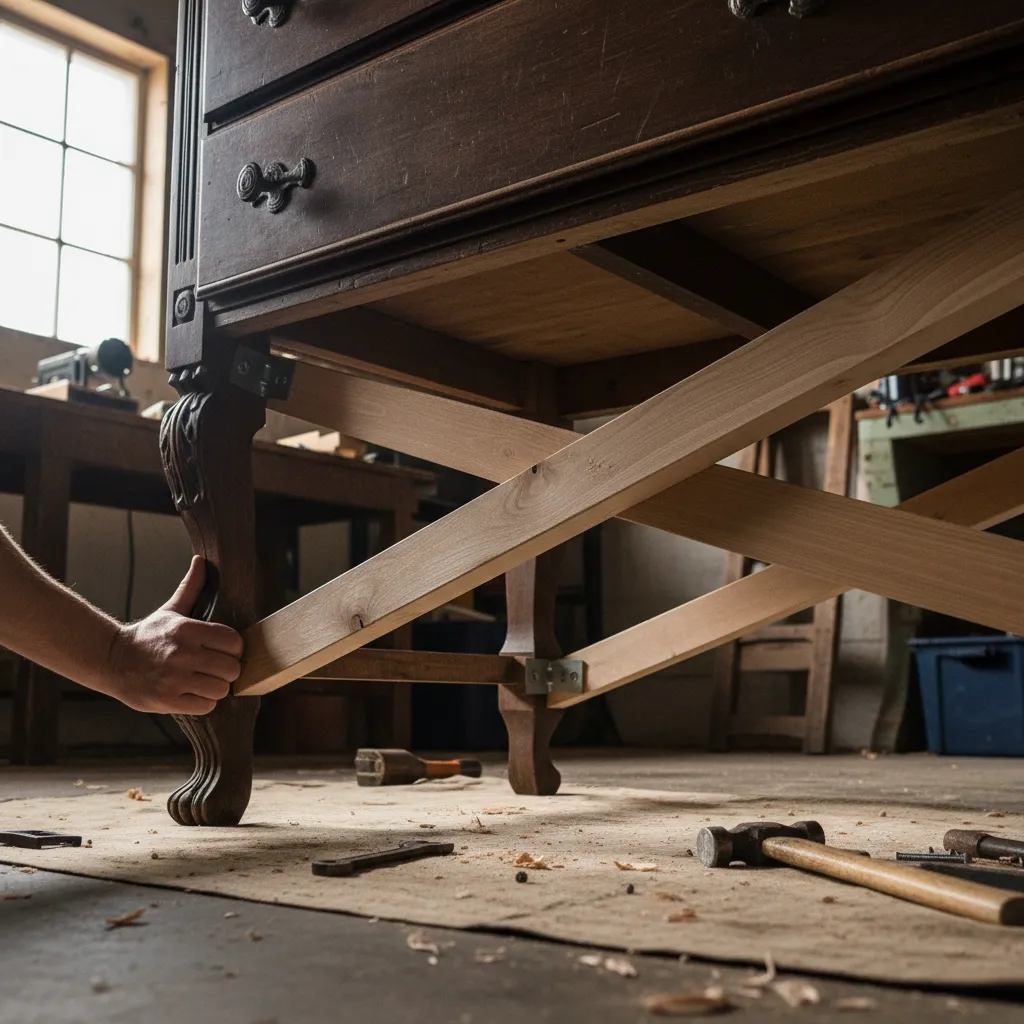
Commercial espresso machines can weigh over fifty pounds. Verify that the dresser legs are solid wood and not merely decorative spindles attached with glue.
If the dresser is wide, it may sag in the center over time. Adding a fifth support leg to the middle of the base ensures the top remains level and vibration-free.
Check the dovetail joints in the drawers. Strong joinery is essential if you plan to store heavy ceramic mugs or glass carafes inside the moving parts.
This sturdy aesthetic aligns beautifully with primitive living room ideas where raw materials and durability take center stage.
Protecting the Surface from Steam and Spills
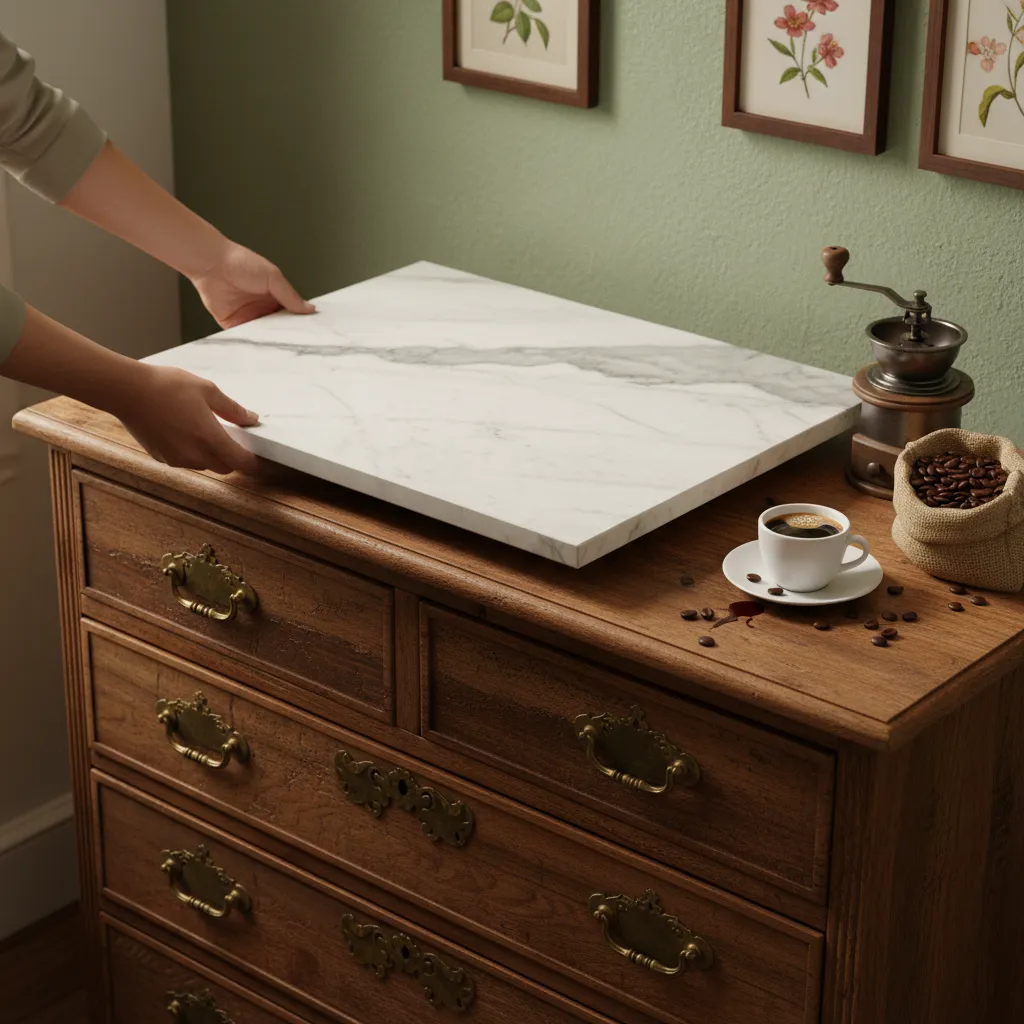
Original varnish on antique furniture cannot withstand boiling water or acidic coffee spills. Steam from a frothing wand will quickly turn old lacquer white and cloudy.
Consider topping the dresser with a custom-cut piece of quartz or tempered glass. This protects the wood while creating a wipeable, sanitary surface for drink preparation.
If you prefer the wood look, apply a marine-grade polyurethane sealant. This finish resists moisture and heat, preserving the patina while offering modern durability.
When repurposing vintage pieces for wet areas like a coffee bar, the finish is your first line of defense. A wax finish will not suffice; you need a hard-wearing varnish to seal the grain against moisture intrusion.
Bob Vila, How to Waterproof Wood
Optimizing Drawers for Workflow
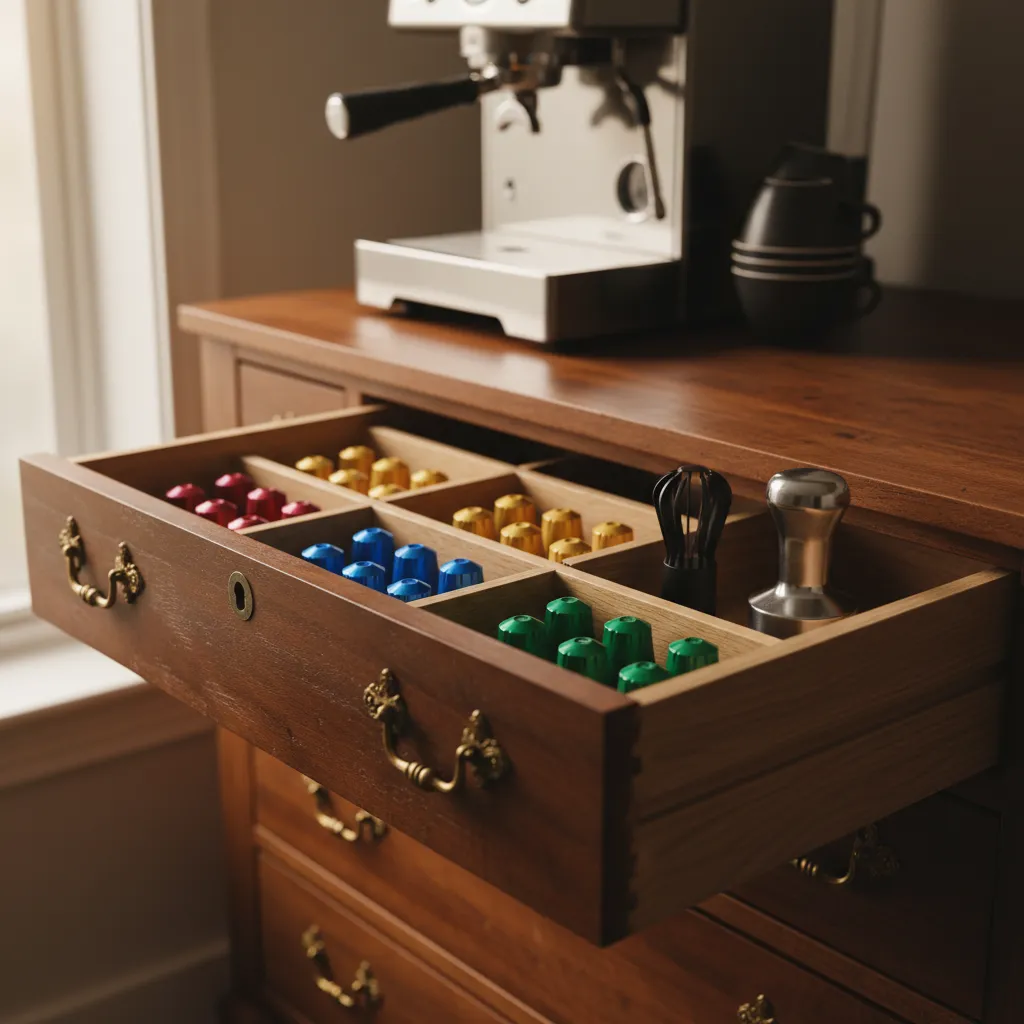
A functional coffee station requires logical zoning. dedicate the top drawers to daily essentials like portafilters, tampers, and spoons for quick access.
Drill a discrete hole through the back panel for power cords. This keeps the countertop clutter-free and maintains the visual elegance of the vintage piece.
With a clear workspace, you can focus on mastering professional at home coffee recipes without fighting for elbow room.
Use the lower, deeper drawers for bulk storage. This keeps visually noisy items like bags of beans and gallons of distilled water out of sight but close at hand.
| Drawer Level | Primary Function | Essential Items to Store |
|---|---|---|
| Top Row | Immediate Access | Tampers, distribution tools, filters, spoons, scale |
| Middle Row | Service Ware | Espresso cups, saucers, latte bowls, napkins |
| Bottom Row | Bulk Inventory | Coffee bean bags, syrups, cleaning tablets, towels |
Upcycle Pro Tip
- Combat center sag on wide dressers by installing an adjustable ‘fifth leg’ under the base; this stabilizes the unit against the constant vibration of the espresso pump.
- Preserve the antique patina without risking water damage by topping the dresser with a custom-cut piece of tempered glass or a quartz remnant instead of relying on wood sealants alone.
- Keep the countertop sleek by using a hole saw to cut a discrete cable pass-through in the back panel, hiding power cords behind the drawers rather than draping them over the front edge.
Small Space Mobile Carts with Smart Electrical Management
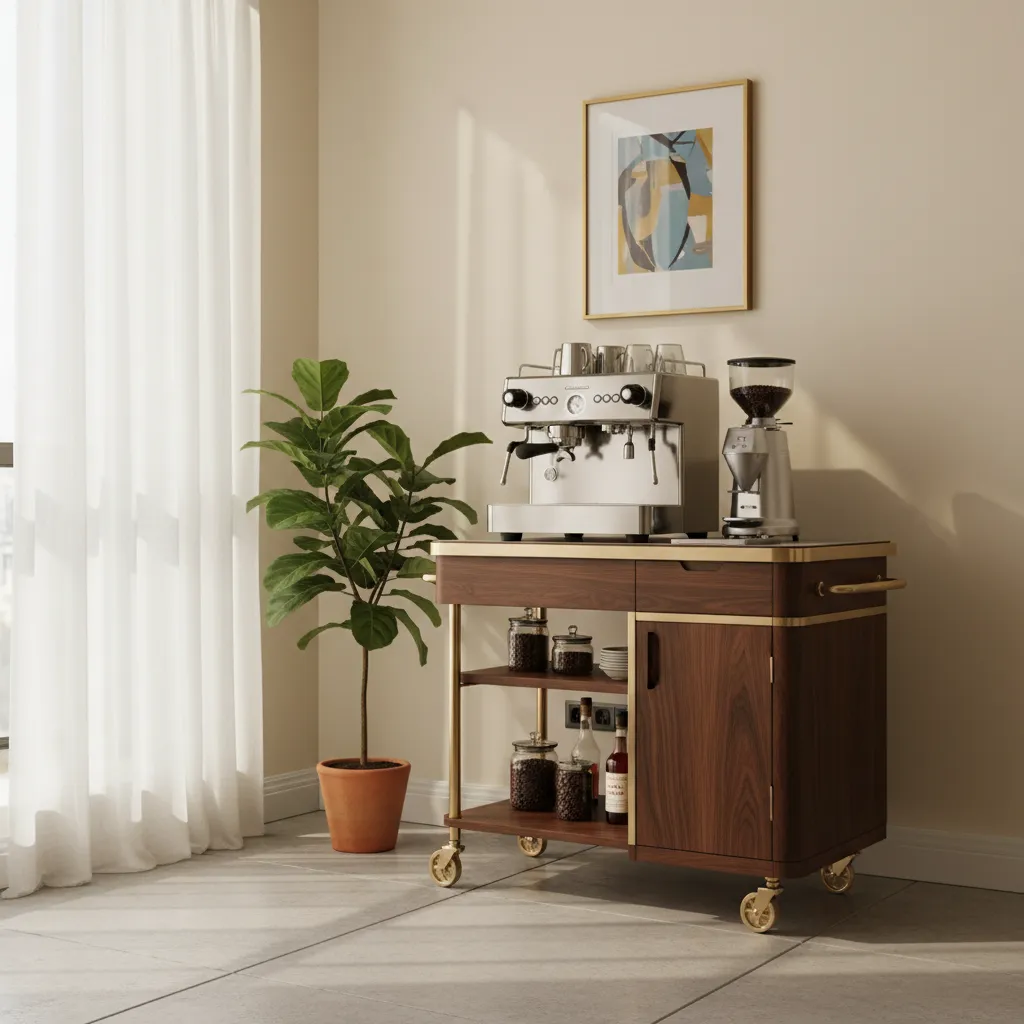
For those navigating limited square footage, a mobile cart offers the ultimate flexibility. It bridges the gap between the kitchen and living area.
A well-chosen cart transforms a tight corner into a functional brewing station. Look for designs that blend durability with elegant spatial dynamics.
The texture of the cart establishes the mood. Raw wood shelves paired with matte black steel create a modern industrial aesthetic.
Alternatively, a gold-finished metal frame with mirrored shelves adds a touch of glamour. This reflects ambient light to make the space feel larger.
Designing for Power and Connectivity
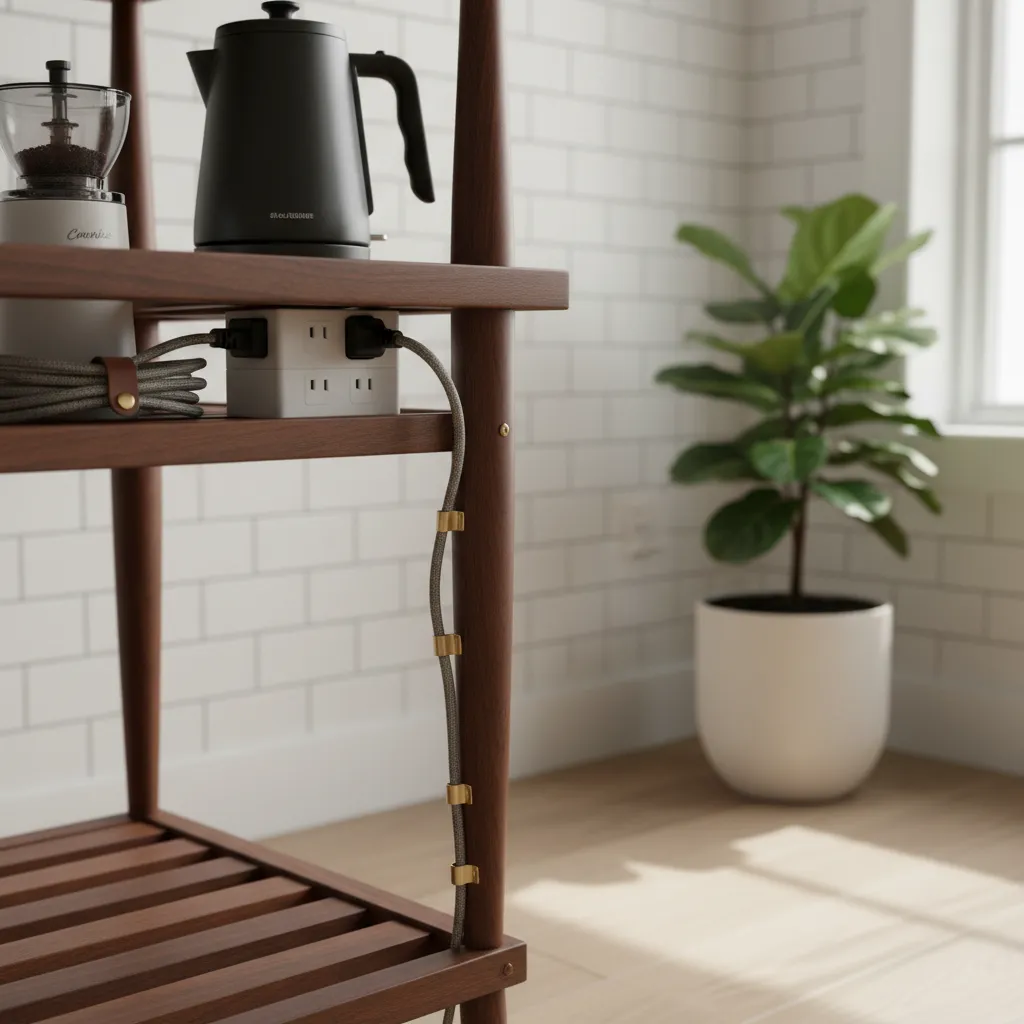
The biggest challenge with mobile coffee stations is the power cord. Exposed wires ruin the visual flow and create tripping hazards.
Select a cart with hollow metal legs if possible. This allows you to thread the machine’s heavy power cable down through the frame structure.
If internal routing is not an option, use adhesive cable clips. Secure the cord along the back leg to keep the silhouette clean and tidy.
Mount a slim surge protector to the underside of the bottom shelf. This creates a single plug point for your grinder, kettle, and machine.
To keep a small space feeling open, you must eliminate visual clutter. Tangled cords stop the eye and make a room feel chaotic and unplanned.
Maxwell Ryan, Apartment Therapy
This setup improves safety and ergonomics. You only need to unplug one main cord when moving the station to a new zone for entertaining.
This flexibility is crucial when planning open kitchen and living room decor ideas effectively.
A mobile unit helps define distinct functional zones. It allows you to shift the focal point of the room without permanent construction.
Essential Cart Accessories Checklist
To maximize functionality in a small footprint, every inch of the cart must be optimized. Use this checklist to ensure your station is efficient.
- Cord Management Clips: Adhesive backs allow for placement anywhere on the frame to guide wires.
- Under-Shelf Basket: Utilizes vertical space for storing beans or napkins without cluttering the top.
- Heat-Resistant Mat: Protects the wood finish from hot carafes or espresso machine boilers.
- Locking Casters: Essential for stability while tamping espresso or pouring hot water.
- Retractable Extension Cord: Allows the cart to move freely within a radius without unplugging.
Design is not just about how it looks, but how it moves with you through your daily rituals.
Styling Your Mobile Station
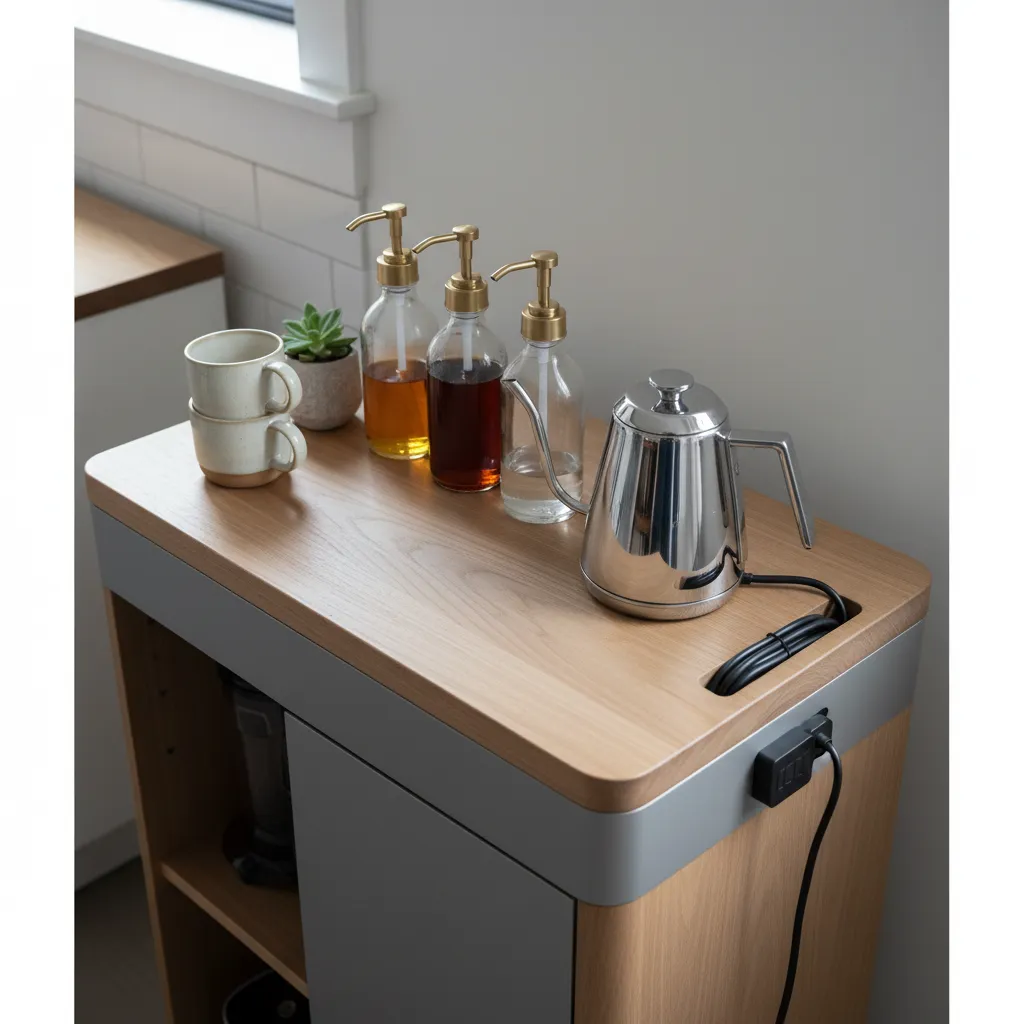
Once the technical elements are secure, focus on the display. Grouping items on trays keeps the surface organized during movement.
Transfer ingredients into uniform glass vessels. This reduces visual noise and elevates the sense of craftsmanship in your setup.
Consider adding easy homemade coffee syrup recipes to your display for a pop of color.
Amber glass bottles with gold spouts look stunning against wood grain. They turn functional ingredients into beautiful decor elements.
Finally, ensure your heaviest equipment sits on the lowest stable shelf if not in use. This lowers the center of gravity for safer mobility.
The Mobile Barista Guide
- Use magnetic cable ties on metal frames for a tool-free way to route cords and change your layout instantly.
- Always place your heaviest equipment on the bottom shelf during transport to lower the center of gravity and prevent accidental tipping.
- Mount a power strip with a flat plug to the cart’s underside to create a central hub that requires only one outlet connection.
Vertical Organization Systems for Syrups, Pods, and Accessories
Maximizing vertical space is the secret to a functional coffee station.
It clears the countertop for preparation while turning supplies into decor.
This approach transforms clutter into a curated display.
The key to successful vertical organization is zoning. You must arrange items by frequency of use. Keep daily essentials within arm’s reach and reserve higher shelves for decorative stock.
Design is not just what it looks like and feels like. Design is how it works.
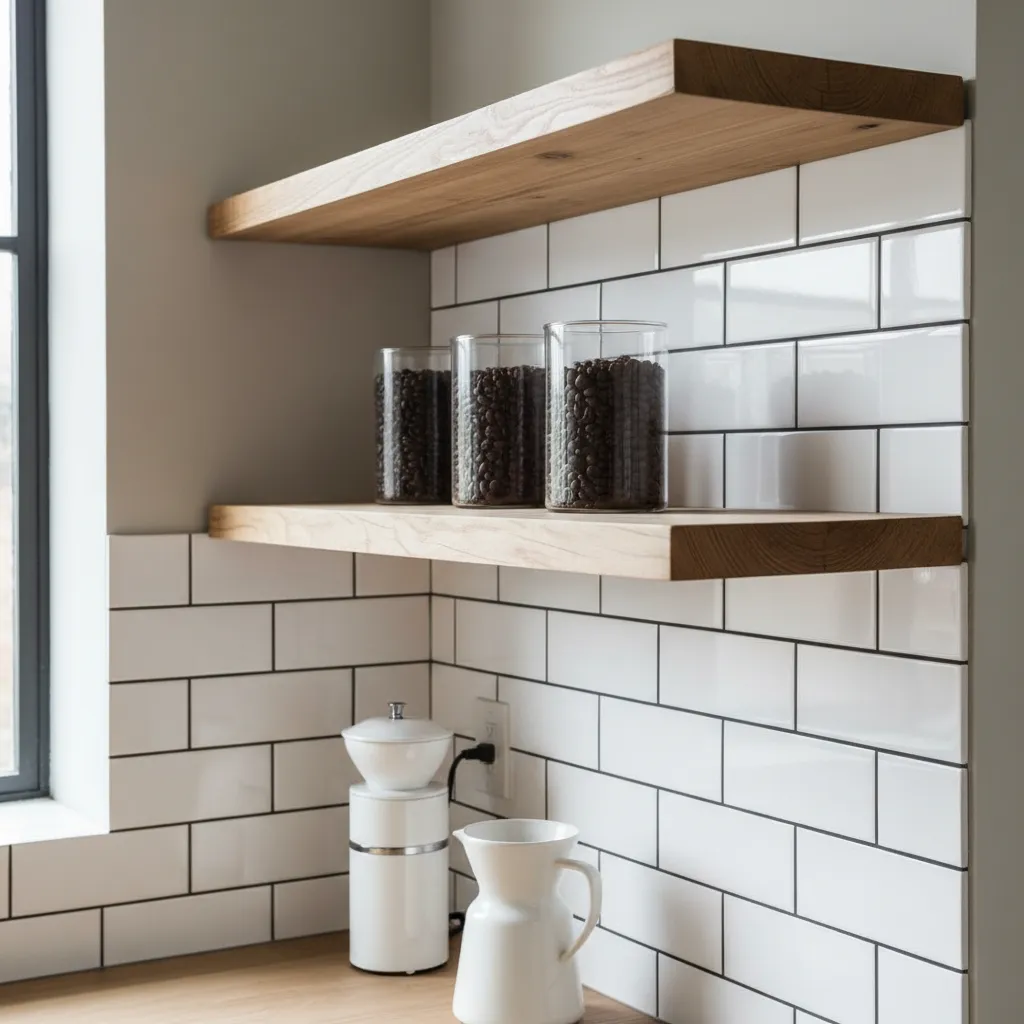
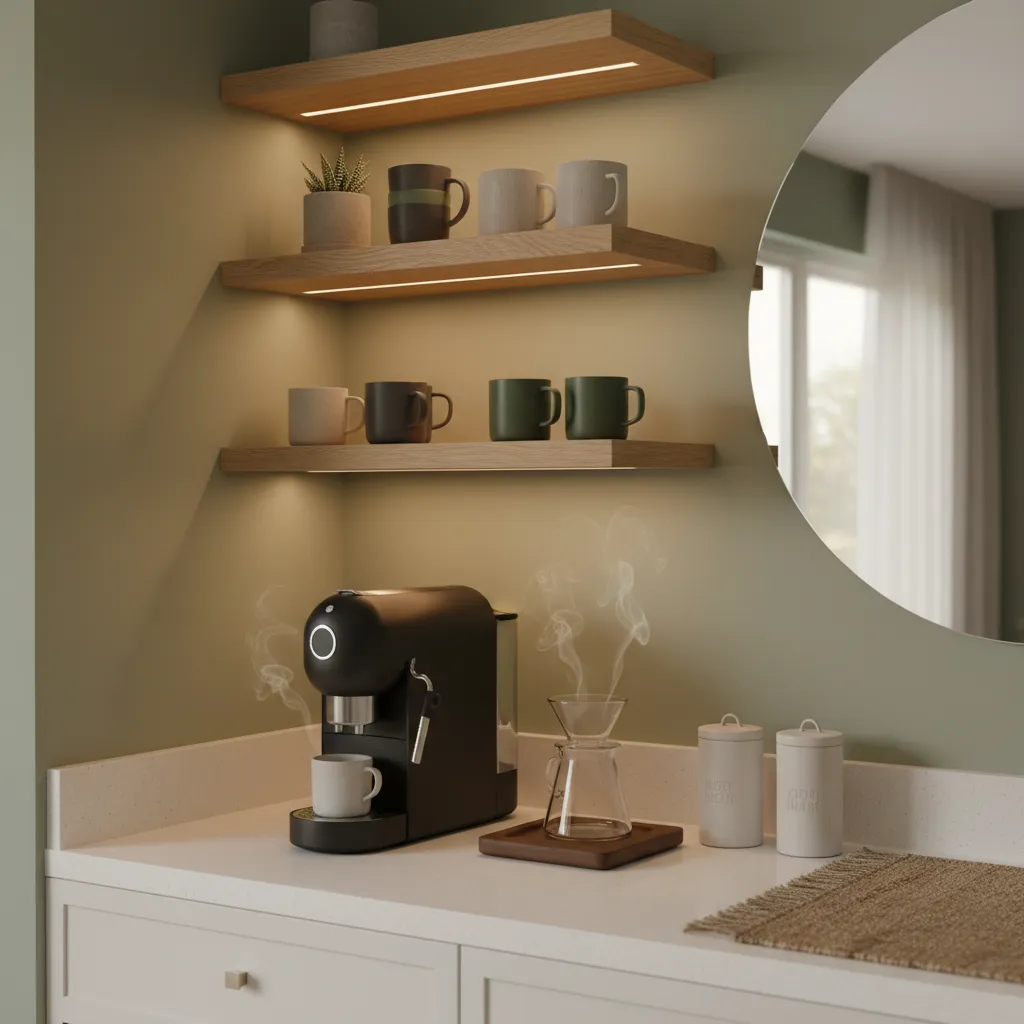
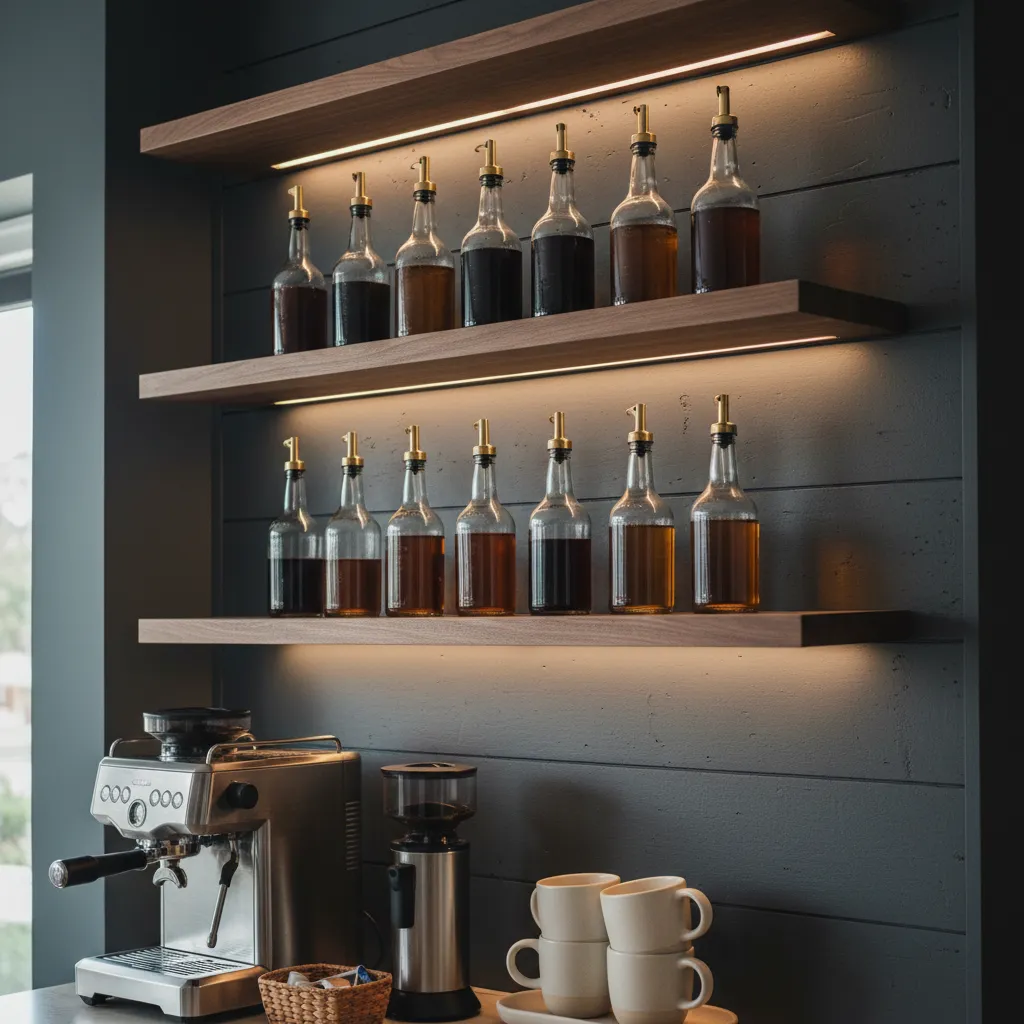
Floating Shelves and Rail Systems
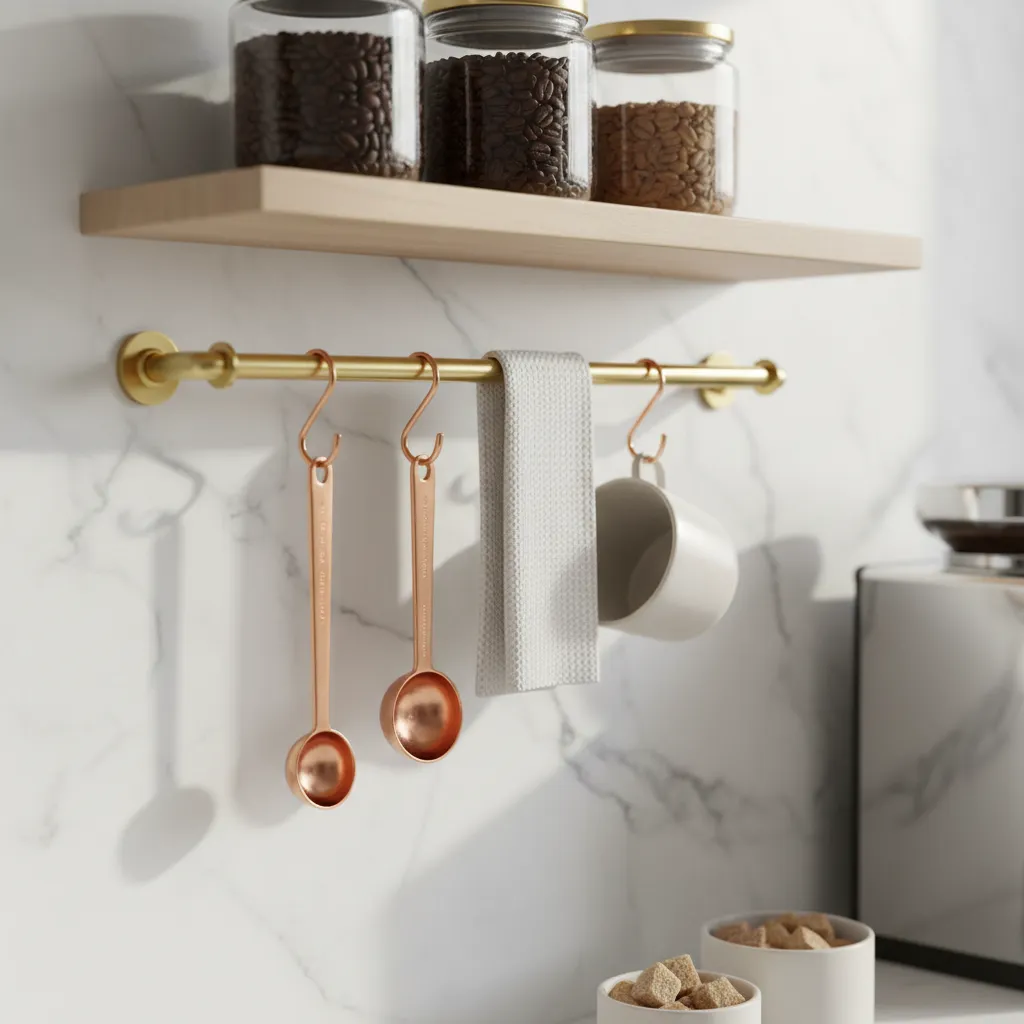
Floating shelves offer a streamlined look that reduces visual bulk.
Natural wood textures, such as raw oak or stained walnut, introduce warmth to the station. They contrast beautifully against cool tile backsplashes.
Install polished brass or matte black rails below these shelves.
These rails utilize S-hooks to hold mugs or precision brewing tools. This keeps the workflow ergonomic and swift during morning rushes.
Lighting is a crucial element for these vertical systems. Install recessed LED strips beneath the shelves to cast a warm ambient glow.
This highlights the texture of your easy homemade coffee syrup recipes decanted into glass bottles.
Styling Syrups and Pod Storage
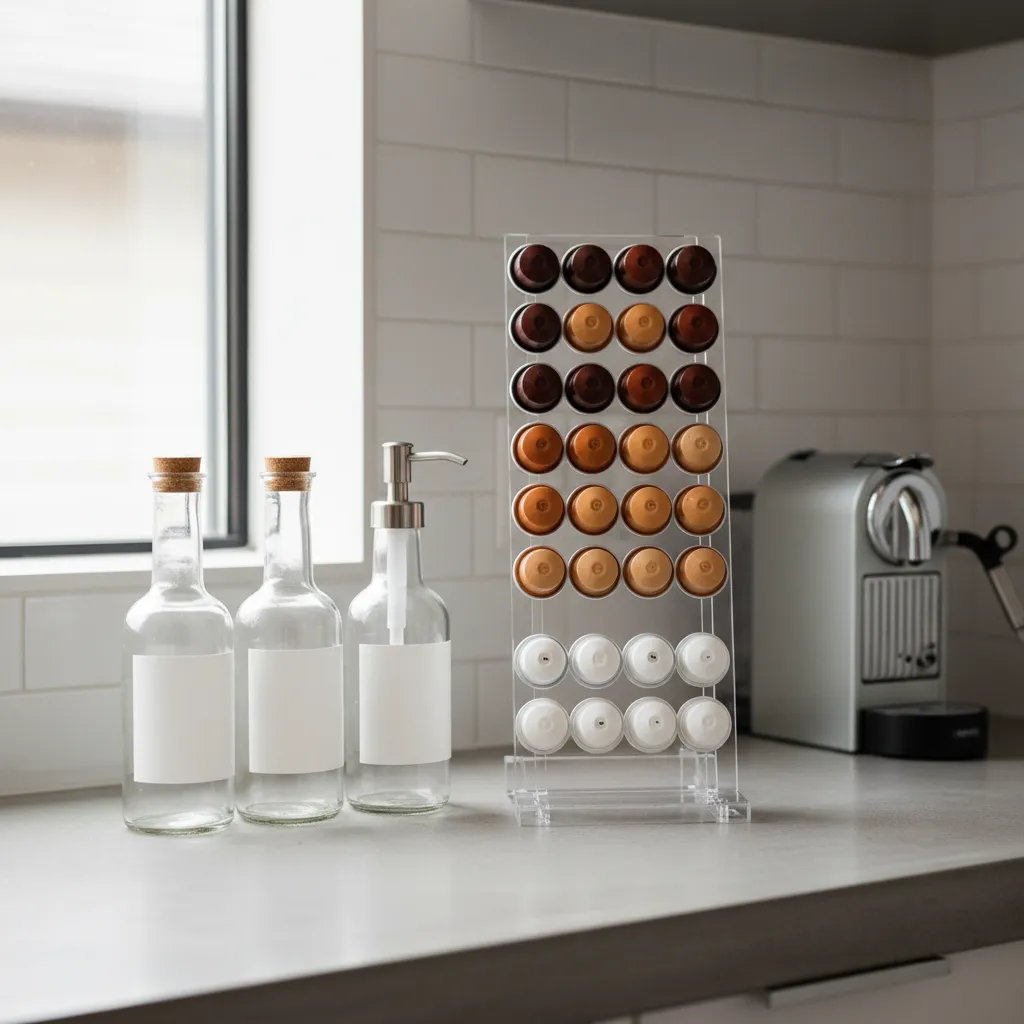
Original packaging often creates visual noise.
Transferring syrups into uniform glass dispensers creates a cohesive aesthetic. Arrange them on a tiered riser to ensure labels remain visible and accessible.
For pod storage, wall-mounted dispensers are highly efficient. They utilize gravity to feed capsules one by one. This eliminates the need for bulky countertop carousels that eat up prep space.
If you prefer an open-concept look, consider glass jars for loose pods.
This works particularly well in open kitchen and living room decor layouts. It integrates the coffee bar seamlessly into the broader design.
To keep counters clear, mount a shelf or rail system for mugs and frequently used tools. This frees up workspace and keeps everything you need within arm’s reach.
The Editors, House Beautiful
Organization Material Guide
Choosing the right materials ensures your vertical storage withstands daily use.
Steam and heat from coffee machines can damage inferior finishes. Select durable options that complement your hardware.
- Stainless Steel: ideal for rail systems and hooks. It resists rust and cleans easily with a damp cloth. It suits modern and industrial aesthetics.
- Tempered Glass: Perfect for shelves in compact spaces. It allows light to pass through, making the area feel larger and less cramped.
- Sealed Hardwood: Essential for floating shelves. Ensure the wood is sealed with polyurethane to resist moisture from steam and spills.
- Acrylic Organizers: Best for drawer inserts or wall-mounted pod holders. Clear acrylic disappears visually, letting the colorful pods serve as decor.
- Ceramic Canisters: Use these for dry goods like sugar or stirrers. Opaque containers protect ingredients from sunlight and maintain freshness.
Implementing these vertical systems improves the ergonomics of your daily ritual. A well-organized wall allows for a smooth workflow from grinding beans to the final pour.
Space-Saving Secrets
- Swap bulky branded syrup bottles for uniform glass dispensers with waterproof labels to eliminate visual noise and create a professional boutique café aesthetic.
- Install motion-sensor LED strips under your lowest floating shelf to illuminate your prep area and highlight your glass containers without fumbling for switches during early morning brews.
- Use clear acrylic tiered risers on your shelves to create ‘stadium seating’ for pods and accessories, ensuring smaller items don’t get lost behind taller bottles.
Curating Your Daily Ritual
Elevating your morning routine requires a marriage of structural foresight and aesthetic restraint. It is not merely about equipment, but flow.
By adhering to the ergonomic workflow triangle, you ensure that every movement; from grinding to tamping; feels instinctive and effortless.
Whether you integrate a plumbed system or curate a manual brew station, the result should be a sanctuary that reflects your personal taste.
Take these architectural principles and craft a coffee bar that stands as a testament to both functional design and the art of living well.
Design Dilemmas Solved
You do not need a massive footprint. A dedicated 30-inch wide console or countertop section is often sufficient. Utilize vertical shelving to maximize storage in compact areas.
While not mandatory, plumbing creates a level of professional luxury. It eliminates manual tank refills and streamlines maintenance, ensuring a truly seamless brewing experience.
Absolutely. Ensure you have access to a dedicated power circuit. If a sink is absent, invest in a high-quality waste bin and a stylish water pitcher to maintain functionality.
Lighting is often forgotten. Install under-cabinet LED strips or a focused sconce. Proper illumination allows you to accurately inspect grind texture and espresso crema.