Table of Contents
- The Classic Fondant Brick Block Stack
- Iconic Yellow Minifigure Head 3D Sculpture
- Works in Progress: The Construction Site Scene
- The Anti-Gravity Floating Brick Pour
- Peek-A-Boo Interior: The Brick Reveal Technique
- Pastel Palettes for a Lego Friends Garden Theme
- Ninjago Warriors: Character-Focused Designs
- The Edible Mosaic Number Cake
- The Final Brick in the Edible Edifice
- Blueprint Clarifications
Architectural precision meets culinary artistry in the realm of Lego-inspired cakes. Mastering this craft requires a deep understanding of structural balance and foundational stability. Just as a developer evaluates a floor plan, a baker must approach edible construction with a clear vision for scale and proportion.
Choosing the right materials is essential for creating a professional aesthetic. From the smooth finish of fondant bricks to the modular logic of interlocking shapes, every element serves a purpose. High-quality ingredients act as the building blocks for a design that is both visually striking and structurally sound for any environment.
Success lies in the meticulous attention to detail during the final styling phase. Whether you are organizing a corporate event or a home celebration, these techniques offer actionable guidance for any maker. Transforming a simple concept into a masterpiece of edible architecture demands patience and a commitment to technical excellence.
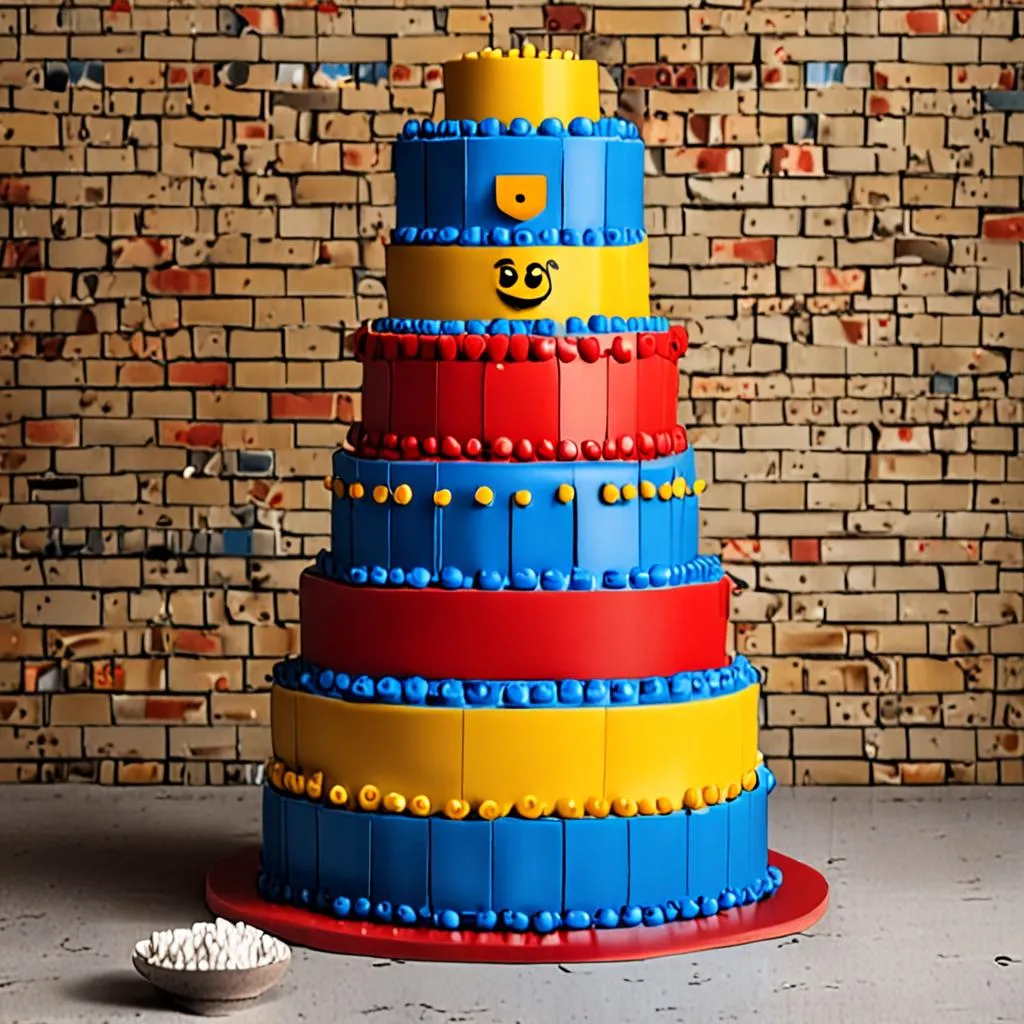
The Classic Fondant Brick Block Stack
The quintessential Lego cake mimics the clean, glossy finish of industrial plastic bricks. Achieving this look requires a level of precision similar to laying high-end tile.
Rolled fondant is the primary material for this design. It provides the smooth, matte-satin texture necessary to cover imperfections and create sharp, architectural edges.
Unlike the loose structure of a Easy Lemon Blueberry Cheesecake Dump Cake Recipe: A Tutorial, this design demands a dense base.
A firm pound cake or madeira sponge is essential. These denser crumbs support the weight of the heavy sugar paste without buckling under the structural load.
Precision in design turns a simple dessert into an edible architectural marvel.
Structural Integrity and Crumb Coats
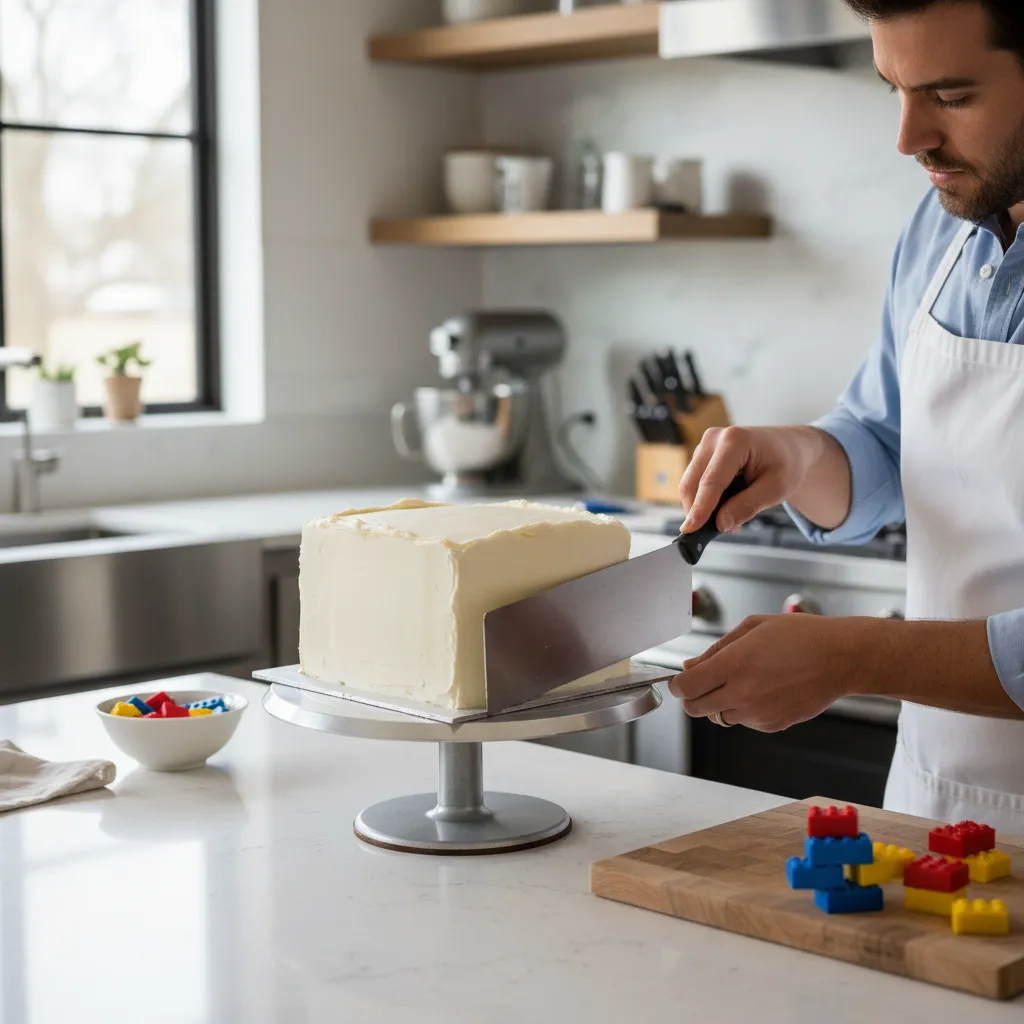
Before the colored fondant is applied, the “drywall” phase occurs. A layer of ganache or buttercream creates a rigid foundation for the outer finish.
You must chill the cake until this undercoat is rock hard. This allows you to retain the sharp 90-degree angles that define the brick aesthetic during the smoothing process.
Round edges destroy the illusion of plastic bricks. Use acrylic disks or a bench scraper to ensure your spatial dynamics remain geometrically perfect.
To get that perfect smooth finish with fondant, your crumb coat must be flawless. Any bump in the buttercream will show through the fondant like a wrinkle in a silk sheet.
Duff Goldman, Food Network’s Ace of Cakes
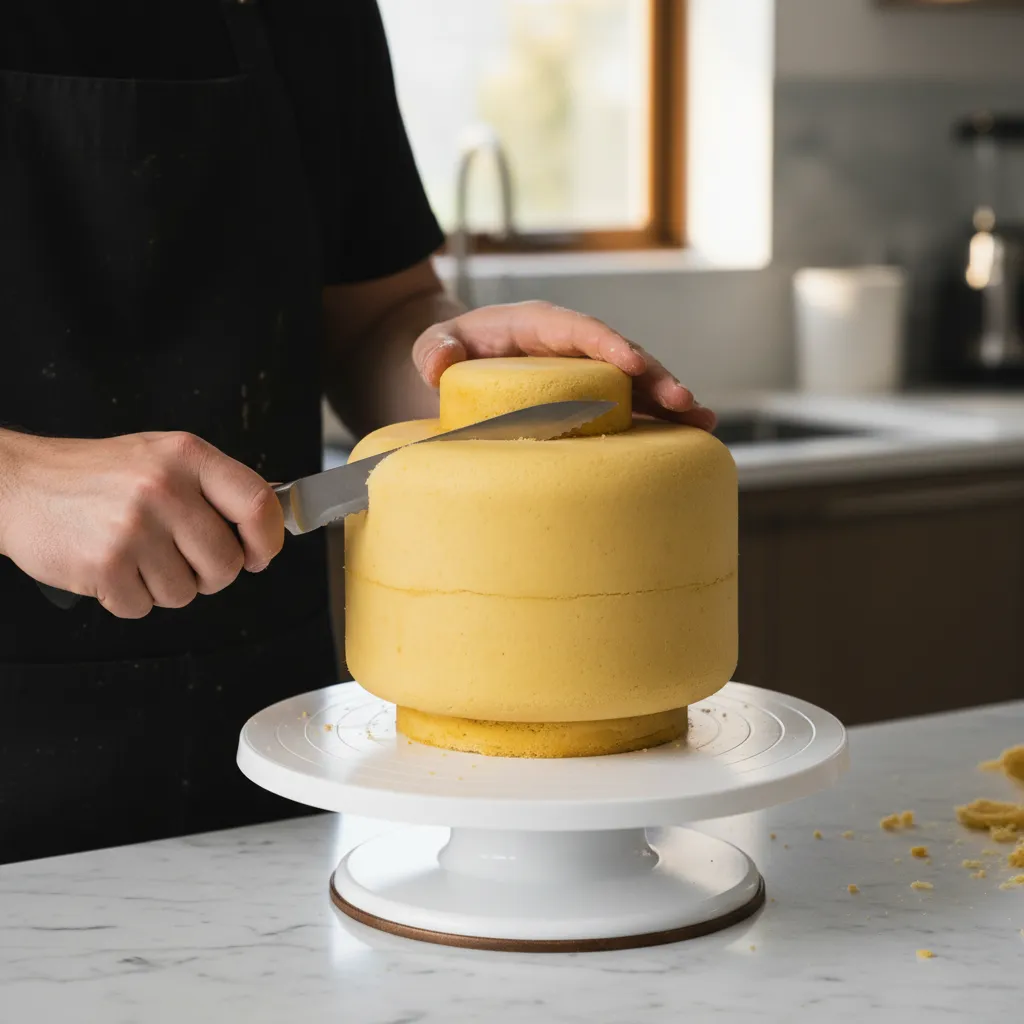
Fabricating the Signature Studs
The defining feature of any Lego block is the connection studs on top. Uniformity here is critical for the visual flow of the piece.
Cut thick circles of fondant using a small round cutter. These should be prepared in advance to harden slightly, ensuring they maintain their vertical shape.
Attach them in a precise grid pattern using edible glue. This repetition creates a rhythm in the design that is pleasing to the eye and mimics manufactured perfection.
| Feature | Rolled Fondant | American Buttercream |
|---|---|---|
| Finish Texture | Smooth, Matte-Satin | Soft, Porous |
| Edge Sharpness | High (Architectural) | Medium (Rounded) |
| Durability | High (Warm Rooms) | Low (Melts easily) |
| Stud Definition | Precise, 3D | Soft, Blended |
For a sophisticated twist, consider a monochrome palette. An all-white or matte black brick stack fits a modern minimalist interior aesthetic better than primary colors.
Just as you might curate Elegant Easter Sweet Treats to Make for a Gourmet Brunch, the styling of the cake table matters.
Place the cake on a mirrored or acrylic stand. The reflection enhances the geometric lines and adds to the ambient lighting of the dessert station.
Master Builder Hacks
- To achieve razor-sharp edges, use two fondant smoothers simultaneously; one on the side and one on top; gently ‘pinching’ the corner to create that crisp, industrial 90-degree angle.
- For perfectly uniform studs, roll your fondant between two guide sticks of equal thickness before cutting with a round plunger to ensure every piece is the exact same height.
- If you are using high-saturation primary colors like Lego red or blue, dye your fondant 24 hours in advance to let the pigment fully develop and the paste rest for better elasticity.
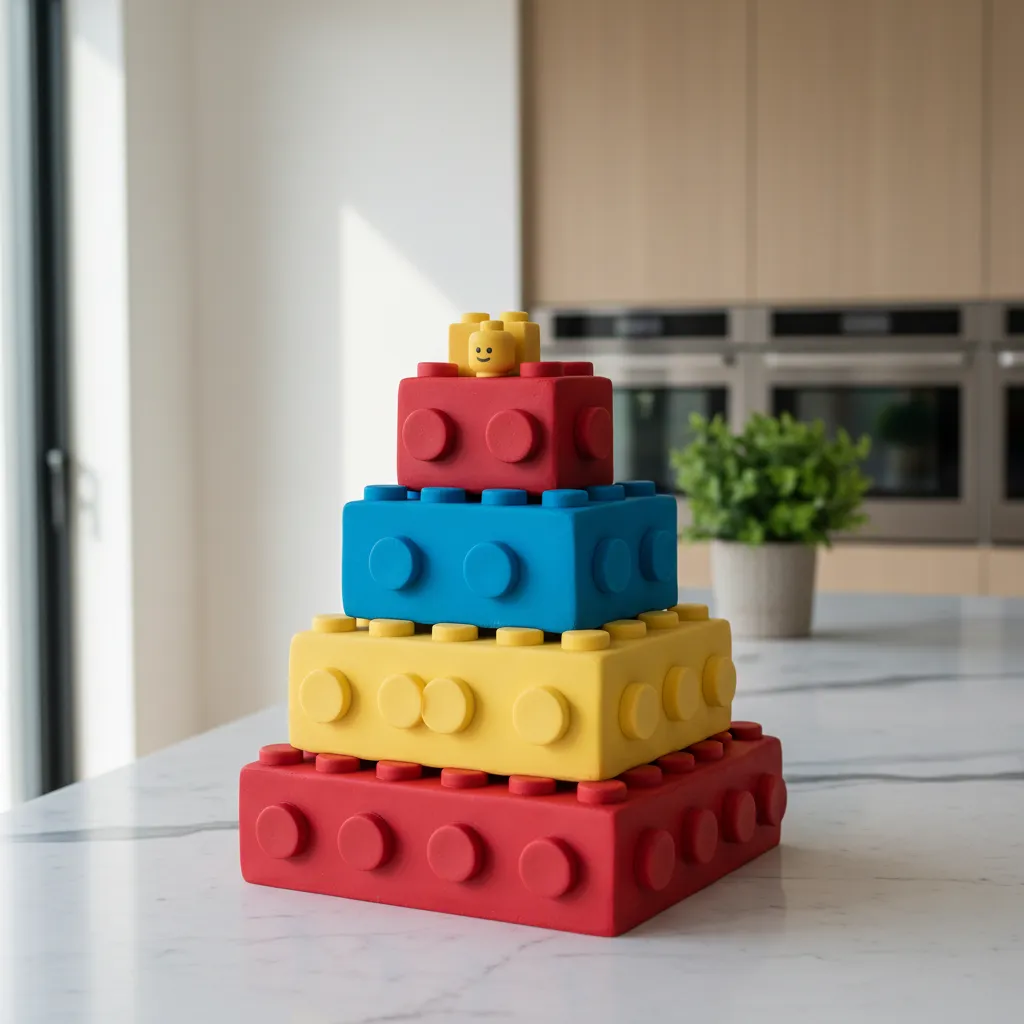
Iconic Yellow Minifigure Head 3D Sculpture
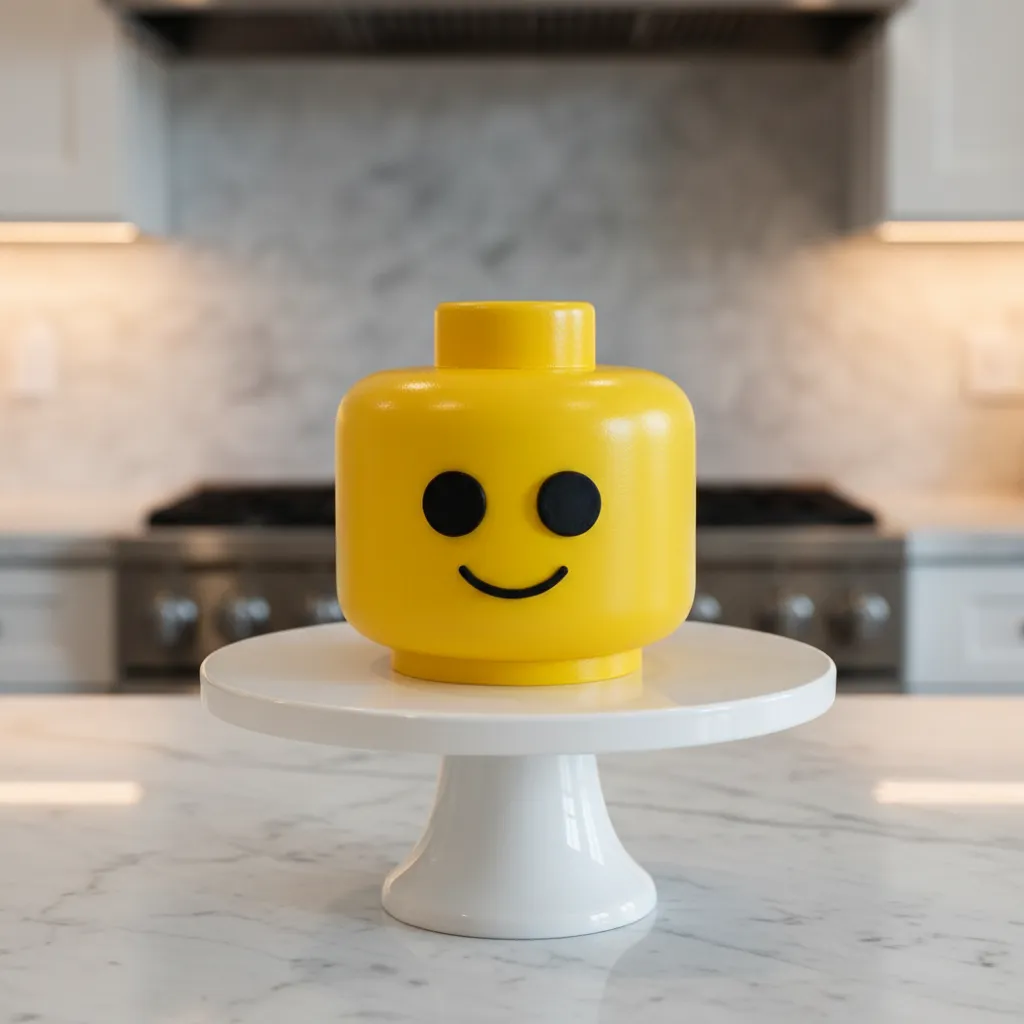
The iconic yellow minifigure head is more than just a toy; it is a symbol of creativity. Translating this shape into a cake requires an eye for geometry and structural balance.
A cylindrical form with tapered edges creates the distinct silhouette. The goal is to mimic the smooth, manufactured finish of the plastic original using edible materials.
Structural Foundation and Baking
Structural integrity is paramount when building a 3D sculpture. A light chiffon sponge will likely collapse under the weight of the fondant and vertical stacking.
You need a dense base that holds its shape when carved. A robust batter, such as a sour cream coffee cake recipe easy to sculpt, offers the necessary crumb tightness.
Use internal dowels to anchor the layers. This prevents the tall, narrow cake from leaning or shifting during transport or warm party conditions.
Always freeze your cakes before carving. A frozen cake produces fewer crumbs and allows for much sharper, more precise edges.
Elisa Strauss, Confetti Cakes
Achieving the Plastic Aesthetic
The “skin” of the minifigure head must be flawless. A layer of dark chocolate ganache under the fondant acts as a rigid shell, providing a sharp surface for smoothing.
Roll the fondant slightly thicker than usual to hide any bumps. Polish the surface with a fondant smoother to achieve a glossy, plastic-like sheen that catches the light.
For the interior flavor, contrast the rigid exterior with a creamy filling. Notes inspired by a perfectly easy crème brûlée add a gourmet touch to the whimsical design.
True craftsmanship in baking turns fleeting moments into structural masterpieces.
Essential Sculpting Checklist
To ensure your minifigure head looks professional rather than homemade, strict adherence to a process is vital. This checklist keeps the build organized.
- Density Check: Ensure the cake sponge is firm and chilled before stacking.
- Internal Support: Place a center dowel and four support dowels in the bottom tier.
- Crumb Coat: Apply a firm ganache seal to lock in moisture and crumbs.
- Facial Proportions: Measure the placement of eyes exactly halfway down the cylinder.
- Top Stud: Use a smaller cookie cutter to create the connecting stud on top.
The final details rely on minimalism. Use edible black fondant for the eyes and smile, ensuring the edges are crisp and free of fraying for that authentic factory look.
Master Builder’s Secrets
- Lightly steam the finished fondant surface with a handheld clothing steamer to achieve that authentic, high-gloss plastic sheen.
- Use a paper template for the facial features to ensure the iconic smile and eyes are perfectly symmetrical and factory-accurate.
- For the top ‘stud,’ use a pre-chilled circular rice cereal treat base to maintain a perfect, crisp cylinder shape that won’t sag.
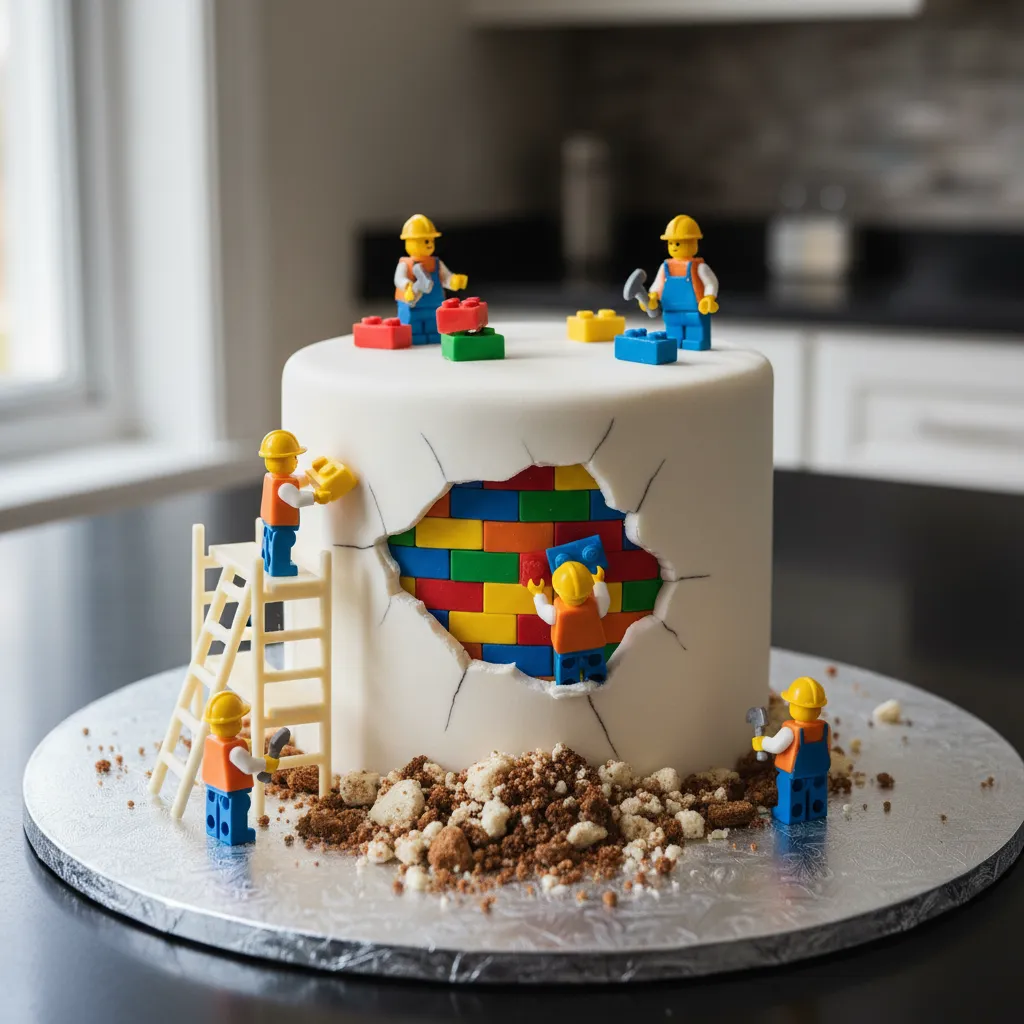
Works in Progress: The Construction Site Scene
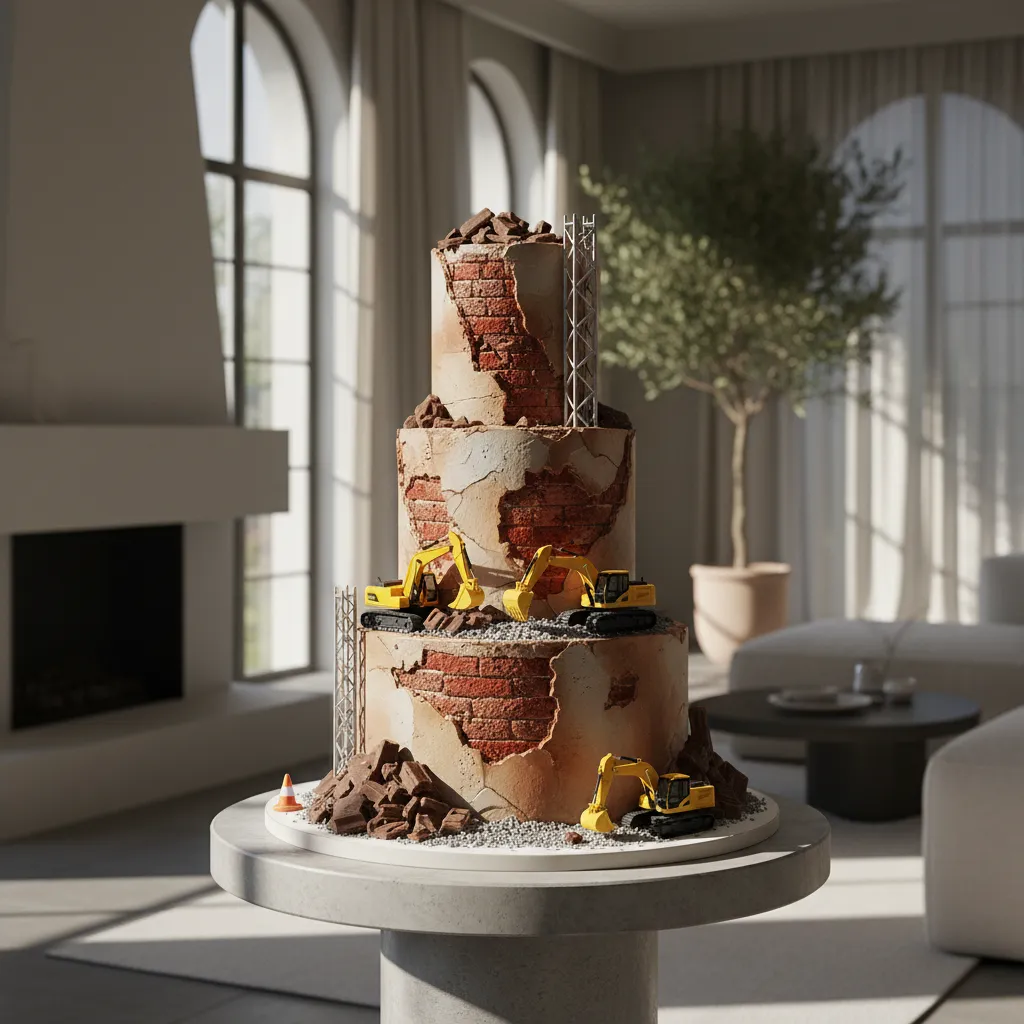
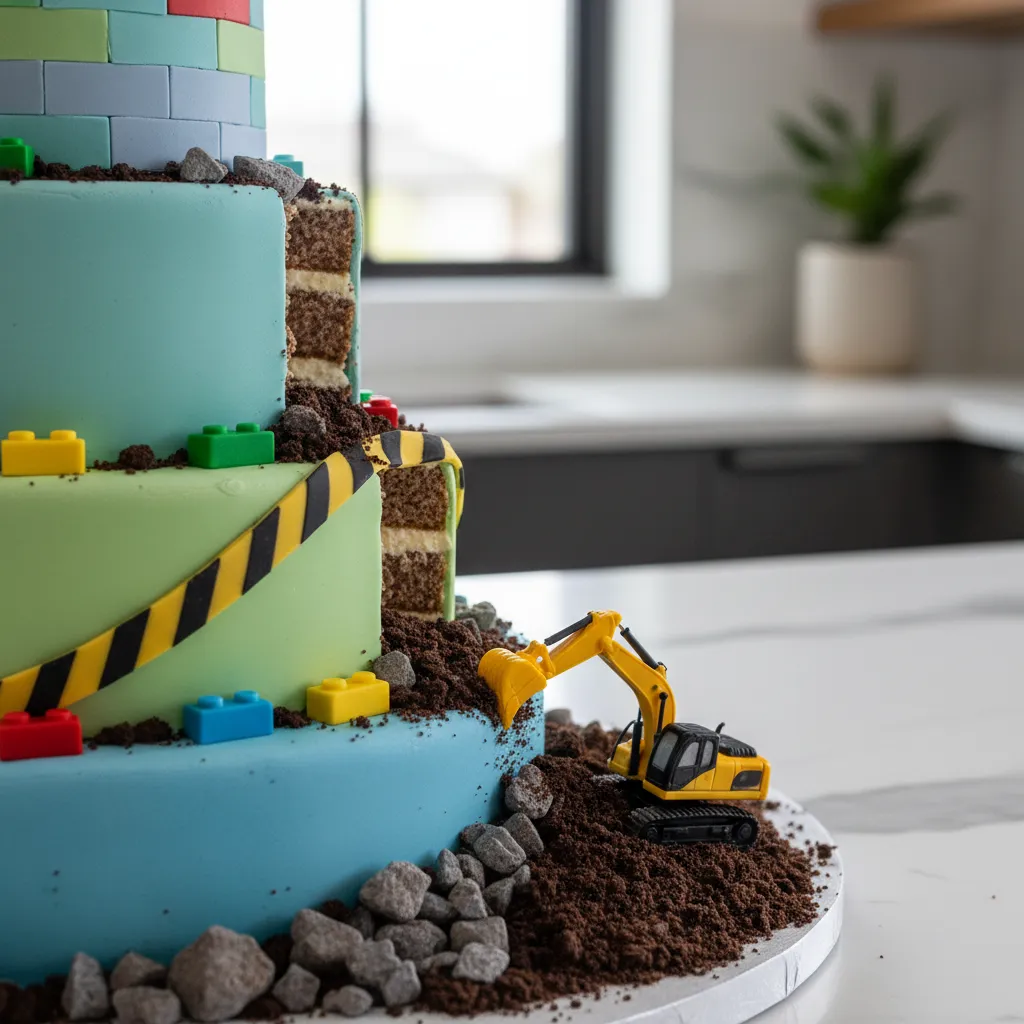
The construction site aesthetic embraces the beauty of the unfinished. It transforms a standard dessert into a dynamic zone of activity, celebrating the raw structural integrity of the confection.
Visually, this theme bridges the gap between polished design and rugged play. It invites interaction through distinct textural contrasts, utilizing “rubble” and “foundation” elements.
This design choice also offers significant functionality for the host. The intentional messiness of an excavation scene creates a forgiving canvas that hides minor icing imperfections effortlessly.
Structural Integrity and Edible Hardscaping
To achieve a realistic look, you must focus on the materials used for hardscaping. Crumbled chocolate cookies serve as excellent asphalt, while brown sugar mimics the texture of sand.
For a sophisticated finish, incorporate elements that add verticality. Chocolate-covered pretzel rods can simulate rebar, adding a sense of height and industrial grit to the edible architecture.
If you are looking for the perfect soil texture, the techniques used in an Easter Dirt Cake Casserole can be adapted here to create deep, realistic excavation pits.
Design is not just what it looks like and feels like. Design is how it works.
Zoning the Work Area
Effective spatial dynamics are crucial when arranging the “work zone.” Avoid overcrowding the tiers with too many vehicles; instead, create distinct focal points for the machinery.
Position an excavator scooping out a corner of the cake to create negative space. This removal of material implies action and movement, making the cake feel like a frozen moment in time.
Use smooth grey buttercream to represent freshly poured concrete. Contrast this with the rough textures of your edible gravel to enhance the visual depth of the presentation.
The key to a successful themed party is immersion. You want your guests to feel like they’ve stepped into a different world, even if it’s just through the details on a cake.
Colin Cowie, Colin Cowie Lifestyle
Material Palette and Safety Aesthetics
The color palette should be high-contrast and industrial. Utilize safety yellow, asphalt black, and brick red to guide the eye across the various levels of the dessert.
Geometric precision is key for elements like caution tape. You can adapt the sharp line techniques found in geometric tape resist art to create clean, uniform fondant stripes.
Select ingredients that mimic real construction materials to maintain the illusion. The following list outlines ideal edible substitutions for common industrial elements.
| Construction Element | Edible Material Substitution | Textural Effect |
|---|---|---|
| Exposed Brick | KitKat bars or red fondant rectangles | Rigid, geometric patterns |
| Boulders | Chocolate river rocks | Smooth, organic hardness |
| Lumber/Beams | Wafer cookies or pretzel sticks | Linear structural support |
| Cement Mix | Grey buttercream or crushed meringue | Matte finish vs. dusty powder |
| Safety Cones | Molded orange fondant or bugles | Bright, warning accents |
Lighting plays a subtle but vital role in the presentation. Ensure the display area has warm ambient lighting to highlight the shadows cast by the toy machinery and the texture of the crumbs.
Always sanitize any plastic toys thoroughly before placing them on the cake. Using food-safe barriers, such as a small cut of fondant under the wheels, ensures hygiene without compromising the look.
Site Manager’s Secret
- Mix varying sizes of chocolate cookie crumbs; from fine powder to pea-sized chunks; to create a more realistic, multi-dimensional ‘gravel’ look.
- If using heavy plastic excavators, anchor them with hidden cake dowels or thick straws to prevent them from sinking into the soft sponge.
- For perfectly straight ‘caution tape’ stripes, chill your fondant first and use a rolling pizza cutter to ensure sharp, industrial-grade edges.
The Anti-Gravity Floating Brick Pour
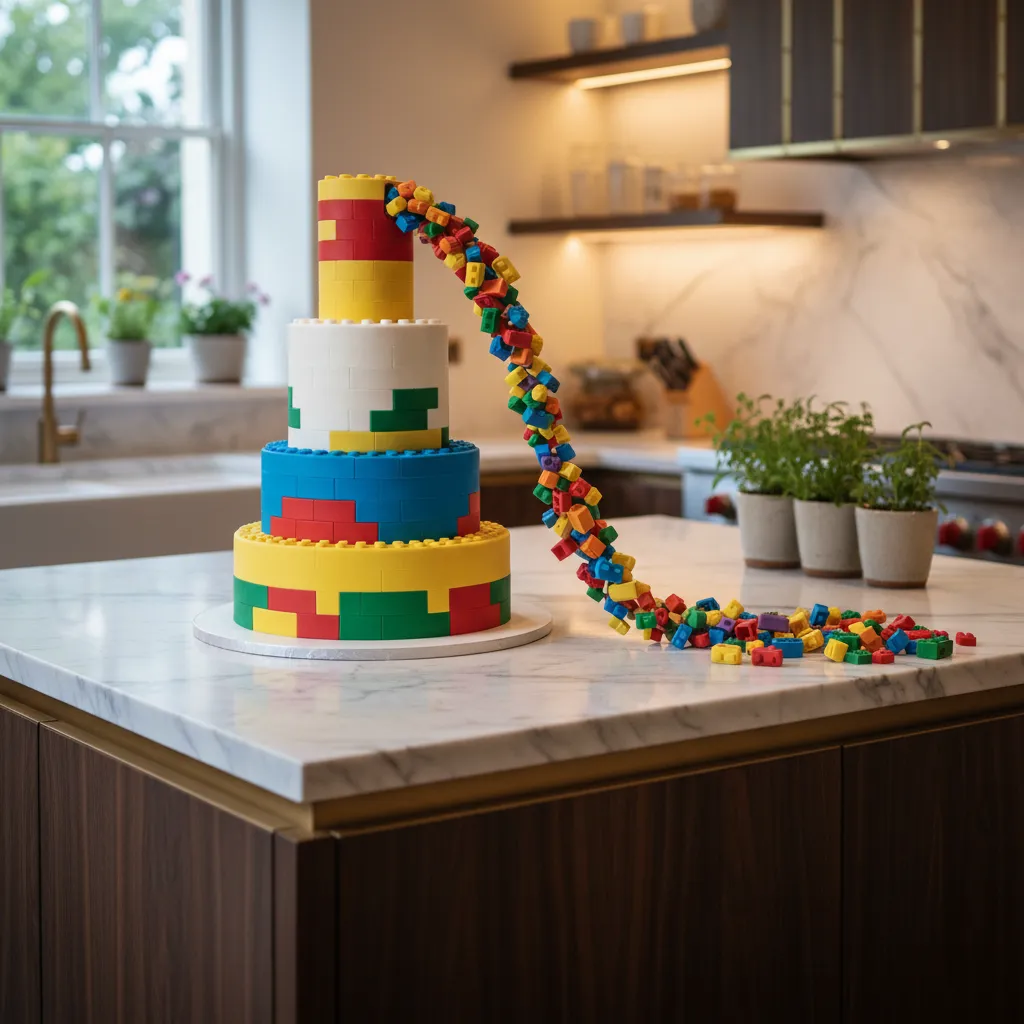
The anti-gravity cake acts as a sculptural focal point in any event space. It mimics the tension found in cantilevered architecture. The illusion creates immediate visual intrigue.
Achieving this look requires more than just baking skills. You must approach the project like a structural engineer. A hidden armature supports the floating vessel above the base.
This internal skeleton ensures the cake maintains its integrity. It prevents the tiers from shifting during the party. The result is a dynamic display that appears frozen in time.
Design is not just what it looks like and feels like. Design is how it works.
Engineering the Suspension
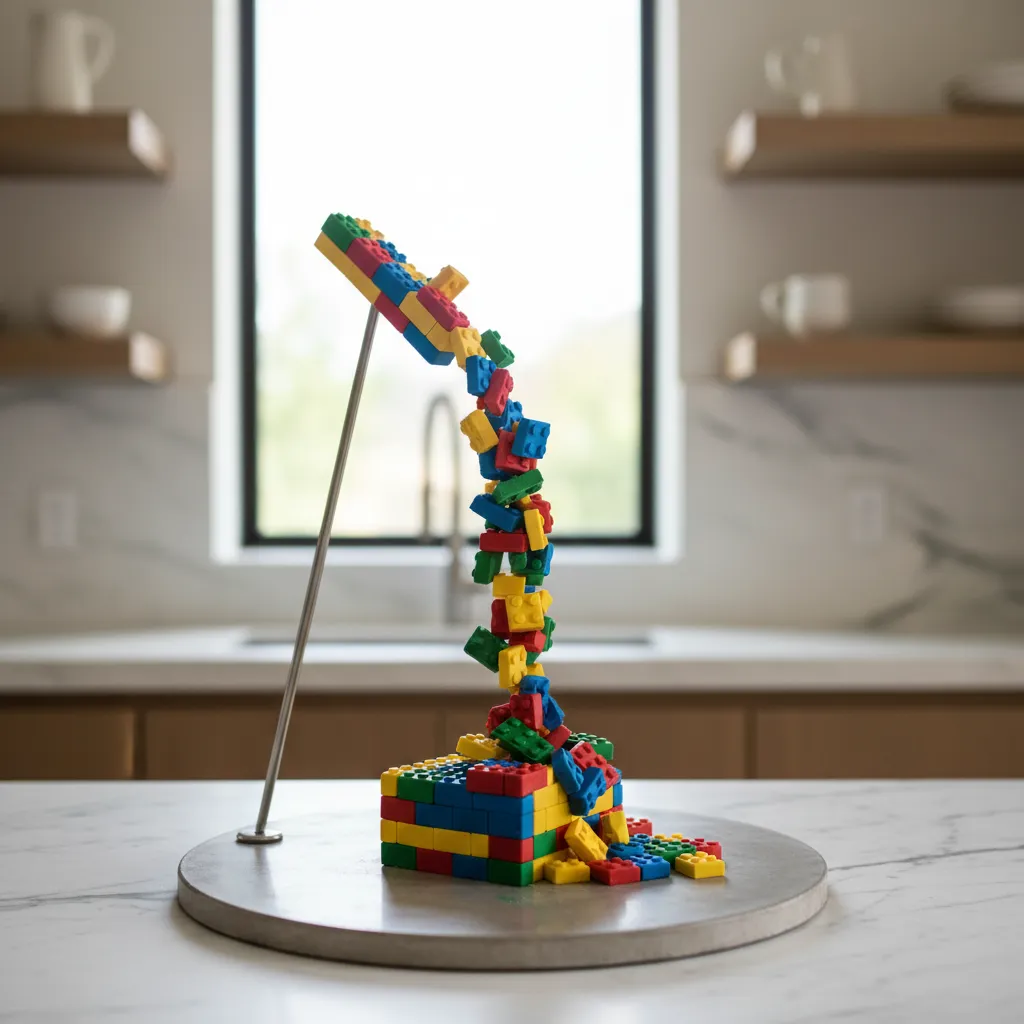
The core of this design is a food-safe threaded rod system. This anchors the floating element to the cake board. It provides the necessary tensile strength for the pour.
Cover the hardware with modeling chocolate or dense fondant. This conceals the mechanics while adding volume. The cascading bricks are then applied to this masked column.
Precision is key when placing the individual bricks. The aesthetic relies on the same clean lines found in geometric tape resist art projects.
| Component | Material Choice | Structural Function |
|---|---|---|
| Base Anchor | Wooden Board & Flange | Provides a heavy counterweight to prevent tipping. |
| Central Column | Threaded Rod | Supports vertical weight and allows for angles. |
| Adhesive | Royal Icing | Acts as the mortar to secure bricks to the rod. |
| Floating Vessel | Empty Lego Box/Cup | The lightweight visual origin of the “pour.” |
Lighting enhances the dramatic effect of the falling bricks. A well-placed spotlight creates deep shadows between the pieces. This emphasizes the three-dimensional texture.
The details are not the details. They make the design.
Charles Eames, Eames Office
Balance the hard edges of the bricks with softer elements. Consider serving this sculptural piece alongside perfectly easy crème brûlée for a texture contrast.
The pouring motion guides the eye down the tiers. This creates a vertical flow that connects the floating object to the table. It is a masterclass in spatial dynamics.
Structural Secrets
- Ensure your base board is significantly heavier than the floating element to act as a counterweight and prevent the entire structure from tipping.
- Apply modeling chocolate to the central rod before attaching bricks; its firm yet tacky texture provides a better grip for heavy decorations than standard fondant.
- Vary the angles of the bricks near the top of the pour to create a more realistic sense of motion and chaotic momentum.
Peek-A-Boo Interior: The Brick Reveal Technique
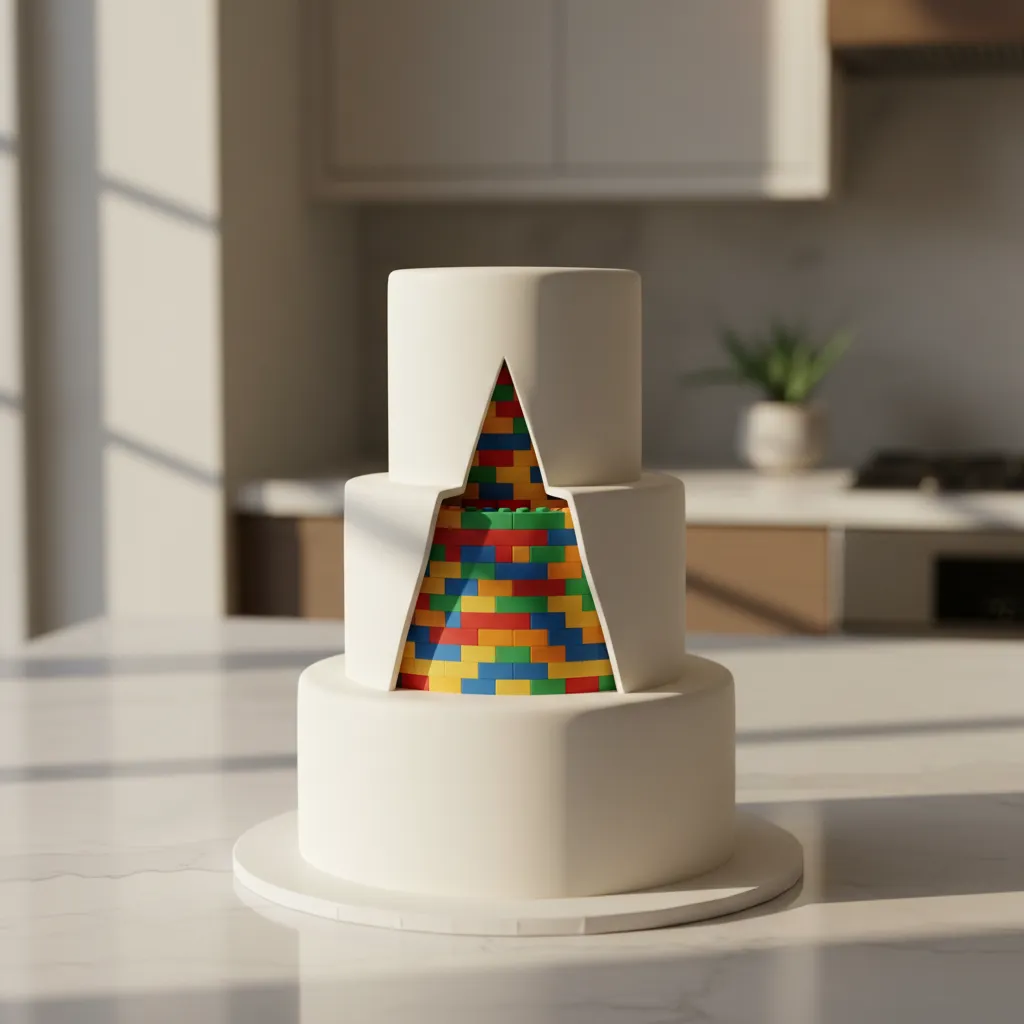
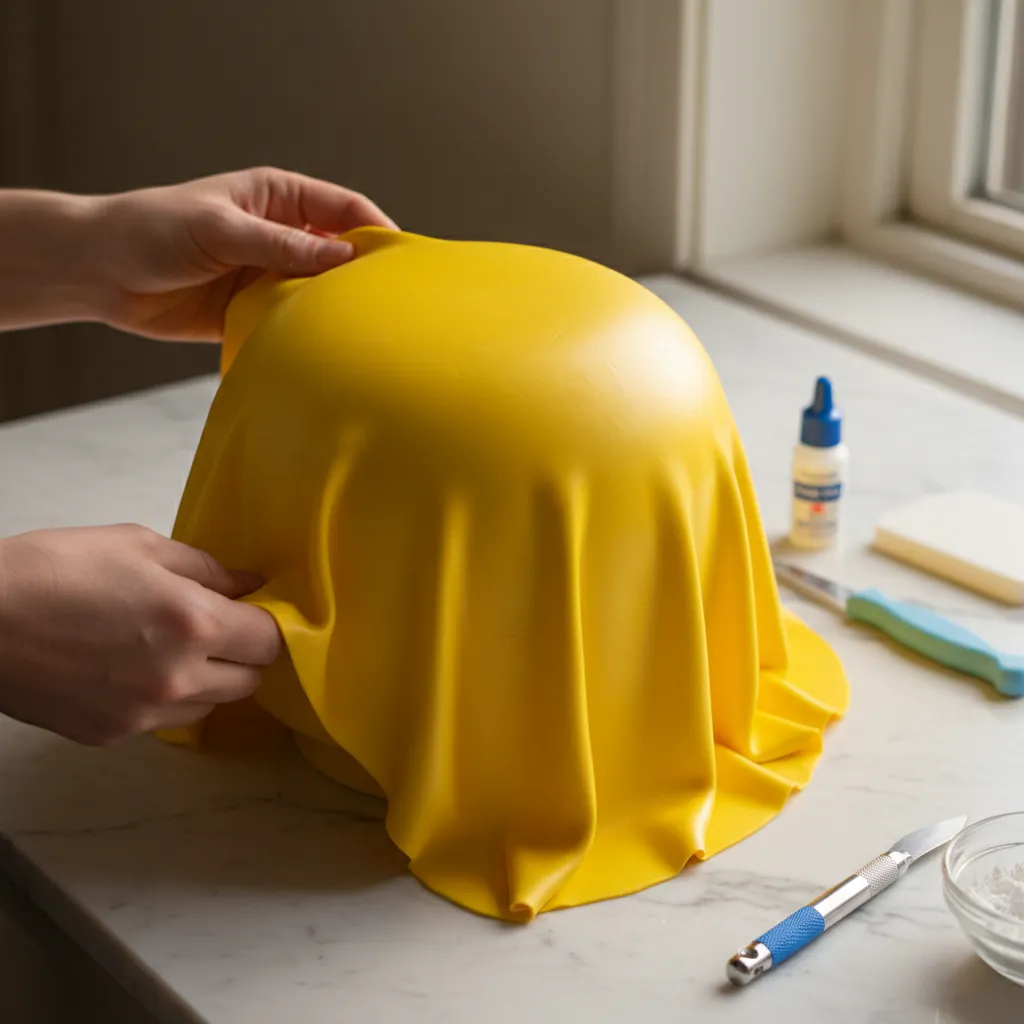
The “Peek-A-Boo” or “Brick Reveal” technique is the architectural equivalent of an exposed brick wall in a modern industrial loft. It plays with the concept of negative space.
This design creates a sophisticated visual narrative. It suggests that beneath the polished, traditional white exterior of the cake, there is a colorful and playful foundation supporting it.
To achieve this look, you must treat the cake as a structural blueprint. The outer layer of fondant mimics drywall or plaster, while the inner layer represents the structural integrity of the build.
Great design is about the reveal. It is the unexpected texture hidden beneath the surface that turns a simple cake into a conversation piece.
Drafting the Structural Opening
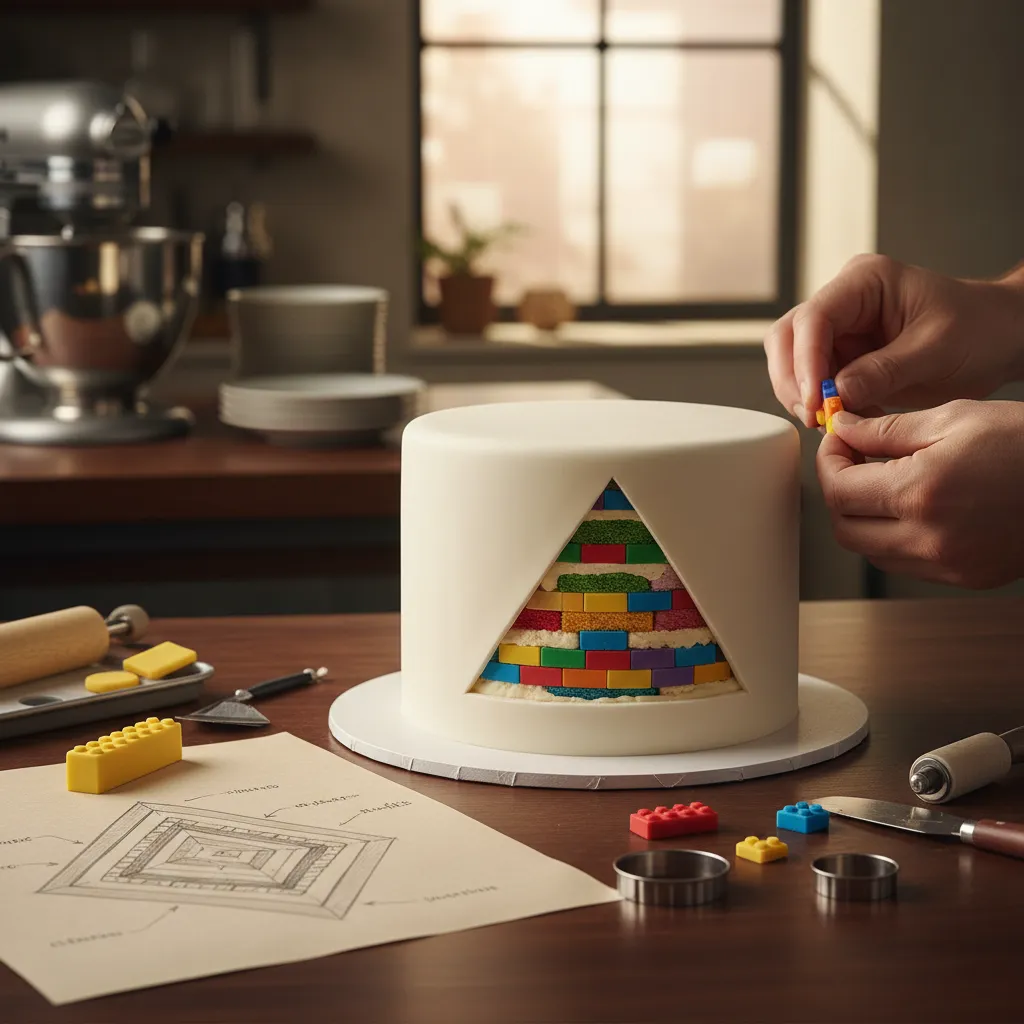
Precision is paramount when carving the “reveal” section. You are essentially renovating the cake face to expose the studs. Use a scalpel or X-Acto knife for clean, sharp lines.
The depth of the cut matters. You need a dense cake base that can withstand carving without crumbling. A fragile sponge will collapse under the weight of the added fondant bricks.
For this reason, many designers prefer a robust batter. A substantial base, such as a Sour Cream Coffee Cake Recipe Easy: The Ultimate Guide, provides the necessary crumb density to hold the structural changes.
Material Selection for Brick Facades
Choosing the right medium for your bricks determines the realism of the finish. You need a material that holds sharp edges but remains pliable enough to mold into the cutout.
Comparison of Brick Sculpting Materials:
| Material | Structural Pros | Aesthetic Cons | Best For |
|---|---|---|---|
| Fondant | Hardens quickly, excellent edge retention. | Can show seams if not smoothed perfectly. | Sharp, geometric standard bricks. |
| Modeling Chocolate | Seamless blending, high plasticity. | Sensitive to heat/warm lighting. | Curved reveals and organic draping. |
| Marzipan | Rich texture, adheres easily. | Yellow tint affects pure color output. | Vintage or rustic textured looks. |
When creating an illusion cake, the transition point is critical. The edge where the ‘skin’ of the fondant is peeled back must look thin and delicate, not thick and doughy, to maintain the trompe-l’oeil effect.
Toba Garrett, Institute of Culinary Education
The Construction Zone Aesthetic
To sell the illusion of a renovation in progress, incorporate texture around the base. This grounds the visual weight of the cake and adds to the storytelling element of the design.
Scatter edible “rubble” near the peel-back site. Crumbled cookies or chocolate rocks work well here. The texture should look excavated, similar to the layers found in an Easter Dirt Cake Casserole Cooking Taste: A Gourmet Guide.
Finally, roll the edges of the white fondant outward. This simulates the flexibility of vinyl or wallpaper peeling away. It creates a dynamic sense of motion, as if the reveal is happening right now.
The Blueprint Hack
- Taper the edges of your ‘peeled’ fondant using a ball tool on a foam pad to create a paper-thin, realistic wallpaper effect.
- Chill your cake thoroughly before carving the reveal section to ensure the crumb stays tight and the lines remain razor-sharp.
- Dust the brick crevices with a mix of cocoa powder and cornstarch to mimic authentic masonry dust and aged mortar.
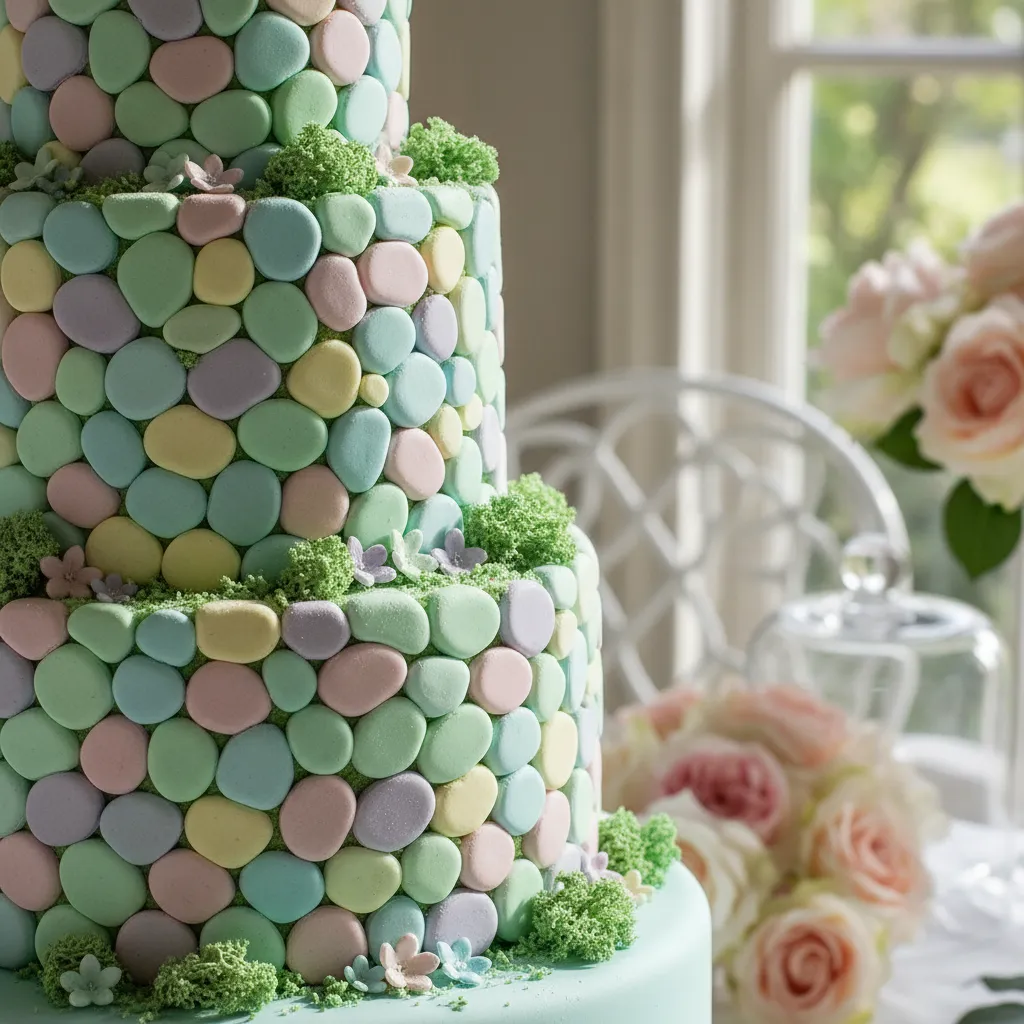
Pastel Palettes for a Lego Friends Garden Theme
Integrating the vibrant world of Heartlake City requires a shift in your color strategy. Unlike standard bricks, this theme demands softness.
We move away from primary reds and blues to embrace a sophisticated pastel spectrum. This approach mimics the visual language of a spring garden.
The goal is to balance the rigid geometry of the bricks with the organic flow of nature. Soft hues make the structural elements feel lighter and airy.
Design is not just about structure; it is about creating a soft place for the eye to land.
Consider the lighting in the room where the cake will be displayed. Warm ambient lighting enhances the creaminess of pastel fondant.
Harsh fluorescent lights can wash out pale lavenders and pinks. Natural daylight is always the superior choice for these delicate tones.
When planning your table, look for inspiration in related decor styles. You might find synergy with our Easter Strawberries in Egg Carton chic tablescape ideas.
Heartlake Design Secrets
- Mix your own custom pastels by adding a tiny drop of pigment to a white base to ensure a soft, airy finish rather than a saturated one.
- Display your creation near natural light or warm bulbs to prevent delicate lavender and mint tones from looking washed out under harsh fluorescent lighting.
- Balance rigid brick shapes with hand-modeled organic flowers and vines to achieve the signature Lego Friends garden aesthetic.
Constructing Edible Hardscaping
In this design, the cake board acts as your foundation or landscape. We treat the icing application like hardscaping in a real garden plan.
Use fondant to create smooth, interlocking brick veneers. This provides a clean finish that contrasts beautifully with textured elements.
Texture is vital to prevent the cake from looking flat or plastic. Incorporate crushed cookie “soil” or piped buttercream “grass” for depth.
These organic textures soften the hard lines of the Lego concept. It creates a seamless transition between the edible toy and the treat.
Rawness and refinement are not opposite ends of a spectrum. They are two variables that need to be in balance.
Kelly Wearstler, Kelly Wearstler Interior Design
To achieve the perfect hue, mix your food coloring sparingly. You can always add more pigment, but you cannot remove it once mixed.
If you enjoy creating detailed sweet elements, you might also appreciate the techniques used in our Elegant Easter Sweet Treats guide.
Master Builder Secret
- Use a metal ruler or a specialized modeling tool to score your fondant bricks for professional, perfectly aligned grout lines.
- Chill your cake base thoroughly before applying heavy hardscape elements to prevent the weight of the fondant from causing structural shifts.
- To achieve a realistic natural stone look, partially marble light and dark grey fondant together before rolling it out to create organic mineral veins.
Character-Inspired Color Zoning
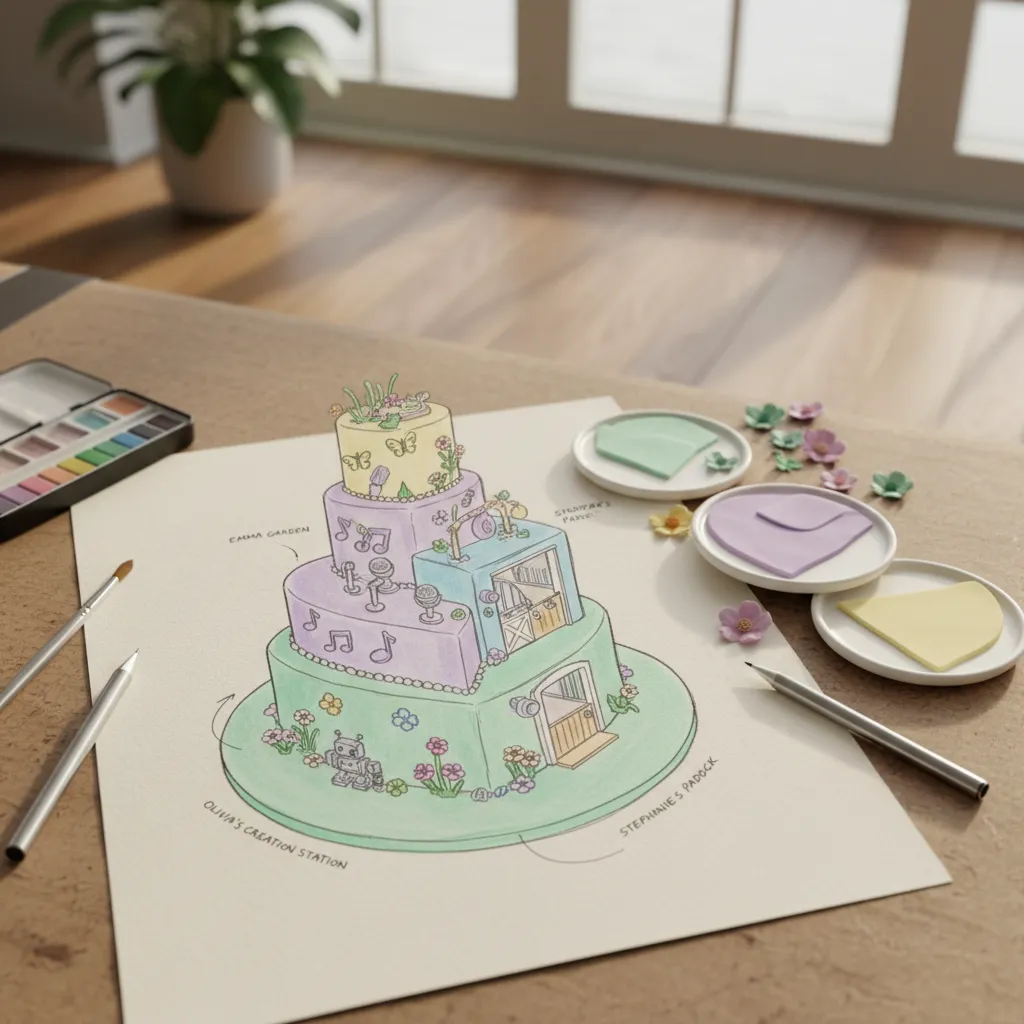
Assigning specific zones on the cake to different colors helps organize the visual flow. This technique creates a cohesive narrative.
Each level of the cake can represent a different character or garden element. This layering adds architectural interest to the dessert.
Refer to the guide below to match your fondant dyes to the classic character aesthetics. This ensures authenticity in your design.
| Character Inspiration | Base Palette Tone | Texture Pairing | Garden Element |
|---|---|---|---|
| Olivia | Soft Raspberry Pink | Smooth Fondant | Geometric Walkways |
| Mia | Lime & Forest Green | Rough Buttercream | Organic Vines |
| Andrea | Pale Gold & Teal | Wafer Paper | Musical Note Toppers |
| Stephanie | Powder Blue & White | Royal Icing Drip | Picket Fence Borders |
| Emma | Lavender & Violet | Edible Glitter | Artistic Swirls |
Using these pairings allows you to tell a story without using figures. The colors themselves invoke the personality of the theme.
Ensure that your edible glue is strong enough to hold heavy fondant bricks. Structural integrity is just as important as the color palette.
The Master Zoning Blueprint
- Use neutral dividers like white or metallic bands between character zones to prevent visual clutter and keep the narrative clear.
- Incorporate character-specific textures; like Emma’s edible glitter or Mia’s rough buttercream; to add tactile depth to your color story.
- Check your palette under different lighting to ensure subtle tones like Raspberry Pink and Lavender maintain distinct contrast from a distance.
Ninjago Warriors: Character-Focused Designs
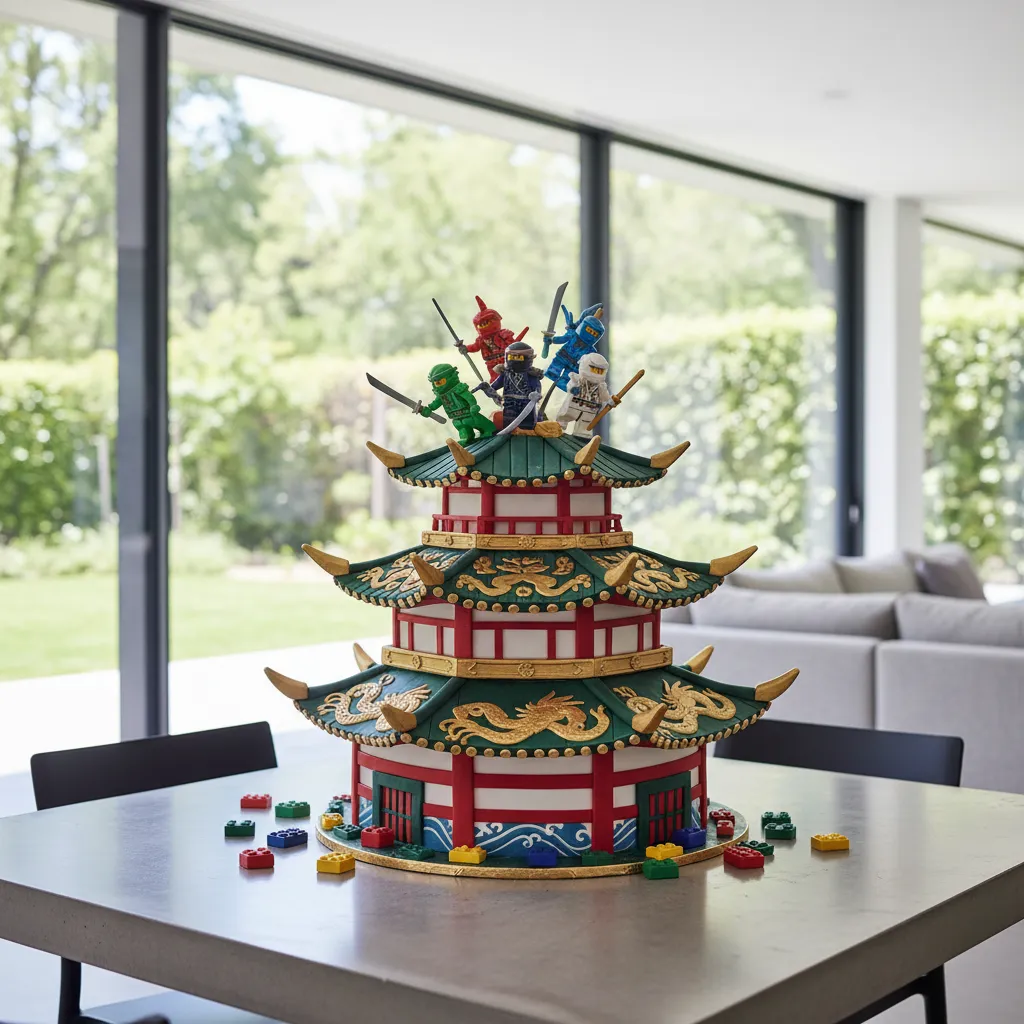
The Ninjago universe offers a sophisticated palette for cake design. It moves beyond simple primary colors into a realm of elemental textures and architectural forms.
Designers often draw inspiration from the pagoda structures found in the series. This allows for a tiered approach that mimics ancient Japanese architecture.
To achieve a high-end look, focus on the finish of the fondant. A glossy red finish represents the Fire element, contrasting beautifully with matte gold accents.
Structural Integrity and Zoning
When constructing a vertical cake, stability is paramount. Use internal dowels to support the weight of heavy fondant decorations and toppers.
Consider the cake table as a focal point similar to a well-styled console. You might draw inspiration from Simple Home Coffee Bar Ideas Anyone Can Create Today for arranging the display.
In cake design, as in architecture, the foundation dictates the height of your ambition.
Master the Elemental Art
- Contrast high-gloss finishes with matte gold leaf to mimic the elemental power and luxury of the Ninjago universe.
- Incorporate edible rice paper or thin fondant to create the tiered, flared eaves of pagoda-inspired structures.
- Anchor your design by placing the cake on a natural stone or dark wood base to reflect the series’ architectural roots.
Elemental Texture Mapping
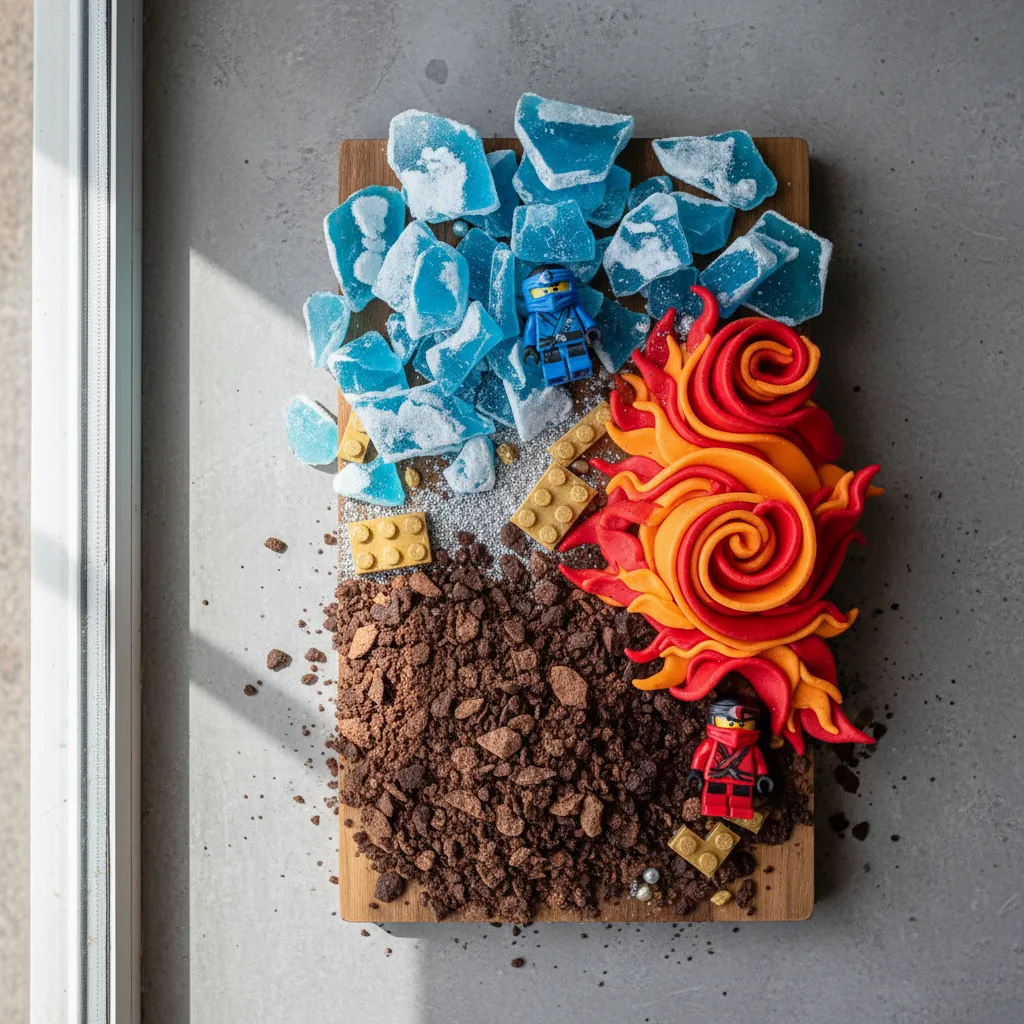
Ninjago is defined by the elements of Fire, Ice, Earth, and Lightning. Translating these into edible textures adds depth to the culinary experience.
For the “Ice” ninja, Zane, utilize jagged shards of clear isomalt. This creates a translucent, glass-like effect that catches ambient lighting.
For Cole, the “Earth” ninja, incorporate rough textures. Crumbled chocolate cookies or rock candy simulate the raw, grounded nature of his character.
Balancing these textures is critical for palatability. Refer to guides like Kid Friendly Dinners for Picky Eater: The Texture Bridge to understand how varied textures affect enjoyment.
Texture conveys flavor before the food even hits the tongue. The crunch of a sugar shard or the smoothness of a ganache sets the expectation.
Christina Tosi, Milk Bar Founder & Pastry Chef
Character Flavor Profiles
Aligning the interior flavor with the exterior design creates a cohesive narrative. The following table suggests pairings based on character aesthetics.
| Character (Element) | Primary Color | Visual Texture | Suggested Flavor Profile |
|---|---|---|---|
| Kai (Fire) | Crimson Red | Swirled Fondant Flames | Red Velvet with Cinnamon |
| Jay (Lightning) | Electric Blue | Metallic Silver Dust | Blueberry Lemon Zest |
| Cole (Earth) | Deep Black | Matte Crumbled Cookie | Dark Chocolate Mud |
| Zane (Ice) | Frost White | Isomalt Shards | White Chocolate Vanilla |
Using these pairings ensures the cake tastes as dynamic as it looks. The visual cues prepare the guest for the specific flavor profile.
Always test your color dyes in advance. Deep reds and blacks require time to develop and can alter the consistency of your frosting if not managed well.
Sensei’s Secret Techniques
- To achieve Kai’s deep crimson or Cole’s midnight black without thinning your frosting, mix colors 24 hours in advance to let the pigments fully develop.
- When crafting Zane’s ice shards, pour your isomalt onto a textured silicone mat to create unique, frosted patterns that catch the light like real arctic ice.
- For an ultra-realistic Earth texture for Cole, mix varying sizes of cookie crumbs with edible gold dust to mimic mineral-rich soil.
The Edible Mosaic Number Cake
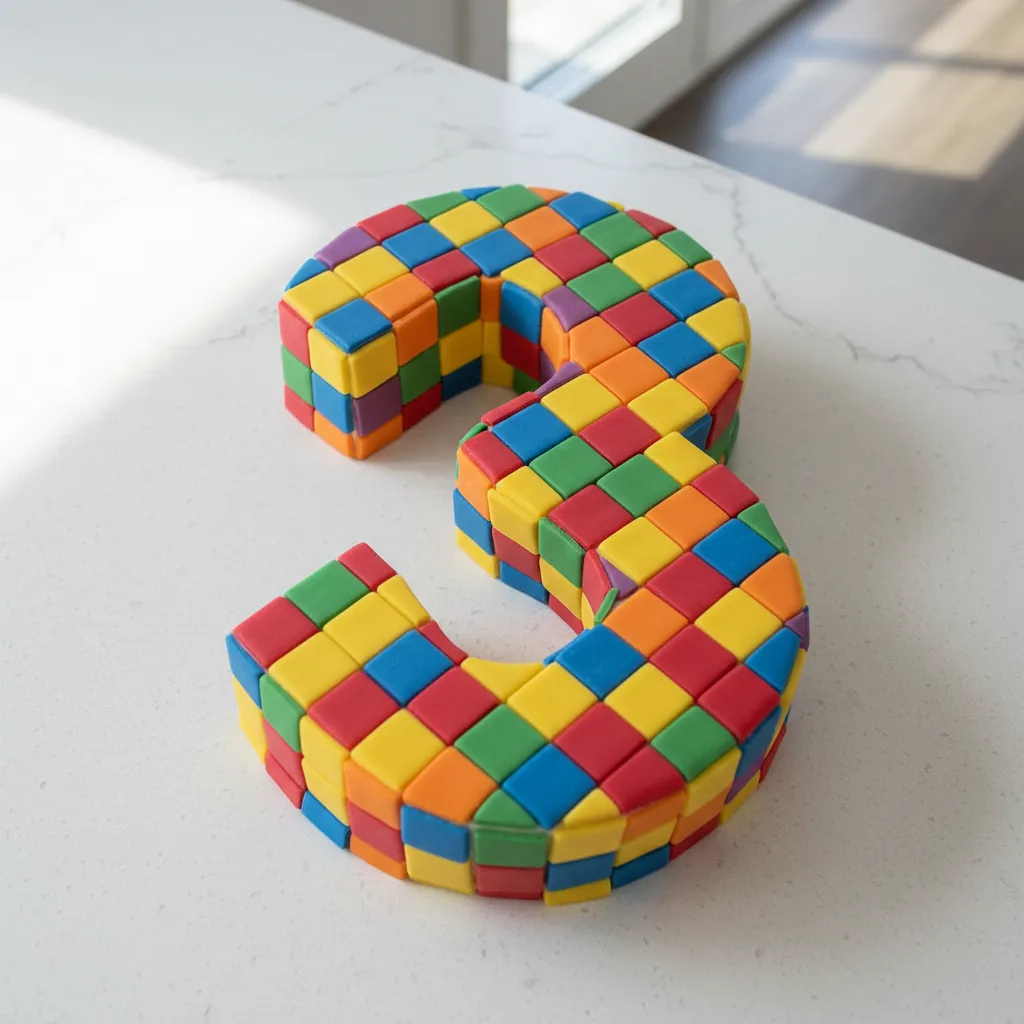
The edible mosaic number cake transforms a standard birthday treat into a structural masterpiece. This design relies heavily on geometric precision and grid planning.
Think of the cake surface as a blank architectural floor plan. You are tiling this space to create a cohesive visual flow. The result is a clean, modern aesthetic.
Achieving this look requires a dense cake base. A sponge that is too airy may crumble under the weight of the decorations. You need structural integrity here.
For a reliable foundation, you might adapt a dense crumb recipe. The texture found in our Blueberry Coffee Cake Recipes Easy: One-Bowl Baking Guide works exceptionally well for carving.
Drafting the Blueprint
Before frosting, sketch your design. This ensures your “pixels” or studs align perfectly without awkward gaps at the edges. It is similar to laying tile in a bathroom.
Use a buttercream “grout” that contrasts slightly with your tiles. This adds depth to the visual field and highlights the individual geometric components.
The lighting in the room will interact with your materials. Glossy candies reflect ambient light, creating a vibrant energy. Matte fondant absorbs light for a soft finish.
Treat your cake design like a floor plan; flow, structure, and spacing are just as vital in baking as they are in building.
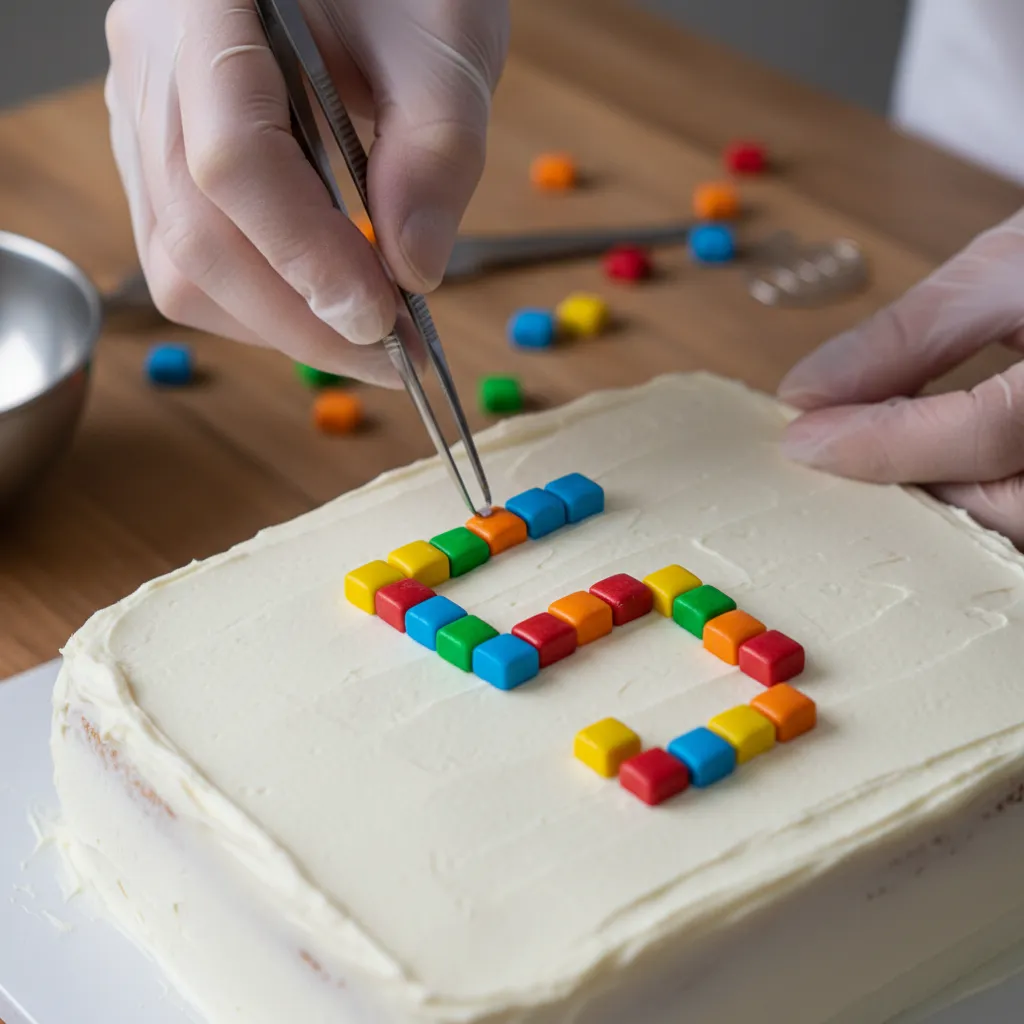
Selecting Your Tiling Materials
The material you choose for the mosaic defines the texture of the piece. Each option offers a distinct tactile experience and visual finish.
Review this checklist to select the right medium for your design goals:
- Fondant Squares: These provide a smooth, matte finish resembling unglazed ceramic. They allow for custom color mixing to match specific decor palettes.
- Square Candies (e.g., M&Ms): These offer a high-gloss, glass-tile effect. They reflect overhead lighting, adding a playful sparkle to the presentation.
- Chocolate Bricks: Using molded chocolate adds a rich, velvety texture. This adds a layer of luxury and depth that flat tiles cannot achieve.
- Fruit Cubes: For a fresher approach, distinct cubes of melon or kiwi can be used. This mimics the light, airy feel of our 15 Easter Desserts Ideas Easy No Bake for Spring Hosting.
Geometric patterns on cakes require the same discipline as architectural tiling. If your base layer isn’t perfectly level, your entire grid will drift, ruining the optical illusion of the mosaic.
Ron Ben-Israel, Ron Ben-Israel Cakes
Finishing the Edges
The sides of the cake require attention to maintain the illusion of a solid block. A messy edge destroys the clean lines of the top mosaic.
Pipe a vertical bead border to frame the mosaic. This acts like a baseboard in a room, concealing the raw edge where the top design meets the side wall.
Keep the serving platter neutral. A white or slate board ensures the colorful geometry of the cake remains the undisputed focal point of the table setting.
Master the Grid
- Chill your cake for at least two hours before carving or leveling to ensure clean, architectural lines and a stable foundation for your tiling materials.
- Use a clean ruler or a parchment paper grid template to lightly score the frosting before placement, preventing your mosaic tiles from drifting as you work.
- Handle glossy candies or chocolate bricks with kitchen tweezers to prevent body heat from dulling the finish or leaving unsightly fingerprints on your design.
The Final Brick in the Edible Edifice
Building a Lego cake is more than baking; it is an exercise in edible engineering. You must respect the physics of cake density and the aesthetics of clean lines.
Whether you choose the crisp finish of rolled fondant or the softer approach of buttercream, precision remains your guiding principle throughout the process.
Ultimately, the joy lies in the construction. Treat every layer like a foundation for a masterpiece that tastes as good as it looks.
Blueprint Clarifications
Whipped cream lacks the structural density required for sharp, brick-like edges. For a realistic industrial finish, firm fondant or ganache is non-negotiable.
Prepare studs at least 24 hours prior. This drying period hardens the sugar paste, ensuring they maintain their vertical shape and uniform height upon assembly.
Bulging usually signals a weak foundation. Ensure your sponge is dense and your crumb coat is thoroughly chilled before applying the heavy outer fondant layer.
Use concentrated gel food coloring rather than liquid. Gels provide that saturated, industrial gloss without compromising the structural chemistry of the sugar paste.