Creating a dessert charcuterie board requires the same precision as drafting a functional floor plan. Every element must serve a purpose within the overall composition.
By selecting a high-quality foundation, such as a hand-milled walnut slab or a polished marble tray, you establish a structural focal point that bridges the gap between culinary art and interior styling.
Spring entertaining demands a palette that reflects renewal and light. Incorporate a variety of textures; combine crisp shortbread with soft macarons and vibrant seasonal fruits.
These components function like interior finishes, where the contrast between matte and gloss surfaces creates visual depth and sophistication for both home gatherings and corporate environments.
Practicality remains essential when styling these edible landscapes.
Consider the flow of traffic around the display and the durability of each ingredient under ambient light.
This guide provides a detailed blueprint for assembling a chic dessert board that maintains its integrity from the first guest’s arrival to the final toast of the evening.
The Deconstructed Strawberry Shortcake Board
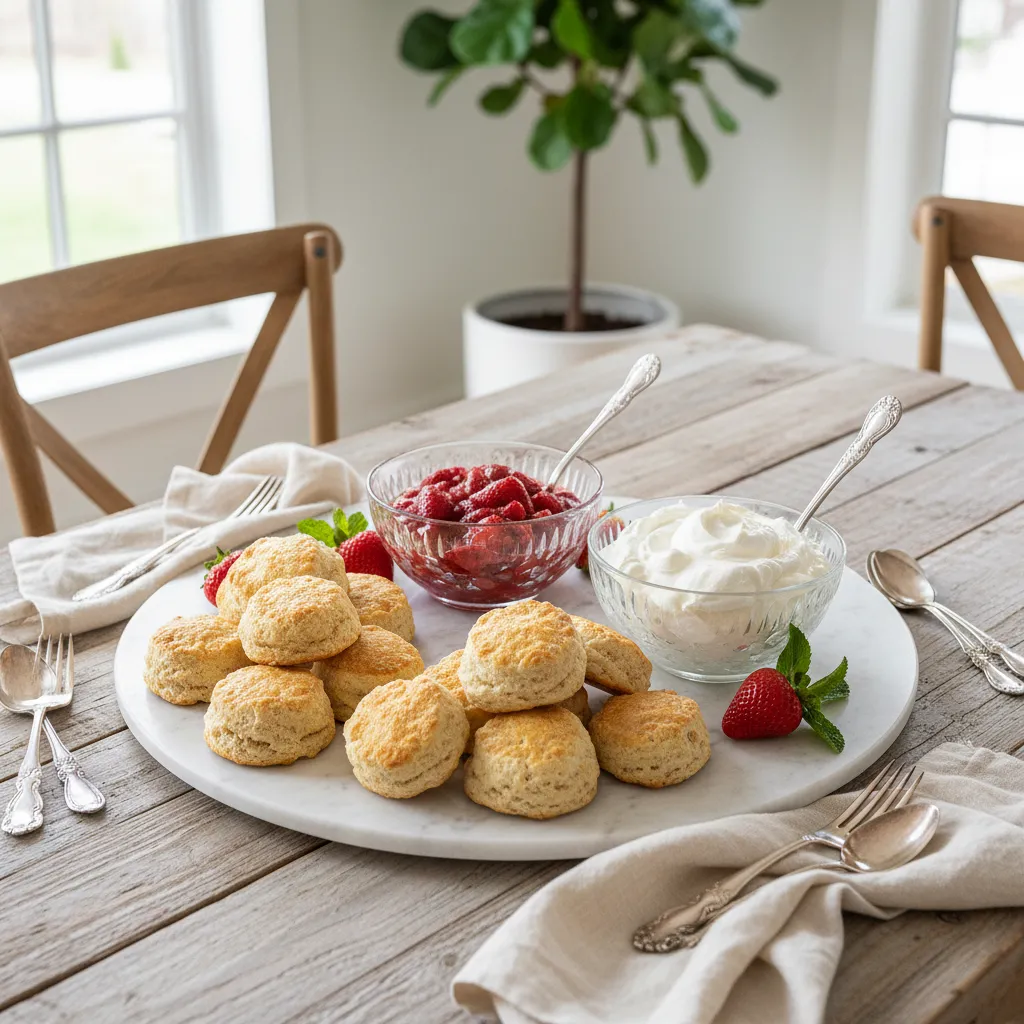
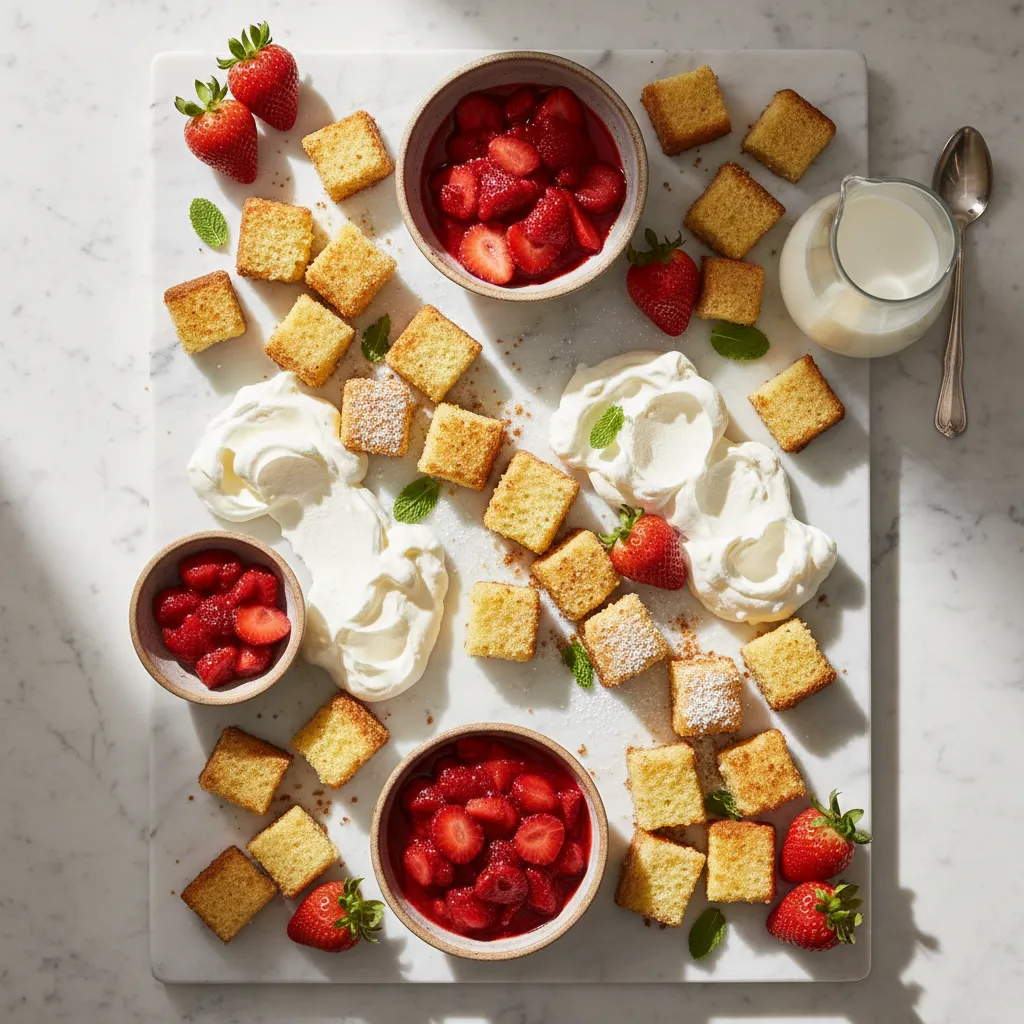
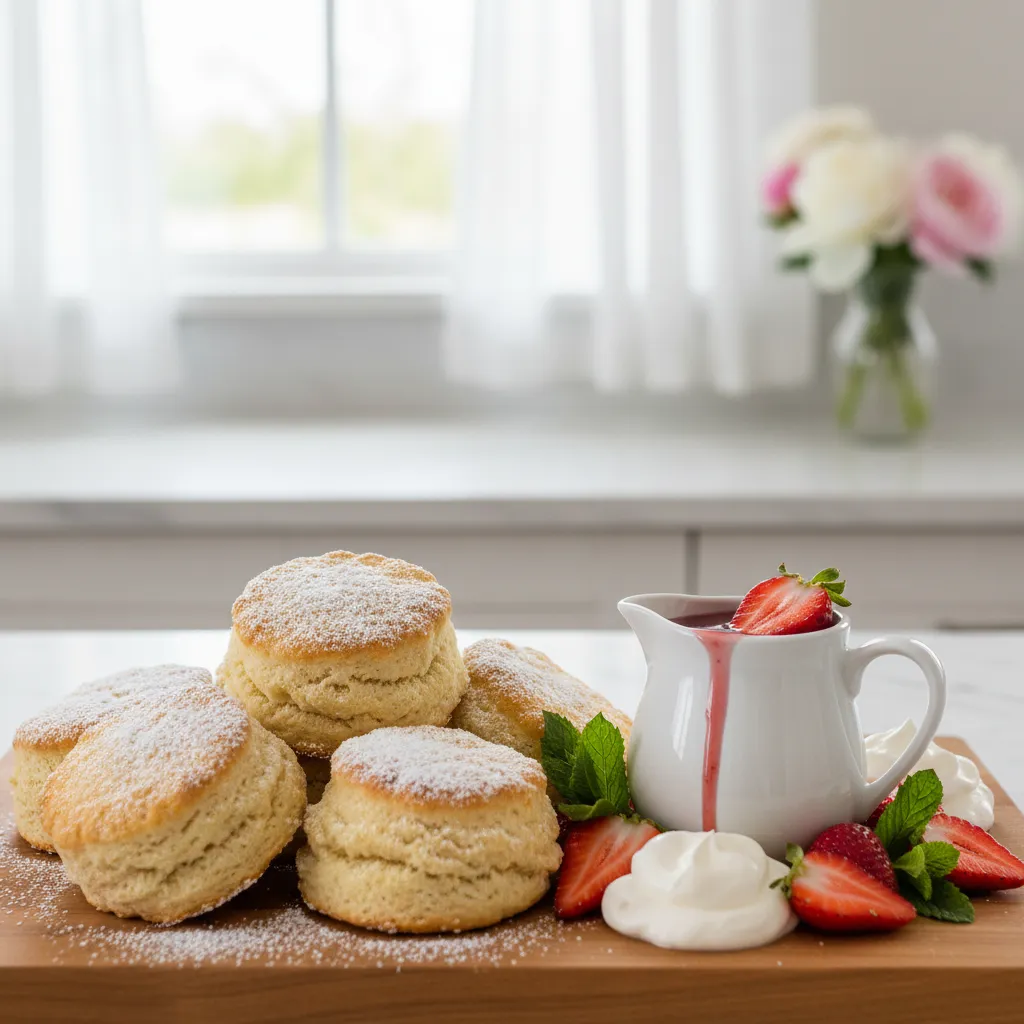
The deconstructed strawberry shortcake board transforms a classic dessert into an interactive architectural centerpiece.
By separating the elements, you allow guests to customize their ratios of cake to cream, turning consumption into a curated experience.
This approach also prevents the soggy texture often associated with pre-assembled shortcakes, maintaining the structural integrity of your biscuits or pound cake until the moment of enjoyment.
Visually, this arrangement relies on the stark contrast of textures and colors. The deep ruby red of macerated berries creates a striking focal point against the cloud-like fluffiness of fresh whipped cream.
When placed upon a cool surface, such as Carrara marble or polished slate, these colors pop with a vibrancy that signals the arrival of spring.
For a warmer aesthetic that complements rustic interiors, consider using a darker wood like walnut or acacia to ground the bright palette.
Design is not just about how a room looks, but how your guests move through it; a well-placed dessert board invites conversation and lingers like a sweet memory.
Zoning Your Dessert Landscape
To achieve a professional aesthetic, treat your board like a floor plan. You must establish distinct zones to guide the eye and the hand.
Start by anchoring the arrangement with your vessels. Bowls holding semi-liquids, such as strawberry glaze or Chantilly cream, should act as the structural pillars of the design.
Place these first, creating a triangle or asymmetrical scattering to establish balance before filling in the gaps with solid items.
Once the bowls are placed, arrange the bakery elements in flowing rivers rather than rigid piles. If you are using square cubes of pound cake or round biscuits, fan them out to create movement.
This technique mimics the organic flow found in nature, softening the hard edges of the board.
For additional inspiration on creative fruit presentation, you might explore techniques used in Easter Strawberries in Egg Carton: Chic Tablescape Ideas, which applies similar zoning principles to holiday decor.
The most important thing for me when I’m entertaining is that I’m relaxed. If the host is stressed, the guests are stressed. A ‘build-your-own’ board removes the pressure of plating individual dishes.
Ina Garten, Barefoot Contessa
Selecting the Right Foundation
The material of your board significantly impacts both the visual warmth and the practical longevity of the dessert. A stone board will keep dairy-based dips cold for longer periods, which is essential for outdoor spring gatherings.
Conversely, wood offers a tactile warmth that suits cozy indoor evenings but requires a parchment barrier for oily items.
| Material | Thermal Properties | Visual Texture | Best Application |
|---|---|---|---|
| White Marble | Retains cold; keeps cream firm | Sleek, bright, sophisticated | Outdoor garden parties |
| Acacia Wood | Neutral temperature | Rich grain, organic warmth | Rustic dining rooms |
| Slate | Slightly cool | Matte, dark contrast | Modern, industrial lofts |
| Ceramic Platter | Neutral temperature | Glossy, smooth finish | Formal indoor hosting |
Finishing Touches and Pairing
Texture is the final layer of your design. Incorporate a crunch element, such as crushed pistachios or shortbread crumbs, to contrast the softness of the fruit and cream.
Fresh mint leaves act as greenery, bridging the gap between culinary art and floral arrangement. This splash of green breaks up the red and white dominance, adding visual relief and a fresh aromatic quality to the station.
Finally, consider the beverage pairing to complete the sensory experience. A board this rich requires a drink that can cut through the sweetness.
A robust coffee setup is ideal here.
Specifically, the texture of a Whipped Coffee Recipe: Design Your Perfect Morning Ritual mirrors the creamy elements of the board while providing a bitter counterpoint that cleanses the palate between bites.
Entertaining Blueprint
- Chill Your Canvas: If using marble or slate, place the board in the refrigerator for an hour before assembly. This passive cooling keeps your whipped cream stiff and berries fresh, even during sun-drenched garden parties.
- Texture Contrast: Don’t just slice; vary your fruit preparation. Keep some strawberries whole with stems for height and dipping, while macerating others to create a glossy, liquid element for the bowls.
- The Parchment Trick: If opting for a wooden board, slip a small, cut-to-size piece of parchment paper under buttery biscuits or oily nuts. This invisible barrier prevents dark grease stains from ruining the natural grain aesthetic.
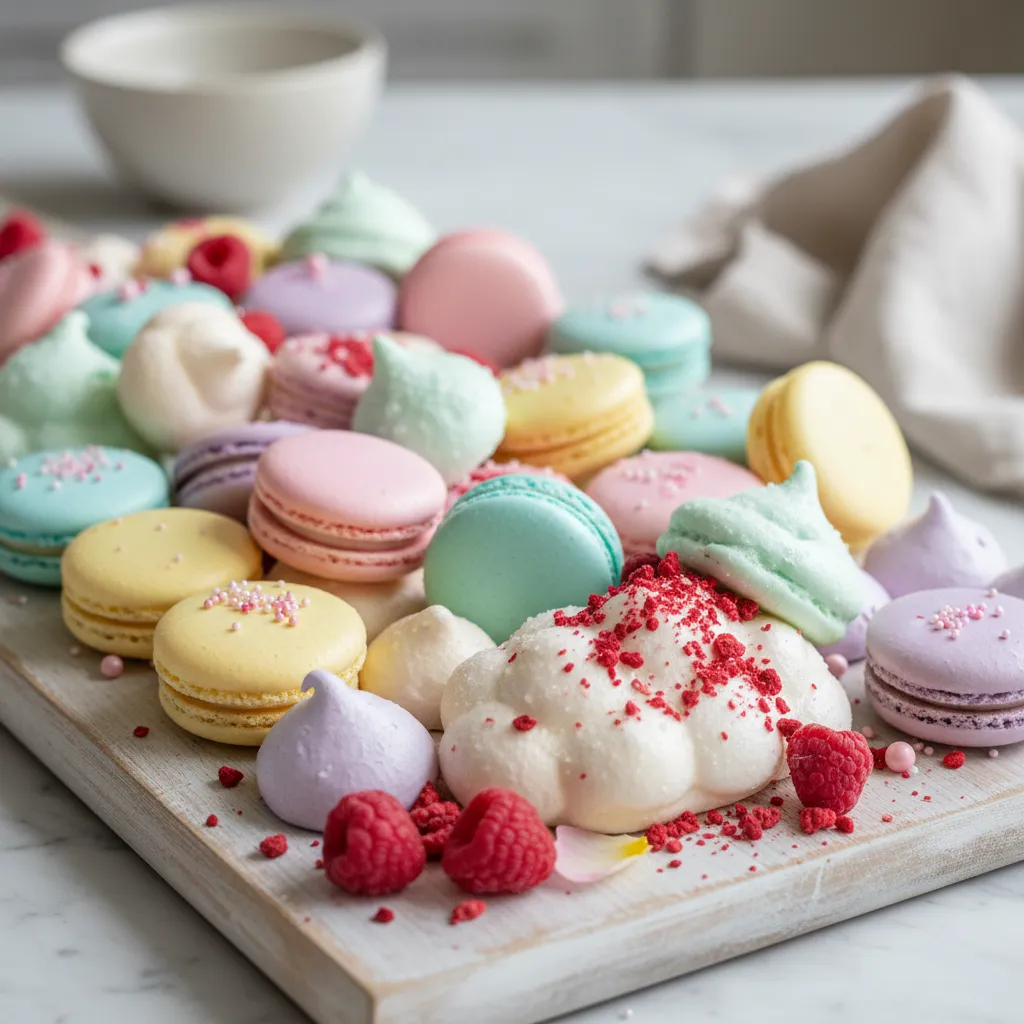
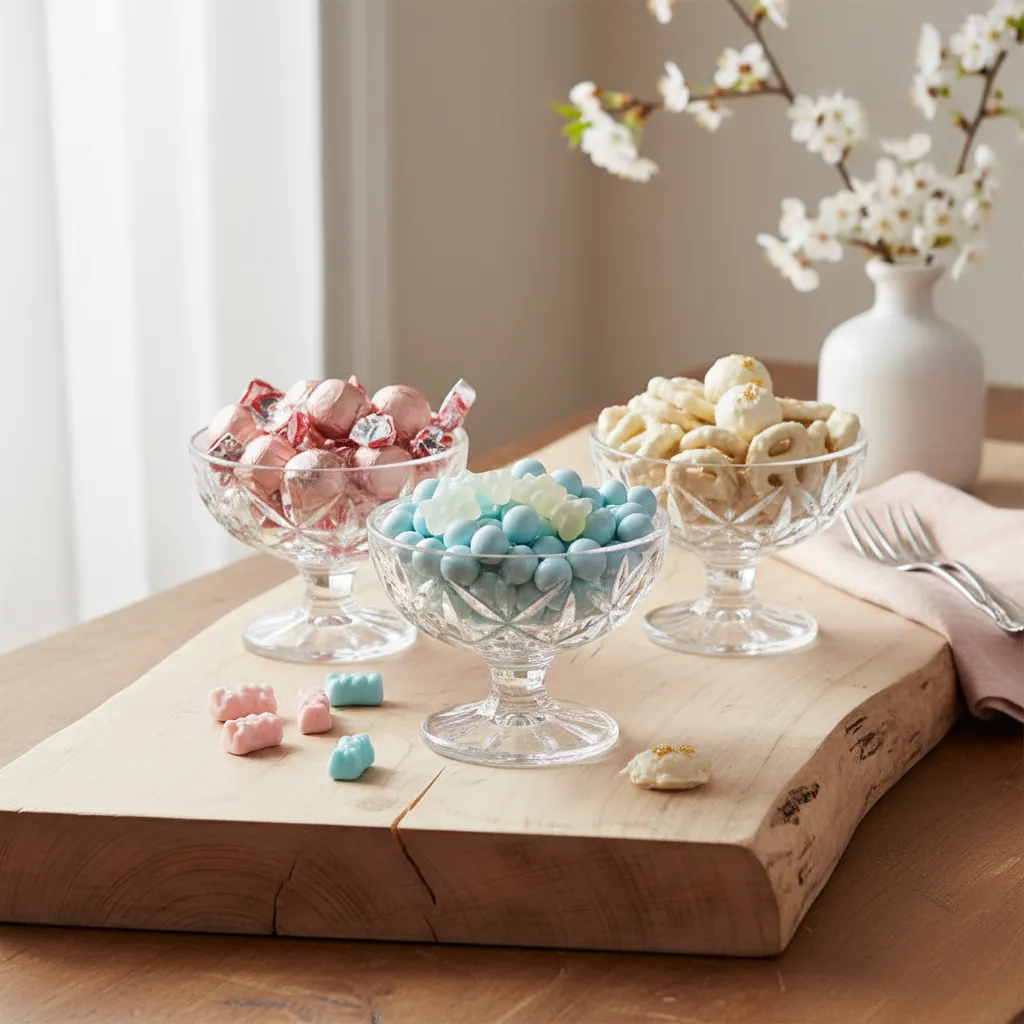
Pastel Macaron and Meringue Cloud Platter
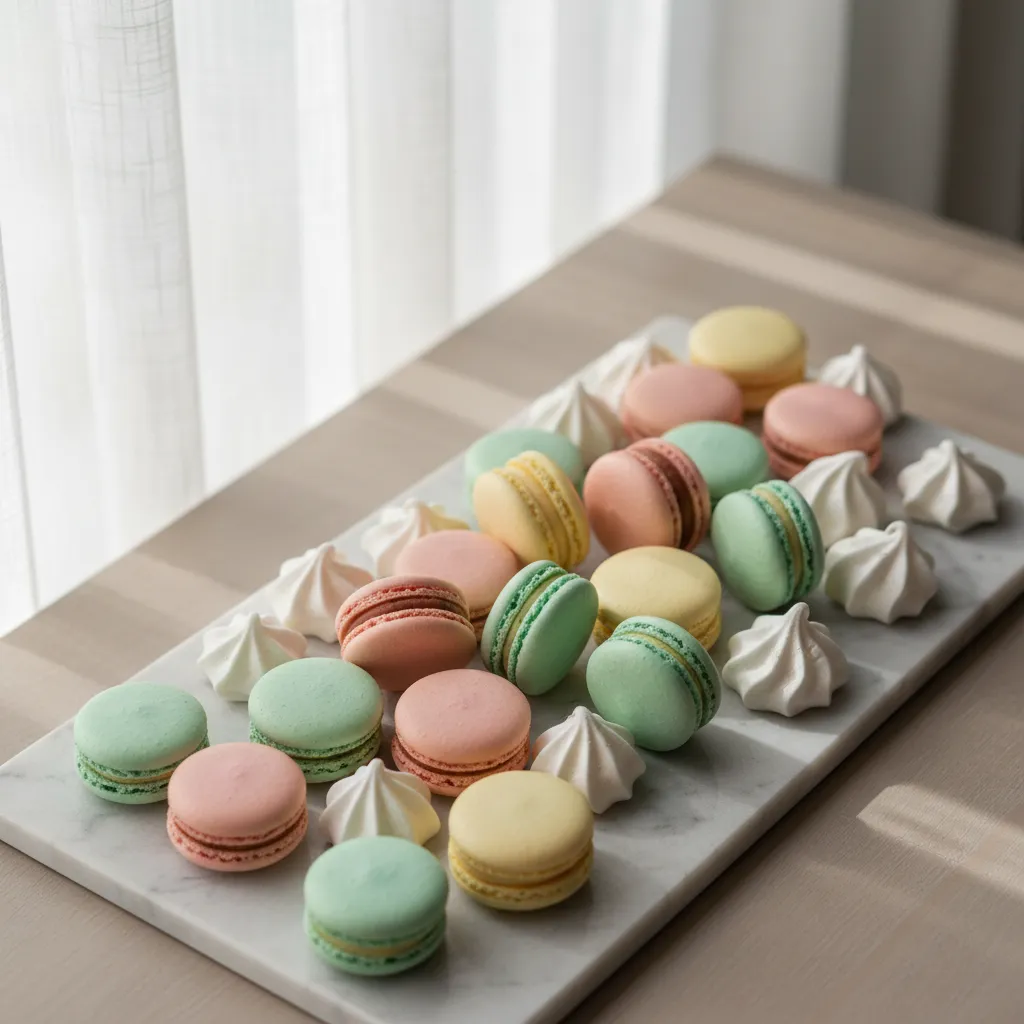
Nothing captures the essence of spring quite like a palette of soft pastels. This board focuses on the airy textures of French macarons and crisp meringues.
The visual appeal lies in the gradient of colors, moving from soft blush to pale mint. It mimics the blooming garden outside your window.
Functionally, this arrangement works best on a cool surface. A polished marble slab keeps delicate buttercream fillings firm during service.
Dessert boards are edible art; let the colors flow like a watercolor painting across the table.
To achieve a cloud-like aesthetic, avoid rigid rows. Cluster the treats in organic groupings to simulate a natural, flowing landscape.
If you are coordinating a larger event, you can easily pair this setup with sophisticated hosting recipes for a complete menu.
Texture and Height Dynamics
A successful dessert board relies on varying heights to engage the eye. Flat arrangements can feel one-dimensional and uninspired.
Use small porcelain risers or vintage glass bowls to elevate specific clusters. This adds architectural interest and maximizes table space.
Incorporating items like elegant sweet treats alongside the macarons adds necessary variety for your guests.
Key Styling Elements for Spring Boards:
- The Anchor: Start with a substantial focal point, such as a bowl of vanilla bean cream or curd.
- The Bridge: Use smaller items like yogurt-covered pretzels to fill gaps between larger cookies.
- The Garnish: Sprinkle edible violets or freeze-dried strawberries for a pop of tartness.
- The Flow: Arrange colors in a specific gradient, such as pink to peach to yellow.
Texture plays a crucial role in user experience. The crunch of a meringue must balance the chewiness of the macaron.
I approach food styling exactly how I approach design; it is about composition, texture, and distinct layers.
Athena Calderone, EyeSwoon
Ensure you include serving tongs with delicate grips. Macaron shells are fragile and can crush easily under standard utensil pressure.
Finally, consider the lighting in your dining area. Warm ambient light will enhance the pastel hues, making the board look inviting and soft.
The Art of Assembly
- Chill your marble slab or serving platter in the refrigerator for 20 minutes before plating; this keeps temperature-sensitive buttercream fillings firm and ensures meringues remain crisp.
- Avoid a flat, one-dimensional look by using the ‘bridge’ technique: fill empty negative spaces between larger cookies with smaller textural elements like yogurt-covered pretzels or white chocolate shards.
- Introduce architectural height without bulk by using overturned vintage glassware or petite porcelain risers to display specific color clusters, creating a dynamic, flowing landscape.
Zesty Lemon Dip and Fresh Berry Spread
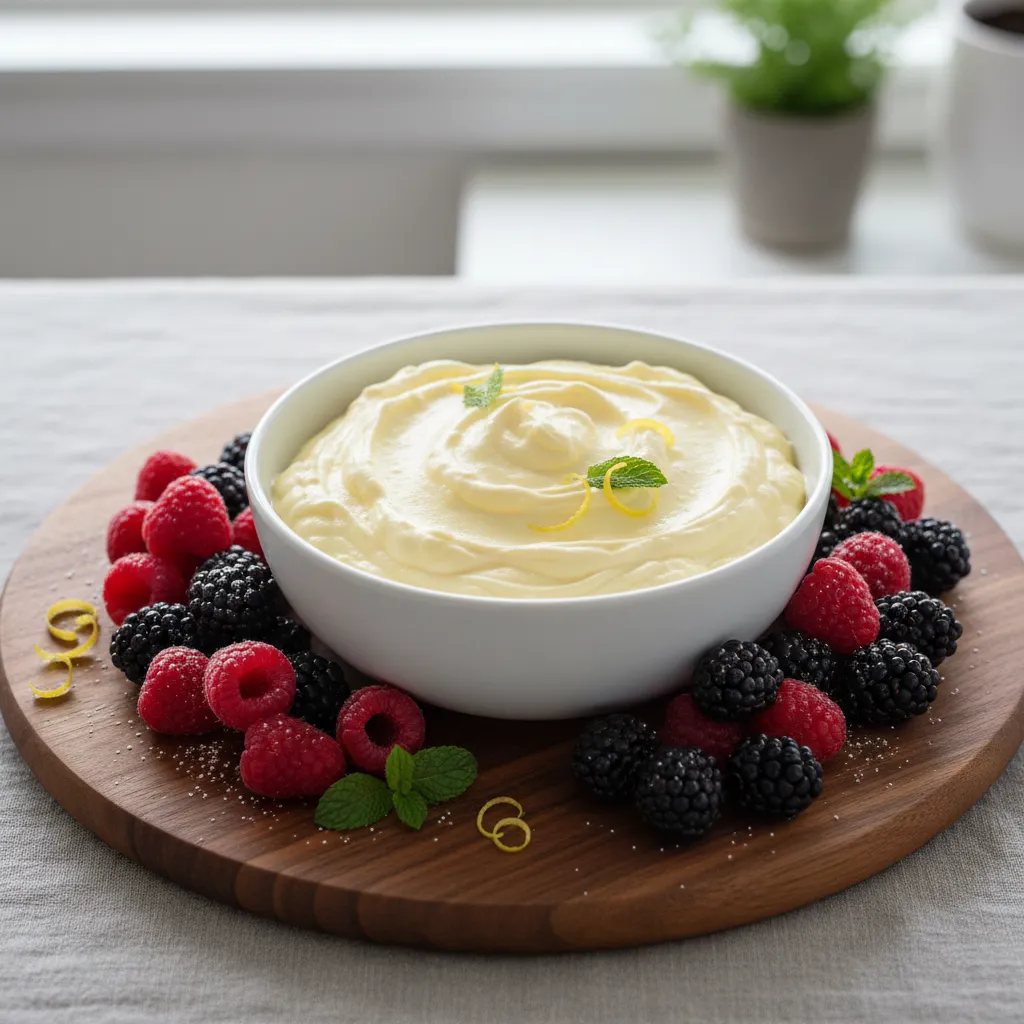
A vibrant lemon dip serves as the visual and flavor anchor for any spring dessert board. It offers a bright, acidic counterpoint to sweet pastries.
The creamy texture creates a stunning focal point when placed in the center of your arrangement. It balances the sugar of cookies with necessary acidity.
Citrus is the sunshine of the culinary world; it wakes up the palate and brightens the table.
Achieving the Perfect Consistency
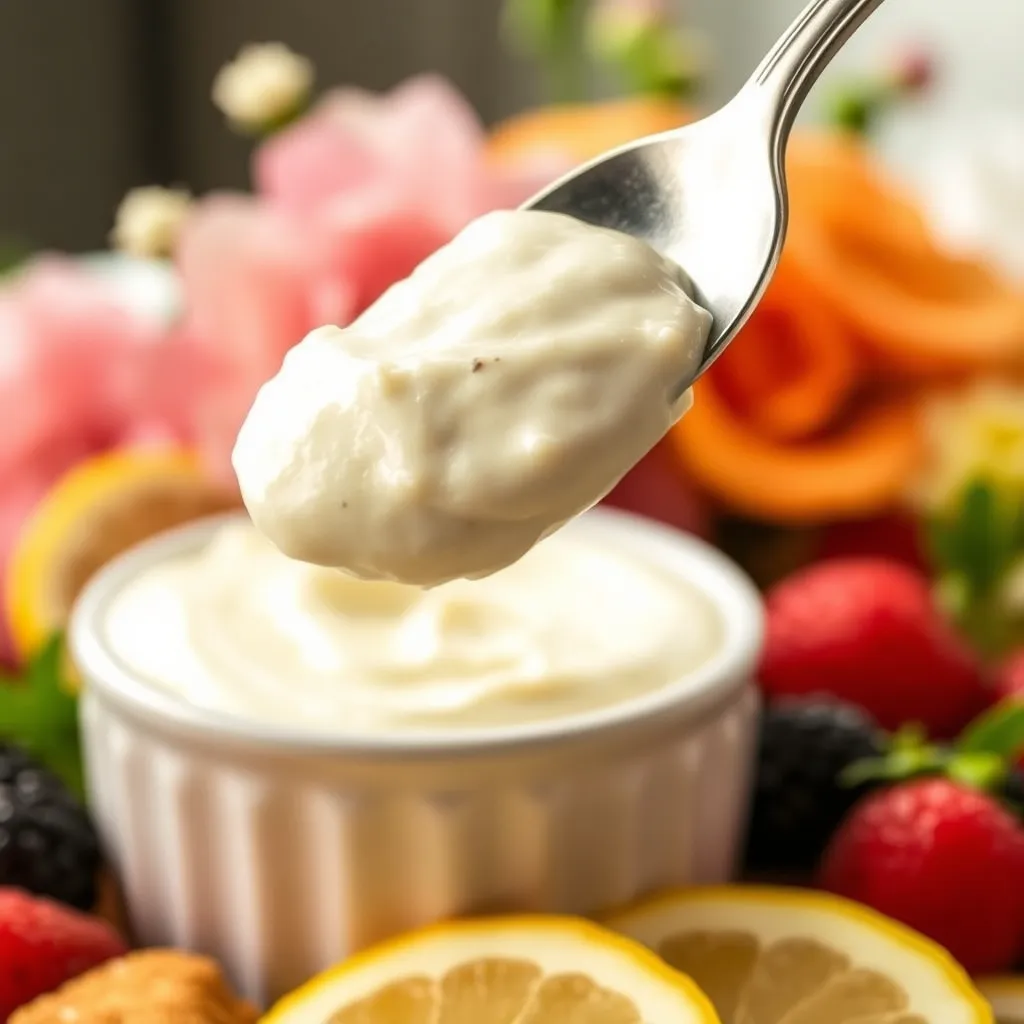
Texture is paramount when designing a functional edible display. The dip must be thick enough to cling to fruit without dripping onto the table.
We recommend a base of mascarpone or heavy cream cheese. These ingredients provide a sturdy structure that holds up well at room temperature.
If you enjoy lemon blueberry flavor profiles, consider swirling a blueberry reduction into the dip. This adds visual depth and a bespoke touch.
The finish should be glossy but firm. This prevents the dip from weeping into adjacent dry items like crackers or meringues.
Selecting and Styling Fresh Berries
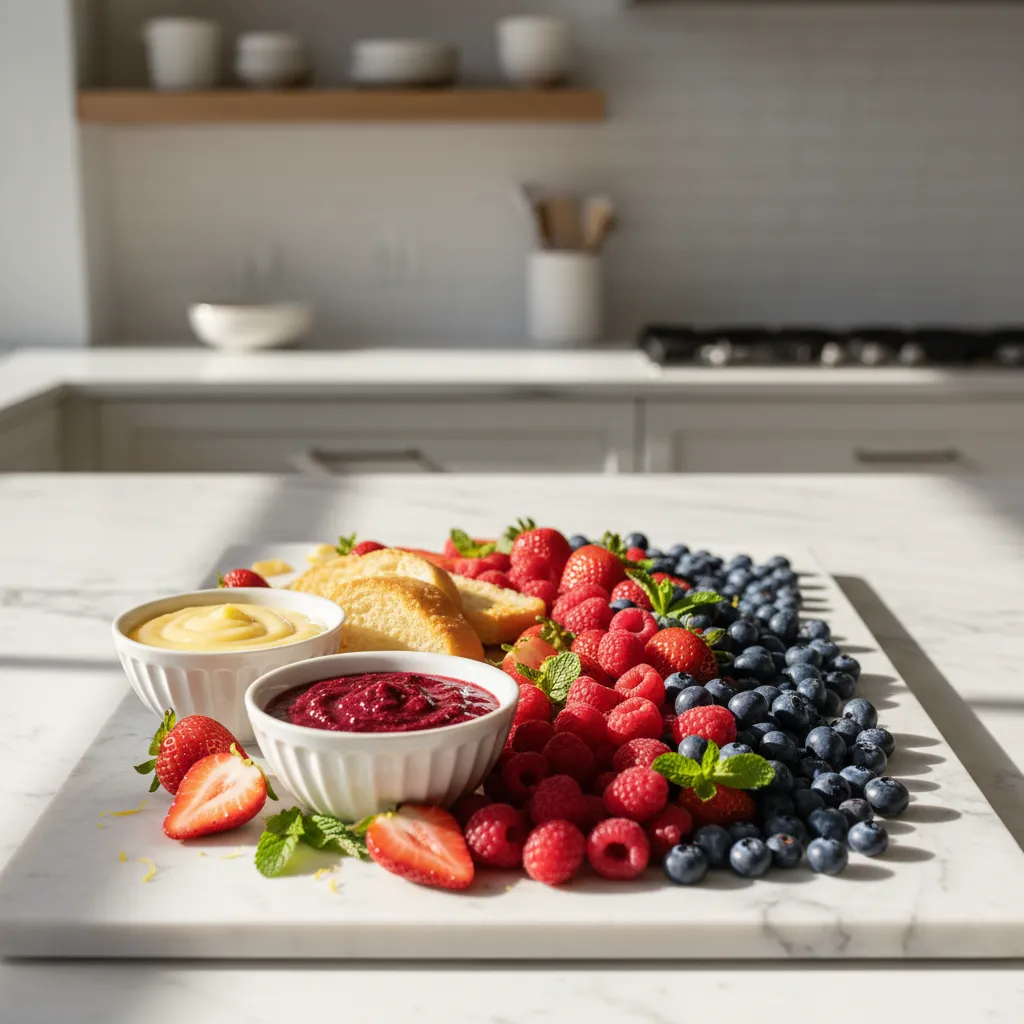
Fresh berries introduce organic shapes and vibrant colors to the rigid lines of a serving platter. They soften the overall aesthetic of the spread.
Choose fruit that is firm and free of blemishes. Soft fruit can release juice that stains raw wood boards or soggy linens.
For a unique look, try a creative strawberry presentation by leaving the stems on. The green tops add a necessary pop of contrast.
To get the best flavor from your berries, let them come to room temperature before serving. Cold suppresses their natural sweetness.
Ina Garten, Barefoot Contessa Tips
Proper cleaning is essential for guest safety and board longevity. Wash and thoroughly dry all fruit at least one hour before assembly.
Any residual moisture will compromise the crunch of surrounding biscuits. Pat berries dry with a paper towel to ensure a moisture-free zone.
Fruit Durability Guide
Not all fruits behave the same way when left out for grazing. Use this guide to select the most durable options for your gathering.
| Berry Type | Texture Profile | Board Longevity | Best Pairing |
|---|---|---|---|
| Raspberries | Soft, hollow | 2 hours | Dark Chocolate |
| Blueberries | Firm, smooth | 4+ hours | Lemon Curd |
| Strawberries | Juicy, fibrous | 3 hours | Shortbread |
| Blackberries | Plump, tart | 3 hours | Brie Cheese |
Arrange the darker berries near the lighter lemon dip for maximum visual impact. This high contrast draws the eye immediately to the dipping station.
Styling Secrets
- To ensure your dip maintains its structure at room temperature, always use full-fat mascarpone or cream cheese; lower-fat versions have higher water content and are prone to weeping.
- Prevent soggy crackers by washing berries well in advance and laying them on a paper towel-lined baking sheet to dry completely before assembly.
- Unlock maximum flavor by pulling your berries from the fridge 30 minutes prior to serving, as cold temperatures tend to mute their natural sweetness.
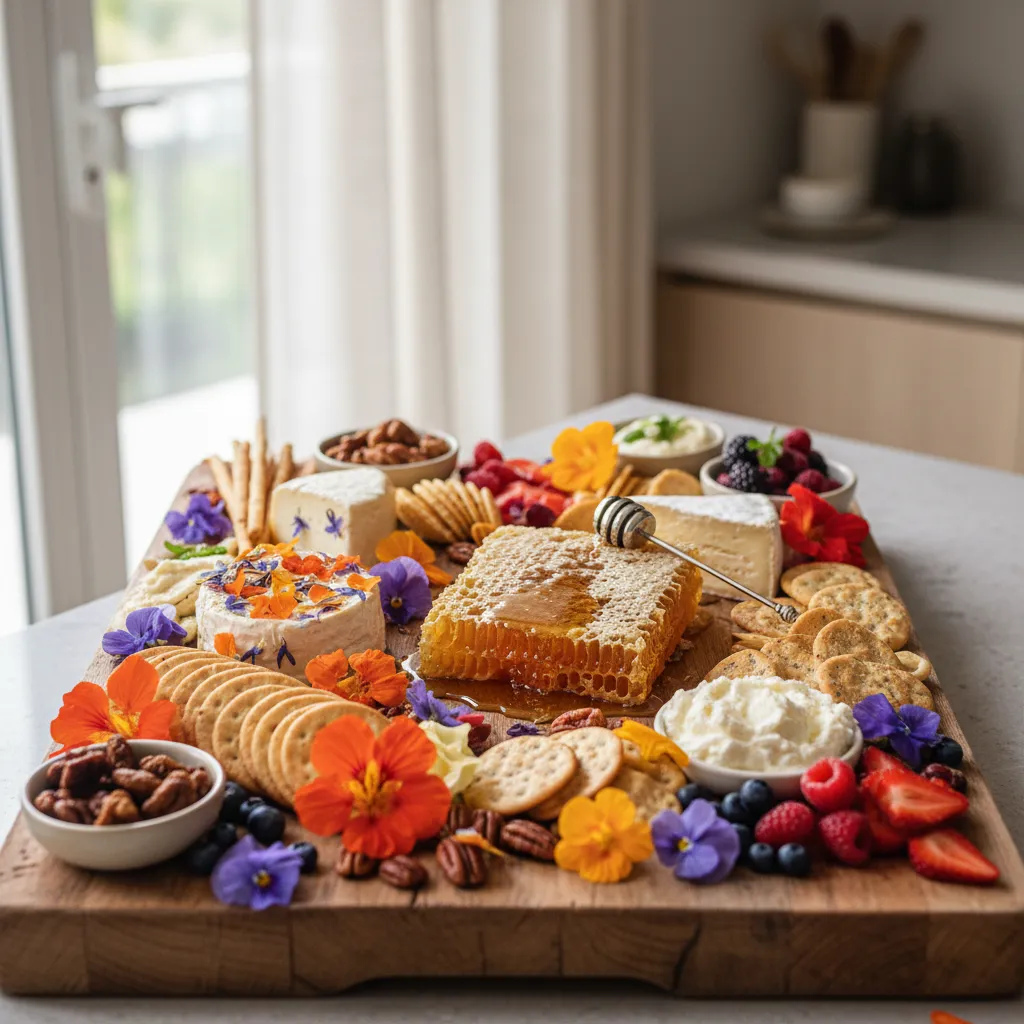
Edible Flower and Honeycomb Grazing Tray
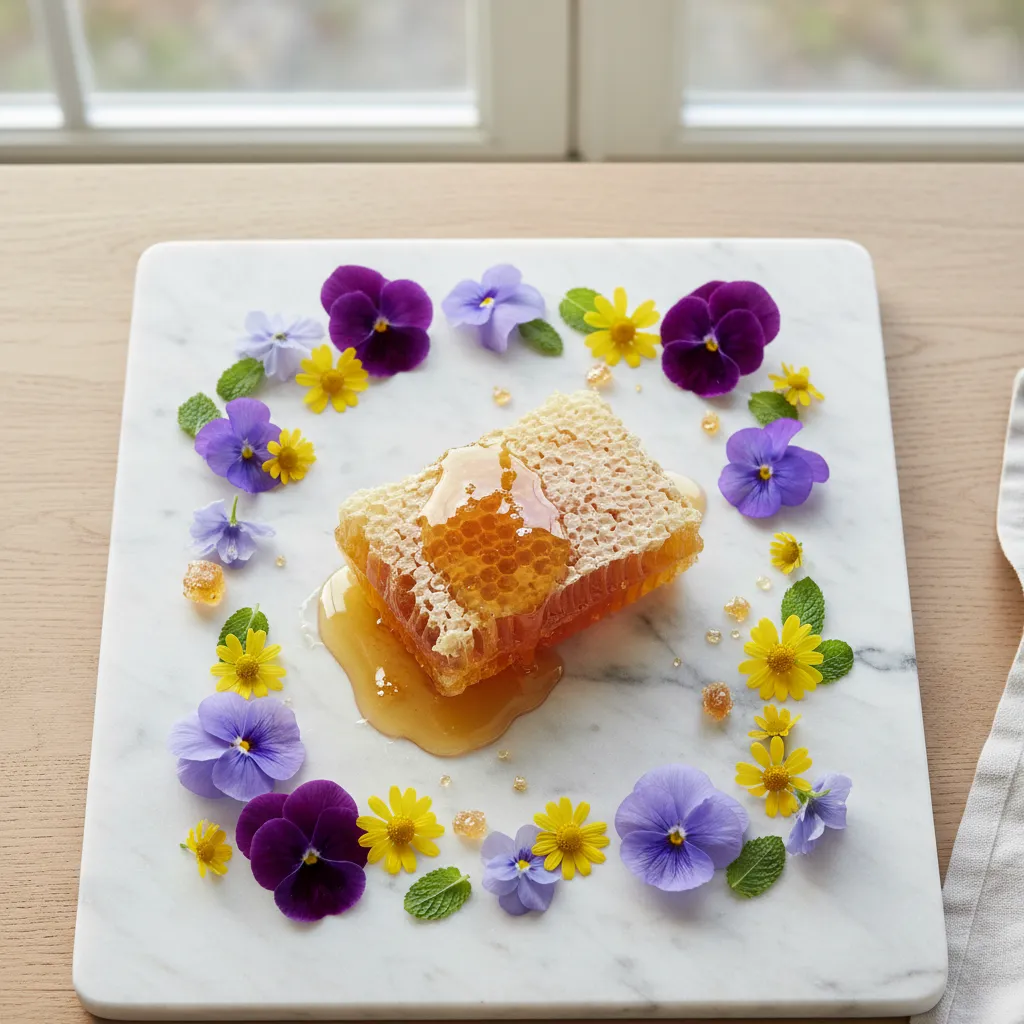
Incorporating botanical elements transforms a standard dessert spread into a living art piece. The vibrancy of fresh petals creates a focal point.
This approach relies on the interplay between organic imperfections and structured placement. It mimics the natural asymmetry found in a garden.
Raw honeycomb serves as the architectural anchor of the tray. Its geometric cells provide a complex texture that contrasts with smooth ceramics.
When backlit by warm ambient lighting, the honey glows with a golden hue. This adds immediate warmth and sophistication to your spatial dynamics.
Nature provides the most vibrant palette; we simply arrange the masterpiece on the table.
Selecting Safe and Stylish Botanicals
Functionality is paramount when selecting flowers for consumption. You must ensure every element on the board is safe and chemically untreated.
The flavor profile of the bloom should complement the cheeses and sweets. Spicy notes can cut through rich creams, while floral notes enhance sweetness.
To create a cohesive look, limit your color palette to three distinct hues. This prevents visual clutter and maintains a modern aesthetic.
| Botanical Variety | Flavor Profile | Best Structural Pairing |
|---|---|---|
| Pansies | Mild, slightly grassy | Soft Brie or Camembert |
| Nasturtiums | Peppery, watercress-like | Aged Cheddar or Gouda |
| Lavender | Sweet, floral, potent | Goat Cheese or Honey |
| Chamomile | Subtle apple, earth | Ricotta or Mascarpone |
For those planning a larger gathering, consider including elegant sweet treats alongside the raw elements. This adds variety to the texture.
Mastering the Flow and Drip
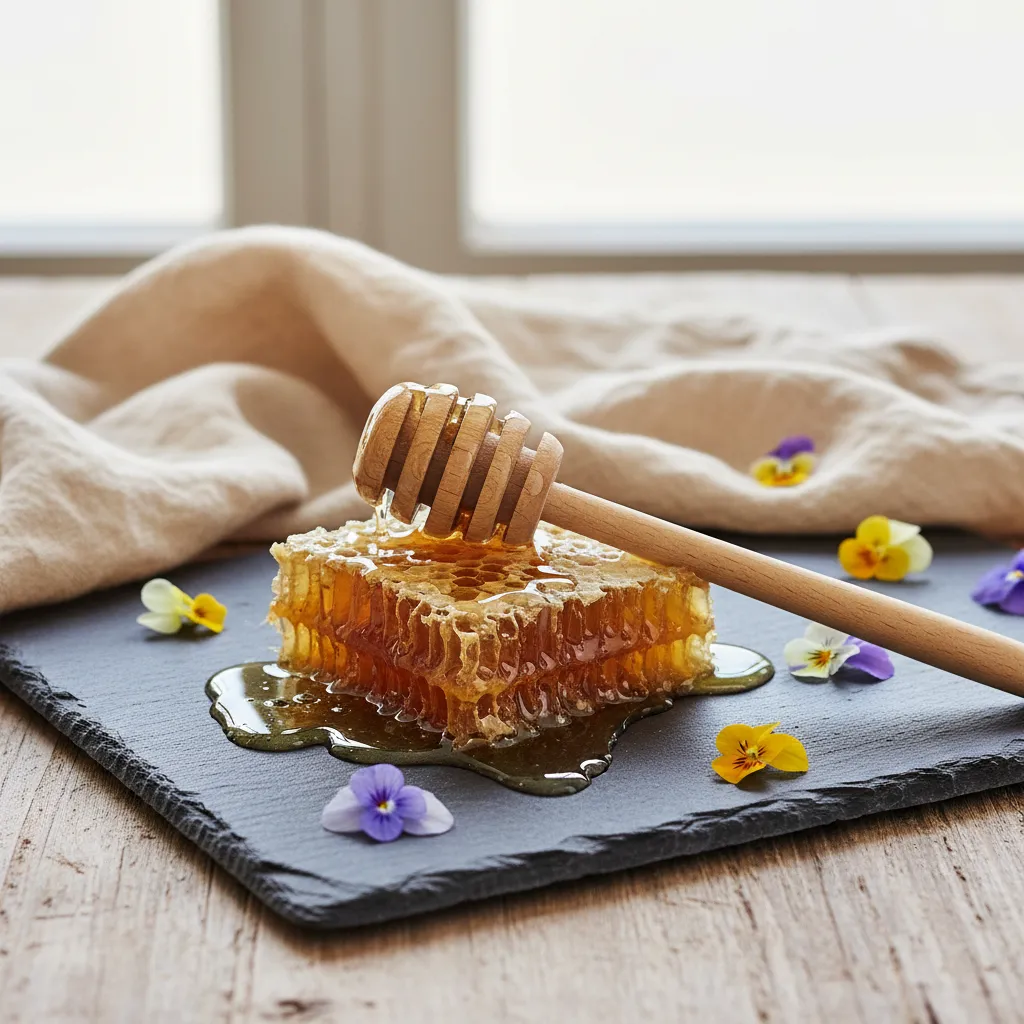
Place the honeycomb slightly off-center to create a natural visual hierarchy. Allow the honey to pool naturally around the base for an organic look.
Surround sticky elements with hard cheeses or crackers to contain the spread. This creates functional zoning that keeps the board tidy during service.
Pairing these rich textures with citrus-infused beverages cuts through the sweetness. The acidity balances the palate.
I want the food to look like it has abundance. It should look like it’s been thrown together with a lot of generosity.
Yotam Ottolenghi, The Guardian
Use small porcelain risers to add height to specific floral clusters. This verticality improves the ergonomics of the display for your guests.
Ensure the flowers remain fresh by keeping them cool until the moment of service. Wilting petals can ruin the crisp aesthetic of the arrangement.
The Botanical Stylist’s Secret
- Prevent honey from making crackers soggy by placing the honeycomb on a small slate coaster or a bed of firm dried apricots to create a natural barrier.
- Keep delicate petals vibrant and crisp by misting them lightly with cold filtered water just minutes before your guests arrive.
- For a professional finish, use culinary tweezers to nestle smaller blooms like lavender buds directly into the honeycomb’s geometric cells to enhance the 3D effect.
Spring Candy and Chocolate Pretzel Mosaic
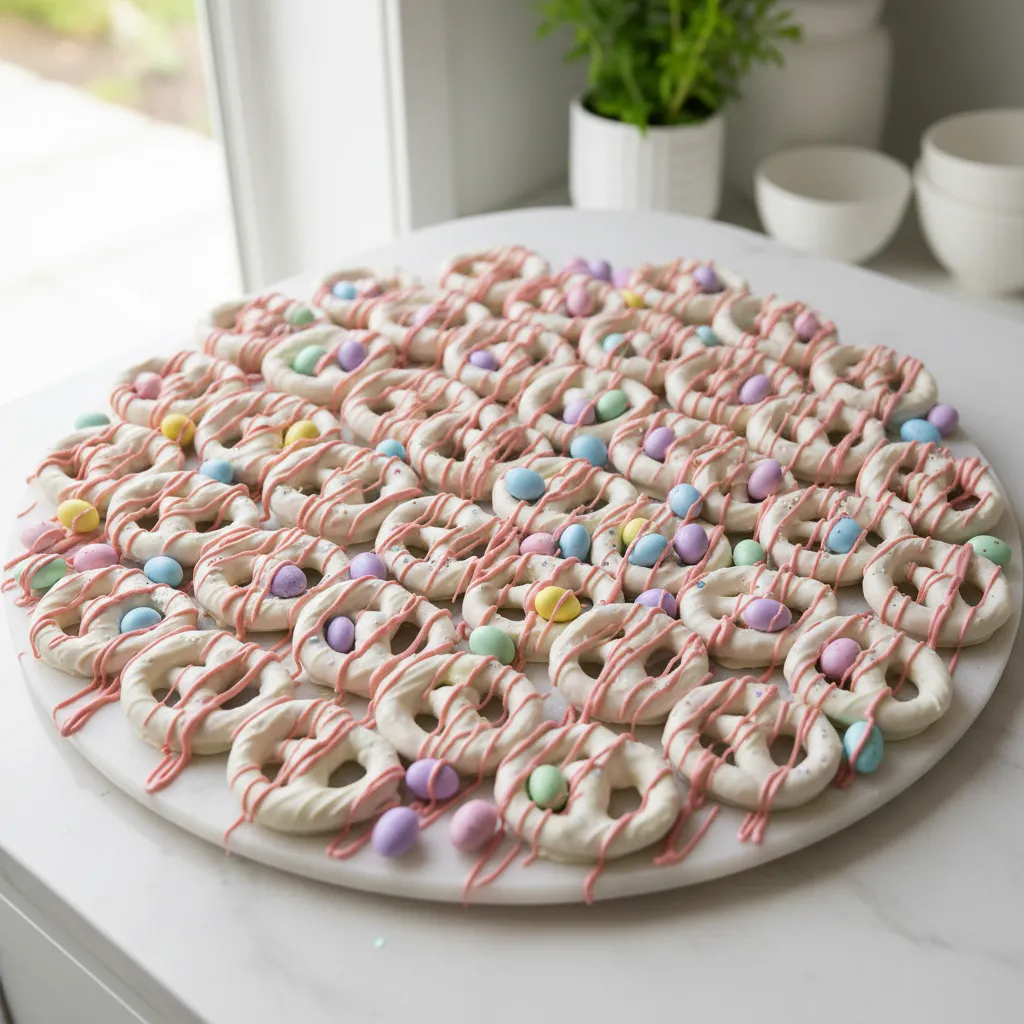
Creating a dessert mosaic requires viewing your serving board as a blank canvas. The goal is to eliminate negative space using a variety of confectionery shapes.
This approach mimics tile work found in architectural design. You achieve visual interest by interlocking rigid pretzels with organic candy shapes.
Texture plays a critical role in the success of this arrangement. The glossy finish of chocolate must balance against the matte surface of sugar shells.
Design is not just what it looks like and feels like. Design is how it works, even on a dessert plate.
Mosaic Mastery
- Fill every gap by using tiny sprinkles or micro-candies as ‘grout’ between your larger chocolate pretzel ’tiles’ to create a seamless mosaic effect.
- Alternate matte-finish gummies with high-gloss chocolate coatings to create a dynamic visual rhythm that catches the light differently across the board.
- Define your borders first with rigid pretzels to create a structural frame, then work inward with softer shapes to maintain a professional, clean edge.
Curating the Confectionery Palette
Select a color palette that reflects the soft transition of the season. Blush pinks, robin egg blues, and creamy whites create a sophisticated foundation.
Avoid using too many primary colors, which can make the design look chaotic. Stick to three main hues to maintain a cohesive and elegant aesthetic.
Incorporating different scales of sweets is vital for spatial dynamics. Large items anchor the board, while smaller treats act as grout between the tiles.
For those planning a larger gathering, integrating concepts from a Sophisticated Mother Day Recipes Desserts: A Hosting Guide can elevate the overall presentation.
The way you present food is just as important as how it tastes. People eat with their eyes first.
Giada De Laurentiis, Food Network Personality
The Stylist’s Secret
- Stick to tonal variations of your primary hues to add depth and dimension without overwhelming the aesthetic.
- Position your ‘anchor’ desserts first, then use tiny treats like chocolate pearls or sugar-coated almonds as ‘grout’ to fill every gap.
- Incorporate a single metallic accent, such as edible gold leaf, to unify diverse colors and add a touch of high-end elegance.
Structural Assembly of the Mosaic
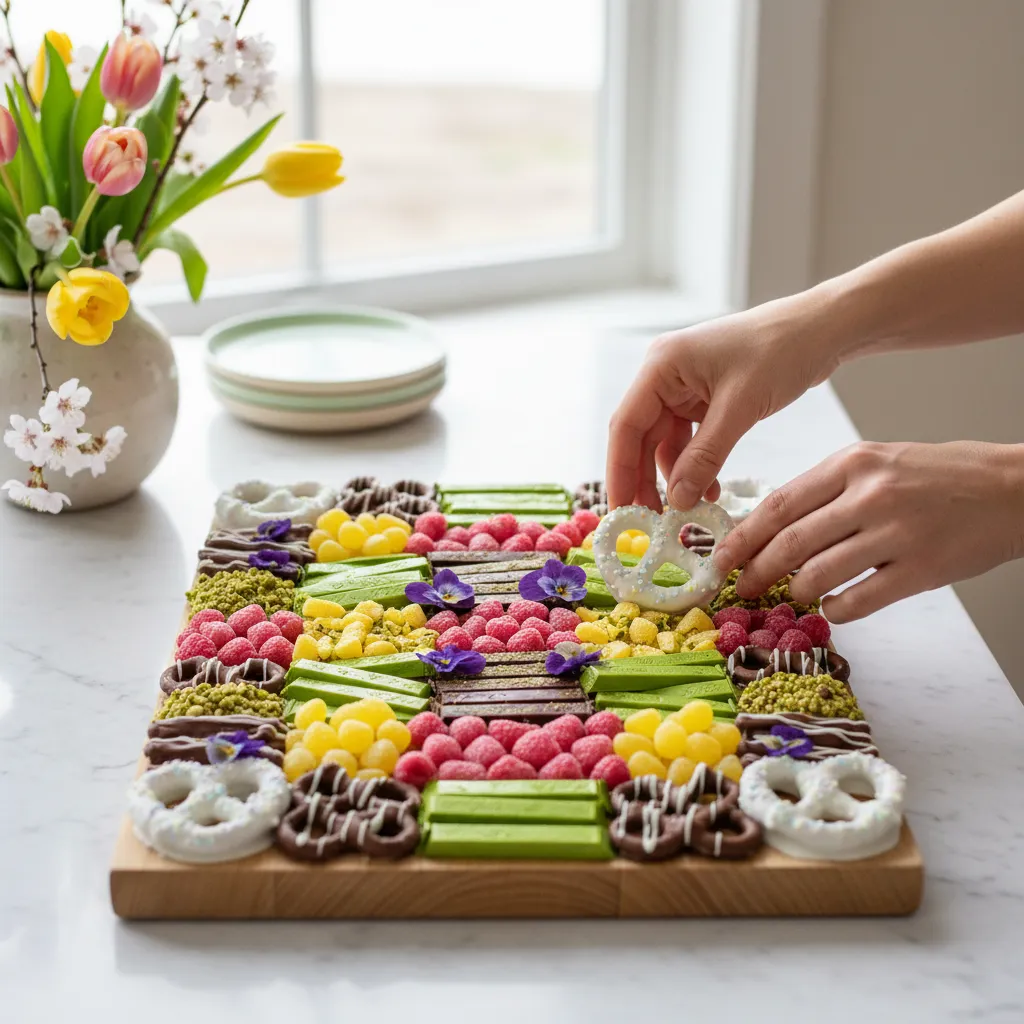
Begin by placing your largest focal points, such as chocolate-covered pretzel rods, in a zigzag pattern. This establishes the flow of the board.
Fill the resulting triangular gaps with medium-sized elements. Chocolate-covered almonds or marshmallows work well to soften the rigid lines of the pretzels.
Finally, scatter the smallest candies into the remaining crevices. This density creates an abundant look that feels luxurious and inviting to guests.
If you prefer lighter options to balance the sugar, consider adding easy treats like those found in 15 Easter Desserts Ideas Easy No Bake for Spring Hosting.
Texture and Placement Guide
Use this guide to balance the physical weight and visual texture of your mosaic components.
| Component | Texture Profile | Structural Role | Placement Strategy |
|---|---|---|---|
| White Chocolate Pretzels | Smooth & Rigid | The Anchor | Place first to define borders and zones. |
| Pastel Jelly Beans | Glossy & Smooth | The Grout | Scatter last to fill tiny voids and add shine. |
| Yogurt Covered Raisins | Matte & Irregular | The Softener | Cluster in groups of three to break straight lines. |
| Candy Coated Almonds | Hard & Matte | The Bridge | Use to connect different color zones seamlessly. |
This careful layering ensures structural integrity when the board is moved. A tight pack prevents items from sliding during transport from kitchen to table.
The result is a functional piece of edible art. It invites guests to graze while serving as a stunning focal point for your spring entertaining.
Mosaic Masterclass
- Choose a board or tray with a raised rim to keep round ‘grout’ items, like jelly beans or chocolate pearls, from rolling off during transport.
- Perform a gentle ’tilt test’ before serving; if heavy items slide, wedge more small candies into the gaps to friction-lock the structure in place.
- Step back periodically to check your color balance; ensure specific hues are distributed across the board rather than clustered in a single corner for a cohesive look.
Curating Your Edible Architecture
Designing a spring dessert board is akin to planning a room; it requires balance, flow, and a strong focal point to succeed aesthetically.
Whether you choose cool marble for function or warm acacia for texture, your materials set the stage for the culinary experience.
Remember to zone your elements intentionally. Guide your guests through the display just as an architect guides movement through a well-designed home.
Ultimately, these deconstructed arrangements transform simple ingredients into interactive centerpieces, celebrating the vibrant renewal of spring.
Design Dilemmas Solved
White marble or slate are superior choices. Their thermal density retains cold temperatures, keeping creams and cheeses firm during warm garden parties.
Treat ingredients like furniture. Anchor the board with bowls first to create structure, then arrange dry items in flowing “rivers” to soften the layout.
You can prep the structural layout early, but place fresh berries and whipped cream just before serving to maintain texture and visual crispness.
Estimate about 3 to 5 ounces of sweets per guest. Ensure your board’s surface area allows for negative space so the design breathes and remains accessible.