
Table of Contents
- Pressed Edible Flower Cake Designs for a Natural Aesthetic
- Pastel Watercolor Buttercream Techniques for Artsy Vibes
- Earl Grey and Lavender Infused Sponges for Sophisticated Palates
- Rustic Naked Cakes Topped with Fresh Seasonal Berries
- Strawberry Rhubarb Layer Cake with Chantilly Cream
- The Final Flourish: Curating Your Spring Centerpiece
- Design Dilemmas: Expert Solutions
Designing a seasonal cake requires the same level of precision as drafting a structural floor plan.
A successful birthday centerpiece begins with a solid foundation; the choice of sponge and crumb stability mirrors the integrity of high quality building materials.
By approaching the assembly process with a focus on scale and proportion, one can ensure that the final product is both stable and visually balanced.
The transition from structural preparation to surface treatment is where technical skill meets aesthetic vision.
Much like selecting the perfect hardwood floor or wall finish, watercolor frosting techniques offer a sophisticated layer of texture that enhances the overall environment of a celebration.
These fluid designs provide a professional touch that is suitable for high end corporate events and intimate home gatherings alike.
Incorporating floral elements serves as the final decorative flourish, bridging the gap between functional craft and fine art.
For homeowners and makers seeking a comprehensive guide, these designs offer practical ways to elevate a standard dessert into a bespoke creation.
Mastering these detailed techniques allows anyone to curate a memorable experience that reflects a refined sense of style and craftsmanship.
Pressed Edible Flower Cake Designs for a Natural Aesthetic
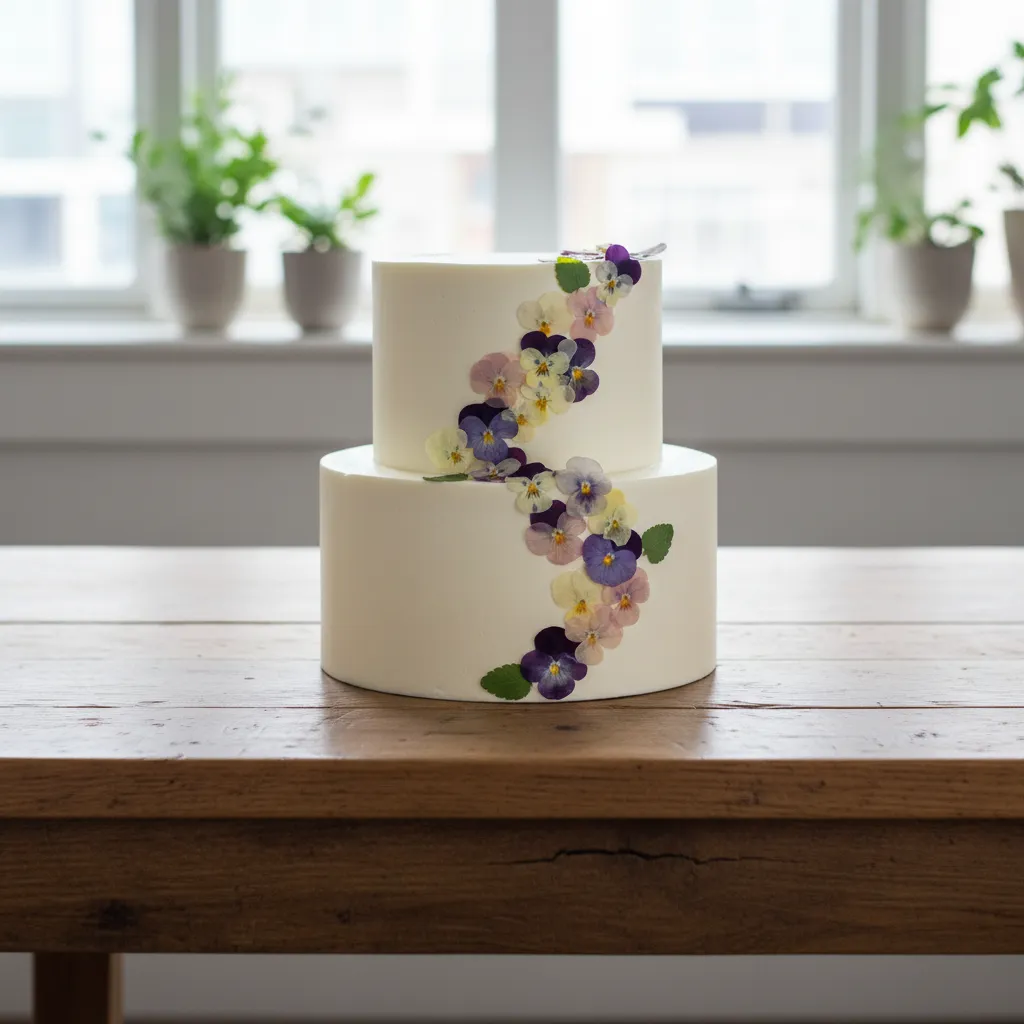
Pressed flower designs bridge the gap between culinary art and organic gardening. This style utilizes dehydrated blooms to create a 2D effect.
The visual result is akin to botanical illustrations or vintage herbarium sheets. It transforms a standard birthday cake into a piece of edible art.
Texture plays a crucial role here. The papery crispness of dried petals contrasts beautifully against the smooth, rich finish of Swiss meringue buttercream.
Bringing the garden onto the plate creates an immediate sense of seasonal grounding and sophisticated whimsy.
Selecting the Right Botanicals
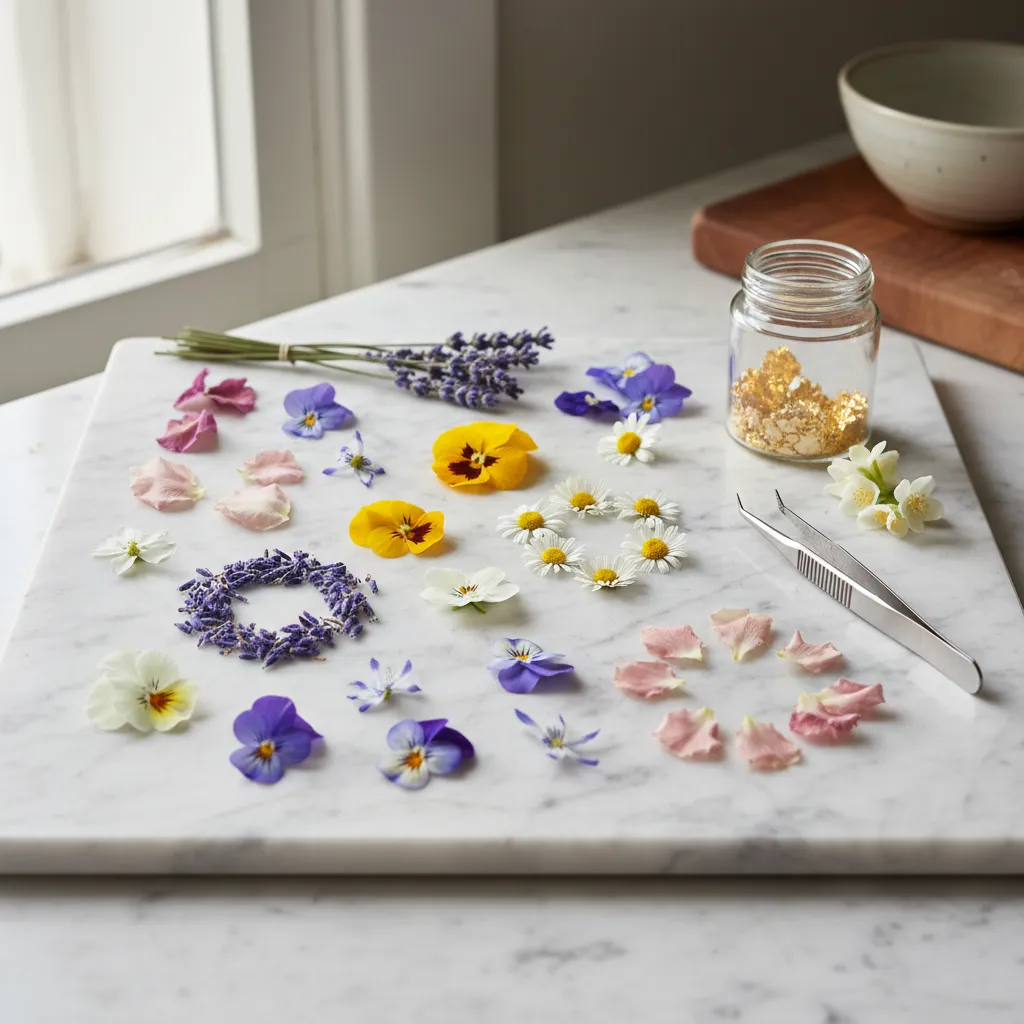
Safety and aesthetics must be balanced carefully. Only use flowers that are explicitly labeled as edible and grown without harmful pesticides.
Color palettes should reflect the surrounding decor. Soft pastels suggest a gentle spring morning, while deep purples evoke a moody, modern vibe.
Consider the flavor profile of the bloom as well. Some flowers are purely decorative, while others add distinct herbal notes to the dessert.
For a complete seasonal spread, pair these floral designs with Elegant Easter Sweet Treats to Make for a Gourmet Brunch.
| Flower Variety | Flavor Profile | Visual Impact |
|---|---|---|
| Pansy | Mild, slightly grassy | Bold, face-like patterns; high contrast. |
| Lavender | Floral, herbaceous | Architectural spikes; adds height and texture. |
| Chamomile | Sweet, apple-like | Delicate, daisy-like; ideal for minimalist looks. |
| Calendula | Slightly spicy, peppery | Vibrant orange tones; adds warmth to the palette. |
Application Techniques for Flow
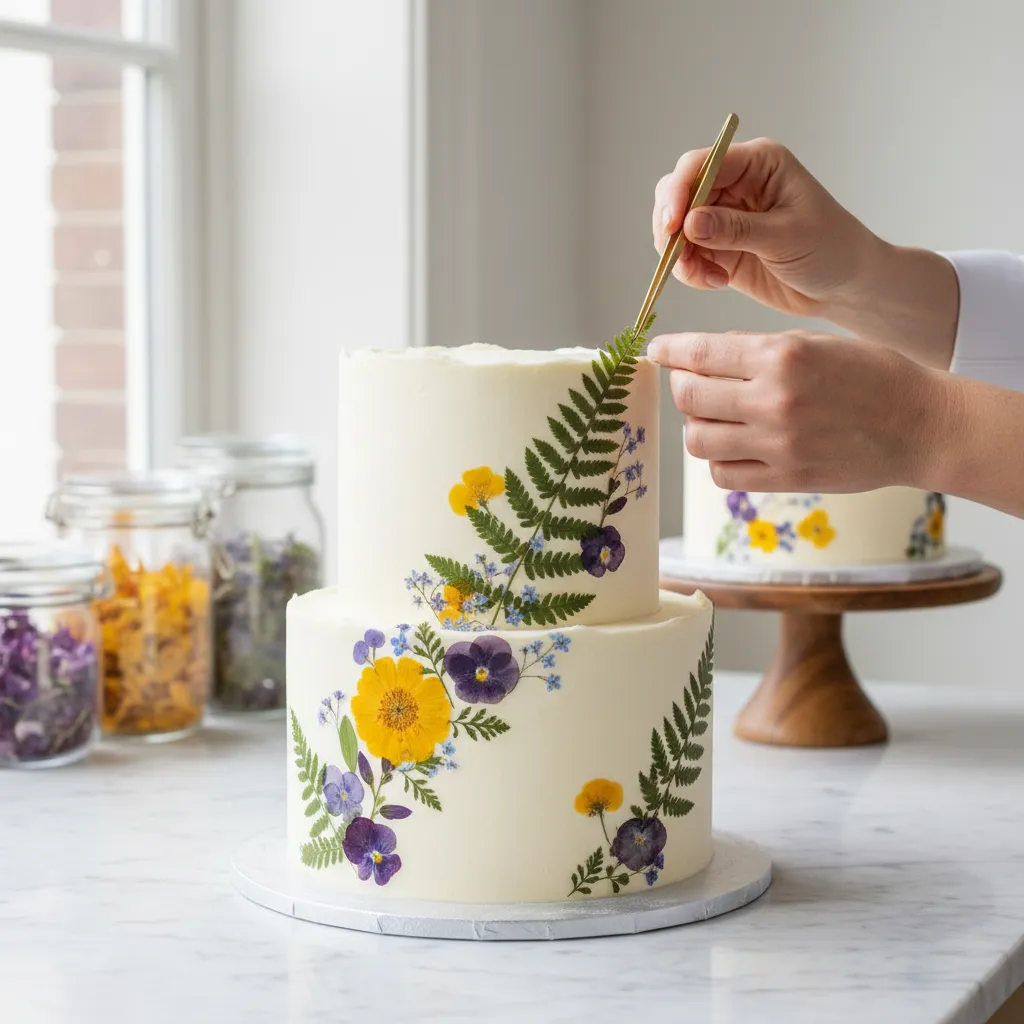
Precision is required when applying dried botanicals. Use sanitized culinary tweezers to place fragile petals without crushing them.
Design the layout before touching the cake. Sketching a rough “blueprint” helps ensure the final arrangement has a natural, organic flow.
Avoid symmetry for a more modern look. Asymmetrical clusters that drift up the side of the tier mimic the way wildflowers grow in nature.
When working with edible flowers, always remove the pistils and stamens before serving, as these parts can contain pollen that affects allergies and flavor.
Miche Bacher, Cooking with Flowers
Styling the Display Table
The cake stand should complement the botanical theme. A raw wood slice or a matte ceramic pedestal enhances the rustic elegance.
Lighting is essential for highlighting the textures. Position the display near a window to let natural light catch the details of the petals.
For a cohesive event, consider matching your decor to the cake. You can find inspiration in Sophisticated Wedding Party Favors Guests Will Keep.
Botanical Studio Secrets
- Use sanitized culinary tweezers for application; the heat from your fingers can melt buttercream and easily crush delicate dried petals.
- Map out your floral arrangement on a sheet of parchment paper cut to the size of your cake tier before placing any blooms to ensure a balanced composition.
- Create a natural ‘meadow’ effect by clustering larger flowers at the base of the cake and allowing smaller petals to drift asymmetrically up the sides.
Pastel Watercolor Buttercream Techniques for Artsy Vibes
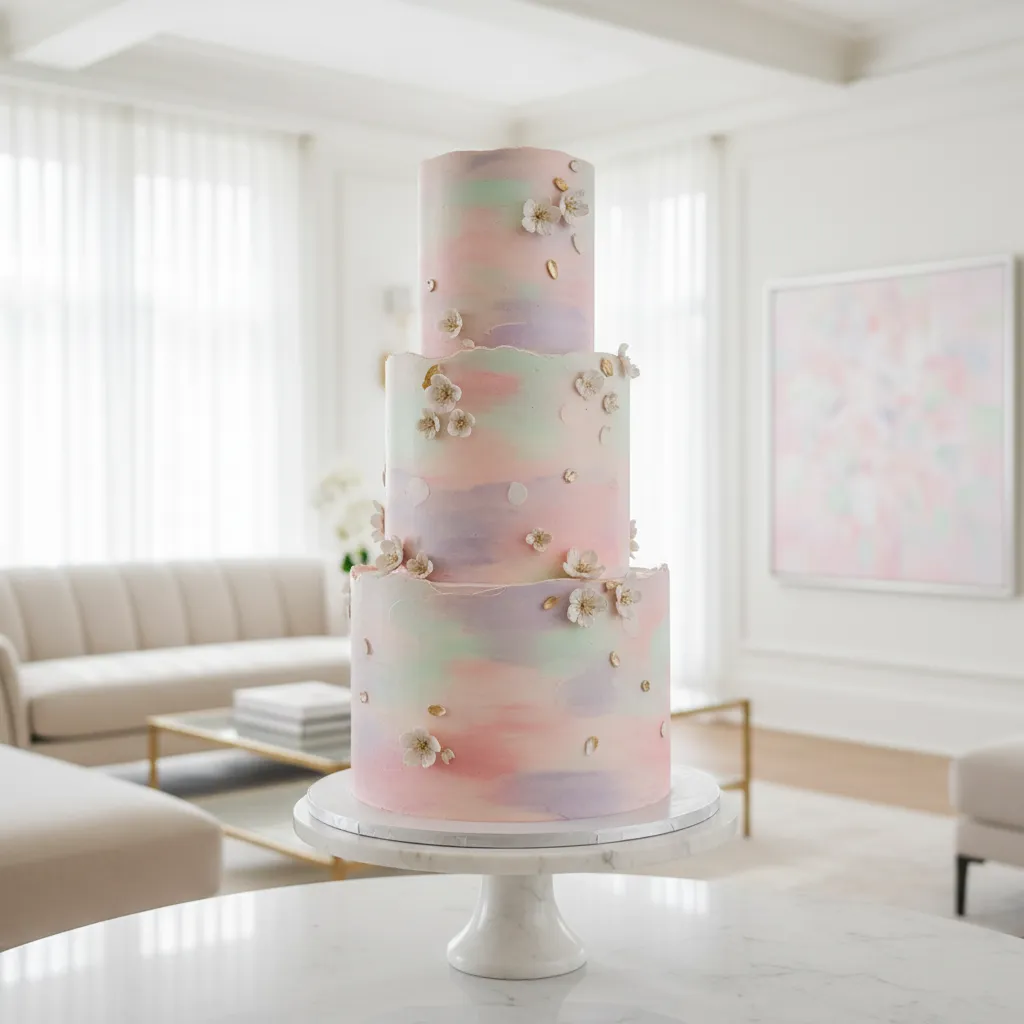
Achieving a painterly aesthetic on a birthday cake transforms a standard dessert into a focal point. The watercolor technique relies on soft gradients.
This design style mimics the fluid beauty of an impressionist painting. It works best with a smooth base like Swiss meringue buttercream.
Buttercream with a high fat content blends seamlessly without creating air bubbles. This ensures the final texture looks polished and deliberate.
The lighting in your dining space will interact with the cake’s finish. A satin finish on the frosting catches ambient light for a sophisticated glow.
For a cohesive dessert table, match these pastel tones with elegant Easter sweet treats.
The Spatula Scrape Method
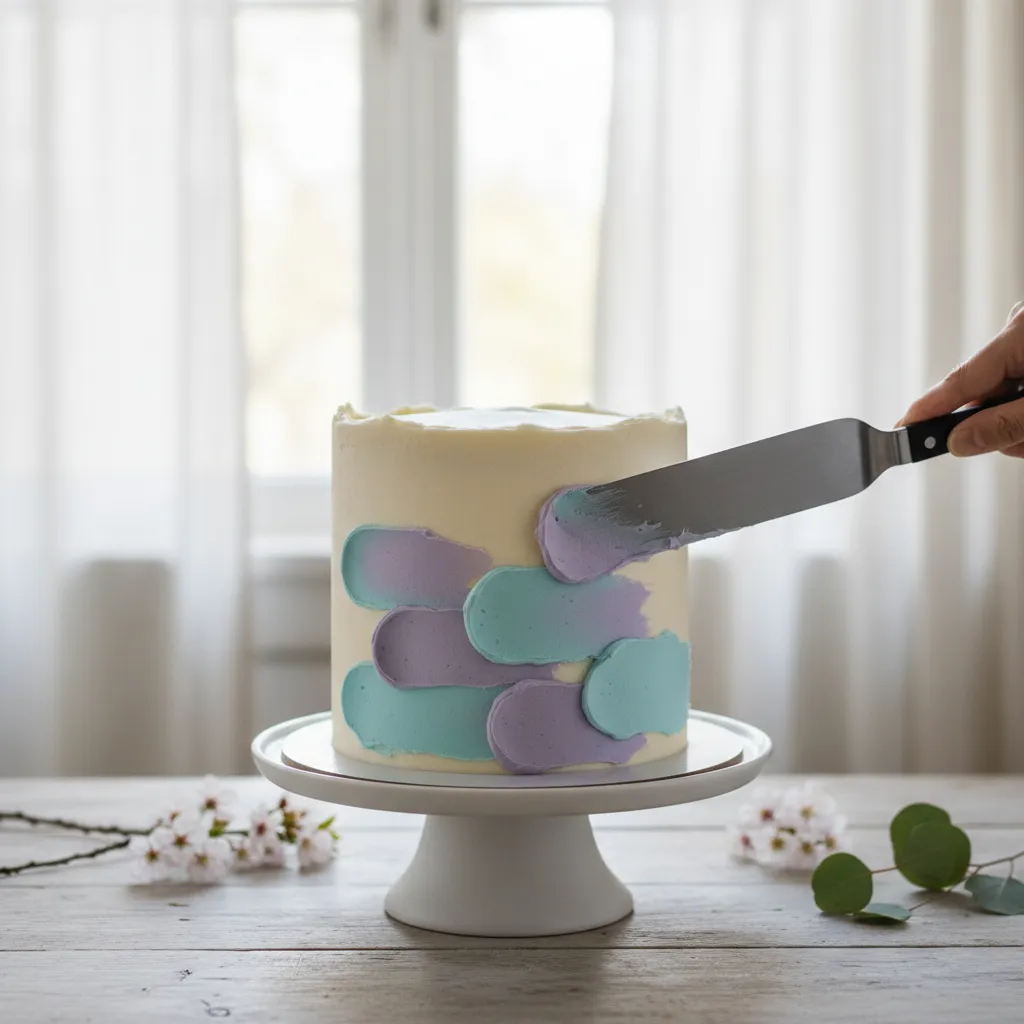
To start, chill your crumb-coated cake until it is firm to the touch. A cold canvas prevents the new colors from muddying the base layer.
Apply small dollops of tinted frosting randomly around the sides of the cake. Use gel food coloring to keep the consistency stable and vibrant.
Hold a metal bench scraper at a 45-degree angle against the cake side. Rotate the turntable smoothly to smear the dots into elongated streaks.
The goal is to create organic movement rather than perfect stripes. Imperfections in the blend add to the authentic artistic vibe.
Structural integrity is key when applying pressure. A dense base, like a sour cream coffee cake recipe, holds up well.
The beauty of the watercolor technique is that it’s impossible to mess up. The imperfections are what make it look like a painting.
Whitney DePaoli, Sugar & Sparrow
Curating a Spring Palette
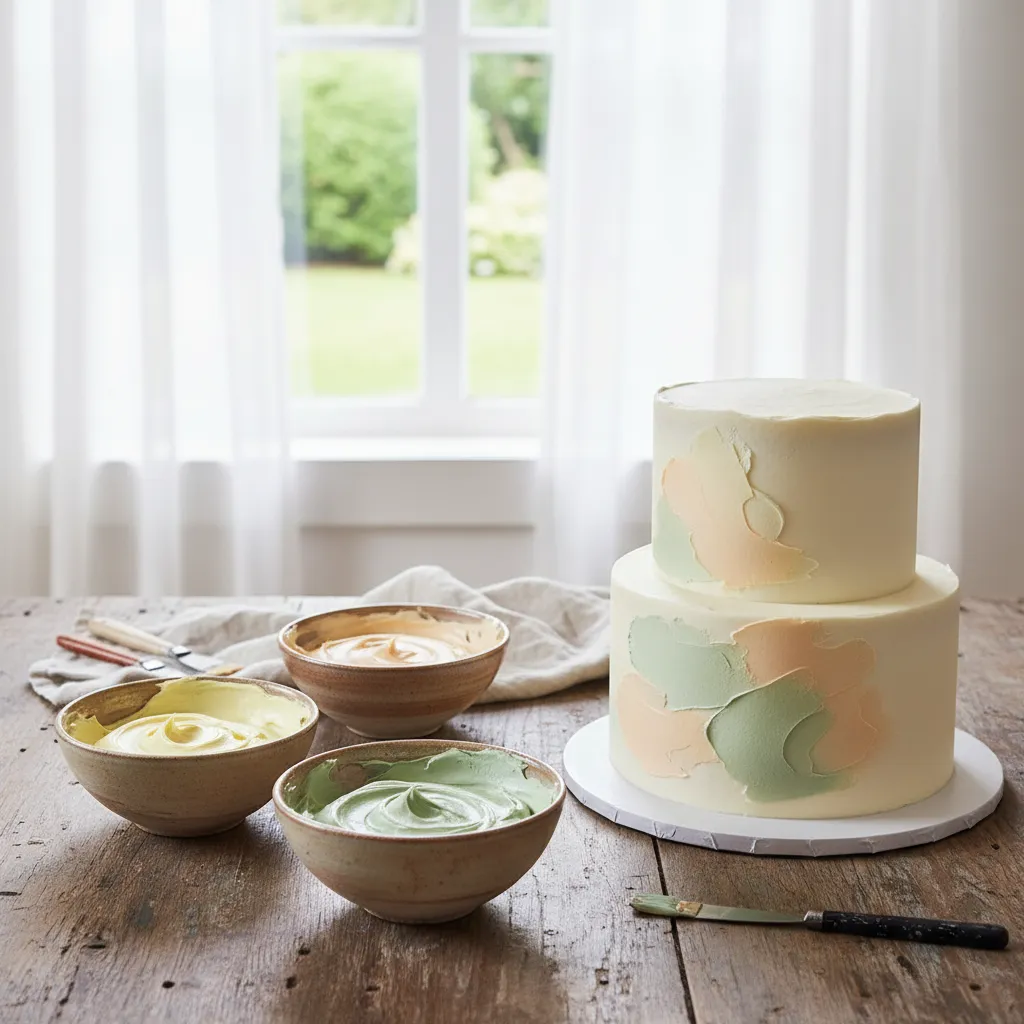
Selecting the right color trio is crucial for a harmonious look. Too many contrasting colors can quickly turn the frosting into a brown mess.
Stick to analogous colors that sit next to each other on the color wheel. This guarantees that any accidental mixing results in a pleasant new hue.
Consider the room’s decor when mixing your dyes. The cake should complement the surrounding linens and floral arrangements for a unified theme.
| Spring Vibe | Primary Tone | Accent Shade 1 | Accent Shade 2 |
|---|---|---|---|
| Garden Party | Sage Green | Dusty Rose | Cream |
| Sunset Glow | Soft Peach | Pale Lavender | Gold Leaf |
| Coastal Morning | Sky Blue | Seafoam | White |
In cake design, as in art, the beauty often lies in the organic imperfections of the process.
Finishing Touches
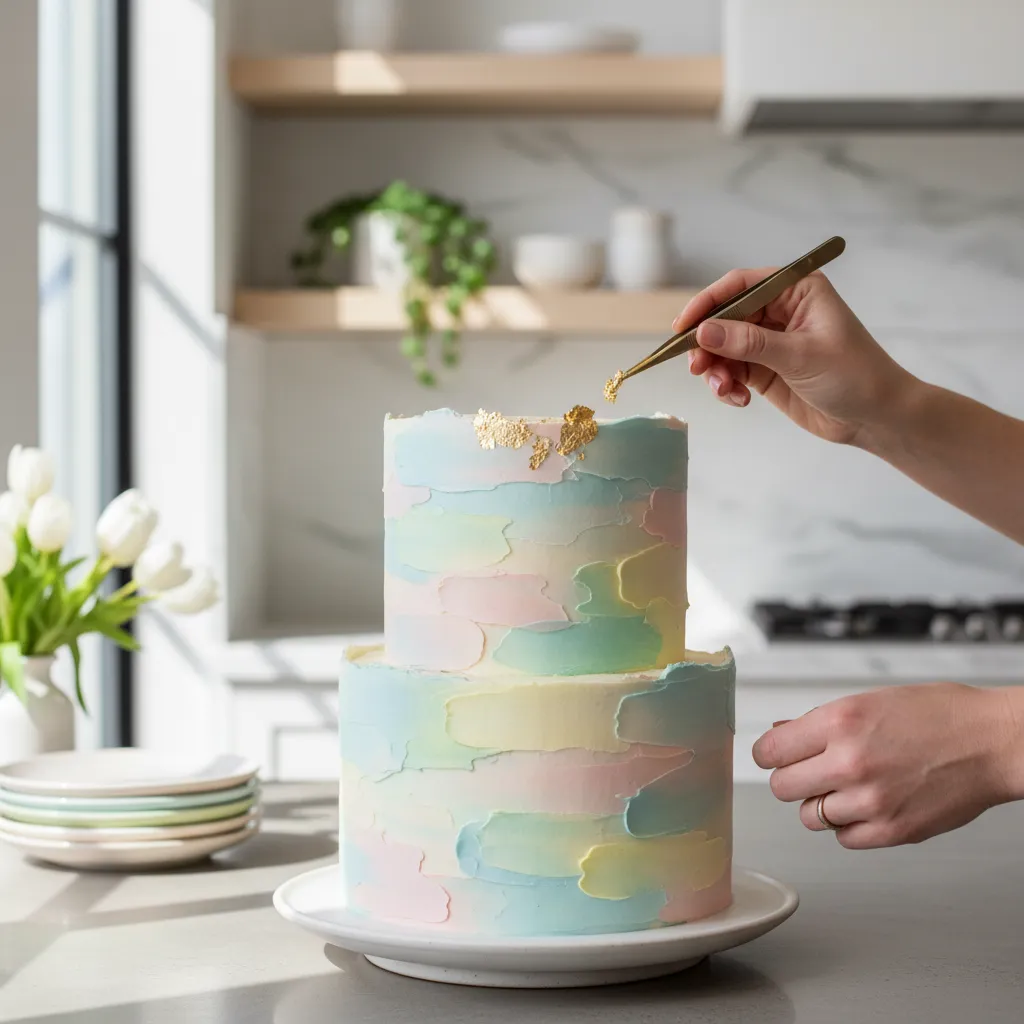
Once the watercolor base is smooth, add texture to break up the surface. Edible gold leaf applied to the edges adds a layer of luxury.
Keep the top of the cake relatively simple to let the sides shine. A few fresh edible flowers or a single structural topper often suffice.
Always wipe the cake board clean with a damp cloth before serving. A crisp, clean edge at the bottom enhances the professional appearance.
The Art of Frosting
- Always chill your crumb-coated cake until it is firm before applying the colored dollops; this ‘cold canvas’ prevents the new colors from digging into and muddying the base layer.
- Stick to analogous colors; those that sit next to each other on the color wheel; to ensure that any accidental blending creates a harmonious new hue rather than a muddy brown mess.
- Use gel food coloring instead of liquid dyes to keep your buttercream consistency stable while achieving vibrant, stable streaks.
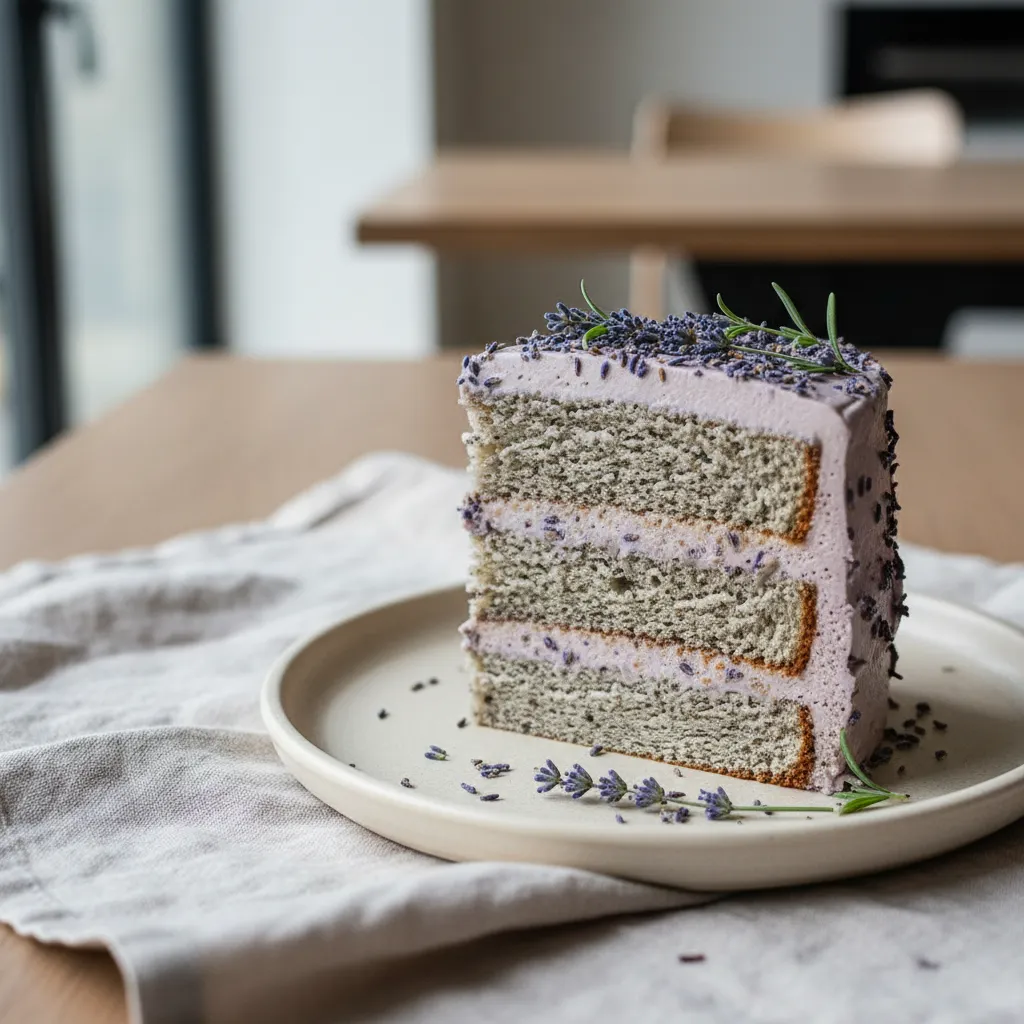
Earl Grey and Lavender Infused Sponges for Sophisticated Palates
For a mature birthday celebration, sugary confections often fall short. We turn to the subtle complexity of botanical infusions instead.
Earl Grey offers a tannic depth that grounds the palate perfectly. It creates a cake that feels like a curated experience rather than just dessert.
The addition of lavender provides a floral high note. This combination evokes the transition of the seasons without relying on artificial sweetness.
True elegance in hosting lies in the balance of flavor and atmosphere.
Constructing the Botanical Crumb
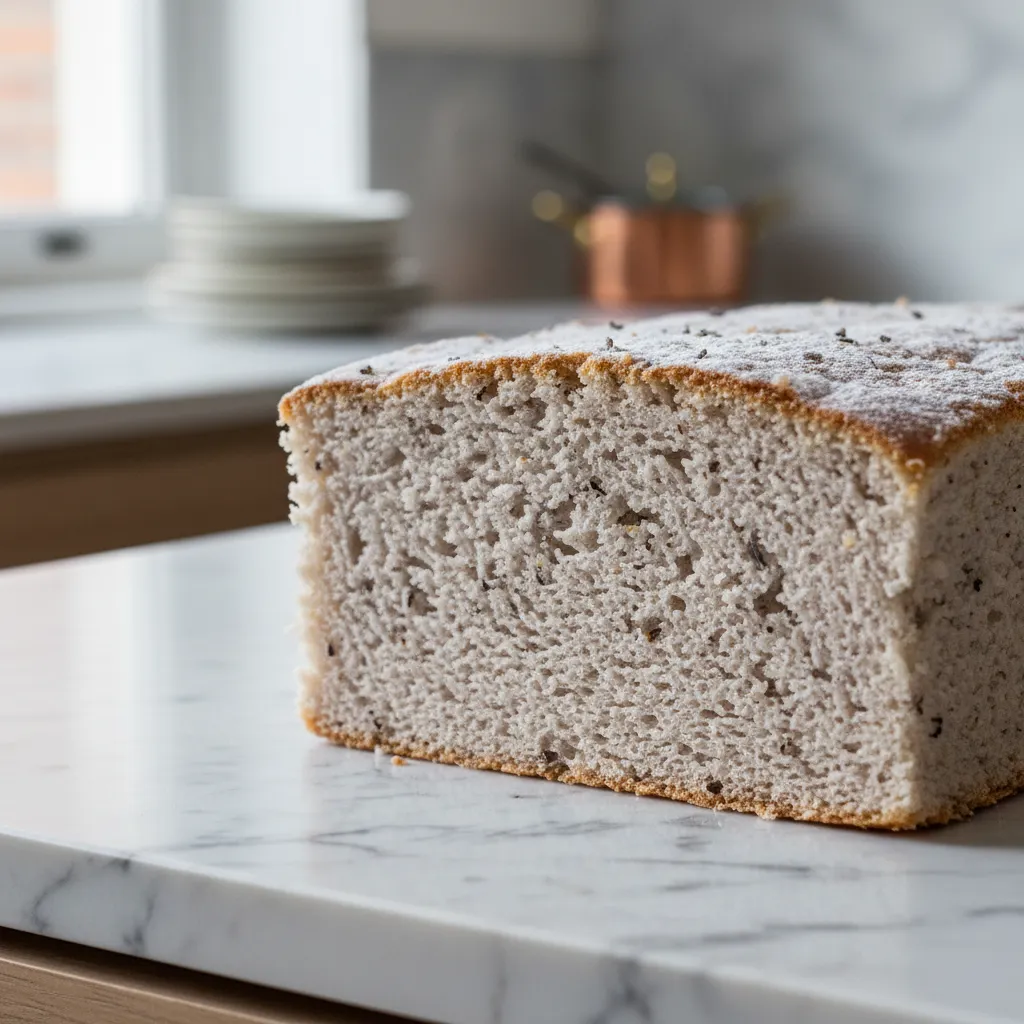
The structural integrity of an infused sponge is paramount. Grounding tea leaves directly into the flour creates a speckled, organic texture.
This method ensures the flavor permeates every bite evenly. It prevents the essential oils from pooling, which can compromise the cake’s lift.
For those interested in liquid infusion techniques, similar principles apply when you explore tea-based recipes for relaxation.
The crumb should remain tight yet moist. This density allows for precise slicing, maintaining the architectural lines of the wedge when plated.
The Bergamot in the Earl Grey gives a scent of citrus that is both fresh and haunting.
Nigella Lawson, How to Be a Domestic Goddess
Palette and Spatial Presentation
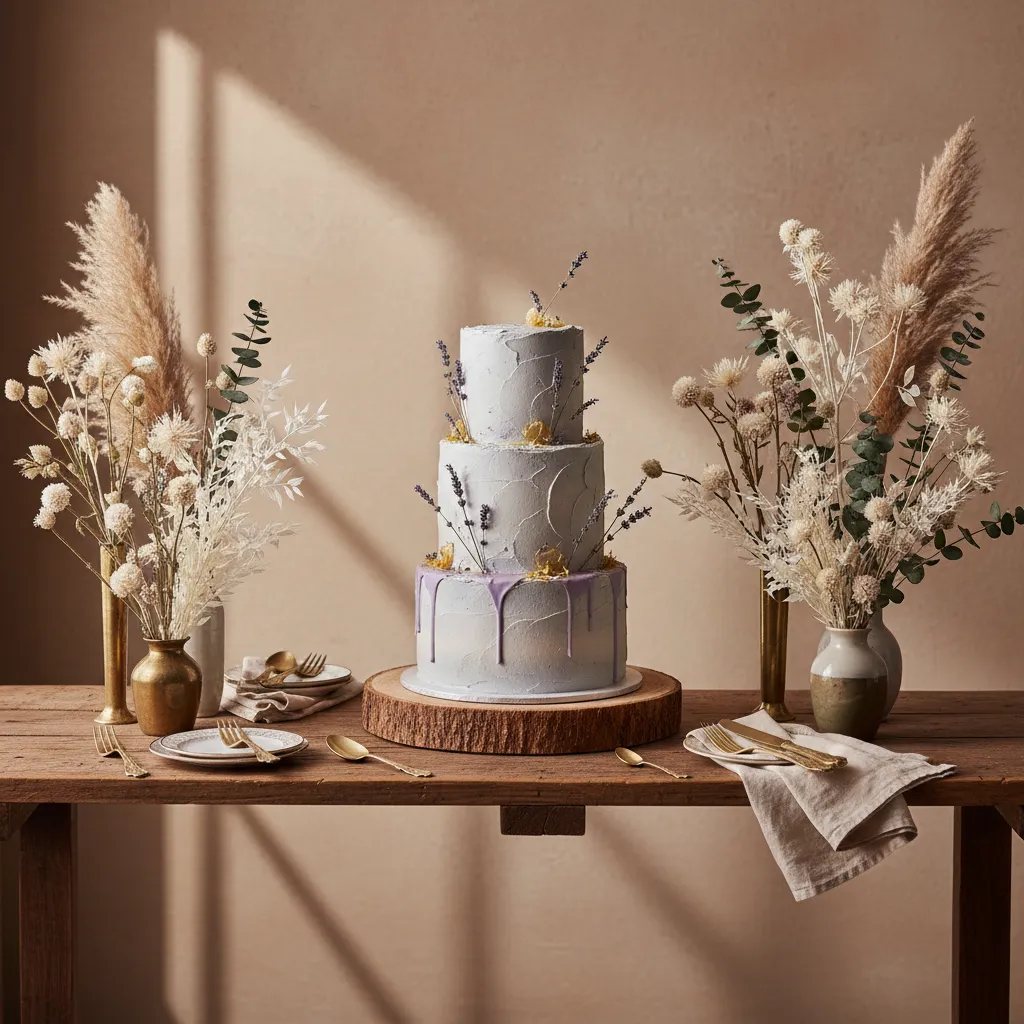
Visually, this cake demands a restrained color palette. The natural grey-brown hue of the sponge pairs elegantly with muted creams and soft lilacs.
Avoid bright food dyes to maintain sophistication. Instead, rely on the texture of the frosting and the placement of dried botanicals for visual interest.
If you are styling a room with soft hues, understanding neutral pairings and lighting is essential for cohesion.
Place the cake on a pedestal to create a focal point. This elevates the dessert physically and visually, improving the spatial flow of the buffet.
To ensure a cohesive design, consider the following pairing guide for your spring table:
| Design Element | Texture Choice | Color Palette | Functionality |
|---|---|---|---|
| Table Linens | Raw Washed Linen | Oatmeal or Sage | Absorbs spills, non-slip base |
| Serving Ware | Matte Ceramic | Charcoal or White | Fingerprint resistant, durable |
| Cake Stand | Acacia Wood/Marble | Natural Wood/Veined | Sturdy base for heavy tiers |
| Garnish | Dried Lavender | Muted Purple | Aromatic, inedible warning |
Proper lighting enhances these textures. Ambient, warm light softens the matte icing and highlights the specks of tea within the sponge.
The Curator’s Note
- To avoid a ‘soapy’ aftertaste, infuse your wet ingredients (like milk or melted butter) with lavender buds and strain them out, rather than adding dried flowers directly to the batter.
- Grind your Earl Grey leaves into a fine powder with a tablespoon of flour before mixing; this ensures the bergamot notes permeate evenly without compromising the sponge’s lift.
- Maintain the sophisticated aesthetic by swapping traditional sprinkles for crystallized violet petals or a light dusting of matcha to complement the earthy tones.
Rustic Naked Cakes Topped with Fresh Seasonal Berries
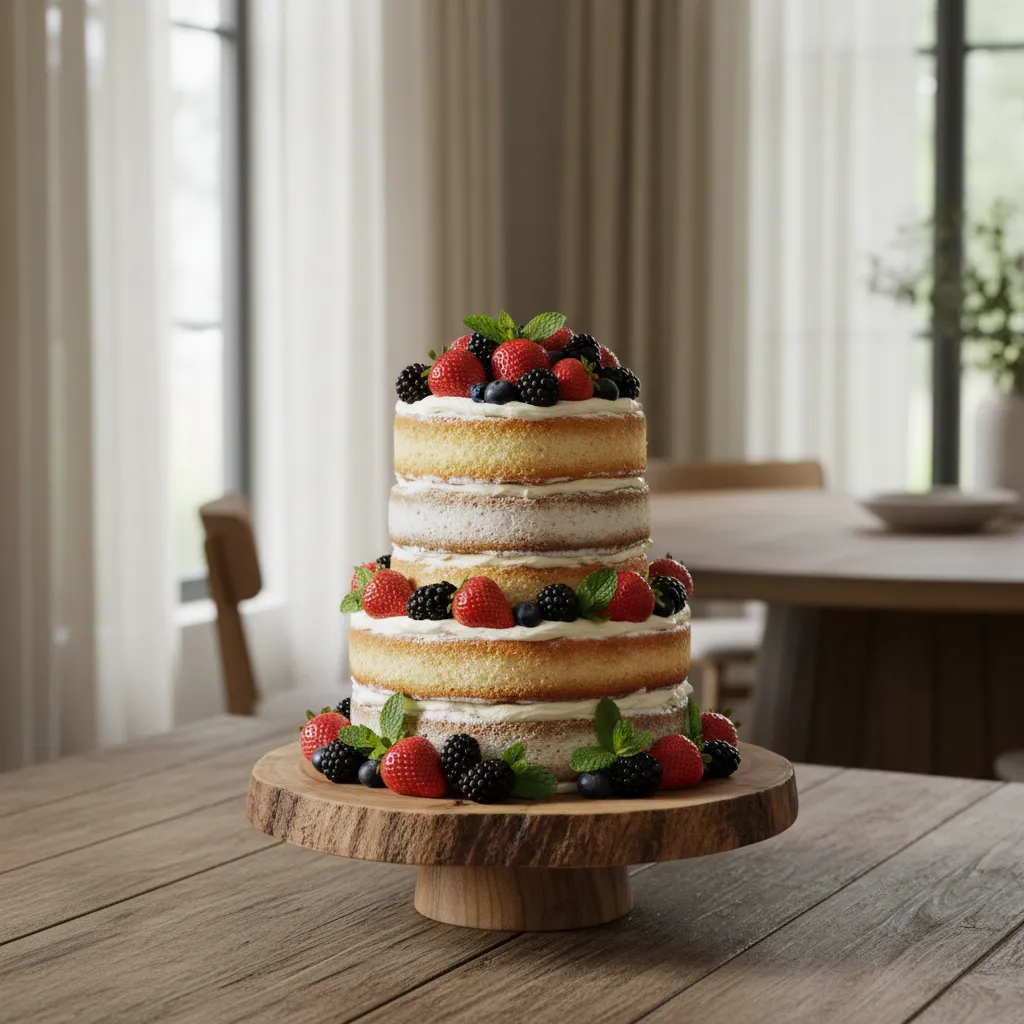
The rustic naked cake has solidified its place as a cornerstone of sophisticated spring entertaining. Its design philosophy relies on honesty and organic textures rather than heavy ornamentation.
By exposing the sponge layers through a sheer veil of buttercream, you create a visual depth that feels grounded. This aesthetic mimics the raw materials often found in modern farmhouse interiors.
Functionally, the naked cake is superior for warm spring gatherings. The reduced amount of frosting ensures structural integrity, preventing the sliding often seen with heavy fondant in the heat.
True elegance in culinary design is found in the raw, organic details that tell a story of craftsmanship.
The flavor profile often leans lighter, which appeals to a broader adult palette.
Pairing lemon sponge with blueberries echoes the fresh flavors found in bake perfect lemon blueberry muffins frozen fruit secrets.
Architectural Assembly and Berry Placement
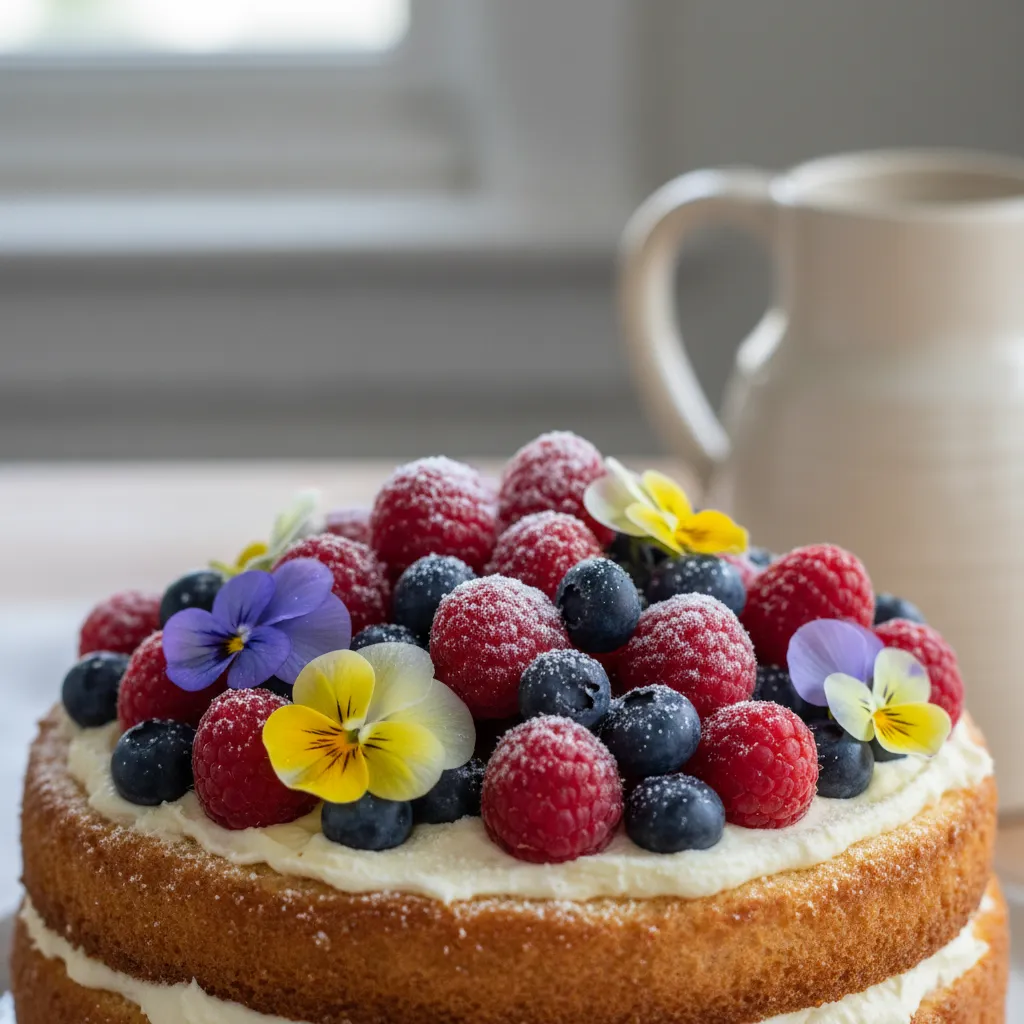
To achieve a professional finish, the placement of fruit must be intentional rather than random. Think of the cake top as a canvas where balance and negative space are critical.
Start with the largest berries, such as strawberries or blackberries, to establish your focal points. Cluster them slightly off-center to create a dynamic, asymmetrical look that guides the eye.
Fill the gaps with smaller fruits like blueberries or currants. This technique mimics the layering used in floral arrangements. It adds dimension and prevents the design from looking flat.
These cakes serve as a stunning centerpiece that anchors your table, much like the mains in 10 elegant easter lunch menu ideas main dishes to serve.
When decorating with fresh flowers or berries, always ensure your produce is completely dry. Water is the enemy of buttercream and can cause your frosting to separate or slide.
Tessa Huff, Style Sweet
Structural Integrity Checklist
Creating a naked cake requires precision in the baking phase since imperfections cannot be hidden. Follow this structural guide to ensure a stable and visually pleasing result.
- Leveling is Mandatory: Use a serrated knife to level the dome off every cake layer. Flat layers ensure the stack remains vertical and prevents sliding.
- The Crumb Coat: Apply a thin layer of buttercream and scrape it back firmly. This seals the moisture in the sponge while creating that signature “exposed” look.
- Chill Time: Refrigerate the cake for at least 30 minutes before adding the fruit topping. A cold cake provides a sturdy base for heavier garnishes.
- Edible Glue: Use a dab of buttercream on the bottom of larger berries to anchor them to the cake, ensuring they do not roll off during transport or service.
Incorporating Organic Greenery
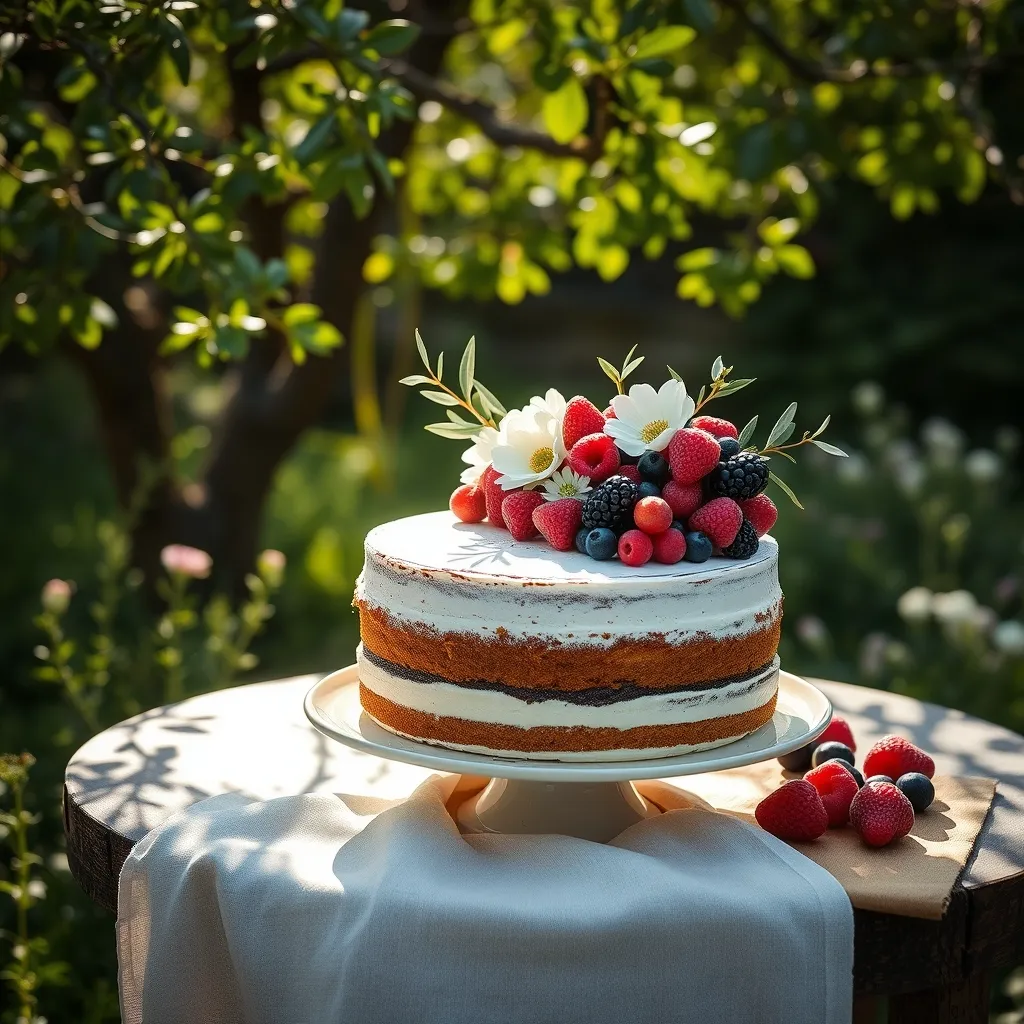
To elevate the rustic aesthetic, integrate non-toxic greenery between the berry clusters. Olive branches, mint sprigs, or rosemary add a muted green tone that complements the vibrant red fruit.
The addition of greenery bridges the gap between the food and the table decor. It softens the architectural lines of the stacked layers, creating a seamless flow with your centerpiece arrangements.
Always wrap the stems of any fresh florals in floral tape before inserting them into the cake. This maintains food safety standards while allowing you to bring garden elements onto the plate.
Baker’s Secret
- To prevent berries from bleeding into the frosting, wash and dry them completely on a paper towel at least an hour before decorating, or brush them with a light glaze of melted apricot jam for a professional shine.
- For the cleanest ‘naked’ look, use a metal bench scraper held at a 90-degree angle to the cake while spinning your turntable to achieve a perfectly even, sheer finish.
- If hosting outdoors, consider adding a small amount of cornstarch or using a white chocolate ganache base for your frosting to increase stability against spring humidity.
Strawberry Rhubarb Layer Cake with Chantilly Cream
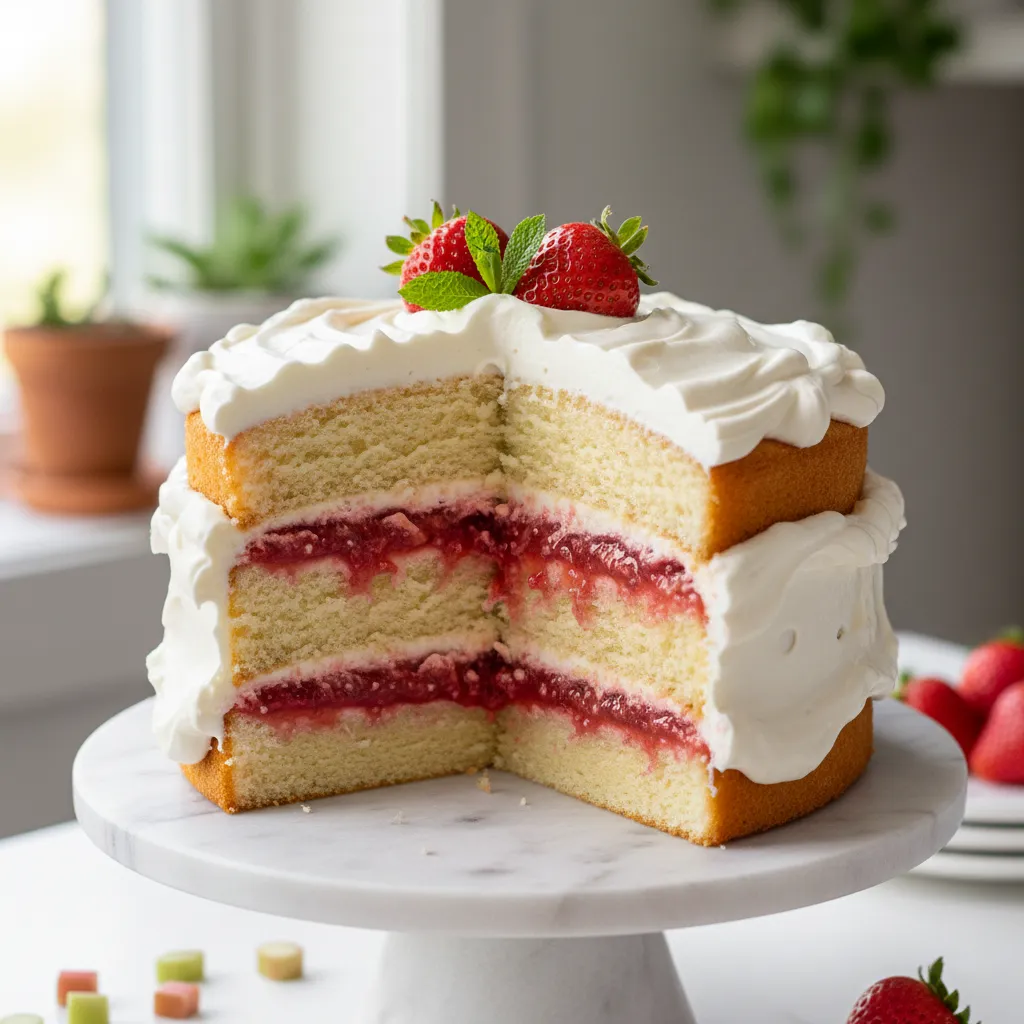
This cake defines the transition from late winter to early spring. The tart rhubarb cuts through the sweetness of strawberries perfectly.
It offers a sophisticated flavor profile for adult birthday celebrations. The visual appeal relies on the contrast between the ruby filling and white cream.
For the best aesthetic, style this cake on a tall ceramic pedestal. This elevates the dessert, turning it into a sculptural focal point for the room.
Balance is the key to spring desserts; allow the natural tartness of the season to shine through the sugar.
Structural Integrity of Fruit Fillings
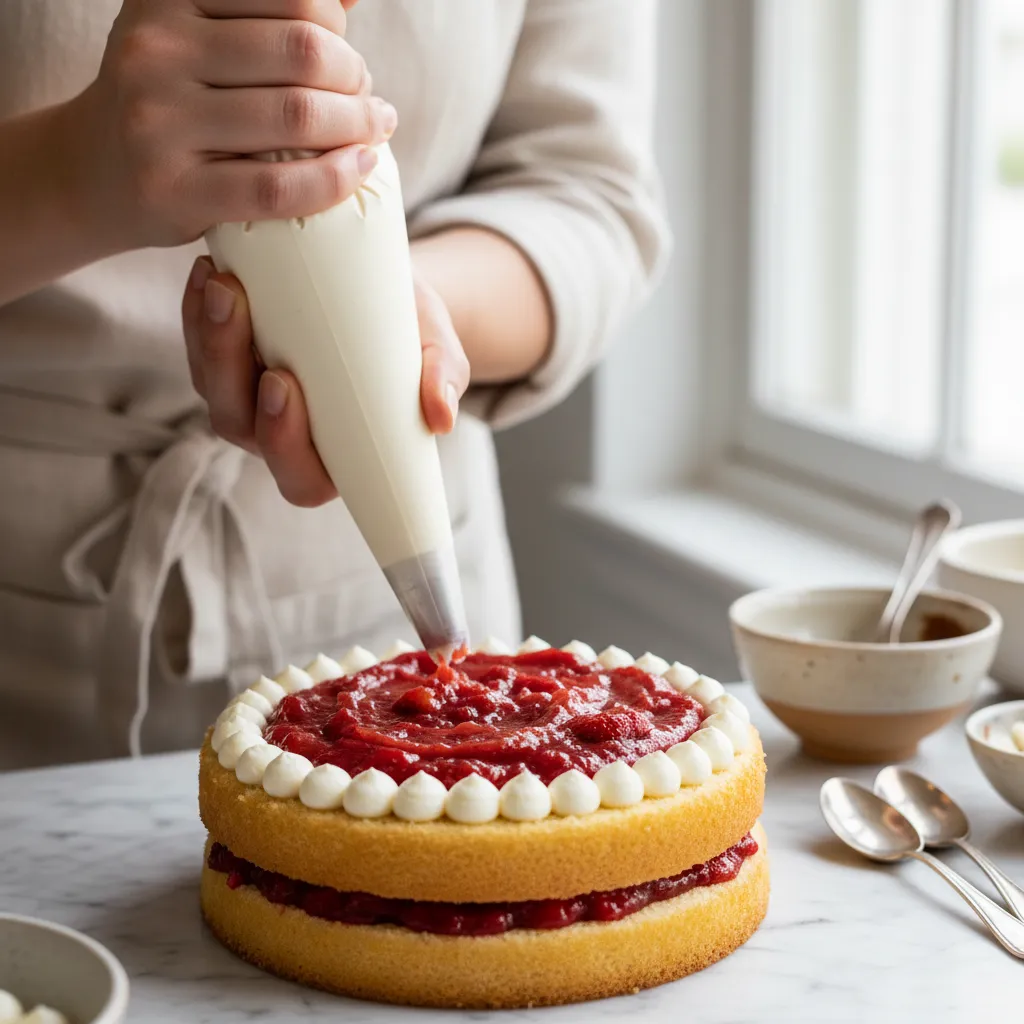
Fruit fillings can compromise the stability of a layer cake. The moisture from the rhubarb compote may seep into the sponge if left unchecked.
To prevent this, apply a thin layer of buttercream to the cake surface first. This acts as a sealant against the liquid content of the fruit.
Pipe a sturdy dam of frosting around the perimeter of each layer. This structural ring holds the soft filling inside, preventing it from leaking out.
This technique is essential for clean slices and presentation. It ensures the cake maintains a vertical profile similar to seasonal hosting menus.
When filling cakes with jam or curd, always pipe a dam of buttercream around the edge of the layer to keep the filling from oozing out.
Tessa Huff, Layered: Baking, Building, and Styling Spectacular Cakes
Stabilizing the Chantilly Cream
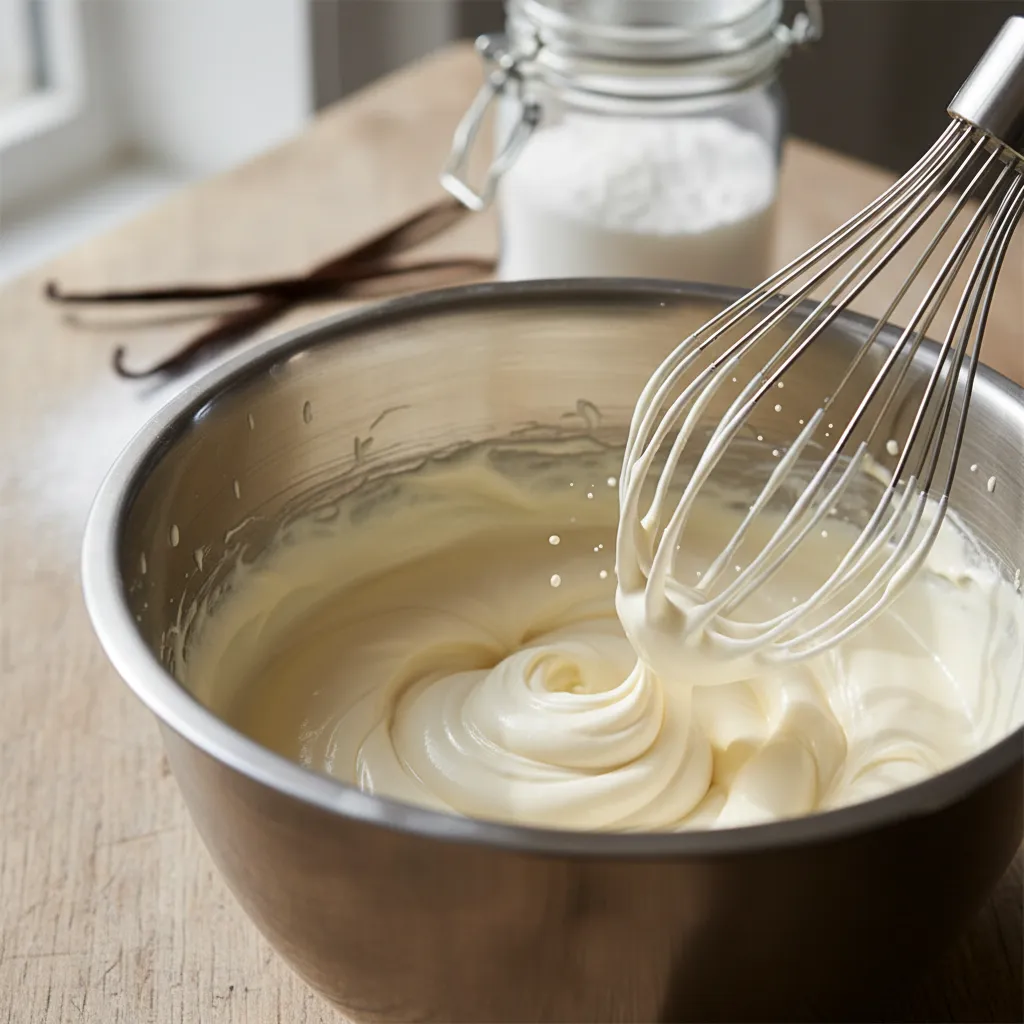
Standard whipped cream often wilts in warm spring temperatures. For a birthday party display, you need a stabilizer to maintain the design.
Incorporating mascarpone cheese is a professional trick. It adds fat and structure without altering the clean, milky flavor of the cream.
This stabilized cream holds sharp piping details for hours. It provides a reliable finish that pairs beautifully with a luxury coffee service.
The texture becomes velvety rather than airy. This added density supports the weight of the cake layers and fresh fruit garnishes.
Cream Stabilizer Comparison
Choosing the right stabilizer depends on your display environment. Review these options to ensure your cake withstands the duration of the event.
| Stabilizing Agent | Texture Impact | Ideal Duration | Visual Finish |
|---|---|---|---|
| Mascarpone Cheese | Rich and Velvety | 4 to 6 Hours | Smooth, opaque |
| Unflavored Gelatin | Firm and Airy | 8+ Hours | Glossy, stiff |
| Instant Pudding Mix | Thick and Dense | 24+ Hours | Matte, hefty |
| Cornstarch | Slightly Chalky | 2 to 3 Hours | Soft, weeping |
The Pastry Chef’s Playbook
- Roast your rhubarb instead of boiling it to intensify the ruby-red color and concentrate the juices, preventing the filling from becoming too watery.
- Chill your sponge layers for at least 30 minutes before assembly; cold cake sets the buttercream dam instantly, ensuring a rock-solid structural foundation.
- Wait to garnish with fresh strawberry slices until just before serving to prevent the fruit’s natural juices from bleeding into the pristine white Chantilly cream.
The Final Flourish: Curating Your Spring Centerpiece
Integrating pressed flowers into birthday cakes elevates a simple dessert into a structural work of art. It blends organic beauty with culinary precision.
Remember that selecting the right botanicals involves both safety and color theory. A thoughtful palette creates a sophisticated visual hierarchy.
Whether you choose asymmetrical drifts or precise placements, technical execution is key. Use the proper tools to maintain the integrity of delicate petals.
Ultimately, a spring birthday cake should reflect the season’s renewal. Let your design bloom with natural elegance and refined taste.
Design Dilemmas: Expert Solutions
Plan for structural integrity. Press blooms between parchment paper within a heavy book for at least two weeks to ensure a crisp, flat finish suitable for mounting.
Safety is paramount. Only utilize blooms explicitly identified as edible and grown organically. Avoid florist arrangements due to likely pesticide treatment.
Wait for the buttercream to slightly crust or chill the cake. Use sanitized tweezers to gently press the dried petal onto the surface without marring the finish.
Balance is essential. Light citrus or vanilla bean sponges act as a neutral foundation, allowing subtle floral notes like lavender or pansy to register effectively.