
Thanksgiving is a time for gratitude, family, and, of course, incredible food. It’s a holiday many of us cherish deeply.
However, the kitchen can quickly become a high-stress zone. Juggling multiple dishes, limited oven space, and precise timing can feel overwhelming.
The secret to a calmer, more enjoyable Thanksgiving Day? Make-ahead recipes. These culinary lifesavers allow you to spread out the work.
By preparing dishes in advance, you free up precious time and energy. You can actually relax and savor the moments with your loved ones. This list offers twelve fantastic recipes you can tackle before the big day arrives.
1. Creamy Dreamy Make-Ahead Mashed Potatoes
Mashed potatoes are a non-negotiable Thanksgiving staple. Their fluffy, buttery goodness is pure comfort on a plate.

Why These Potatoes Are Your Pre-Thanksgiving Ally
Preparing mashed potatoes on Thanksgiving Day means peeling, boiling, and mashing amidst chaos. This takes up valuable stove top real estate.
Making them ahead allows you to complete this task when your kitchen is calm. It also gives the flavors a chance to meld beautifully.
Essential Ingredients You Will Need
- 5 pounds Russet or Yukon Gold potatoes, peeled and quartered
- 1 cup (2 sticks) unsalted butter, softened
- 1 cup heavy cream or whole milk, warmed
- 4 ounces cream cheese, softened (optional, for extra creaminess)
- Salt and freshly ground black pepper to taste
Your Advance Preparation Masterplan
You can peel and chop your potatoes up to 24 hours in advance. Keep them fully submerged in cold water in the refrigerator to prevent browning.
When ready to cook, drain the potatoes. Place them in a large pot and cover with fresh cold water. Add a generous pinch of salt.
Bring to a boil, then reduce heat and simmer. Cook for 15 to 20 minutes, or until fork tender. Drain the potatoes thoroughly in a colander. Let them steam dry for a minute or two.
Return the potatoes to the warm pot or a large bowl. Add the softened butter and mash well. You can use a potato masher, a ricer, or an electric mixer on low speed.
Gradually add the warmed heavy cream or milk. If using, beat in the softened cream cheese until smooth. Season generously with salt and pepper. Taste and adjust seasoning if needed.
Allow the mashed potatoes to cool completely. Transfer them to a buttered oven safe baking dish. Cover tightly with plastic wrap or foil. Refrigerate for up to two days.
Thanksgiving Day: The Grand Reheat
Remove the potatoes from the refrigerator about an hour before reheating. This helps them warm more evenly.
To reheat in the oven: Preheat your oven to 350°F (175°C). Dot the top of the potatoes with a few extra pats of butter. Cover the dish tightly with foil. Bake for 30 to 40 minutes, or until heated through. Stir gently before serving.
To reheat in a slow cooker: Transfer the potatoes to your slow cooker. Set it to low heat. Allow them to warm for 2 to 4 hours, stirring occasionally. If they seem dry, stir in a little more warm milk or cream.
Pro Tips for Potato Perfection
For the fluffiest potatoes, choose starchy Russets. Yukon Golds yield a creamier, more buttery result. Avoid waxy potatoes.
Do not overmix the potatoes, especially if using an electric mixer. Overmixing develops gluten and makes them gluey.
A potato ricer or food mill is your best friend for lump free potatoes. These tools create a light, airy texture.
Ensure the potatoes are well drained after boiling. Excess water can make them soupy.
For storage, an airtight container is crucial. If using a baking dish, ensure the plastic wrap or foil seals tightly.
Consider adding roasted garlic, fresh chives, or crispy bacon bits. These can be stirred in before serving for extra flavor.
2. Rich and Savory Make-Ahead Turkey Gravy
No Thanksgiving plate is complete without a generous ladle of rich, savory gravy. It ties everything together.

Why This Gravy Eases Thanksgiving Day Pressure
Making gravy at the last minute, while the turkey rests and guests arrive, can be frantic. Drippings need to be degreased, flour whisked, and lumps avoided.
Preparing your gravy base ahead of time is a massive stress reliever. You can focus on achieving the perfect consistency and flavor without rush.
Essential Ingredients You Will Need
- Turkey neck and giblets (liver reserved for other use if desired)
- 1 large onion, roughly chopped
- 2 carrots, roughly chopped
- 2 celery stalks, roughly chopped
- 4 cups chicken or turkey broth (low sodium preferred)
- 2 sprigs fresh thyme
- 1 bay leaf
- 1/4 cup unsalted butter
- 1/4 cup all purpose flour
- Salt and freshly ground black pepper
Your Advance Preparation Masterplan
Up to three days before Thanksgiving, start your gravy base. In a large saucepan or Dutch oven, brown the turkey neck and giblets (excluding liver). Do this over medium high heat. Remove and set aside.
Add the chopped onion, carrots, and celery to the same pot. Sauté until softened and lightly browned, about 8 to 10 minutes.
Return the turkey parts to the pot. Add the chicken or turkey broth, thyme, and bay leaf. Bring to a simmer. Reduce heat to low, cover, and cook gently for 1.5 to 2 hours. This creates a flavorful stock.
Strain the stock through a fine mesh sieve into a clean bowl. Discard the solids. You should have a deeply flavored broth. If you have less than 3-4 cups, add more purchased broth or water.
In a clean saucepan, melt the butter over medium heat. Whisk in the flour and cook, whisking constantly, for 2 to 3 minutes. This creates a roux and cooks out the raw flour taste.
Gradually whisk the prepared stock into the roux. Bring the mixture to a simmer, whisking constantly until it thickens. Reduce heat and let it simmer gently for 5 to 10 minutes. Season with salt and pepper to taste.
Let the gravy cool completely. Transfer it to an airtight container and refrigerate for up to three days.
Thanksgiving Day: The Grand Reheat
On Thanksgiving Day, once your turkey is roasted and resting, collect the pan drippings. Skim off as much fat as possible from these drippings.
Reheat your make-ahead gravy gently on the stovetop. Whisk in a few tablespoons of the defatted turkey drippings. This adds that fresh, roasted turkey flavor.
Simmer for a few minutes, adjusting consistency if needed. If too thick, add a little more broth or water. If too thin, simmer a bit longer or make a small slurry of cornstarch and water to thicken. Taste and adjust seasoning.
Pro Tips for Gravy Glory
For an even richer flavor, roast the turkey neck and vegetables. Do this alongside the giblets before making the stock.
A splash of dry white wine or sherry can elevate the gravy. Add it to the vegetables after they have browned and let it reduce.
If you prefer a darker gravy, use a dark roux. Cook the butter and flour mixture longer, until it turns a light brown color.
To avoid lumps, add the stock to the roux slowly. Whisk constantly, especially at the beginning. A good whisk is essential.
If lumps do appear, don’t panic. You can strain the gravy through a fine mesh sieve before serving.
Consider adding a teaspoon of soy sauce or Worcestershire sauce. These can deepen the umami flavor. Fresh herbs like sage or rosemary, finely chopped, are also nice additions.
3. Classic Herb Stuffing (or Dressing) You Can Assemble Early
Stuffing, or dressing if baked outside the bird, is a cornerstone of the Thanksgiving meal. Its savory aroma is iconic.

Why Pre-Assembling Stuffing is a Smart Move
Chopping vegetables, toasting bread, and mixing ingredients for stuffing takes time. Doing this on Thanksgiving morning adds to the kitchen bustle.
Assembling the stuffing a day ahead allows flavors to meld. It also means one less dish to actively prepare on the holiday itself.
Essential Ingredients You Will Need
- 1 pound loaf of sturdy white or sourdough bread, cubed and dried/toasted
- 1 large onion, finely chopped
- 2 celery stalks, finely chopped
- 1/2 cup unsalted butter
- 1 pound sausage (optional, pork or sage sausage works well)
- 1 to 2 tablespoons fresh sage, chopped (or 1-2 teaspoons dried)
- 1 tablespoon fresh thyme, chopped (or 1 teaspoon dried)
- 1/2 cup fresh parsley, chopped
- 2 to 3 cups chicken or turkey broth
- 2 large eggs, lightly beaten
- Salt and freshly ground black pepper
Your Advance Preparation Masterplan
Cut the bread into 1 inch cubes several days in advance. Spread them on baking sheets and let them air dry. Alternatively, toast them in a 300°F (150°C) oven for 20 to 30 minutes until dry.
One or two days before Thanksgiving, prepare the aromatics. Melt butter in a large skillet over medium heat. Add the chopped onion and celery. Sauté until softened, about 8 to 10 minutes.
If using sausage, cook it in a separate skillet until browned. Crumble it as it cooks. Drain off any excess fat.
In a very large mixing bowl, combine the dried bread cubes, sautéed vegetables, and cooked sausage (if using). Add the chopped fresh sage, thyme, and parsley. Season with salt and pepper. Toss gently to combine.
In a separate bowl, whisk together the beaten eggs and 2 cups of the broth. Pour this mixture over the bread and vegetable mixture. Toss gently until everything is moistened. Add more broth, a little at a time, if it seems too dry. The stuffing should be moist but not soggy.
Transfer the stuffing mixture to a buttered 9×13 inch baking dish. Cover tightly with foil. Refrigerate for up to 24 hours. Do not stuff the turkey in advance for food safety reasons.
Thanksgiving Day: Baking to Perfection
Remove the stuffing from the refrigerator about 30 minutes before baking. This allows it to come to room temperature.
Preheat your oven to 375°F (190°C). If you want a crispier top, you can dot the stuffing with a few extra pieces of butter.
Bake the stuffing, still covered with foil, for 30 minutes. Then, remove the foil and bake for another 15 to 25 minutes. The top should be golden brown and crispy, and the center hot. An instant read thermometer should register 165°F (74°C).
Let the stuffing rest for a few minutes before serving.
Pro Tips for Stellar Stuffing
The type of bread matters. Use a good quality, sturdy bread. Avoid soft, sandwich bread as it can become mushy. Cornbread also makes a delicious stuffing base.
Don’t overmix the stuffing once the liquid is added. This can make it dense. Gentle tossing is key.
For extra flavor, consider adding chopped apples, dried cranberries, or toasted pecans/walnuts. Sautéed mushrooms are another great addition.
If you prefer a very moist stuffing, add a bit more broth. For a drier, crispier stuffing, use slightly less.
Always bake dressing to an internal temperature of 165°F (74°C). This is crucial for food safety, especially if using eggs.
If you decide to stuff your turkey, do so just before roasting. Never stuff it the night before. Pack the stuffing loosely to allow for even cooking.
4. Zesty Homemade Cranberry Sauce (Days in Advance!)
Canned cranberry sauce has its place, but homemade is a game changer. Its bright, tart flavor cuts through the richness of other dishes.
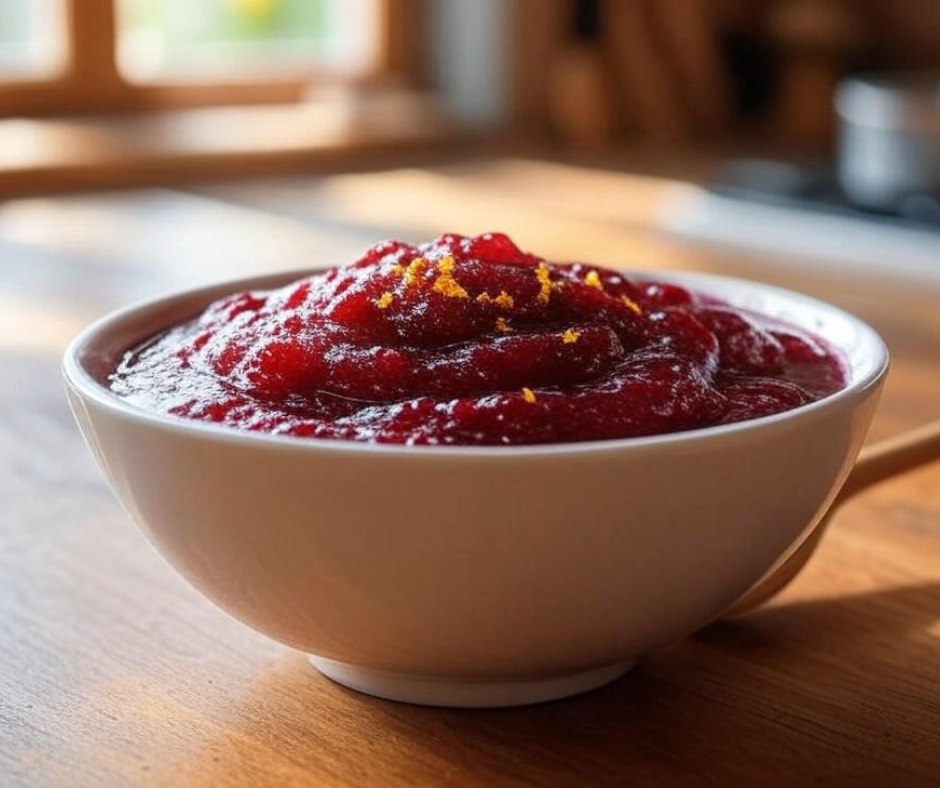
Why Cranberry Sauce is an Early Prep Superstar
This is perhaps one of the easiest Thanksgiving dishes to make well in advance. In fact, its flavor improves as it sits.
Making it days, or even a week, ahead frees up your stovetop. It’s one less thing to even think about on the busy days leading up to Thanksgiving.
Essential Ingredients You Will Need
- 12 ounce bag fresh or frozen cranberries
- 1 cup granulated sugar (or to taste)
- 1 cup water or orange juice
- Zest of 1 orange (optional)
- 1 cinnamon stick (optional)
- Pinch of salt
Your Advance Preparation Masterplan
Rinse the cranberries thoroughly. Pick out any bruised or soft ones.
In a medium saucepan, combine the cranberries, sugar, and water or orange juice. Add the orange zest and cinnamon stick, if using, along with a tiny pinch of salt. The salt enhances the other flavors.
Bring the mixture to a boil over medium high heat. Stir occasionally to help dissolve the sugar.
Once boiling, reduce the heat to medium low. Simmer for 10 to 15 minutes. The cranberries will begin to pop and the sauce will thicken. Stir occasionally.
The sauce is ready when most of the cranberries have burst. The desired consistency is up to you. For a thicker sauce, simmer a bit longer. Keep in mind it will thicken further as it cools.
Remove the saucepan from the heat. If using a cinnamon stick, remove it now. Allow the cranberry sauce to cool completely to room temperature.
Transfer the cooled sauce to an airtight container. Store it in the refrigerator. It can be made up to one week in advance.
Thanksgiving Day: Simply Serve
On Thanksgiving Day, there’s almost nothing to do for this dish. Simply transfer the cranberry sauce from its storage container to a serving bowl.
If it has thickened too much in the fridge, you can stir in a tablespoon of water or orange juice. This will loosen it to your desired consistency.
Serve chilled or at room temperature.
Pro Tips for Cranberry Brilliance
Adjust the sugar to your liking. If you prefer a tarter sauce, use less sugar. For a sweeter sauce, add a bit more. You can also use maple syrup or honey as a sweetener.
Orange juice and zest add a wonderful citrusy brightness. Lemon zest and juice work well too.
For a spiced cranberry sauce, consider adding star anise, a few whole cloves, or a pinch of ground ginger along with the cinnamon stick.
A splash of port wine or Grand Marnier added at the end of cooking can give it a sophisticated kick. Stir it in after removing the sauce from the heat.
For a different texture, you can reserve about half a cup of cranberries. Stir them in during the last 5 minutes of cooking. This leaves some whole berries for a chunkier sauce.
Leftover cranberry sauce is incredibly versatile. Use it on sandwiches, with yogurt, or as a glaze for meats.
5. Luscious Sweet Potato Casserole (Assemble Ahead)
Sweet potato casserole, whether topped with marshmallows or pecans, is a beloved sweet and savory side.

Why This Casserole Benefits from Advance Assembly
The process of cooking, mashing sweet potatoes, and assembling the casserole layers can be time consuming.
Getting this dish fully assembled a day or two before means it’s ready for the oven. This frees up your prep time on Thanksgiving.
Essential Ingredients You Will Need
For the Sweet Potatoes:
- 3 pounds sweet potatoes (about 4 to 5 medium)
- 1/2 cup unsalted butter, melted
- 1/4 cup heavy cream or milk
- 1/4 cup brown sugar, packed
- 1 teaspoon vanilla extract
- 1/2 teaspoon ground cinnamon
- 1/4 teaspoon ground nutmeg
- Pinch of salt
For the Topping (Pecan Streusel Option):
- 1/2 cup all purpose flour
- 1/2 cup brown sugar, packed
- 1/2 cup chopped pecans
- 1/4 cup unsalted butter, cold and cubed
(Alternatively, for Marshmallow Topping: 2 cups mini marshmallows)
Your Advance Preparation Masterplan
Peel the sweet potatoes and cut them into 1 inch chunks. Place them in a large pot and cover with cold water. Bring to a boil and cook for 15 to 20 minutes, or until very tender. Drain well.
Transfer the cooked sweet potatoes to a large bowl. Add the melted butter, heavy cream, brown sugar, vanilla, cinnamon, nutmeg, and salt. Mash until smooth. An electric mixer can be used for a very smooth consistency.
Spread the sweet potato mixture evenly into a buttered 9×13 inch baking dish.
If making the pecan streusel topping: In a separate bowl, combine the flour, brown sugar, and chopped pecans. Cut in the cold, cubed butter using a pastry blender or your fingertips. Continue until the mixture resembles coarse crumbs. Sprinkle this topping evenly over the sweet potato mixture.
If using marshmallow topping, do not add it yet. This is best added during the last few minutes of baking.
Cover the assembled casserole (with pecan topping, if using) tightly with foil or plastic wrap. Refrigerate for up to two days.
Thanksgiving Day: Bake and Serve
Remove the casserole from the refrigerator about 30 to 60 minutes before baking.
Preheat your oven to 375°F (190°C). Bake the casserole, covered with foil (if it was covered with plastic wrap, replace with foil), for 25 to 30 minutes. This is if you used the pecan topping.
If you are using marshmallow topping, bake the casserole (covered) for 20 minutes. Then remove the foil, sprinkle the mini marshmallows evenly on top. Return to the oven, uncovered, for another 10 to 15 minutes. Watch carefully, as marshmallows can brown quickly. Bake until they are golden and puffy.
For the pecan streusel version, after 25 to 30 minutes covered, remove the foil. Bake for an additional 10 to 15 minutes, or until the topping is golden brown and the casserole is heated through.
Let the casserole rest for a few minutes before serving.
Pro Tips for Sweet Potato Success
Roasting the sweet potatoes instead of boiling can intensify their flavor. Pierce whole sweet potatoes, roast at 400°F (200°C) for 45 to 60 minutes until tender. Then scoop out the flesh.
Don’t over sweeten the base if using a very sweet topping. Taste the sweet potato mixture before adding all the sugar.
For a richer flavor, use bourbon or dark rum instead of vanilla extract. A tablespoon or two will do.
Ensure the sweet potatoes are thoroughly cooked before mashing. This ensures a smooth, not lumpy, casserole.
If your pecan topping isn’t browning as much as you’d like, you can briefly place it under the broiler. Watch it very closely to prevent burning.
For a lighter version, you can use milk instead of heavy cream. You can also reduce the amount of butter slightly.
6. Maple Glazed Brussels Sprouts (Prep Veggies Ahead)
Move over, mushy green beans. These Brussels sprouts offer a fresh, flavorful, and slightly sophisticated green vegetable option.

Why These Sprouts Simplify Day-Of Cooking
The most time consuming part of preparing Brussels sprouts is trimming and halving them. This can be done well in advance.
Making the glaze ahead also saves precious minutes on Thanksgiving Day. The final cooking is quick and easy.
Essential Ingredients You Will Need
- 2 pounds Brussels sprouts, trimmed and halved (or quartered if large)
- 3 tablespoons olive oil
- Salt and freshly ground black pepper
- 1/4 cup pure maple syrup
- 2 tablespoons balsamic vinegar
- 1 tablespoon Dijon mustard
- Optional: 1/2 cup toasted pecans or walnuts, 1/4 cup dried cranberries
Your Advance Preparation Masterplan
Up to two days before Thanksgiving, wash, trim, and halve (or quarter) the Brussels sprouts. Store them in an airtight container or a resealable plastic bag in the refrigerator.
In a small bowl, whisk together the maple syrup, balsamic vinegar, and Dijon mustard. This is your glaze. Store it in an airtight container in the refrigerator. It can also be made up to two days ahead.
If using nuts, toast them ahead of time. Let them cool completely and store in an airtight container at room temperature.
Thanksgiving Day: Roast to Charred Perfection
Preheat your oven to 400°F (200°C). Line a large baking sheet with parchment paper for easy cleanup.
In a large bowl, toss the prepared Brussels sprouts with the olive oil. Season generously with salt and pepper. Spread them in a single layer on the prepared baking sheet. Avoid overcrowding the pan; use two if necessary.
Roast for 15 to 20 minutes, or until they are tender and nicely caramelized. Some outer leaves should be crispy and slightly charred.
While the sprouts are roasting, give your make-ahead glaze a quick whisk.
Once the sprouts are cooked, transfer them to a serving bowl. Immediately pour the maple balsamic glaze over them. Toss gently to coat everything evenly.
If using, stir in the toasted nuts and dried cranberries. Serve warm.
Pro Tips for Brussels Sprouts Bliss
Don’t overcrowd the pan when roasting. This causes the sprouts to steam rather than roast, preventing caramelization.
High heat is key for crispy, flavorful Brussels sprouts. A temperature of 400°F (200°C) or even 425°F (220°C) works well.
For extra flavor, consider adding a few cloves of smashed garlic or some shallot wedges to the pan. Roast them along with the sprouts.
Bacon makes everything better. Cook a few strips of bacon until crispy. Crumble it and toss with the glazed sprouts. You can also roast the sprouts in a little bacon fat.
If you don’t have maple syrup, honey can be a good substitute. Adjust sweetness as needed.
Taste and adjust seasoning before serving. A final sprinkle of flaky sea salt can make a big difference.
7. Fluffy Dinner Rolls (Bake Ahead or Freeze Dough)
Warm, soft dinner rolls are perfect for soaking up gravy and rounding out the Thanksgiving meal.
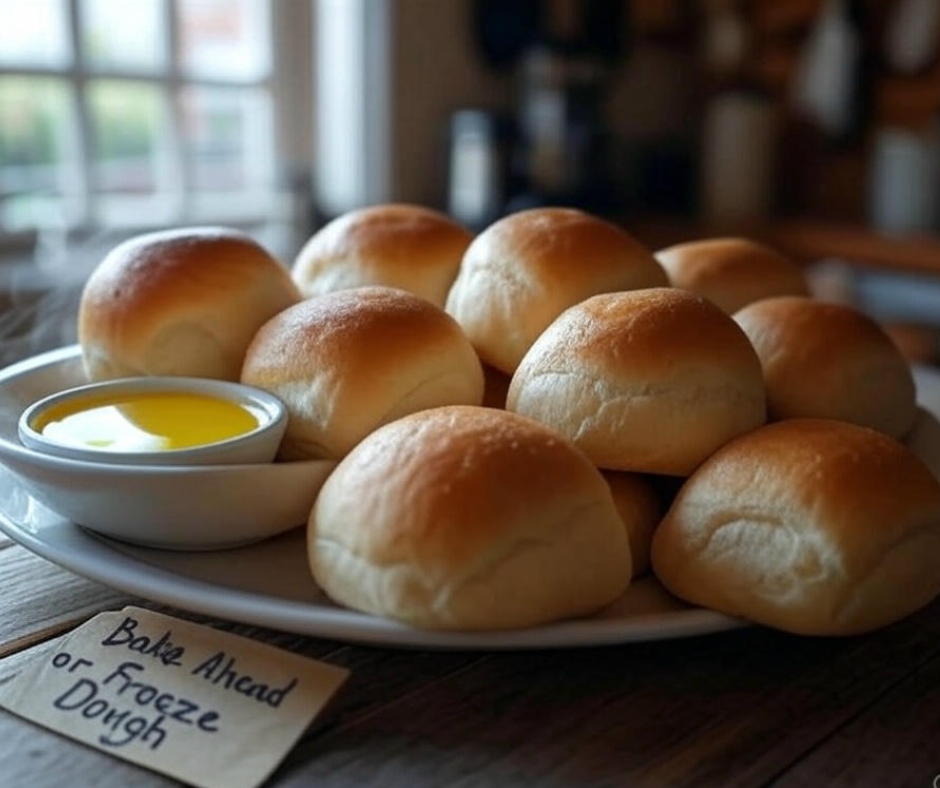
Why Homemade Rolls Don’t Have to Be a Day-Of Burden
Yeast doughs can seem intimidating, but many recipes are quite forgiving. You can bake rolls completely ahead of time and rewarm them.
Alternatively, prepare the dough and let it do its first rise. Then shape the rolls and freeze them, ready to thaw and bake.
Essential Ingredients You Will Need
- 1 cup warm milk (105°F to 115°F)
- 2 1/4 teaspoons active dry yeast (1 packet)
- 2 tablespoons granulated sugar
- 1 large egg, at room temperature
- 1/4 cup unsalted butter, melted and cooled slightly
- 3 to 3 1/2 cups all purpose flour
- 1 teaspoon salt
- Optional: Melted butter for brushing
Your Advance Preparation Masterplan (Option 1: Bake Ahead)
In a large bowl or the bowl of a stand mixer, dissolve the yeast and sugar in the warm milk. Let it sit for 5 to 10 minutes, until foamy.
Add the egg, melted butter, salt, and 3 cups of flour. Mix on low speed with a dough hook (or stir with a wooden spoon) until a shaggy dough forms.
Gradually add more flour, a little at a time, until the dough pulls away from the sides of the bowl. It should be soft and slightly tacky, but not sticky.
Knead the dough on a lightly floured surface for 5 to 7 minutes (or with dough hook for 5 minutes). Knead until it’s smooth and elastic.
Place the dough in a lightly oiled bowl, turning to coat. Cover and let it rise in a warm place for 1 to 1.5 hours, or until doubled in size.
Punch down the dough. Divide it into 12 to 16 equal pieces. Shape each piece into a smooth ball. Arrange the rolls in a greased 9×13 inch baking pan or on a parchment lined baking sheet.
Cover and let them rise again for 30 to 45 minutes, or until puffy.
Preheat oven to 375°F (190°C). Bake for 15 to 20 minutes, or until golden brown. If desired, brush with melted butter immediately after removing from oven.
Let the rolls cool completely. Store them in an airtight container or zip top bag at room temperature for up to 2 days. Or freeze for longer storage.
Your Advance Preparation Masterplan (Option 2: Freeze Dough)
Prepare dough and let it complete the first rise as described above. Punch down and shape into rolls.
Place shaped rolls on a parchment lined baking sheet. Do not let them do the second rise. Flash freeze them on the sheet until solid, about 1 to 2 hours.
Transfer frozen rolls to a freezer safe bag or container. They can be frozen for up to 1 month.
Thanksgiving Day: Serving Your Rolls
For rolls baked ahead: Reheat them in a 300°F (150°C) oven for 5 to 10 minutes. Wrap them in foil to keep them soft.
For frozen dough rolls: The night before Thanksgiving, remove rolls from freezer. Arrange them in a greased baking pan. Cover loosely with greased plastic wrap. Let them thaw and rise in the refrigerator overnight (8 to 12 hours).
Alternatively, for a quicker thaw and rise: Let them sit at room temperature for 3 to 5 hours. They should be puffy and nearly doubled.
Once risen, bake as directed in the original recipe (375°F for 15-20 minutes). Brush with melted butter if desired.
Pro Tips for Perfect Rolls
Ensure your yeast is fresh and active. The foaming step is crucial. If it doesn’t foam, your yeast may be old.
Don’t add too much flour. The dough should be soft. Too much flour results in dense, heavy rolls.
A warm, draft free place is best for rising dough. An oven with just the light on can work well.
For an extra rich flavor, use whole milk or even add a tablespoon of honey to the dough.
Brushing with an egg wash (1 egg beaten with 1 tablespoon water) before baking gives a shiny, golden crust.
These rolls can also be shaped into Parker House style or cloverleaf rolls for a different presentation.
8. Vibrant Autumn Harvest Salad (Components Prepped)
A fresh, crisp salad provides a welcome contrast to the richer Thanksgiving dishes. This one is packed with seasonal flavors.

Why This Salad Simplifies Your Thanksgiving Spread
Salads are best assembled just before serving for optimal freshness. However, all the individual components can be prepped well in advance.
Chopping vegetables, making the dressing, and toasting nuts ahead means assembly is a quick, last minute task.
Essential Ingredients You Will Need
For the Salad:
- 10 ounces mixed greens (spinach, arugula, romaine blend)
- 1 large apple (Honeycrisp or Fuji), cored and thinly sliced or diced
- 1 pear, cored and thinly sliced or diced
- 1/2 cup dried cranberries or pomegranate seeds
- 1/2 cup toasted pecans or walnuts, roughly chopped
- 1/4 cup crumbled goat cheese or feta cheese (optional)
For the Apple Cider Vinaigrette:
- 1/2 cup olive oil
- 1/4 cup apple cider vinegar
- 2 tablespoons maple syrup or honey
- 1 tablespoon Dijon mustard
- 1 small shallot, minced (optional)
- Salt and freshly ground black pepper to taste
Your Advance Preparation Masterplan
Up to 2 to 3 days ahead: Make the apple cider vinaigrette. Combine all vinaigrette ingredients in a jar with a tight fitting lid. Shake vigorously until emulsified. Store in the refrigerator. Bring to room temperature and shake again before using.
Toast the pecans or walnuts. Cool completely and store in an airtight container at room temperature.
Wash and dry your mixed greens thoroughly. Store them in a container lined with paper towels, or in a salad spinner, in the refrigerator.
The day before or morning of Thanksgiving: Core and slice/dice the apple and pear. To prevent browning, toss them with a little lemon juice or some of the prepared vinaigrette. Store in an airtight container in the refrigerator.
If using pomegranate seeds, deseed the pomegranate. Store the arils in an airtight container in the fridge. Crumble the cheese if using.
Thanksgiving Day: Quick Assembly
Just before serving, place the prepared mixed greens in a large salad bowl. Add the sliced apples and pears, dried cranberries or pomegranate seeds, and toasted nuts.
Give the vinaigrette a good shake. Pour about half of it over the salad. Toss gently to coat. Add more dressing as needed, to your preference. Avoid over dressing.
Sprinkle the crumbled goat cheese or feta over the top, if using. Serve immediately.
Pro Tips for a Showstopping Salad
Use a variety of greens for texture and flavor. A mix of tender and slightly bitter greens works well.
Choose firm, crisp apples and pears that hold their shape. Soaking sliced apples in a little salt water (1/2 tsp salt per cup of water) for 10 minutes, then rinsing, also prevents browning effectively.
Roast some cubed butternut squash or sweet potato. Let it cool and add it to the salad for extra heartiness and fall flavor.
Candied pecans or walnuts add a delightful sweet crunch. You can make these a few days ahead too.
For a different flavor profile, try a balsamic vinaigrette or a poppy seed dressing.
To make it a main course salad after Thanksgiving, add leftover shredded turkey.
9. Classic Pumpkin Pie (Bake Ahead, Flavors Improve)
Is it even Thanksgiving without pumpkin pie? This quintessential dessert is a must have for many.

Why Pumpkin Pie is Perfect for Advance Baking
Pumpkin pie, like many custard based pies, actually benefits from chilling. The flavors meld and the filling sets up perfectly.
Baking it a day or two ahead means your oven is free on Thanksgiving. Plus, you get dessert duty out of the way.
Essential Ingredients You Will Need
- 1 (15 ounce) can pure pumpkin puree (not pumpkin pie filling)
- 1 (12 ounce) can evaporated milk
- 3/4 cup granulated sugar
- 1 teaspoon ground cinnamon
- 1/2 teaspoon ground ginger
- 1/4 teaspoon ground cloves
- 1/4 teaspoon ground nutmeg
- 1/2 teaspoon salt
- 2 large eggs, lightly beaten
- 1 (9 inch) unbaked pie crust (homemade or store bought)
Your Advance Preparation Masterplan
You can make your pie crust several days in advance. Wrap it well and refrigerate, or freeze for longer storage. If frozen, thaw in the refrigerator overnight.
One or two days before Thanksgiving, bake the pie. Preheat your oven to 425°F (220°C).
If using a homemade crust, roll it out and fit it into your 9 inch pie plate. Crimp the edges decoratively. If using a store bought crust, unroll it and place it in the pie plate.
In a large bowl, whisk together the pumpkin puree, evaporated milk, sugar, cinnamon, ginger, cloves, nutmeg, and salt. Mix until well combined and smooth.
Whisk in the lightly beaten eggs until just incorporated. Do not overmix.
Pour the pumpkin filling into the unbaked pie crust.
Carefully place the pie in the preheated oven. Bake at 425°F (220°C) for 15 minutes. This helps set the crust.
Then, reduce the oven temperature to 350°F (175°C). Continue baking for another 40 to 50 minutes. The pie is done when the edges of the filling are set, and the center is just slightly jiggly. A knife inserted near the center should come out mostly clean.
If the crust edges start to brown too quickly, cover them with a pie shield or strips of aluminum foil.
Once baked, transfer the pie to a wire rack. Let it cool completely to room temperature, which can take 2 to 3 hours.
Once cooled, cover the pie loosely with plastic wrap. Refrigerate for at least 4 hours, or preferably overnight. It can be stored in the refrigerator for up to 3 days.
Thanksgiving Day: Serve and Enjoy
Remove the pumpkin pie from the refrigerator about 30 minutes to an hour before serving. Some prefer it chilled, others at cool room temperature.
Slice and serve with a dollop of whipped cream or a scoop of vanilla ice cream. A light dusting of cinnamon on the whipped cream is a nice touch.
Pro Tips for Pie Perfection
Use pure pumpkin puree, not pumpkin pie filling. Pie filling already contains sugar and spices.
Don’t overbake the pie. This can cause the filling to crack or become rubbery. The slight jiggle in the center is important.
For a smoother filling, you can strain the pumpkin mixture through a fine mesh sieve before pouring it into the crust. This removes any stringy bits from the pumpkin.
Blind baking the crust partially before adding the filling can help prevent a soggy bottom. Prick the bottom of the crust with a fork, line with parchment paper and pie weights (or dried beans), and bake at 375°F (190°C) for 15-20 minutes. Remove weights and paper, then add filling.
Spice it up! Add a pinch of black pepper or cardamom to the spice blend for a unique twist.
If you have leftover pumpkin filling, it can be baked in small ramekins for individual custard cups. Adjust baking time accordingly.
10. Creamy Butternut Squash Soup (A Perfect Starter)
A warm, velvety soup is an elegant way to begin the Thanksgiving meal. Butternut squash soup, with its autumnal flavors, is ideal.

Why This Soup is a Make-Ahead Marvel
Soups, especially pureed ones, often taste even better the next day. The flavors have more time to marry and deepen.
Making this soup entirely in advance means it just needs reheating. It’s a sophisticated starter with minimal day-of effort.
Essential Ingredients You Will Need
- 1 large butternut squash (about 3 pounds), peeled, seeded, and cubed
- 1 tablespoon olive oil
- 1 large onion, chopped
- 2 carrots, chopped
- 2 celery stalks, chopped
- 4 cloves garlic, minced
- 6 cups chicken or vegetable broth
- 1 teaspoon fresh thyme, chopped (or 1/2 teaspoon dried)
- 1/2 teaspoon ground nutmeg
- Salt and freshly ground black pepper to taste
- 1/2 cup heavy cream or coconut milk (optional, for richness)
- Optional garnishes: Toasted pumpkin seeds, a swirl of cream, croutons, fresh sage
Your Advance Preparation Masterplan
You can roast or boil the butternut squash. For roasting (which adds more flavor): Toss cubed squash with a little olive oil, salt, and pepper. Roast at 400°F (200°C) for 25 to 30 minutes, until tender.
Alternatively, you can boil the squash cubes until tender.
While squash cooks (or using pre-cooked squash): Heat 1 tablespoon of olive oil in a large pot or Dutch oven over medium heat. Add the chopped onion, carrots, and celery. Sauté until softened, about 8 to 10 minutes. Add the minced garlic and cook for another minute until fragrant.
Add the cooked butternut squash to the pot. Stir in the chicken or vegetable broth, thyme, and nutmeg. Season with salt and pepper.
Bring the soup to a boil, then reduce heat and simmer. Cook for 15 to 20 minutes to allow flavors to meld.
Carefully transfer the soup to a blender in batches. Or use an immersion blender directly in the pot. Blend until very smooth and creamy. Be cautious when blending hot liquids.
If using, stir in the heavy cream or coconut milk for extra richness. Taste and adjust seasonings as needed. Add more salt, pepper, or nutmeg if desired.
Let the soup cool completely. Transfer to airtight containers and refrigerate for up to 3 days. It can also be frozen for up to 3 months.
Thanksgiving Day: Reheat and Garnish
If frozen, thaw the soup in the refrigerator overnight.
Reheat the soup gently on the stovetop over medium low heat. Stir occasionally until warmed through. Do not let it boil if cream has been added.
If the soup is too thick, you can add a little more broth or water to reach your desired consistency.
Ladle the warm soup into bowls. Garnish with toasted pumpkin seeds, a swirl of cream, homemade croutons, or finely chopped fresh sage.
Pro Tips for Superb Soup
Roasting the butternut squash, along with the onions, carrots, and celery, before adding to the pot deepens the flavor significantly.
A Granny Smith apple, peeled, cored, and chopped, can be sautéed with the vegetables. It adds a lovely tartness that complements the sweet squash.
For a bit of warmth, add a pinch of cayenne pepper or a dash of curry powder. Ginger also pairs beautifully with butternut squash.
If you don’t have an immersion blender, be very careful when using a standard blender. Fill it only one third full, remove the center cap from the lid, and cover the opening with a folded kitchen towel to allow steam to escape.
For a dairy free version, use full fat coconut milk instead of heavy cream. It adds a subtle, pleasant flavor.
Save the butternut squash seeds! Clean them, toss with a little oil and salt, and roast until crispy for a great snack or soup garnish.
11. Ultimate Baked Macaroni and Cheese (Assemble Ahead)
Macaroni and cheese is pure comfort food. A baked version, with its creamy interior and golden crust, is a welcome addition to any Thanksgiving table.

Why Baked Mac and Cheese Loves Advance Prep
The cheese sauce can be made, pasta cooked, and the entire dish assembled a day or two in advance. This saves significant stovetop and prep time on the holiday.
Like many casseroles, the flavors can even meld a bit while it chills, making it extra delicious.
Essential Ingredients You Will Need
- 1 pound elbow macaroni or other short pasta shape
- 1/2 cup (1 stick) unsalted butter
- 1/2 cup all purpose flour
- 4 cups whole milk, warmed
- 1 teaspoon salt
- 1/2 teaspoon black pepper
- 1/4 teaspoon ground nutmeg (optional)
- 1/2 teaspoon Dijon mustard (optional)
- 4 cups (16 ounces) shredded sharp cheddar cheese
- 2 cups (8 ounces) shredded Gruyere, Monterey Jack, or Colby cheese
- Optional Topping: 1 cup panko breadcrumbs mixed with 2 tablespoons melted butter
Your Advance Preparation Masterplan
Cook the macaroni according to package directions until al dente. It should be slightly undercooked as it will bake further. Drain well and set aside.
In a large saucepan or Dutch oven, melt the butter over medium heat. Whisk in the flour and cook, whisking constantly, for 1 to 2 minutes to create a roux.
Gradually whisk in the warmed milk. Continue whisking until the sauce is smooth and begins to thicken, about 5 to 7 minutes.
Reduce heat to low. Stir in the salt, pepper, nutmeg (if using), and Dijon mustard (if using).
Remove the sauce from the heat. Gradually add the shredded cheeses, stirring until melted and smooth. Reserve about 1/2 cup of cheese for topping if not using breadcrumbs.
Add the cooked macaroni to the cheese sauce. Stir gently to coat all the pasta evenly.
Transfer the macaroni and cheese mixture to a greased 9×13 inch baking dish. If using reserved cheese for topping, sprinkle it over now. If using panko topping, combine panko and melted butter, then sprinkle over the mac and cheese.
Let the dish cool completely. Cover tightly with foil or plastic wrap and refrigerate for up to two days.
Thanksgiving Day: Bake to Golden Bubbly Goodness
Remove the macaroni and cheese from the refrigerator about 30 to 60 minutes before baking. This helps it bake more evenly.
Preheat your oven to 375°F (190°C). If covered with plastic wrap, remove it and cover with foil.
Bake, covered with foil, for 20 to 25 minutes. Then, remove the foil and continue baking for another 15 to 20 minutes. The mac and cheese should be bubbly around the edges and the topping golden brown.
If it’s not browning enough, you can place it under the broiler for a minute or two. Watch very closely to prevent burning.
Let it rest for 5 to 10 minutes before serving. This allows the sauce to set slightly.
Pro Tips for Mac and Cheese Magic
Use good quality cheese and shred it yourself. Pre-shredded cheese often contains anti caking agents that can make the sauce grainy. A blend of cheeses adds depth of flavor.
Warming the milk before adding it to the roux helps create a smoother sauce and prevents lumps.
Do not overcook the pasta initially. Al dente is key, as it will continue to cook in the oven.
For extra creaminess, you can substitute some of the whole milk with evaporated milk or heavy cream.
Flavor boosters: Add a pinch of cayenne pepper for a little kick, or some smoked paprika for a smoky flavor. Cooked, crumbled bacon or sautéed onions can also be stirred in.
If reheating leftovers, do so gently. Add a splash of milk to restore creaminess if needed.
12. Colorful Crudités Platter with Dips (All Prep Ahead)
A vibrant crudités platter offers a fresh, healthy, and visually appealing appetizer. It requires no cooking on Thanksgiving Day.

Why a Crudités Platter is a Sanity Saver
All the components, from chopping vegetables to making dips, can be done days in advance. Assembly is quick and easy.
It provides a light, guilt free option for guests to nibble on while awaiting the main feast. This keeps hunger at bay without being too filling.
Essential Ingredients You Will Need
For the Vegetables (Choose a variety):
- Carrot sticks
- Celery sticks
- Bell pepper strips (various colors)
- Cucumber slices or spears
- Broccoli florets
- Cauliflower florets
- Cherry tomatoes
- Radishes, halved or sliced
- Snap peas or snow peas
For the Dips (Choose 2 or 3):
- Hummus (store bought or homemade)
- Ranch dip (store bought or homemade from mix)
- Spinach artichoke dip (can be made ahead and served cold or warmed)
- Guacamole (best made closer to serving, or use a store-bought version with good reviews)
- Baba ghanoush
Your Advance Preparation Masterplan
Up to 2 to 3 days ahead: Prepare your chosen dips (except possibly guacamole, which browns). Store homemade dips in airtight containers in the refrigerator.
Wash and chop all your vegetables. Ensure they are thoroughly dry. Store each type of vegetable in separate airtight containers or resealable bags lined with a paper towel. This keeps them crisp. Carrots and celery sticks can be stored submerged in water to maintain extra crispness; drain well before arranging.
Thanksgiving Day: Artful Assembly
About an hour before guests arrive, start assembling your platter. Choose a large platter, board, or several smaller dishes.
Arrange the prepared vegetables artfully on the platter. Group similar colors together or create patterns. Think about height and texture.
Spoon your chosen dips into small serving bowls. Place these bowls strategically on the platter amongst the vegetables.
If you made guacamole fresh, do it now. If using store bought, transfer it to a serving bowl.
Cover the assembled platter loosely with plastic wrap. Keep it refrigerated until ready to serve.
Pro Tips for a Perfect Platter
Variety is key. Choose vegetables with different colors, shapes, and textures. This makes the platter more visually appealing and interesting to eat.
Blanching certain vegetables like broccoli, cauliflower, or green beans for a minute or two in boiling water, then immediately plunging into ice water, can enhance their color and make them more tender crisp. This is optional.
Don’t forget to provide small plates and napkins for guests. Small tongs or spoons for the dips are also helpful.
Add other elements for interest: Olives, pickles, marinated artichoke hearts, or even small cheese cubes can complement the vegetables and dips.
For a festive touch, garnish the platter with fresh herbs like parsley or dill. Edible flowers can also add a beautiful pop of color.
Keep the platter chilled. If it will be out for an extended period, consider placing the platter on a bed of ice or using a chilled serving dish.
Stress Less: General Make-Ahead Thanksgiving Strategies
Beyond individual recipes, a few overarching strategies can significantly reduce Thanksgiving Day stress. Planning is your most powerful tool.
Mastering Your Menu Plan
First, list every single dish you aim to serve, from appetizers to desserts. Be realistic about what you can achieve.
For each dish, note whether it can be made entirely ahead, partially prepped, or must be made on Thanksgiving Day. Prioritize make-ahead options.
Consider your oven space and burner availability. Stagger dishes that require the same oven temperature or stovetop cooking.
Don’t feel pressured to make everything from scratch if it overwhelms you. High quality store bought components (like pie crusts or dinner rolls) are perfectly acceptable.
Crafting Your Cooking Timeline
A detailed timeline is your roadmap to a calm Thanksgiving. Work backward from your desired dinner serving time.
Assign specific tasks to specific days. For example:
- 3-4 days out: Shop for non-perishables, make cranberry sauce, prepare pie dough.
- 2 days out: Bake pies, assemble casseroles (like stuffing or sweet potato), make soup base, chop vegetables for various dishes.
- 1 day out: Brine the turkey, make mashed potatoes, assemble salads (components separate), set the table.
- Thanksgiving Day: Roast turkey, reheat make-ahead dishes, make gravy (using pre-made base and drippings), toss salad, finish last minute items.
Write down cooking times and temperatures for everything that needs to be heated or baked on Thanksgiving Day.
Smart Shopping: Your First Step to Success
Once your menu and timeline are set, create a comprehensive shopping list. Check your pantry, fridge, and freezer for items you already have.
Divide your list into non-perishables and perishables. Purchase non-perishable items like canned goods, spices, flour, sugar, and drinks a week or more in advance.
Shop for perishable items like fresh vegetables, dairy, and the turkey 2 to 3 days before Thanksgiving. This ensures freshness and helps avoid crowded stores.
Remember to buy storage containers, foil, and plastic wrap if you’re running low.
Savvy Storage Solutions
Adequate storage is crucial for a make-ahead strategy. Clear out your refrigerator and freezer beforehand to make space.
Invest in a good set of airtight containers in various sizes. Label everything clearly with the dish name and the date it was prepared. This prevents confusion.
Disposable aluminum foil pans can be a lifesaver for some casseroles. They reduce cleanup and can go from fridge to oven easily.
Plan where each make-ahead dish will be stored. Some items might need specific spots in the fridge to maintain temperature.
The Power of Delegation
You do not have to be a Thanksgiving superhero doing everything alone. Accept help when offered, and don’t be afraid to ask for it.
Assign specific, manageable tasks to family members or guests. Kids can help set the table, wash vegetables, or arrange a relish tray.
Someone else can be in charge of drinks, or bringing a simple appetizer or dessert. Even small contributions lighten your load.
Sharing the effort not only reduces your stress but can also make the holiday more enjoyable for everyone involved.
Embrace a Joyful, Stress-Free Thanksgiving
By strategically preparing dishes in advance, you transform your Thanksgiving Day experience. The usual kitchen frenzy can be replaced with a sense of calm and control.
You will find yourself more organized, less frazzled, and with significantly more time to connect with your family and friends. These moments are what the holiday is truly about.
Savor the delicious feast you have thoughtfully prepared. Enjoy the laughter, the stories, and the warmth of togetherness.
This Thanksgiving, let the focus be on gratitude and connection, not on last minute kitchen chaos. With these make-ahead recipes and tips, you are well on your way to a truly joyful and memorable celebration.
Happy Thanksgiving!