Table of Contents
- Embracing Gluten-Free Traditions for Your Easter Table
- Moist Gluten-Free Carrot Cake with Tangy Cream Cheese Frosting
- Traditional Fruit-Studded Gluten-Free Hot Cross Buns
- Vibrant Lemon Bars on a Buttery Shortbread Crust
- Easy 5-Ingredient Coconut Macaroons Dipped in Chocolate
- Festive Cut-Out Gluten-Free Sugar Cookies with Royal Icing
- Elegant Strawberry and Cream Pavlova Wreath
- Savory Cheddar and Chive Gluten-Free Biscuits
- The Art of Inclusive Hosting
- Refining Your Hosting Strategy
Hosting a sophisticated Easter gathering requires the same precision as a well executed floor plan. Every detail, from the structural integrity of your menu to the layout of your dining space, must work in harmony.
For those navigating gluten free requirements, the challenge lies in maintaining a high standard of texture and flavor without compromising on the aesthetic appeal of traditional holiday confections.
The final phase of any project is the styling. Once the foundation is set, you can apply your creative vision to infuse each dish with elegance and charm.
By blending technical baking proficiency with an eye for detail, you will create an environment that caters to all guests. These comprehensive guides provide the reliable blueprints needed for a flawless and inclusive celebration.
Embracing Gluten-Free Traditions for Your Easter Table
Curating a holiday menu often centers on inclusivity. We want every guest to feel welcomed by the spread before them.
A gluten-free Easter table creates a safe haven for those with dietary restrictions. It transforms necessity into a sophisticated culinary display.
The key lies in blending safety with high-end aesthetics. We avoid sterile labeling in favor of integrated design choices.
True hospitality lies in the details that make every guest feel seen, safe, and beautifully served.
Zoning Your Dessert Station for Flow
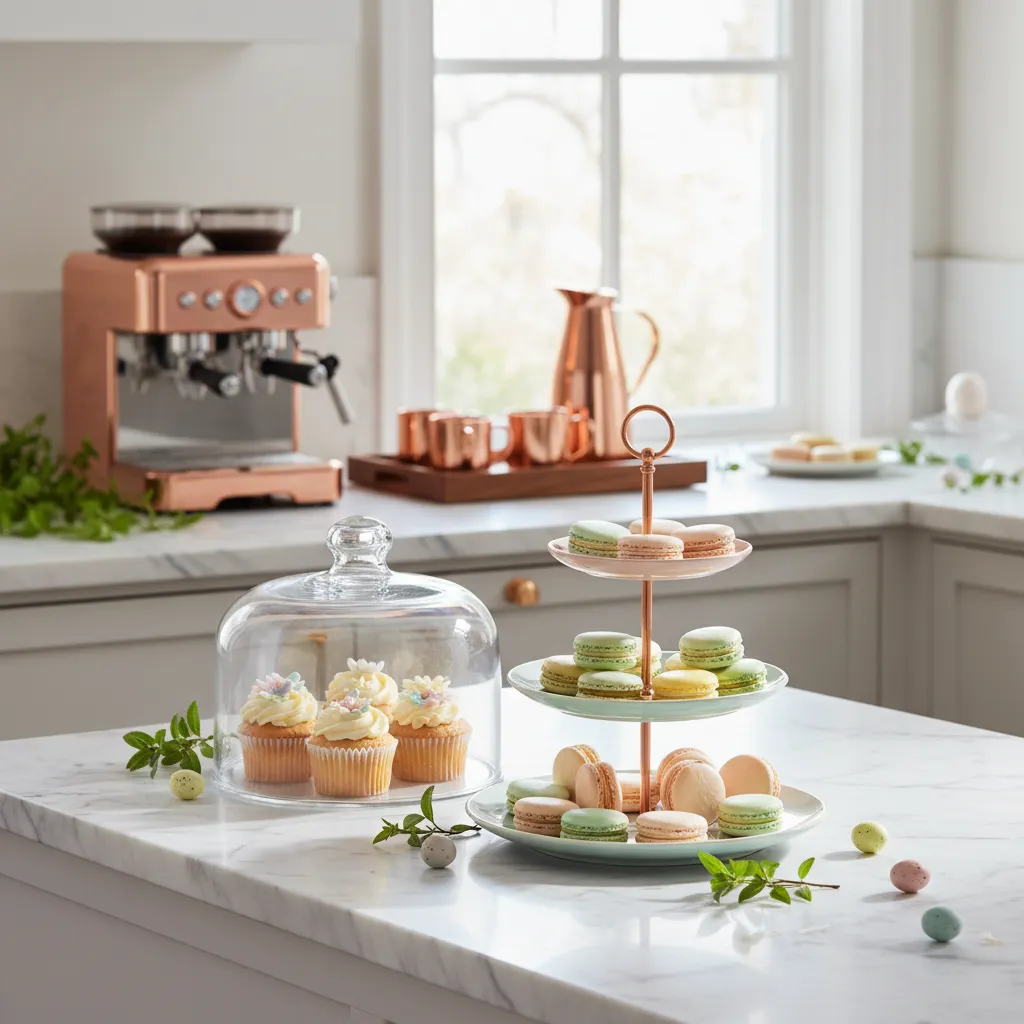
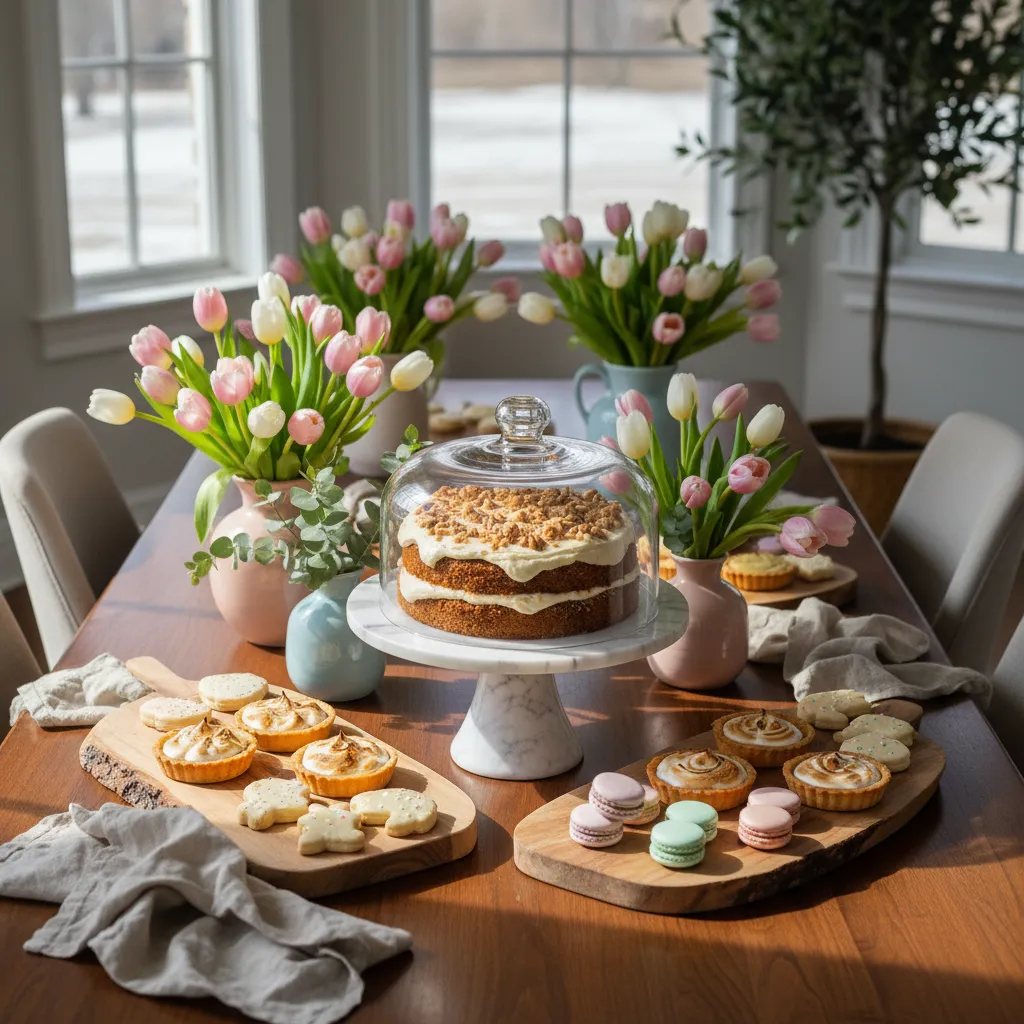
Clear designation of safe zones is vital for peace of mind. Use varying heights to separate gluten-free treats from standard fare.
A marble tiered stand works beautifully for this purpose. It keeps sensitive items elevated and distinct from other platters.
This vertical arrangement improves the visual ergonomics of the table. It draws the eye upward and creates a focal point.
Consider the traffic flow around your serving area. Guests should move seamlessly from the savory dishes to the sweets.
Pair your dessert station with simple home coffee bar ideas anyone can create today. This creates a cohesive flow for post-dinner relaxation.
Selecting Materials that Enhance Presentation
Gluten-free baking often yields denser textures that look stunning against natural materials. Raw wood boards enhance the rustic appeal.
Incorporate washed linen napkins in pastel hues. The fabric softens the look of the table and adds tactile warmth.
Glass cloches are excellent for maintaining moisture in gluten-free cakes. They also act as showcase windows for your culinary art.
Use slate or ceramic markers for elegant labeling. This avoids confusion without disrupting the sophisticated visual palette.
I believe that the way you set your table sets the mood for the meal.
Bunny Williams, Bunny Williams Home
Harmonizing Colors and Refreshments
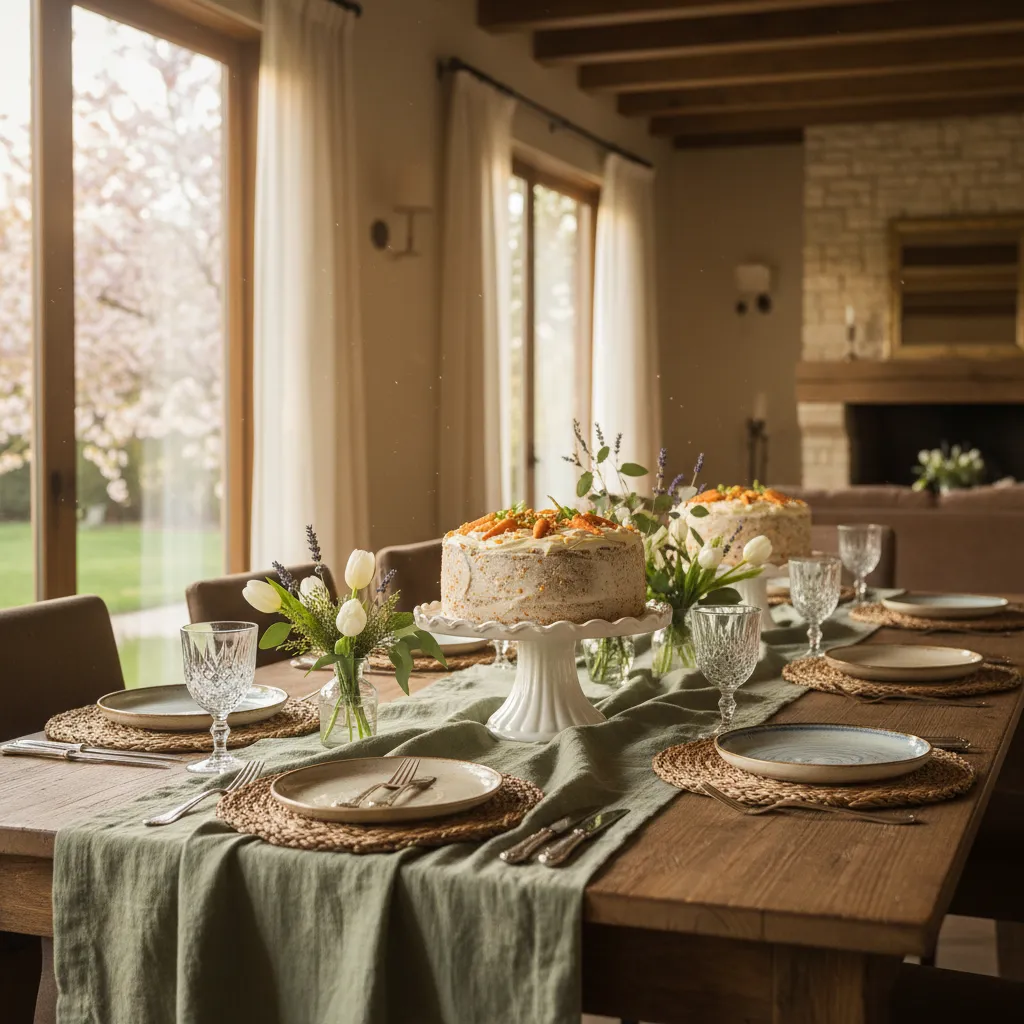
Fresh blooms breathe life into the dining area. Pastel tulips or white hydrangeas reflect the lightness of spring.
Coordinate these floral hues with your beverage choices to unify the room. A consistent color story elevates the entire design.
A pitcher based on pink drinks recipes non alcoholic adds a vibrant pop of color. It complements the soft browns of baked goods.
| Serving Vessel Material | Aesthetic Quality | Functional Benefit for GF Baking |
|---|---|---|
| Glass Dome/Cloche | Elegant, transparent, museum-like display. | Retains moisture essential for rice-flour based cakes. |
| Raw Wood Board | Rustic, grounded, organic warmth. | Contrasts beautifully with the smooth glaze of donuts. |
| Cool Marble Slab | Modern, sleek, clean lines. | Keeps cream-based fillings or frostings cool and firm. |
| Woven Rattan Tray | Bohemian, textured, casual comfort. | Allows airflow for crusty breads or dry cookies. |
The Hostess Secret
- Utilize verticality by placing gluten-free items on the highest tier of a marble stand; this physically prevents crumbs from standard pastries from falling onto sensitive dishes.
- Swap clinical dietary labels for elegant slate or ceramic markers to clearly identify safe options without compromising your table’s sophisticated visual palette.
- Display gluten-free baked goods under a glass cloche until serving to maintain essential moisture, as rice-flour based recipes can dry out more quickly than traditional wheat-based treats.
Moist Gluten-Free Carrot Cake with Tangy Cream Cheese Frosting
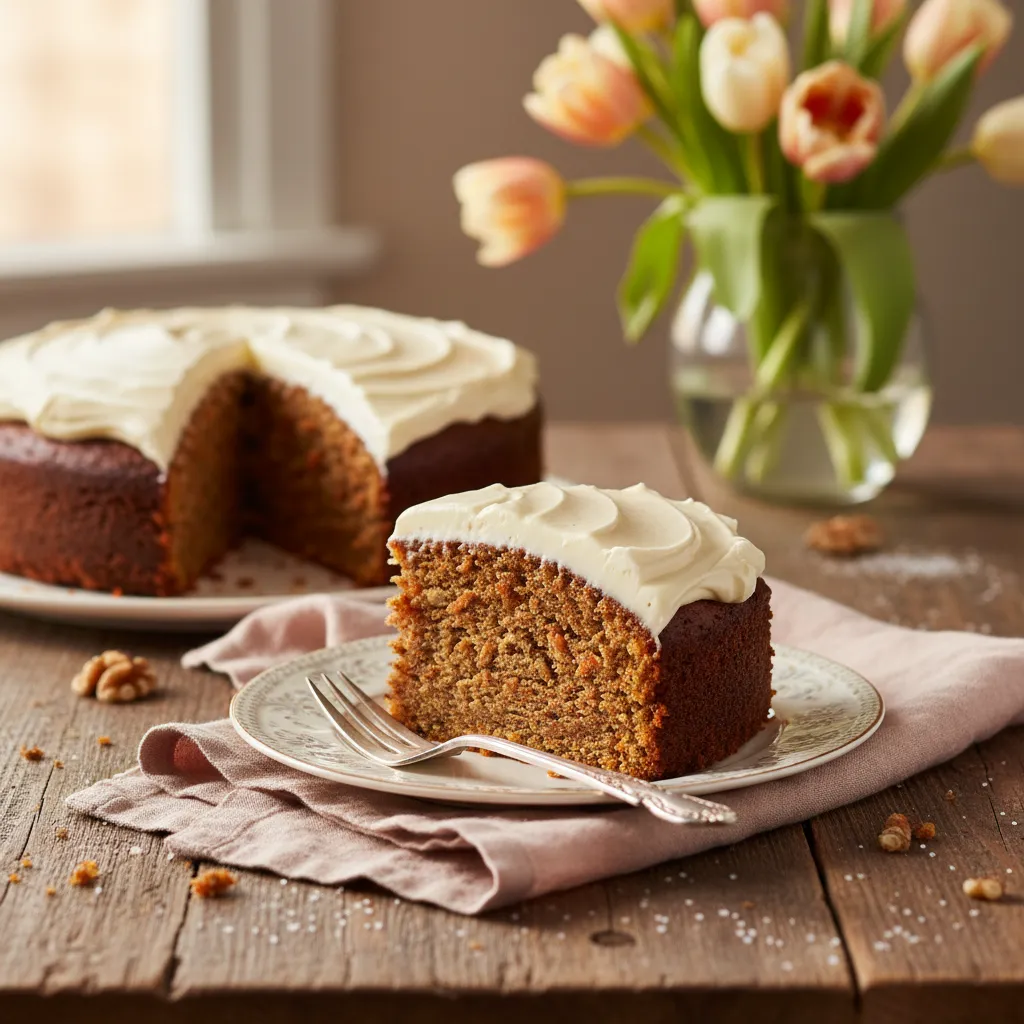
Creating a centerpiece for your holiday table requires balancing visual elegance with culinary engineering. This is especially true for Easter baking.
The architecture of a gluten-free cake demands specific attention to moisture retention. Without gluten, we rely on alternative binders for stability.
A successful sponge should possess a tight crumb that supports the weight of the carrots. It must look as inviting as it tastes on the platter.
We utilize almond flour to introduce a rich, nutty foundation. This ingredient mimics the density found in high-end traditional bakeries.
True design creates a space where function meets delight, and a well-baked cake is the heart of a welcoming home.
The visual texture of this dessert is characterized by the vibrant orange flecks of carrot. They contrast beautifully against the ivory frosting.
Just as you might choose flooring for durability, choose ingredients for performance. Freshly grated spices add a warmth that permeates the room.
If you appreciate the straightforward methods in our guide on Blueberry Coffee Cake Recipes Easy: One-Bowl Baking Guide, you will love this workflow.
Baking is a science. In gluten-free baking, you are replacing the protein structure of wheat with a lattice of starches and gums.
Nicole Hunn, Gluten Free on a Shoestring
Structural Integrity of Ingredients
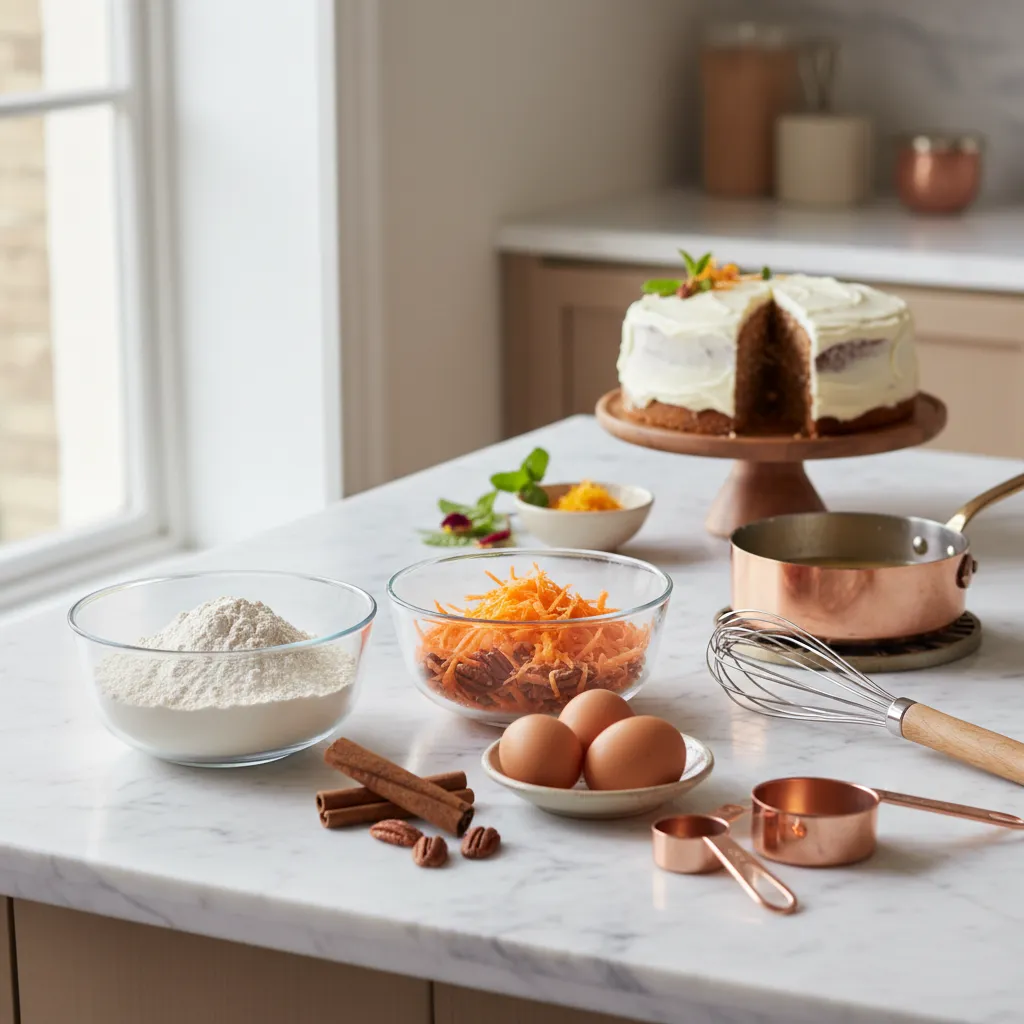
Selecting the right flour blend is critical for the cake’s framework. We analyze the performance of common gluten-free bases below.
| Flour Type | Texture Profile | Moisture Retention | Best Application |
|---|---|---|---|
| Superfine Almond | Dense & Moist | High | Base structure |
| Tapioca Starch | Chewy & Elastic | Medium | Binding agent |
| Coconut Flour | Fibrous & Dry | Very High | Use sparingly |
| Brown Rice Flour | Gritty if coarse | Low | Crisp edges |
Blending these flours creates a composite material that rivals wheat. This ensures the cake does not crumble when sliced for guests.
For the frosting, temperature control is paramount. Room temperature cream cheese ensures a smooth finish without lumps or air pockets.
Construction and Assembly
Follow this blueprint to assemble the cake layers. Precision here ensures a level rise and a professional presentation on your cake stand.
- Prep the Carrots: Grate carrots finely rather than coarsely. This allows them to melt into the batter, improving moisture distribution.
- Aeration Phase: Whisk eggs and sugar until doubled in volume. This mechanical leavening adds necessary lift to the heavy batter.
- Dry Integration: Fold the flour blend in gently. Over-mixing can deflate the air bubbles, resulting in a dense, rubbery puck.
- Baking Dynamics: Bake at a steady 350°F. Avoid opening the oven door, as thermal shock can cause the center to collapse.
- Cooling Period: Allow layers to cool completely on a wire rack. Frosting a warm cake will cause the structure to slide and melt.
Once cooled, apply the frosting with an offset spatula. Create swirls to catch the light, adding a tactile element to the visual design.
This cake pairs exceptionally well with creamy desserts. Consider adding our Perfectly Easy Crème Brûlée to your dessert table for variety.
Garnish with toasted pecans for a rustic finish. This adds a necessary crunch to balance the soft crumb and smooth frosting.
Master Architect’s Secrets
- Let your batter rest for 20 minutes before placing it in the oven to allow the gluten-free starches to fully hydrate, ensuring a smooth and grit-free crumb.
- Use a microplane or the finest side of your grater for the carrots; this ensures they melt into the batter during the bake, maximizing moisture without compromising the cake’s structural integrity.
- For a flawless finish, apply a thin ‘crumb coat’ of frosting and chill the cake for 30 minutes before the final layer to lock in moisture and prevent structural shifts.
Traditional Fruit-Studded Gluten-Free Hot Cross Buns
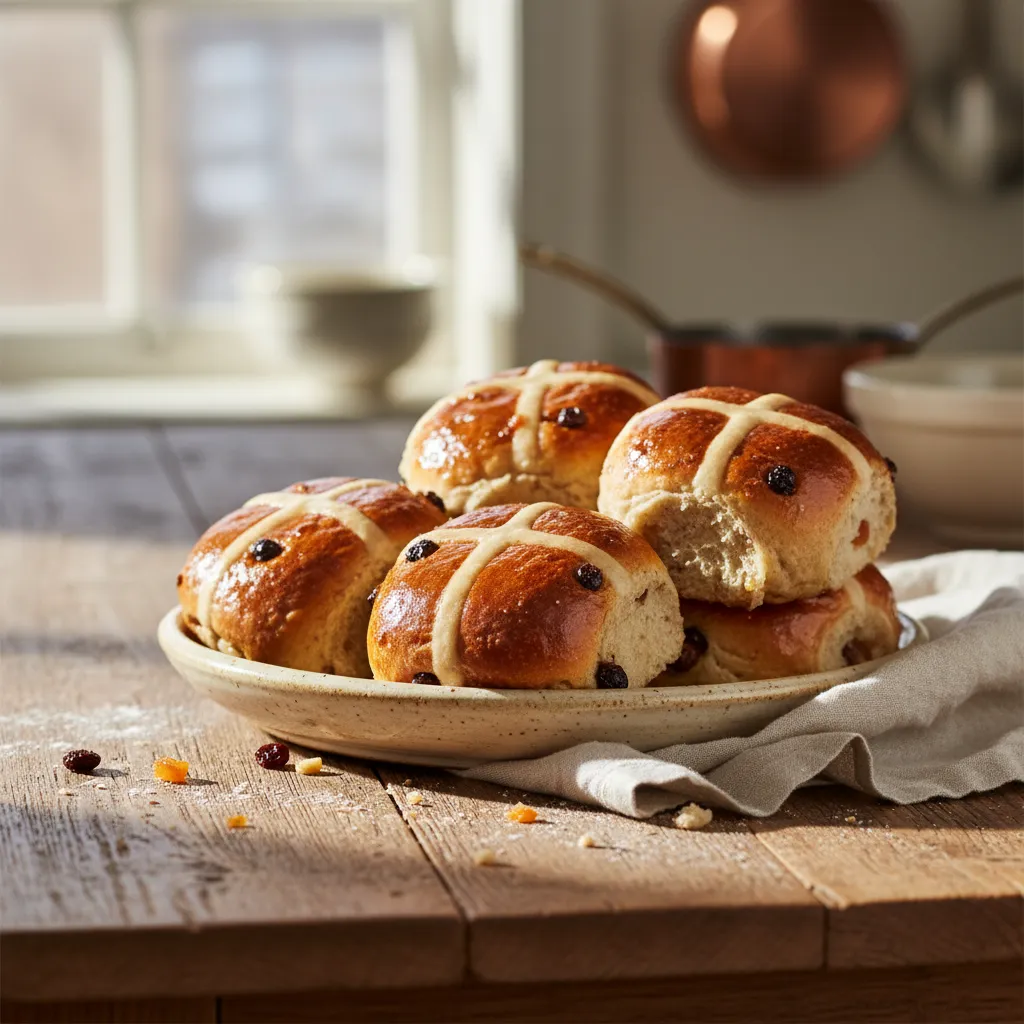
The aroma of spiced yeast dough rising in a warm kitchen sets the tone for a festive morning. It creates an inviting atmosphere that anchors the home.
Achieving the correct texture in Easter baking recipes gluten free requires precise hydration. The dough must be tacky to ensure a soft, moist crumb.
A proper fruit-studded bun should feel dense yet springy, avoiding the crumble often found in substitutes. This relies heavily on structural binding agents.
Baking is the architecture of the kitchen; structure and aesthetics must work in perfect harmony.
Engineering the Flour Blend
Not all flours behave efficiently in yeast-based applications. You need a blend that mimics the elasticity of wheat to hold the gas bubbles.
Xanthan gum or psyllium husk acts as the mortar in this construction. Without these binders, the buns will lack the necessary structural integrity.
Just as you would seek fluffy cinnamon roll recipes for comfort, these buns demand a soft rise. High starch content helps achieve this loft.
Hydration and Fruit Preparation
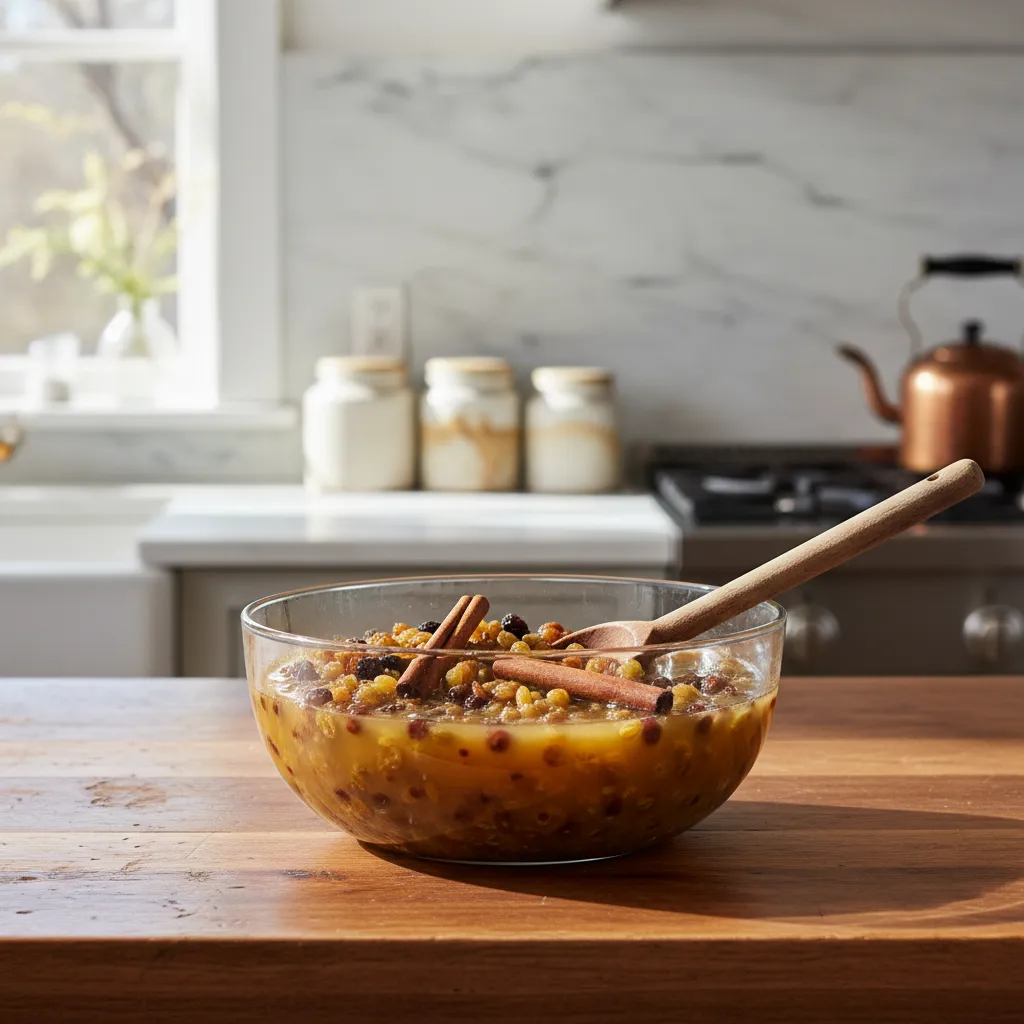
Dry fruit can leech moisture from the dough, leading to a dry final product. Pre-soaking currants in warm juice or tea is a functional necessity.
This process plumps the fruit, ensuring every bite contributes moisture rather than absorbing it. It also distributes flavor evenly throughout the crumb.
When baking gluten-free, the dough should be stickier than you think; more like a thick batter than a traditional bread dough.
Becky Excell, How to Make Anything Gluten Free
The Signature Cross and Glaze
The iconic cross is piped using a simple paste of flour and water before baking. It fuses with the crust, creating a textural contrast upon cooling.
For a professional finish, apply a syrup glaze immediately after the buns exit the oven. You can adapt homemade coffee syrup recipes to create unique flavor profiles.
This step seals the crust, preserving freshness and adding a brilliant sheen. It enhances the visual appeal on your holiday table setting.
Troubleshooting Texture Issues
Understanding the chemistry of your ingredients prevents common baking failures. Refer to this diagnostic guide for structural adjustments.
| Issue | Structural Cause | Correction Technique |
|---|---|---|
| Dense/Heavy Crumb | Insufficient hydration or expired yeast. | Increase liquid by 10% or proof in a warmer spot. |
| Gummy Texture | Under-baking or excessive starch. | Check internal temp reaches 205°F (96°C). |
| Rapid Staling | Lack of fat content in the dough. | Add an extra egg yolk or butter for longevity. |
| Flat Buns | Over-proofing weakened the structure. | Reduce the second rise time by 15 minutes. |
The GF Master’s Method
- To ensure a moist crumb, soak your dried fruit in hot tea or orange juice for 30 minutes before folding them into the dough.
- When piping the signature crosses, use a thick gluten-free flour and water paste to prevent the design from blurring or melting into the buns during baking.
- Always check the internal temperature of your buns with a probe thermometer; they should reach 205°F (96°C) to avoid a gummy texture.
Vibrant Lemon Bars on a Buttery Shortbread Crust
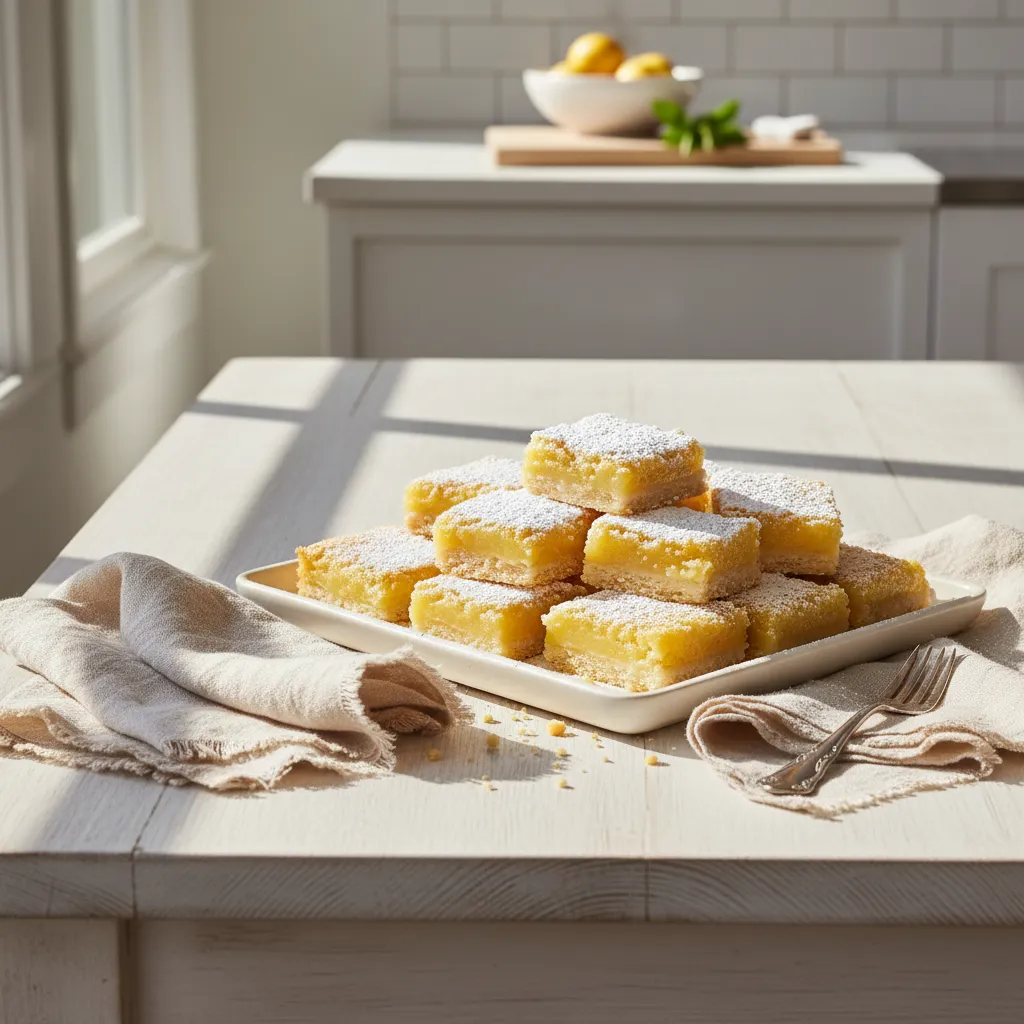
Lemon bars act as a culinary focal point, bringing a necessary burst of sunshine to your Easter tablescape. Their vibrant yellow hue mimics the natural light of spring.
The key to a successful gluten-free variation lies in the structural integrity of the base. A shortbread crust must support the dense custard without crumbling.
Design is not just about what you see, but how the elements function together; a perfect lemon bar balances tart brightness with a sturdy, buttery foundation.
We often treat baking like architecture; the foundation determines the longevity of the structure. In this case, your choice of gluten-free flour is critical.
Using a high-quality almond flour blend adds a rich texture that traditional wheat often lacks. This creates a crumb that is both tender and durable.
Structuring the Perfect Shortbread Base
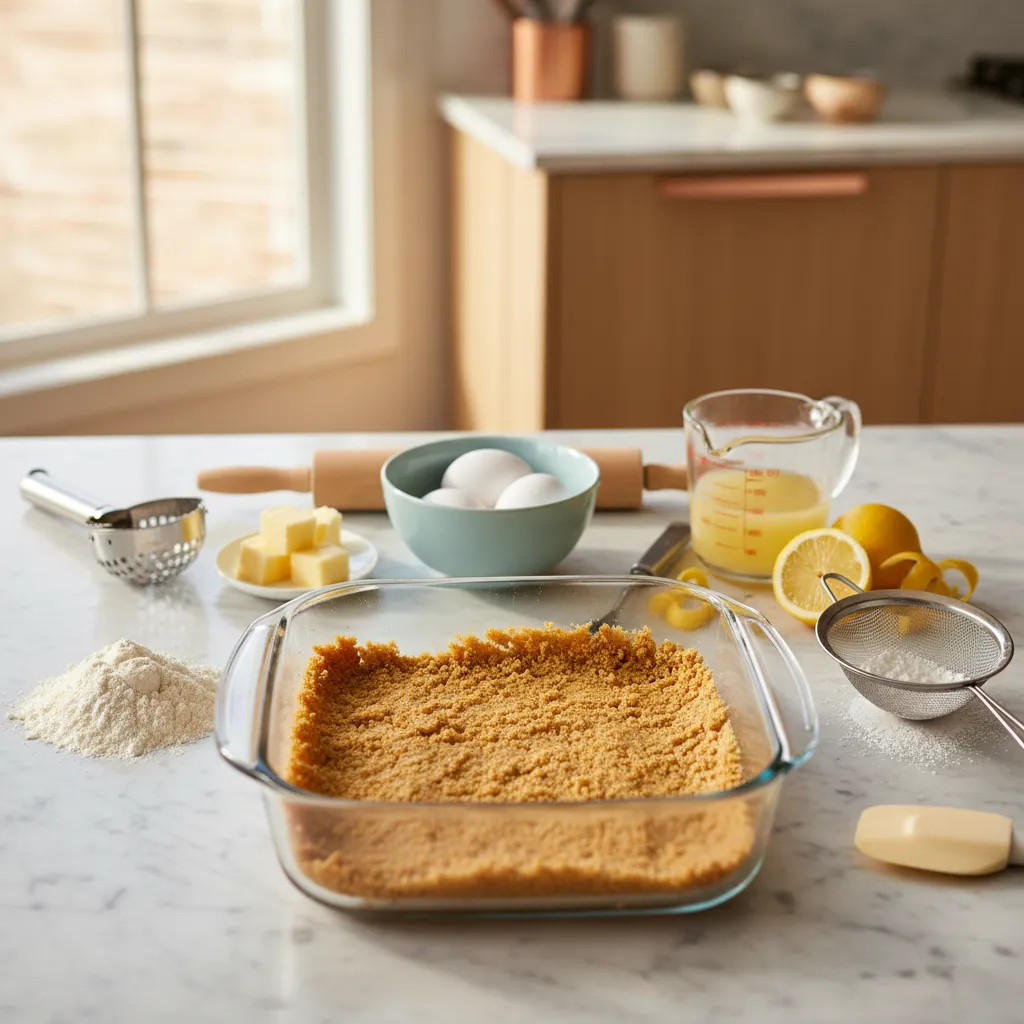
The ergonomics of eating a lemon bar require a crust that snaps cleanly. Cold butter is the essential material for creating these distinct layers.
If you enjoy citrus profiles, you might also explore Master Lemoncello Recipes Drinks Non Alcoholic Like a Pro for a beverage pairing. The tartness complements the sweet custard.
To ensure the base does not become soggy, par-baking is a non-negotiable step in the construction process. It seals the surface before the liquid filling is added.
The secret to a perfect lemon bar is all about the ratio of filling to crust. You want enough crust to hold the bar together, but not so much that it overwhelms the delicate lemon flavor.
Jennifer Segal, Once Upon a Chef
Material Selection for Texture
Choosing the right binding agent changes the mouthfeel significantly. Below is a breakdown of common gluten-free bases and their structural properties.
| Base Material | Texture Profile | Structural Stability |
|---|---|---|
| Almond Flour | Rich, nutty, slightly soft | Moderate; requires thorough cooling |
| 1:1 GF Blend | Crisp, classic snap | High; mimics wheat flour best |
| Coconut Flour | Dense, absorbent | Low; crumbles easily if handled warm |
| Oat Flour | Chewy, rustic | High; adds a hearty density |
Visual Presentation and Service
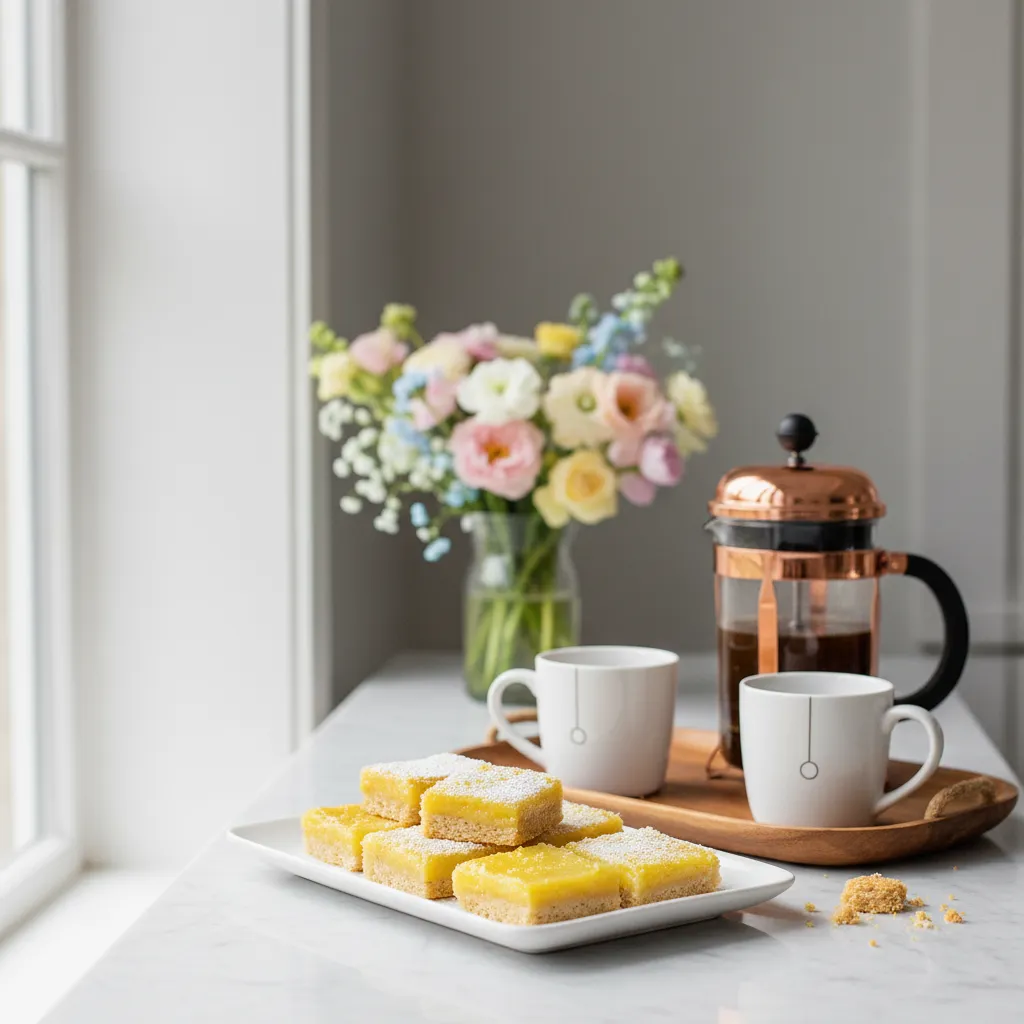
For the best visual impact, dust the bars with powdered sugar immediately before serving. This prevents the sugar from dissolving into the moist custard.
These treats pair exceptionally well with warm beverages. Consider setting up a station using Simple Home Coffee Bar Ideas Anyone Can Create Today to elevate the guest experience.
Allow the bars to cool completely in the pan to maintain their geometric shape. Cutting them while warm will compromise the clean lines of the squares.
The Baker’s Blueprint
- Chill the bars in the refrigerator for at least 2 hours before slicing to achieve sharp, architectural edges that won’t crumble or tear.
- Always par-bake your gluten-free crust until lightly golden to create a moisture barrier, ensuring the base stays crisp under the lemon custard.
- Use a fine-mesh sieve for the powdered sugar dusting immediately before serving to create a professional, even finish that resists dissolving.
Easy 5-Ingredient Coconut Macaroons Dipped in Chocolate
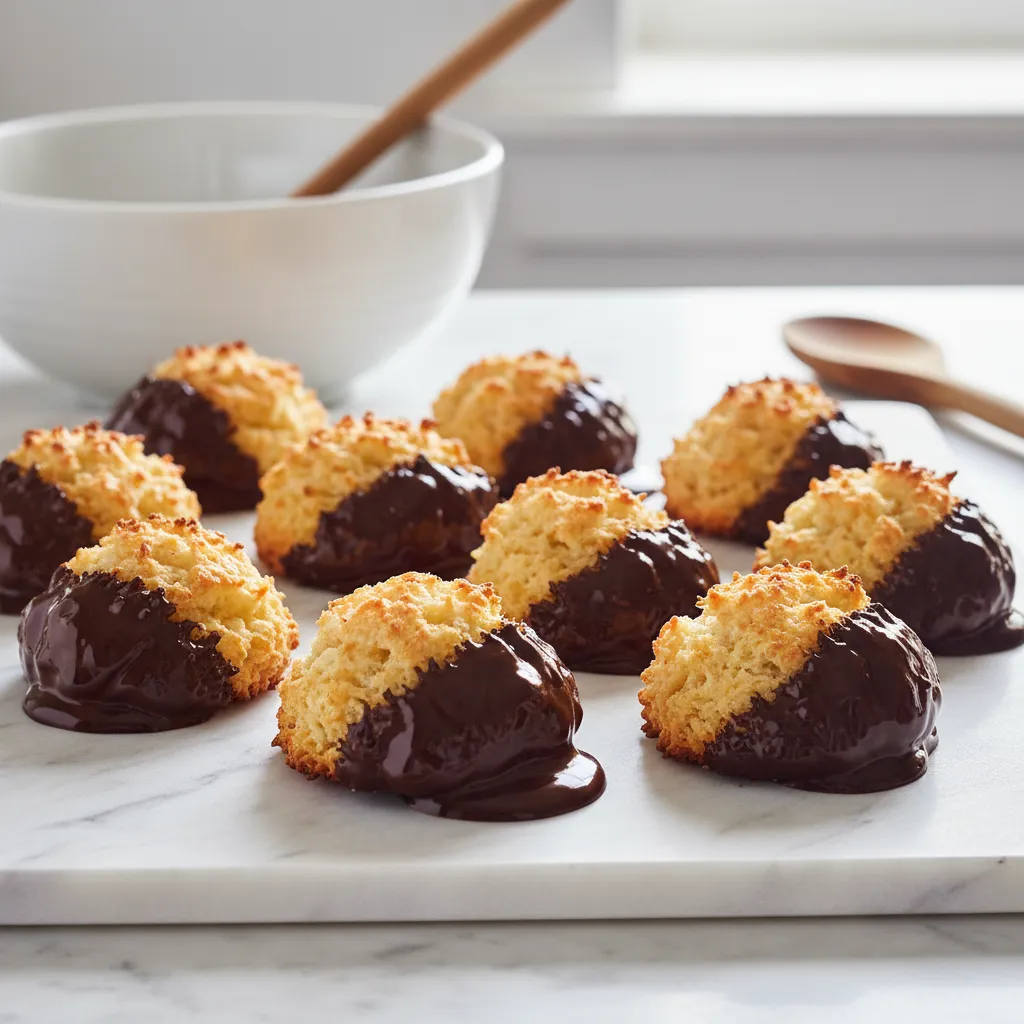
The visual appeal of these macaroons lies in their organic, mounded shape. The golden-brown peaks contrast beautifully with the smooth, dark chocolate dip, creating a sophisticated finish.
Texture is paramount in gluten-free baking. These treats offer a crisp exterior that protects a chewy, moist interior. The structural integrity relies on the binding power of egg whites.
Functionally, this recipe eliminates the need for flour blends entirely. It creates a seamless workflow in the kitchen, requiring only a single mixing bowl and minimal cleanup.
True elegance in design and baking often comes from the restraint of using fewer, higher-quality ingredients.
For a complete dessert table, consider the color palette. The deep brown chocolate pairs elegantly with pastel tones often found in spring decor.
You might serve these alongside creamy banana ice cream homemade to offer a cool, refreshing counterpoint to the dense coconut.
Mastering the Chocolate Temper
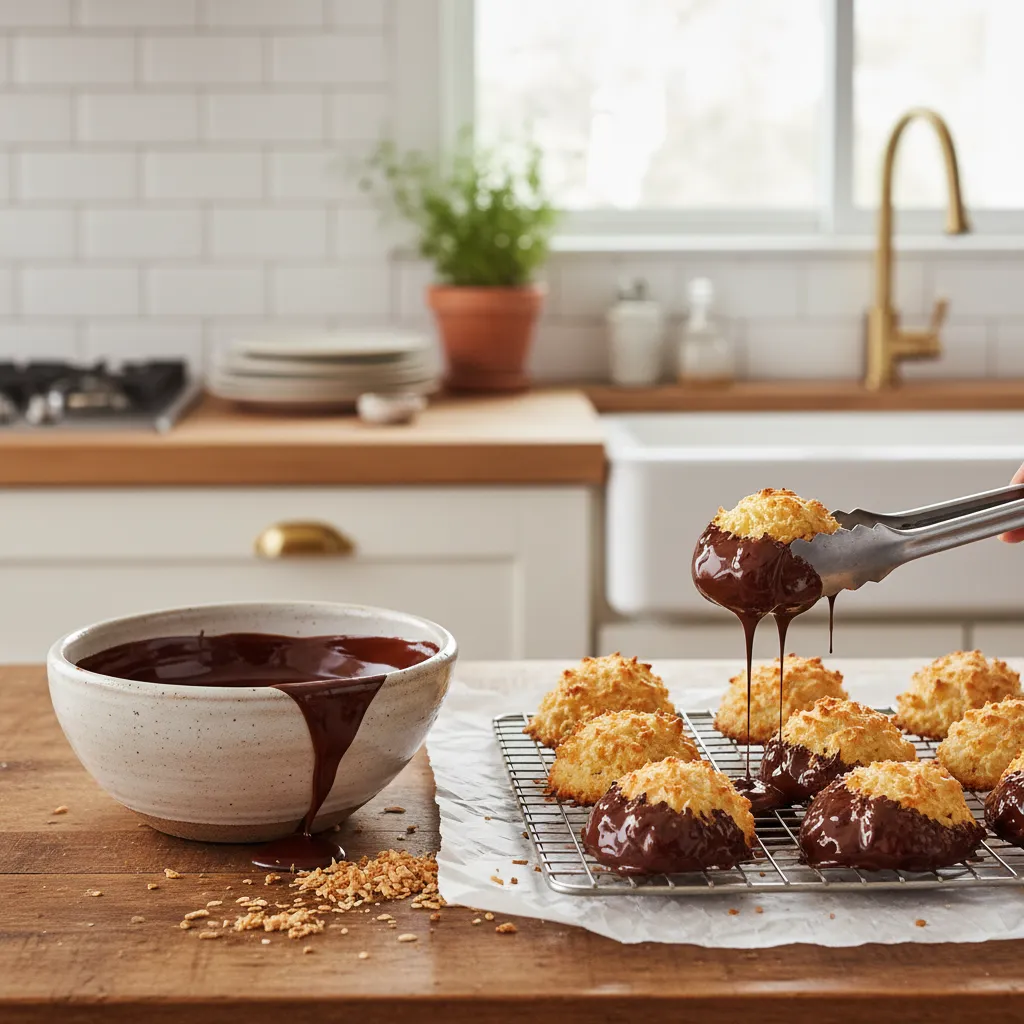
The finish of the chocolate determines the professional look of the final product. A properly tempered dip ensures a satisfying snap rather than a soft, dull coating.
When melting chocolate, avoid direct heat. A double boiler provides the gentle, ambient warmth needed to maintain the emulsification of cocoa butter solids.
The secret to a glossy finish is patience. If you rush the melting process, the chocolate loses its temper and will appear matte and streaky when it dries.
Jacques Torres, Mr. Chocolate
Allow the macaroons to set on parchment paper in a cool area. This ensures the bottoms remain flat and the chocolate creates a defined, sharp line against the toasted coconut.
If you are hosting a brunch, these pair beautifully with pink drinks recipes non alcoholic, creating a cohesive and festive aesthetic.
Troubleshooting Texture and Form
Even with five ingredients, spatial dynamics matter. The ratio of liquid to solid affects whether the macaroon holds its vertical lift or spreads into a flat disc.
Use this guide to diagnose common structural issues during the baking process.
| Visual Symptom | Structural Cause | Design Correction |
|---|---|---|
| Spreading / Puddling | Excess moisture content or under-whipped whites. | Add 2 tbsp more coconut to increase density. |
| Burnt Bottoms | Sugar content caramelizing too quickly on metal. | Use a silicone baking mat for heat diffusion. |
| Dry / Crumbly | Over-baked or insufficient binding agent. | Reduce bake time by 3 minutes; check oven calibration. |
| Dull Chocolate | Improper tempering or humidity exposure. | Add a teaspoon of coconut oil for sheen. |
Store these in an airtight glass container to maintain their chewiness. Exposure to air will harden the coconut sugars, compromising the delicate texture you worked to achieve.
Baker’s Secret
- Use a small cookie scoop to achieve perfectly uniform mounds, ensuring every macaroon bakes at the same rate and maintains that signature organic shape.
- For a professional-grade finish, stir a teaspoon of coconut oil into your melted chocolate to enhance the shine and create a smoother dipping consistency.
- Chill your freshly dipped macaroons on a parchment-lined tray for 15 minutes to ensure a clean, snap-worthy chocolate base that releases easily from the surface.
Festive Cut-Out Gluten-Free Sugar Cookies with Royal Icing
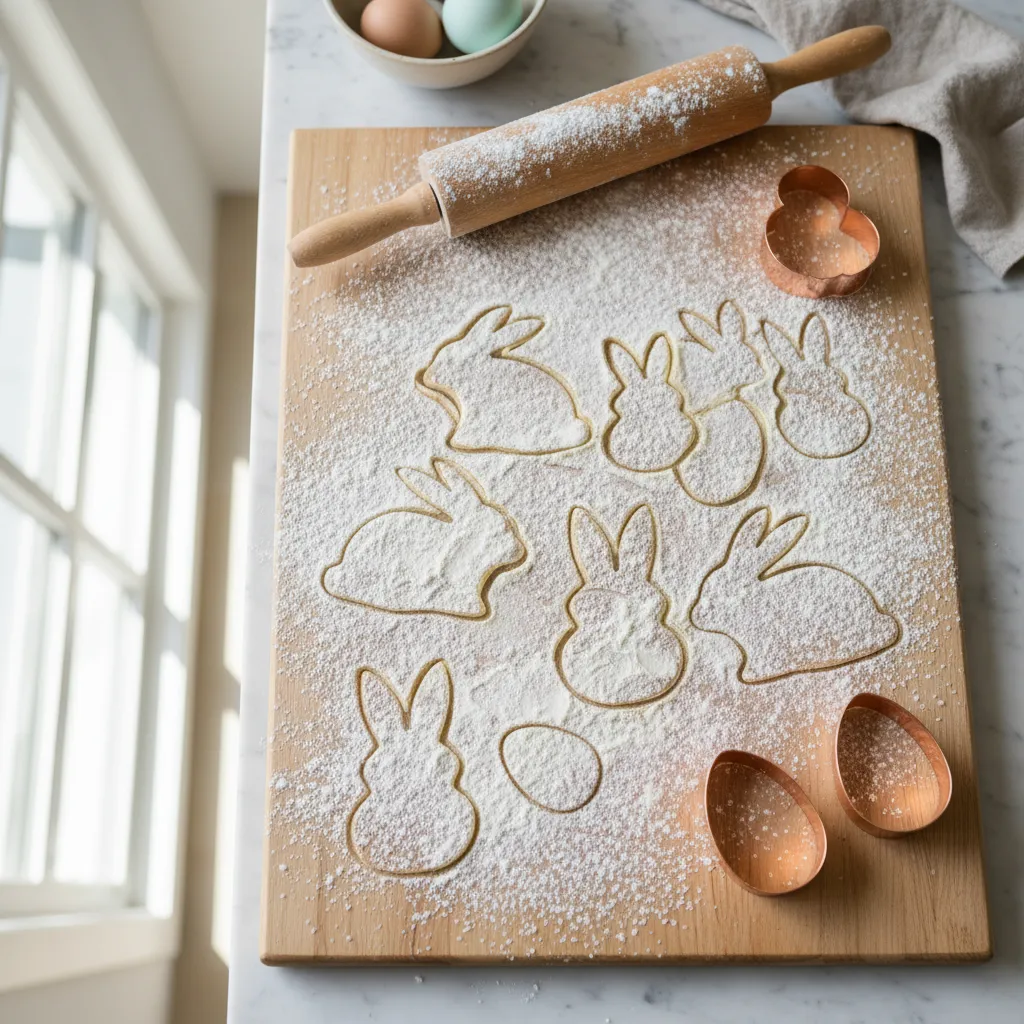
Creating the perfect gluten-free cut-out cookie is akin to laying a solid foundation for a home. The structural integrity of the dough determines the final aesthetic appeal.
Unlike traditional wheat dough, gluten-free blends lack the elasticity that prevents spreading. You must prioritize temperature control to maintain sharp, architectural edges.
We recommend chilling your dough between sheets of parchment paper before cutting. This technique ensures the shapes remain distinct and the surface stays smooth for icing.
Visually, these cookies should offer a pale, creamy finish that acts as a neutral canvas. The texture should be crisp on the edges yet tender in the center.
Baking is the intersection of chemistry and art, where precise measurements create edible masterpieces.
Mastering the Royal Icing Consistency
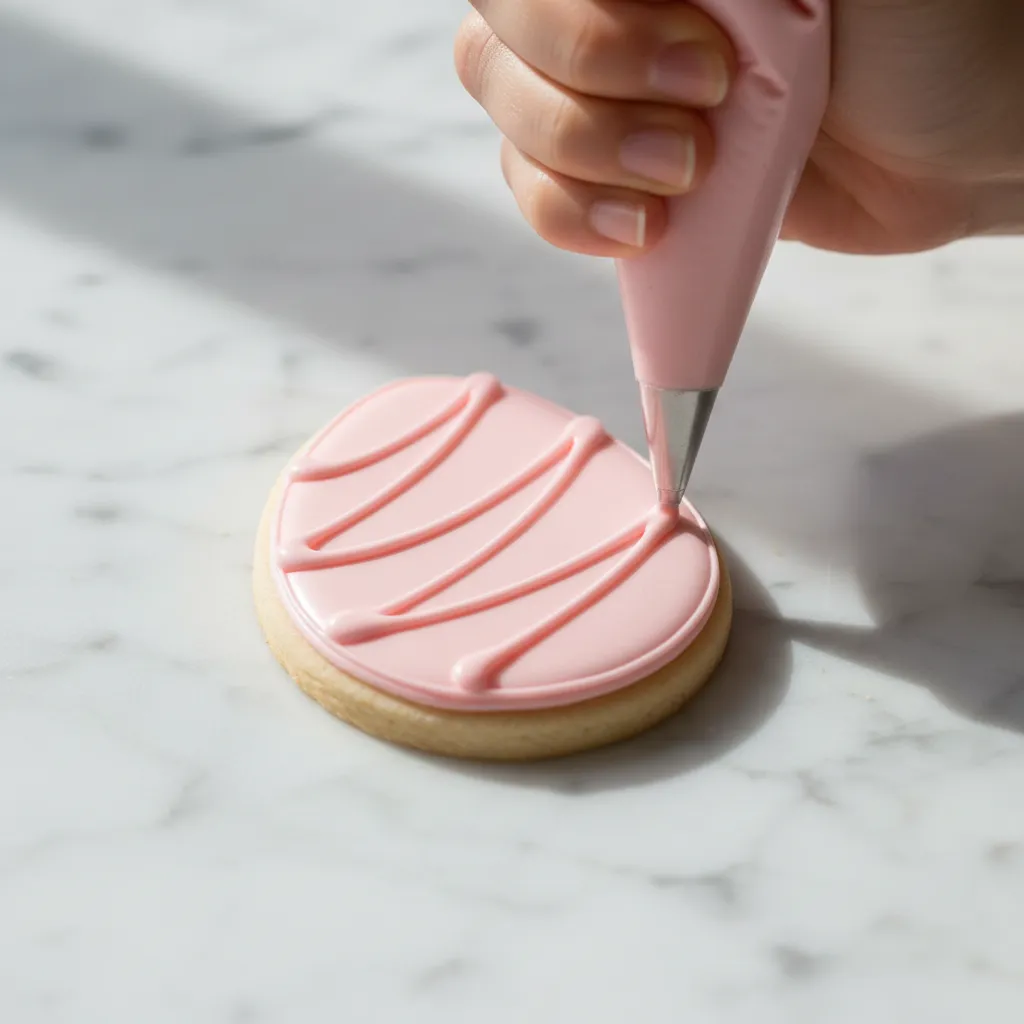
Royal icing serves as the finish carpentry of your baking project. It provides a hard, matte shell that allows for intricate detailing and secure stacking.
For a sophisticated look, utilize a pastel color palette inspired by spring botanicals. Soft sage greens and dusty rose pinks elevate the design beyond standard brights.
The functionality of royal icing lies in its durability. Once cured, these cookies can be packaged as gifts without the risk of the design smudging or fading.
If you are planning a holiday gathering, consider how these treats pair with beverages. You can elevate your brew with easy homemade coffee syrup recipes to complement the vanilla notes.
I think baking is very rewarding, and if you follow a good recipe, you will get success.
Mary Berry, Mary Berry’s Official Website
Troubleshooting Common Structural Flaws
Achieving a bakery-style finish requires understanding why defects occur. The following data highlights how to correct common visual issues during the baking process.
| Visual Defect | Structural Cause | Design Solution |
|---|---|---|
| Blurred Edges | Butter was too warm before baking. | Flash freeze cut shapes for 10 minutes. |
| Cracked Surface | Dough lacked sufficient hydration. | Add 1 teaspoon of milk to the binder. |
| Gritty Texture | Rice flour was not milled finely. | Rest dough for 30 minutes to hydrate. |
| Uneven browning | Oven hotspots or thin rolling. | Rotate tray and use uniform guide rings. |
Proper storage is essential to maintain the crisp texture of your work. Keep cookies in an airtight container to prevent humidity from softening the royal icing.
For those looking to expand their dessert table, you might explore crowd-pleasing no-bake recipes for every occasion to save oven space.
By treating your ingredients with the same care as building materials, you ensure a result that is both structurally sound and visually stunning.
The Gluten-Free Blueprint
- For razor-sharp edges, flash-freeze your cut shapes on the baking sheet for 10 minutes immediately before sliding them into the oven.
- Combat grittiness by letting your dough rest in the fridge for at least 30 minutes; this allows the gluten-free flours to fully hydrate for a smoother bite.
- Master the 10-second rule for royal icing: the surface of your flood icing should become perfectly smooth 10 seconds after dragging a knife through it.
Elegant Strawberry and Cream Pavlova Wreath
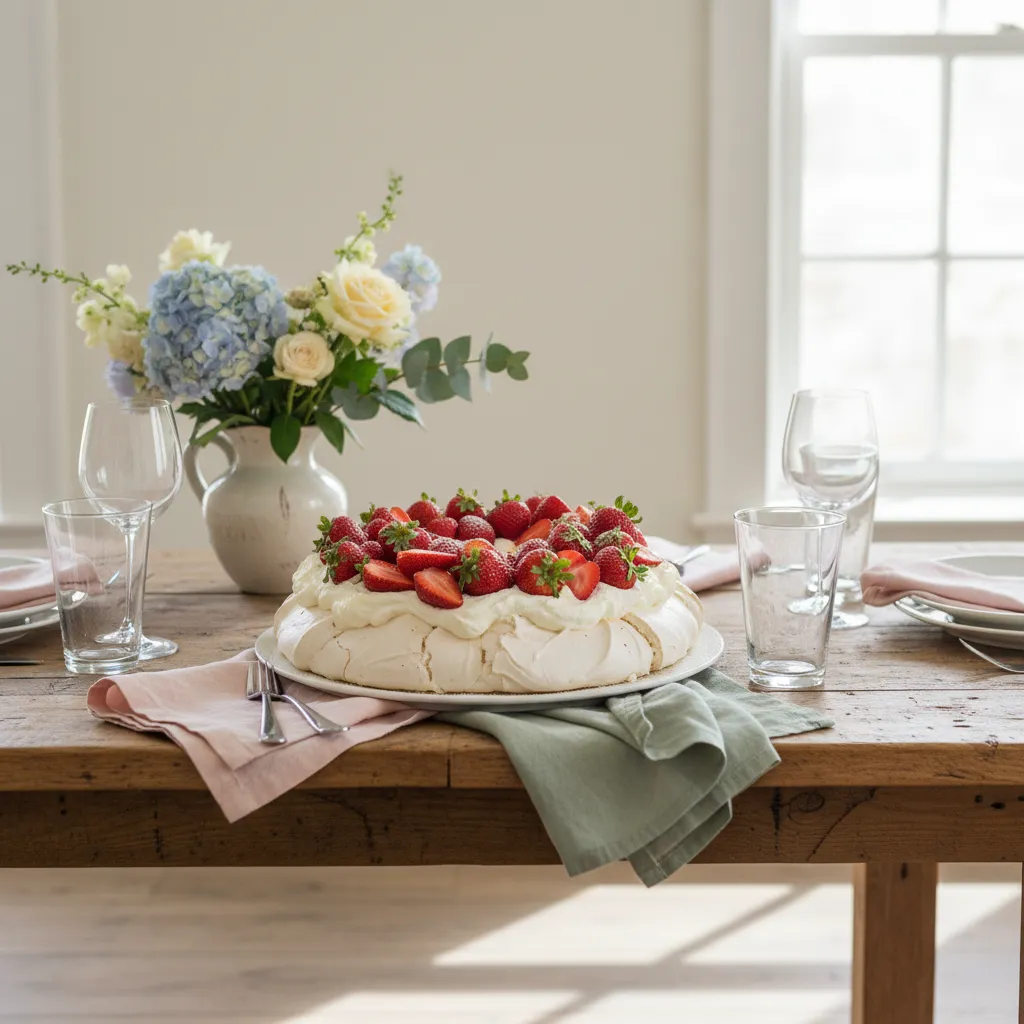
The pavlova wreath serves as a stunning focal point for your holiday table. Its circular shape invites communal dining and conversation.
Visually, the dessert mimics the texture of rough-hewn plaster. The crisp outer shell hides a marshmallow-soft interior that delights the palate.
This design choice is not purely aesthetic. The wreath form improves the ergonomics of serving, allowing for clean slices without structural collapse.
We prioritize fresh strawberries for their vibrant hue. The red fruit creates a striking contrast against the stark white meringue foundation.
In edible architecture, the beauty lies in the contrast between the fragile shell and the luscious, soft interior.
Constructing the Meringue Base
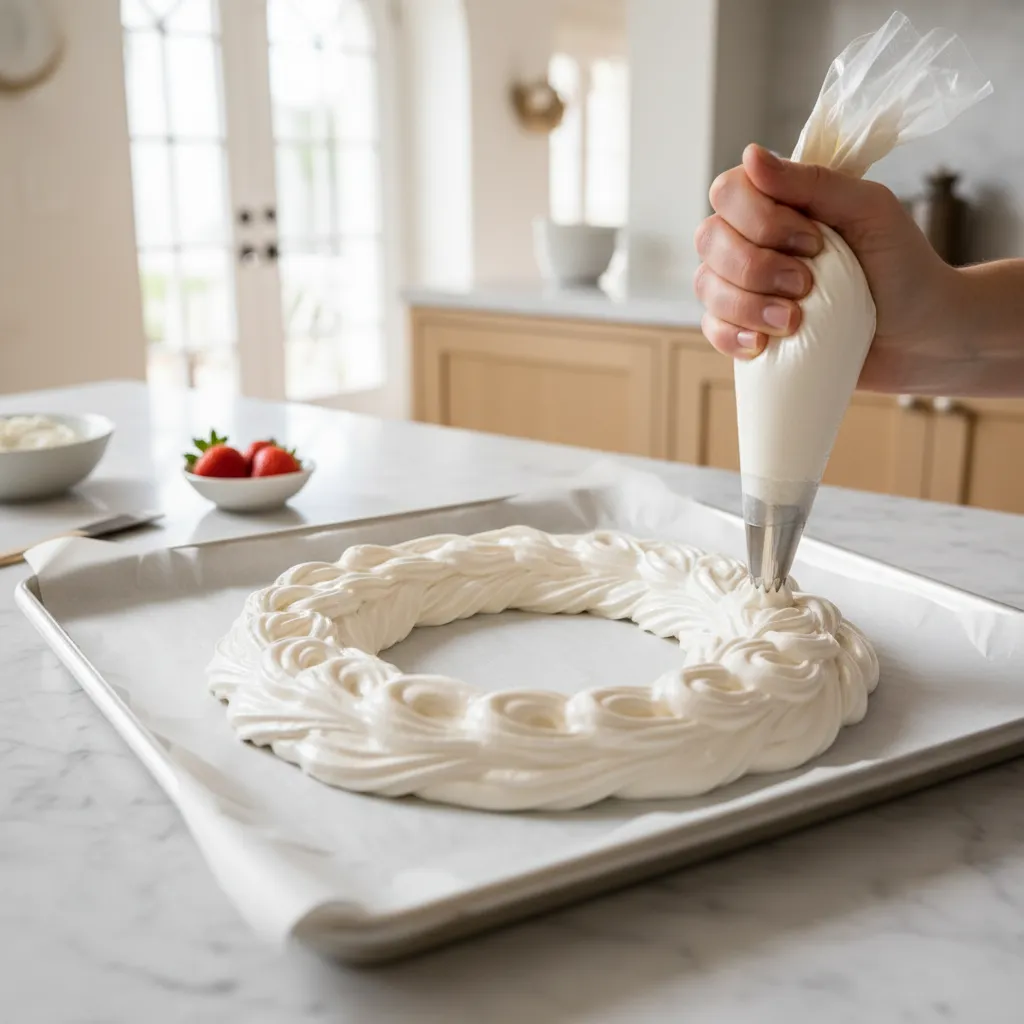
Structural integrity is paramount when baking gluten-free. You must ensure your egg whites are stiff enough to hold the architectural shape.
Use room temperature eggs to achieve maximum volume. This creates an airy spatial dynamic within the meringue, preventing a dense final product.
Acid is a crucial stabilizer in this blueprint. A touch of vinegar reinforces the protein bonds, ensuring the wreath maintains its height.
For a cohesive menu, consider pairing this airy dessert with a whipped coffee recipe. The textures mirror each other perfectly.
You want to bake it until the outside is crisp and pale… turn the oven off and leave the pavlova inside to cool completely.
Sally McKenney, Sally’s Baking Addiction
Finishing and Presentation
The final assembly relies on a balance of moisture and crunch. Apply the cream just before serving to preserve the shell’s delicate finish.
Decorating requires a keen eye for spatial flow. Arrange the strawberries to lead the eye around the curve of the wreath naturally.
If you are planning a larger gathering, this dessert rivals the sophistication of signature drinks for a wedding.
To assist with the baking process, consult the structural troubleshooting guide below. It addresses common issues with meringue architecture.
| Structural Issue | The Architectural Cause | Design Solution |
|---|---|---|
| Weeping | Sugar not fully dissolved creates instability. | Use superfine sugar and beat until smooth. |
| Cracking | Thermal shock from rapid cooling. | Cool inside the turned-off oven. |
| Deflation | Over-beating breaks protein strands. | Stop when stiff, glossy peaks form. |
| Chewy Shell | Humidity affects the drying process. | Avoid baking on rainy, humid days. |
A dusting of powdered sugar acts as the final finish. It softens the visual transition between the fruit and the crisp white edge.
Fresh mint leaves add a touch of organic greenery. This completes the color palette, bringing a sense of spring renewal to the room.
The Pastry Architect’s Secrets
- Wipe your mixing bowl with a wedge of lemon before starting to remove any traces of fat, ensuring your egg whites reach their maximum architectural height.
- Trace a circle on parchment paper using a dinner plate as a template to ensure your wreath maintains a perfectly symmetrical, professional form.
- Apply your whipped cream and strawberries at the very last moment to protect the crisp meringue shell from absorbing moisture and losing its structural crunch.
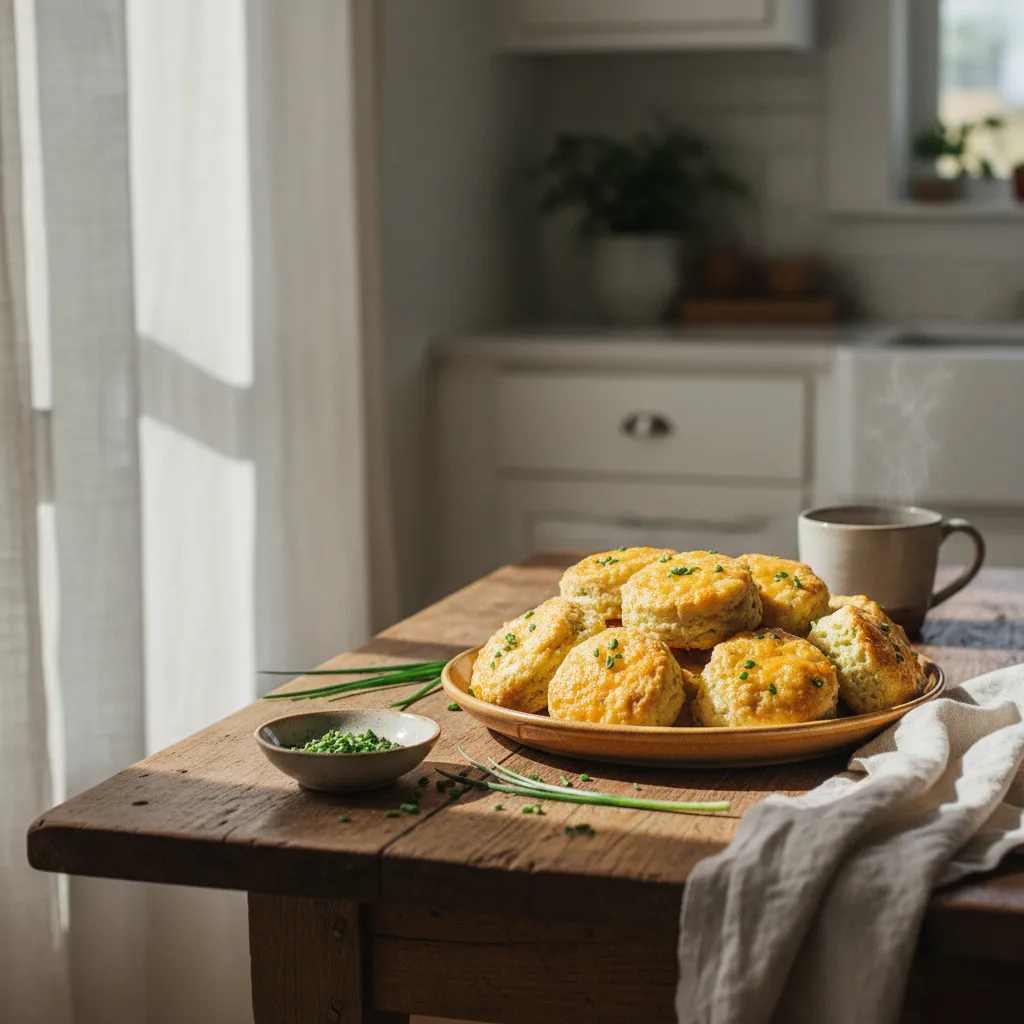
Savory Cheddar and Chive Gluten-Free Biscuits
Balancing a sweet Easter spread requires a savory anchor. These biscuits provide a salty, cheesy contrast to chocolate eggs and pastel cakes.
The visual appeal of these biscuits lies in their rustic finish. The golden-brown crust, speckled with vibrant green chives, adds organic texture.
Functionally, they serve as the perfect vehicle for holiday ham or breakfast spreads. Their structural integrity rivals traditional wheat-based dough.
True hospitality is finding the perfect balance between comfort and elegance on every plate.
The Architecture of a Flaky Biscuit
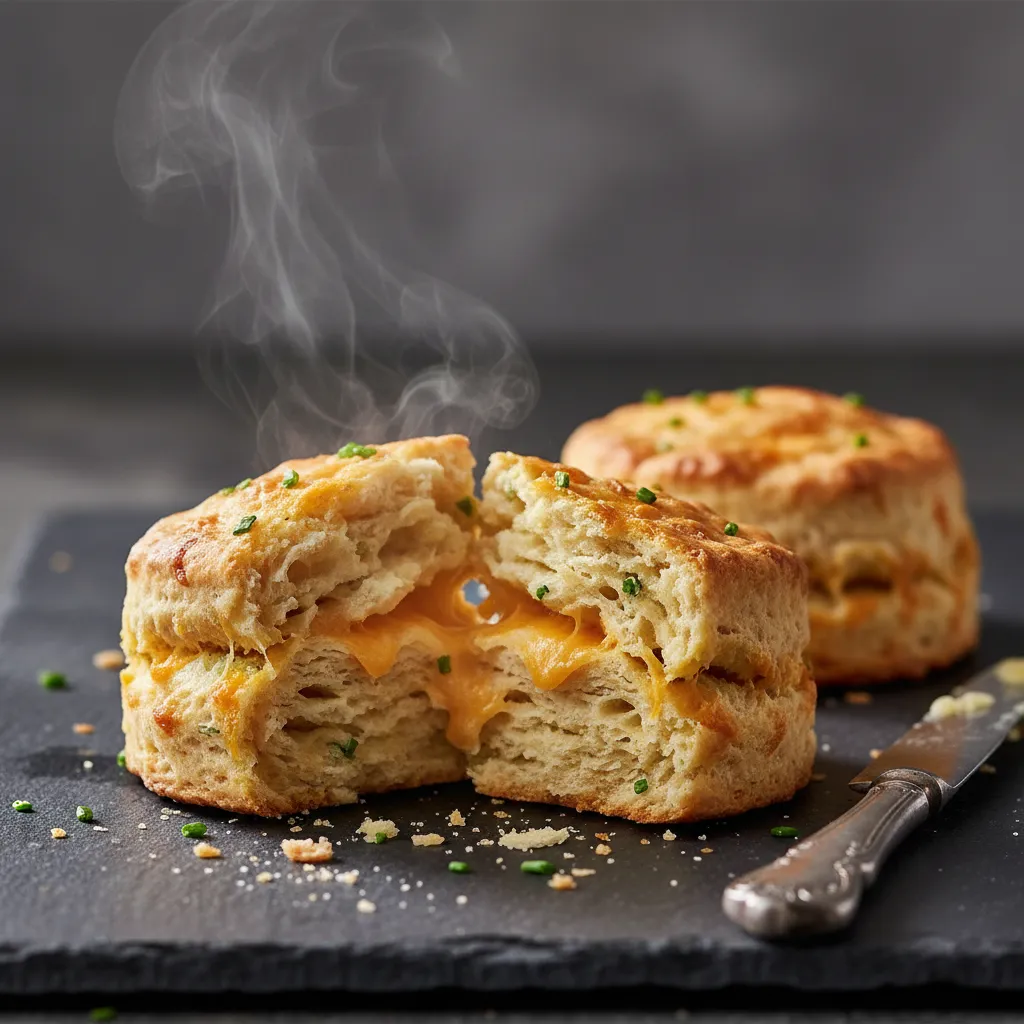
Achieving distinct layers without gluten requires precision. The goal is to suspend cold fat within the flour blend to create steam pockets.
We recommend using a high-quality all-purpose gluten-free flour blend. Look for blends containing xanthan gum to mimic the elasticity of gluten.
Temperature control is the most critical element of this renovation project. Your butter must be ice-cold to ensure the biscuits rise properly.
The secret to a tender biscuit is handling the dough as little as possible. Warm hands melt butter, which leads to a dense, heavy texture.
King Arthur Baking Company, Tips for Better Biscuits
Flavor Profiling and Ingredients
Sharp cheddar is non-negotiable for this recipe. Its bold flavor profile cuts through the starchy base, creating a sophisticated palate experience.
Fresh chives offer a mild onion flavor that brightens the richness. Unlike dried herbs, fresh chives add a necessary pop of spring color to the table.
While some bakers utilize sour cream for tenderness in cakes, buttermilk is the preferred liquid here for its acidity.
Key Success Factors
Constructing the perfect gluten-free biscuit involves specific technical steps. Follow this checklist to ensure your results are bakery-quality.
- Cold Ingredients: Cube your butter and freeze it for ten minutes before cutting it into the flour.
- Sharp Tools: Use a metal biscuit cutter rather than a glass. Press straight down to preserve the layers.
- High Heat: Bake at a high temperature, typically 425°F (218°C), to activate the leavening agents immediately.
- Resting Period: Let the dough rest for 15 minutes before baking to allow the flour to hydrate fully.
If you enjoy the process of savory baking, you might also explore savory sourdough recipes to expand your holiday repertoire.
Serve these warm wrapped in a linen napkin. The steam keeps them soft, while the cloth adds a touch of understated elegance to your Easter brunch.
Mastering the Rise
- Grate frozen butter directly into your flour blend to ensure even distribution without over-handling the dough with your hands.
- Position the biscuits so they are just touching on the baking sheet; this encourages them to rise up rather than spread out.
- Brush the tops with extra buttermilk just before baking to achieve that signature golden-brown, artisanal crust.
The Art of Inclusive Hosting
Designing a gluten-free Easter is about more than ingredients. It creates a space where every guest feels valued through thoughtful presentation.
By layering natural textures like wood and glass, you elevate simple treats into architectural statements. Visual flow ensures both safety and style.
Let your table reflect the warmth of the season. True sophistication lies in seamless inclusion, ensuring everyone enjoys the celebration without worry.
Refining Your Hosting Strategy
Use vertical tiers to separate zones. Place gluten-free items on the highest level or under glass cloches to prevent cross-contamination from crumbs.
Raw wood boards and washed linen napkins provide organic textures. They complement the denser look of gluten-free bakes while adding tactile warmth.
Opt for slate markers or small ceramic tags. These integrate seamlessly into a sophisticated tablescape, avoiding the visual clutter of paper notes.
Floral spring beverages or non-alcoholic pink drinks work beautifully. They offer a refreshing contrast to the richness of almond or rice flour treats.